

Docker学习手册(1)-基础篇
1. Docker 技术背景
Docker 是基于Go 语言实现的开源容器项目,诞生于2013 年年初,最初发起者是 dotCloud 公司。Docker 自开源后受到广泛的关注和l 讨论,目前已有多个相关项目(包括 Docker 三剑客、Kubemetes 等),逐渐形成了围绕Docker 容器的生态体系。 由于Docker 在业界造成的影响力实在太大, dotCloud 公司后来也直接改名为Docker Inc ,并专注于Docker 相关技术和产品的开发。
2. Docker 容器
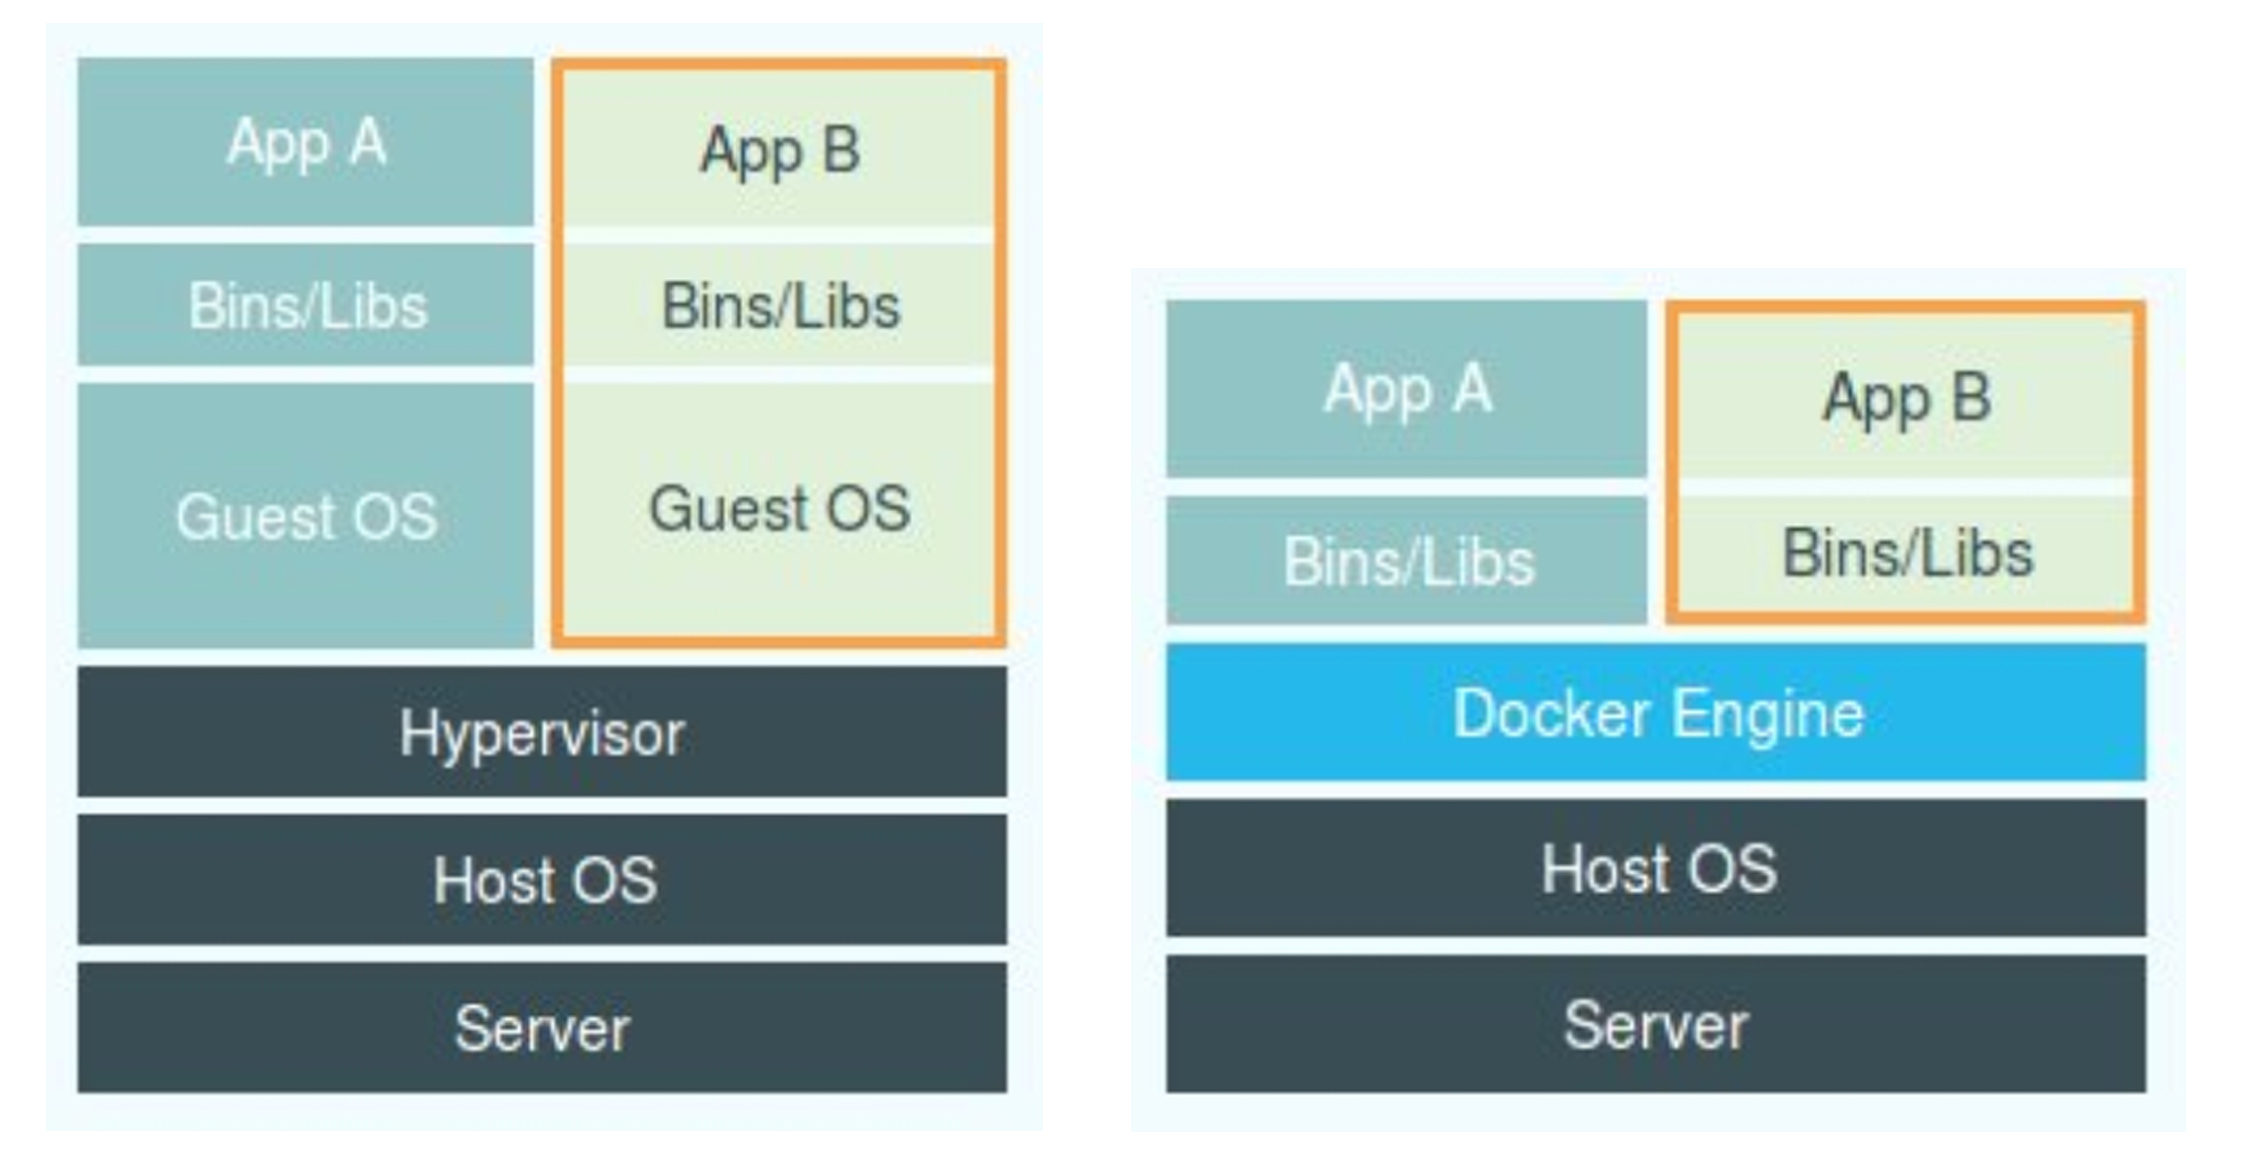
容器其实是一种沙盒技术。顾名思义,沙盒就是能够像一个集装箱一样,把你的应用“装”起来的技术。这样,应用与应用之间,就因为有了边界而不至于相互干扰;而被装进集装箱的应用,也可以被方便地搬来搬去,这就是 PaaS 服务最理想的状态。
在讲容器“边界”之前,我们讲讲计算机程序是怎么运行的。假如现在要写一个加法运算的小程序,这个程序需要的输入来自于一个文件,计算结果输出到另一个文件。
由于计算机只认识 0 和 1,所以无论用哪种语言编写这段代码,最后都需要通过某种方式翻译成二进制文件,才能在计算机操作系统中运行起来。
而为了能够让这些代码正常运行,我们往往还要给它提供数据,比如我们这个加法程序所需要的输入文件。这些数据加上代码本身的二进制文件,放在磁盘上,就是我们平常所说的一个“程序”,也叫代码的可执行镜像(executable image)。
然后,我们就可以在计算机上运行这个“程序”了。
首先,操作系统从“程序”中发现输入数据保存在一个文件中,所以这些数据就会被加载到内存中待命。同时,操作系统又读取到了计算加法的指令,这时,它就需要指示 CPU 完成加法操作。而 CPU 与内存协作进行加法计算,又会使用寄存器存放数值、内存堆栈保存执行的命令和变量。同时,计算机里还有被打开的文件,以及各种各样的 I/O 设备在不断地调用中修改自己的状态。
就这样,一旦“程序”被执行起来,它就从磁盘上的二进制文件,变成了计算机内存中的数据、寄存器里的值、堆栈中的指令、被打开的文件,以及各种设备的状态信息的一个集合。像这样一个程序运行起来后的计算机执行环境的总和,就是我们今天的主角:进程。
所以,对于进程来说,它的静态表现就是程序,平常都安安静静地待在磁盘上;而一旦运行起来,它就变成了计算机里的数据和状态的总和,这就是它的动态表现。
而容器技术的核心功能,就是通过约束和修改进程的动态表现,从而为其创造出一个“边界”。
对于 Docker 等大多数 Linux 容器来说,Cgroups 技术是用来制造约束的主要手段,而 Namespace 技术则是用来修改进程视图的主要方法。
而除了 PID Namespace,Linux 操作系统还提供了 Mount、UTS、IPC、Network 和 User 这些 Namespace,用来对各种不同的进程上下文进行“障眼法”操作。比如,Mount Namespace,用于让被隔离进程只看到当前 Namespace 里的挂载点信息;Network Namespace,用于让被隔离进程看到当前 Namespace 里的网络设备和配置。这,就是 Linux 容器最基本的实现原理了。
所以,Docker 容器这个听起来玄而又玄的概念,实际上是在创建容器进程时,指定了这个进程所需要启用的一组 Namespace 参数。这样,容器就只能“看”到当前 Namespace 所限定的资源、文件、设备、状态,或者配置。而对于宿主机以及其他不相关的程序,它就完全看不到了。所以说,容器,其实是一种特殊的进程而已。
3. Docker 架构

Docker 使用客户端/服务器端架构。 Docker 客户端与 Docker 守护进程对话,后者负责构建、运行和分发 Docker 容器的繁重工作。 Docker 客户端和守护程序可以在同一系统上运行,或者可以将 Docker 客户端连接到远程 Docker 守护程序。 Docker 客户端和守护进程使用 REST API、UNIX 套接字或网络接口进行通信。 另一个 Docker 客户端是 Docker Compose,它允许您使用由一组容器组成的应用程序。
4. Docker 组成
Docker主机(Host):一个物理机或虚拟机,用于运行Docker服务进程和容器。
Docker服务端(Server): Docker守护进程,运行docker容器。
Docker客户端(Client):客户端使用docker命令或其他工具调用docker APl。
Docker仓库(Registry):保存镜像的仓库,类似于git或 svn 这样的版本控制系
Docker镜像(Images):镜像可以理解为创建实例使用的模板。
Docker容器(Container):容器是从镜像生成对外提供服务的一个或一组服务。
官方仓库: https://hub.docker.com/
5. Docker 安装
登录阿里云镜像站
阿里巴巴开源镜像站-OPSX镜像站-阿里云开发者社区 (aliyun.com)
安装Docker社区版
# step 1: 安装必要的一些系统工具
sudo apt update
sudo apt -y install apt-transport-https ca-certificates curl software-properties-common
# step 2: 安装GPG证书
curl -fsSL https://mirrors.aliyun.com/docker-ce/linux/ubuntu/gpg | sudo apt-key add -
# Step 3: 写入软件源信息
sudo add-apt-repository "deb [arch=amd64] https://mirrors.aliyun.com/docker-ce/linux/ubuntu $(lsb_release -cs) stable"
# Step 4: 更新并安装Docker-CE
sudo apt -y update
# 安装指定版本的Docker-CE:
# Step 1: 查找Docker-CE的版本:
root@localhost:~# apt-cache madison docker-ce
 docker-ce | 5:20.10.8~3-0~ubuntu-focal | https://mirrors.aliyun.com/docker-ce/linux/ubuntu focal/stable amd64 Packages
 docker-ce | 5:20.10.7~3-0~ubuntu-focal | https://mirrors.aliyun.com/docker-ce/linux/ubuntu focal/stable amd64 Packages
 docker-ce | 5:20.10.6~3-0~ubuntu-focal | https://mirrors.aliyun.com/docker-ce/linux/ubuntu focal/stable amd64 Packages
 docker-ce | 5:20.10.5~3-0~ubuntu-focal | https://mirrors.aliyun.com/docker-ce/linux/ubuntu focal/stable amd64 Packages
 docker-ce | 5:20.10.4~3-0~ubuntu-focal | https://mirrors.aliyun.com/docker-ce/linux/ubuntu focal/stable amd64 Packages
 docker-ce | 5:20.10.3~3-0~ubuntu-focal | https://mirrors.aliyun.com/docker-ce/linux/ubuntu focal/stable amd64 Packages
 docker-ce | 5:20.10.2~3-0~ubuntu-focal | https://mirrors.aliyun.com/docker-ce/linux/ubuntu focal/stable amd64 Packages
 docker-ce | 5:20.10.1~3-0~ubuntu-focal | https://mirrors.aliyun.com/docker-ce/linux/ubuntu focal/stable amd64 Packages
 docker-ce | 5:20.10.0~3-0~ubuntu-focal | https://mirrors.aliyun.com/docker-ce/linux/ubuntu focal/stable amd64 Packages
 docker-ce | 5:19.03.15~3-0~ubuntu-focal | https://mirrors.aliyun.com/docker-ce/linux/ubuntu focal/stable amd64 Packages
 docker-ce | 5:19.03.14~3-0~ubuntu-focal | https://mirrors.aliyun.com/docker-ce/linux/ubuntu focal/stable amd64 Packages
 docker-ce | 5:19.03.13~3-0~ubuntu-focal | https://mirrors.aliyun.com/docker-ce/linux/ubuntu focal/stable amd64 Packages
 docker-ce | 5:19.03.12~3-0~ubuntu-focal | https://mirrors.aliyun.com/docker-ce/linux/ubuntu focal/stable amd64 Packages
 docker-ce | 5:19.03.11~3-0~ubuntu-focal | https://mirrors.aliyun.com/docker-ce/linux/ubuntu focal/stable amd64 Packages
 docker-ce | 5:19.03.10~3-0~ubuntu-focal | https://mirrors.aliyun.com/docker-ce/linux/ubuntu focal/stable amd64 Packages
 docker-ce | 5:19.03.9~3-0~ubuntu-focal | https://mirrors.aliyun.com/docker-ce/linux/ubuntu focal/stable amd64 Packages
# Step 2: 安装指定版本的Docker-CE:
root@localhost:~# apt install -y docker-ce=5:19.03.15~3-0~ubuntu-focal
deamon配置文件优化,编辑配置文件:/etc/docker/daemon.json
root@localhost:~# cat /etc/docker/daemon.json
{
  "registry-mirrors": ["https://0g7sflox.mirror.aliyuncs.com"]
}
root@localhost:~# sudo systemctl daemon-reload
root@localhost:~# sudo systemctl restart docker
docker 版本信息
root@localhost:~# docker info
Client:
 Context:    default
 Debug Mode: false
 Plugins:
  app: Docker App (Docker Inc., v0.9.1-beta3)
  buildx: Build with BuildKit (Docker Inc., v0.6.1-docker)
  scan: Docker Scan (Docker Inc., v0.8.0)

Server:
 Containers: 0
  Running: 0
  Paused: 0
  Stopped: 0
 Images: 0
 Server Version: 19.03.15
 Storage Driver: overlay2
  Backing Filesystem: extfs
  Supports d_type: true
  Native Overlay Diff: true
 Logging Driver: json-file
 Cgroup Driver: cgroupfs
 Plugins:
  Volume: local
  Network: bridge host ipvlan macvlan null overlay
  Log: awslogs fluentd gcplogs gelf journald json-file local logentries splunk syslog
 Swarm: inactive
 Runtimes: runc
 Default Runtime: runc
 Init Binary: docker-init
 containerd version: e25210fe30a0a703442421b0f60afac609f950a3
 runc version: v1.0.1-0-g4144b63
 init version: fec3683
 Security Options:
  apparmor
  seccomp
   Profile: default
 Kernel Version: 5.4.0-86-generic
 Operating System: Ubuntu 20.04.3 LTS
 OSType: linux
 Architecture: x86_64
 CPUs: 1
 Total Memory: 1.913GiB
 Name: localhost
 ID: YELC:LIBU:QUVJ:6O46:C4QJ:WUX3:DX3I:TNFU:YELP:XOR5:D7ZV:CFFH
 Docker Root Dir: /var/lib/docker
 Debug Mode: false
 Registry: https://index.docker.io/v1/
 Labels:
 Experimental: false
 Insecure Registries:
  127.0.0.0/8
 Registry Mirrors:
  https://0g7sflox.mirror.aliyuncs.com/
 Live Restore Enabled: false

WARNING: No swap limit support
6. Docker 镜像管理
# 搜索镜像
root@localhost:~# docker search ubuntu
# 添加版本搜索
root@localhost:~# docker search ubuntu:18.04
- 下载镜像

完整地址:服务器地址/项目目录/镜像名:版本号
# 查看本地镜像
root@localhost:~# docker images
REPOSITORY   TAG       IMAGE ID       CREATED       SIZE
ubuntu       latest    fb52e22af1b0   3 weeks ago   72.8MB
# 保存镜像
root@localhost:~# docker save ubuntu -o ubuntu.tar.gz
root@localhost:~# ls
snap  ubuntu.tar.gz
# 删除镜像
root@localhost:~# docker image rm ubuntu
Untagged: ubuntu:latest
Untagged: ubuntu@sha256:9d6a8699fb5c9c39cf08a0871bd6219f0400981c570894cd8cbea30d3424a31f
Deleted: sha256:fb52e22af1b01869e23e75089c368a1130fa538946d0411d47f964f8b1076180
Deleted: sha256:4942a1abcbfa1c325b1d7ed93d3cf6020f555be706672308a4a4a6b6d631d2e7
# 导入镜像
root@localhost:~# docker load < ubuntu.tar.gz
4942a1abcbfa: Loading layer [==================================================>]  75.16MB/75.16MB
Loaded image: ubuntu:latest
# 查看镜像
root@localhost:~# docker image ls
REPOSITORY   TAG       IMAGE ID       CREATED       SIZE
ubuntu       latest    fb52e22af1b0   3 weeks ago   72.8MB
7. Docker 基础命令
# 启动一个容器
root@docker:~# docker run -it ubuntu bash
root@9236732939c5:/#
# 启动容器不销毁容器
ctrl + p + q
# 查看正在运行的容器
root@9236732939c5:/# root@docker:~# docker ps
CONTAINER ID   IMAGE     COMMAND   CREATED         STATUS         PORTS     NAMES
9236732939c5   ubuntu    "bash"    2 minutes ago   Up 2 minutes             gracious_matsumoto

# 删除运行中的容器
root@docker:~# docker rm -f 9236732939c5
9236732939c5
root@docker:~# docker ps -a
CONTAINER ID   IMAGE     COMMAND   CREATED   STATUS    PORTS     NAMES

# 随机端口映射
root@docker:~# docker run -P -d --name nginx001 nginx
4289d3a149543a266fef19f3cc172ceaf1539deed59d9b2bbd1125ed48dce0d3
root@docker:~# netstat -nlpt
Active Internet connections (only servers)
Proto Recv-Q Send-Q Local Address           Foreign Address         State       PID/Program name
tcp        0      0 127.0.0.53:53           0.0.0.0:*               LISTEN      806/systemd-resolve
tcp        0      0 0.0.0.0:22              0.0.0.0:*               LISTEN      879/sshd: /usr/sbin
tcp6       0      0 :::22                   :::*                    LISTEN      879/sshd: /usr/sbin
tcp6       0      0 :::10003                :::*                    LISTEN      3714/docker-proxy
root@docker:~# lsof -i :10003
COMMAND    PID USER   FD   TYPE DEVICE SIZE/OFF NODE NAME
docker-pr 3714 root    4u  IPv6  54745      0t0  TCP *:10003 (LISTEN)
访问nginx
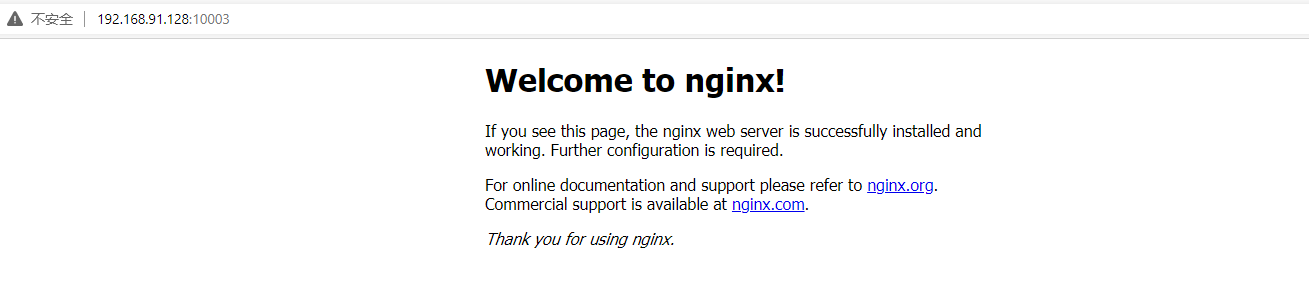
查看容器日志
root@docker:~# docker logs nginx001
/docker-entrypoint.sh: /docker-entrypoint.d/ is not empty, will attempt to perform configuration
/docker-entrypoint.sh: Looking for shell scripts in /docker-entrypoint.d/
/docker-entrypoint.sh: Launching /docker-entrypoint.d/10-listen-on-ipv6-by-default.sh
10-listen-on-ipv6-by-default.sh: info: Getting the checksum of /etc/nginx/conf.d/default.conf
10-listen-on-ipv6-by-default.sh: info: Enabled listen on IPv6 in /etc/nginx/conf.d/default.conf
/docker-entrypoint.sh: Launching /docker-entrypoint.d/20-envsubst-on-templates.sh
/docker-entrypoint.sh: Launching /docker-entrypoint.d/30-tune-worker-processes.sh
/docker-entrypoint.sh: Configuration complete; ready for start up
2021/09/25 11:39:58 [notice] 1#1: using the "epoll" event method
2021/09/25 11:39:58 [notice] 1#1: nginx/1.21.3
2021/09/25 11:39:58 [notice] 1#1: built by gcc 8.3.0 (Debian 8.3.0-6)
2021/09/25 11:39:58 [notice] 1#1: OS: Linux 5.4.0-86-generic
2021/09/25 11:39:58 [notice] 1#1: getrlimit(RLIMIT_NOFILE): 1048576:1048576
2021/09/25 11:39:58 [notice] 1#1: start worker processes
2021/09/25 11:39:58 [notice] 1#1: start worker process 30
192.168.91.1 - - [25/Sep/2021:11:40:49 +0000] "GET / HTTP/1.1" 200 615 "-" "Mozilla/5.0 (Windows NT 10.0; Win64; x64) AppleWebKit/537.36 (KHTML, like Gecko) Chrome/93.0.4577.82 Safari/537.36 Edg/93.0.961.52" "-"
192.168.91.1 - - [25/Sep/2021:11:40:49 +0000] "GET /favicon.ico HTTP/1.1" 404 555 "http://192.168.91.128:10003/" "Mozilla/5.0 (Windows NT 10.0; Win64; x64) AppleWebKit/537.36 (KHTML, like Gecko) Chrome/93.0.4577.82 Safari/537.36 Edg/93.0.961.52" "-"
2021/09/25 11:40:49 [error] 30#30: *2 open() "/usr/share/nginx/html/favicon.ico" failed (2: No such file or directory), client: 192.168.91.1, server: localhost, request: "GET /favicon.ico HTTP/1.1", host: "192.168.91.128:10003", referrer: "http://192.168.91.128:10003/"
查看容器已经映射的端口
root@docker:~# docker port nginx001
80/tcp -> 0.0.0.0:10003
后台启动并指定映射端口
root@docker:~# docker run -it -d --name nginx002 -p 8001:80 nginx
d2b11d6a214eab648c93cc397669d06258ac7533075e75ec9ae25fbb1b453c46
创建并进入容器
root@docker:~# docker run -it --name nginx005 -p 8005:80 nginx /bin/bash
root@23e46cdd20e8:/# pwd
/
root@23e46cdd20e8:/# cat /etc/os-release
PRETTY_NAME="Debian GNU/Linux 10 (buster)"
NAME="Debian GNU/Linux"
VERSION_ID="10"
VERSION="10 (buster)"
VERSION_CODENAME=buster
ID=debian
HOME_URL="https://www.debian.org/"
SUPPORT_URL="https://www.debian.org/support"
BUG_REPORT_URL="https://bugs.debian.org/"
8. Harbor 搭建
harbor安装需要依赖docker、docker-compose
安装docker-compose比较简单
pip3 install docker-compose
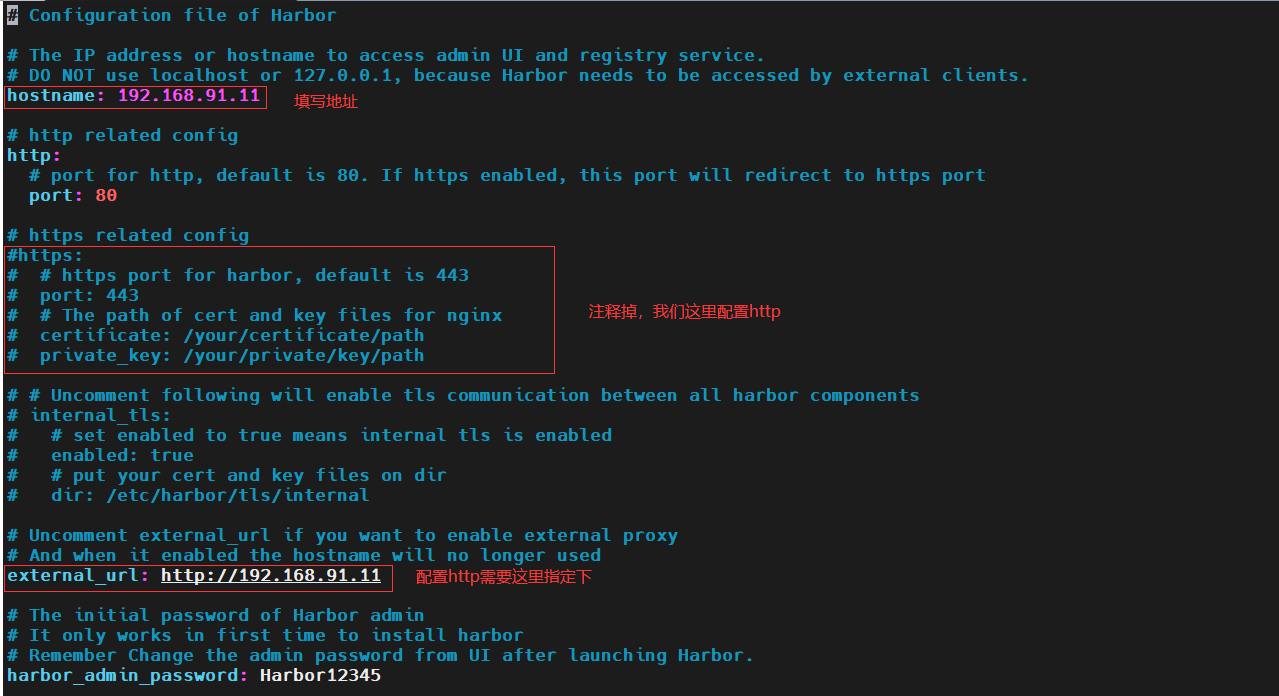
修改配置
root@harbor001:/opt/harbor# vim harbor.yml
执行命令安装
root@harbor001:/opt/harbor# ./install.sh

[Step 0]: checking if docker is installed ...

Note: docker version: 20.10.8

[Step 1]: checking docker-compose is installed ...

Note: docker-compose version: 1.29.2

[Step 2]: loading Harbor images ...
Loaded image: goharbor/redis-photon:v2.3.2
Loaded image: goharbor/nginx-photon:v2.3.2
Loaded image: goharbor/harbor-portal:v2.3.2
Loaded image: goharbor/trivy-adapter-photon:v2.3.2
Loaded image: goharbor/chartmuseum-photon:v2.3.2
Loaded image: goharbor/notary-signer-photon:v2.3.2
Loaded image: goharbor/harbor-core:v2.3.2
Loaded image: goharbor/harbor-log:v2.3.2
Loaded image: goharbor/harbor-registryctl:v2.3.2
Loaded image: goharbor/harbor-exporter:v2.3.2
Loaded image: goharbor/notary-server-photon:v2.3.2
Loaded image: goharbor/prepare:v2.3.2
Loaded image: goharbor/harbor-db:v2.3.2
Loaded image: goharbor/harbor-jobservice:v2.3.2
Loaded image: goharbor/registry-photon:v2.3.2

[Step 3]: preparing environment ...

[Step 4]: preparing harbor configs ...
prepare base dir is set to /opt/harbor
WARNING:root:WARNING: HTTP protocol is insecure. Harbor will deprecate http protocol in the future. Please make sure to upgrade to https
Generated configuration file: /config/portal/nginx.conf
Generated configuration file: /config/log/logrotate.conf
Generated configuration file: /config/log/rsyslog_docker.conf
Generated configuration file: /config/nginx/nginx.conf
Generated configuration file: /config/core/env
Generated configuration file: /config/core/app.conf
Generated configuration file: /config/registry/config.yml
Generated configuration file: /config/registryctl/env
Generated configuration file: /config/registryctl/config.yml
Generated configuration file: /config/db/env
Generated configuration file: /config/jobservice/env
Generated configuration file: /config/jobservice/config.yml
Generated and saved secret to file: /data/secret/keys/secretkey
Successfully called func: create_root_cert
Generated configuration file: /compose_location/docker-compose.yml
Clean up the input dir

[Step 5]: starting Harbor ...
Creating network "harbor_harbor" with the default driver
Creating harbor-log ... done
Creating harbor-portal ... done
Creating harbor-db     ... done
Creating registry      ... done
Creating redis         ... done
Creating registryctl   ... done
Creating harbor-core   ... done
Creating nginx             ... done
Creating harbor-jobservice ... done
✔ ----Harbor has been installed and started successfully.----

root@harbor001:/opt/harbor# docker-compose ps
      Name                     Command                       State                     Ports
------------------------------------------------------------------------------------------------------
harbor-core         /harbor/entrypoint.sh            Up (health: starting)
harbor-db           /docker-entrypoint.sh 96 13      Up (health: starting)
harbor-jobservice   /harbor/entrypoint.sh            Up (health: starting)
harbor-log          /bin/sh -c /usr/local/bin/ ...   Up (health: starting)   127.0.0.1:1514->10514/tcp
harbor-portal       nginx -g daemon off;             Up (health: starting)
nginx               nginx -g daemon off;             Up (health: starting)   0.0.0.0:80->8080/tcp
redis               redis-server /etc/redis.conf     Up (health: starting)
registry            /home/harbor/entrypoint.sh       Up (health: starting)
registryctl         /home/harbor/start.sh            Up (health: starting)
docker 登录harbor镜像仓库

http登录需要修改启动docker参数

9. Dockerfile 介绍
Dockerfile 是一种可以被认为是通过Docker解释器编译的脚本,Dockerfile由一条条的指令组成,每条命令对应Linux一下面的一条命令,Docker 程序将这些 Dockerfile 指令再翻译成真正的 linux 命令,其有自己的书写方式和支持的命令,Docker 程序读取 Dockerfile 并根据指令生成 Docker 镜像,相比手动制作镜像,Dockerfile 更能直观展示镜像是怎么产生的,有了写好的 Dockerfile 文件,当后期某个镜像有额外需求时,只需要改动 Dockerfile 文件,重新构建镜像即可,避免重复手动制作镜像。
需要注意每一条指令构建一层,因此每条指令的内容,都是对当前层的描述。
常用指令如下:
FROM 这个镜像的妈妈是谁?(指定基础镜像)
MAINTAINER 告诉别人,谁负责养它?(指定维护者信息,可以没有)
RUN 你想让它干啥(在命令前面加上RUN即可)
ADD 给它点创业资金(COPY文件,会自动解压)
WORKDIR 我是cd,今天刚化了妆(设置当前工作目录)
VOLUME 给它一个存放行李的地方(设置卷,挂载主机目录)
EXPOSE 它要打开的门是啥(指定对外的端口)
CMD 奔跑吧,兄弟!(指定容器启动后的要干的事情)
dockerfile其他指令:
COPY 复制文件
ENV 环境变量
ENTRYPOINT 容器启动后执行的命令
定制一个nginx的Dockerfile
root@docker:/opt/base# cat Dockerfile
FROM nginx
RUN echo "<h1>Hello, Dockerfile!</h1>" > /usr/share/nginx/html/index.html

root@docker:/opt/base# docker image build -t nginx:v1 .
Sending build context to Docker daemon  2.048kB
Step 1/2 : FROM nginx
 ---> ad4c705f24d3
Step 2/2 : RUN echo "<h1>Hello, Dockerfile!</h1>" > /usr/share/nginx/html/index.html
 ---> Running in 82d88e82a2c5
Removing intermediate container 82d88e82a2c5
 ---> cc828c032ce9
Successfully built cc828c032ce9
Successfully tagged nginx:v1

root@docker:/opt/base# docker images
REPOSITORY   TAG       IMAGE ID       CREATED          SIZE
nginx        v1        cc828c032ce9   48 seconds ago   133MB   # 刚才生成的镜像
centos       latest    5d0da3dc9764   2 weeks ago      231MB
nginx        latest    ad4c705f24d3   3 weeks ago      133MB
ubuntu       latest    fb52e22af1b0   4 weeks ago      72.8MB
RUN 指令执行命令
RUN 指令用来指定命令行命令。其有两种格式:
- shell 格式:RUN <命令> , 这种方式就跟执行Linux bash命令行一样
RUN echo '<h1>Hello, Docker!</h1>' > /usr/share/nginx/html/index.html
- exec 格式:
RUN ["可执行文件", "参数1", "参数2"],这更像是函数调用中的格式。
RUN ["nginx", "-s", "start"]
创建一个redis镜像
root@docker:/opt/base/redis# cat Dockerfile
FROM debian:stretch

RUN apt-get update
RUN apt-get install -y gcc livc-dev make wget
RUN wget -O redis.tar.gz "http://download.redis.io/releases/redis-5.0.3.tar.gz"
RUN mkdir -p /usr/src/redis
RUN tar -xzf redis.tar.gz -C /usr/src/redis --strip-components=1
RUN make -C /usr/src/redis
RUN make -C /usr/src/redis install
之前说过,Dockerfile 中每一个指令都会建立一层,RUN 也不例外。每一个 RUN 的行为,就和刚才我们手工建立镜像的过程一样:新建立一层,在其上执行这些命令,执行结束后,commit 这一层的修改,构成新的镜像。
而上面的这种写法,创建了 7 层镜像。这是完全没有意义的,而且很多运行时不需要的东西,都被装进了镜像里,比如编译环境、更新的软件包等等。结果就是产生非常臃肿、非常多层的镜像,不仅仅增加了构建部署的时间,也很容易出错。 这是很多初学 Docker 的人常犯的一个错误。
Union FS 是有最大层数限制的,比如 AUFS,曾经是最大不得超过 42 层,现在是不得超过 127 层。
上面的 Dockerfile 正确的写法应该是这样:
FROM debian:stretch

RUN set -x; buildDeps='gcc libc6-dev make wget' \
    && apt-get update \
    && apt-get install -y $buildDeps \
    && wget -O redis.tar.gz "http://download.redis.io/releases/redis-5.0.3.tar.gz" \
    && mkdir -p /usr/src/redis \
    && tar -xzf redis.tar.gz -C /usr/src/redis --strip-components=1 \
    && make -C /usr/src/redis \
    && make -C /usr/src/redis install \
    && rm -rf /var/lib/apt/lists/* \
    && rm redis.tar.gz \
    && rm -r /usr/src/redis \
    && apt-get purge -y --auto-remove $buildDeps
首先,之前所有的命令只有一个目的,就是编译、安装 redis 可执行文件。因此没有必要建立很多层,这只是一层的事情。因此,这里没有使用很多个 RUN 一一对应不同的命令,而是仅仅使用一个 RUN 指令,并使用 && 将各个所需命令串联起来。将之前的 7 层,简化为了 1 层。在撰写 Dockerfile 的时候,要经常提醒自己,这并不是在写 Shell 脚本,而是在定义每一层该如何构建。
理解构建上下文
在构建docker镜像时,会看到末尾有一个.,. 表示当前目录,而 Dockerfile 就在当前目录,因此不少初学者以为这个路径是在指定 Dockerfile 所在路径,这么理解其实是不准确的。如果对应上面的命令格式,你可能会发现,这是在指定 上下文路径。那么什么是上下文呢?
当我们进行镜像构建的时候,并非所有定制都会通过 RUN 指令完成,经常会需要将一些本地文件复制进镜像,比如通过 COPY 指令、ADD 指令等。而 docker build 命令构建镜像,其实并非在本地构建,而是在服务端,也就是 Docker 引擎中构建的。那么在这种客户端/服务端的架构中,如何才能让服务端获得本地文件呢?
这就引入了上下文的概念。当构建的时候,用户会指定构建镜像上下文的路径,docker build 命令得知这个路径后,会将路径下的所有内容打包,然后上传给 Docker 引擎。这样 Docker 引擎收到这个上下文包后,展开就会获得构建镜像所需的一切文件。
如果在 Dockerfile 中这么写:
COPY ./package.json /app/
这并不是要复制执行 docker build 命令所在的目录下的 package.json,也不是复制 Dockerfile 所在目录下的 package.json,而是复制 上下文(context) 目录下的 package.json。
因此,COPY 这类指令中的源文件的路径都是相对路径。这也是初学者经常会问的为什么 COPY ../package.json /app 或者 COPY /opt/xxxx /app 无法工作的原因,因为这些路径已经超出了上下文的范围,Docker 引擎无法获得这些位置的文件。如果真的需要那些文件,应该将它们复制到上下文目录中去。
现在就可以理解刚才的命令 docker build -t nginx:v3 . 中的这个 .,实际上是在指定上下文的目录,docker build 命令会将该目录下的内容打包交给 Docker 引擎以帮助构建镜像。
如果观察 docker build 输出,我们其实已经看到了这个发送上下文的过程:
$ docker build -t nginx:v3 .
Sending build context to Docker daemon 2.048 kB
...
一般来说,应该会将 Dockerfile 置于一个空目录下,或者项目根目录下。如果该目录下没有所需文件,那么应该把所需文件复制一份过来。如果目录下有些东西确实不希望构建时传给 Docker 引擎,那么可以用 .gitignore 一样的语法写一个 .dockerignore,该文件是用于剔除不需要作为上下文传递给 Docker 引擎的。
在默认情况下,如果不额外指定 Dockerfile 的话,会将上下文目录下的名为 Dockerfile 的文件作为 Dockerfile。可以在编译时,使用 -f 参数指定 Dockerfile。
一般大家习惯性的会使用默认的文件名 Dockerfile,以及会将其置于镜像构建上下文目录中。
Docker build 其他构建方式
1、直接使用github地址构建
# $env:DOCKER_BUILDKIT=0
# export DOCKER_BUILDKIT=0

$ docker build -t hello-world https://github.com/docker-library/hello-world.git # master:amd64/hello-world

Step 1/3 : FROM scratch
 --->
Step 2/3 : COPY hello /
 ---> ac779757d46e
Step 3/3 : CMD ["/hello"]
 ---> Running in d2a513a760ed
Removing intermediate container d2a513a760ed
 ---> 038ad4142d2b
Successfully built 038ad4142d2b
2、用给定的 tar 压缩包构建
$ docker build http://server/context.tar.gz
3、从标准输入中读取 Dockerfile 进行构建
$ docker build - < Dockerfile
或者
$ cat Dockerfile | docker build -
如果发现标准输入的文件格式是 gzip、bzip2 以及 xz 的话,将会使其为上下文压缩包,直接将其展开,将里面视为上下文,并开始构建。
10. Dockerfile 指令详解
COPY 复制文件
格式:
COPY [--chown=<user>:<group>] <源路径>... <目标路径>
COPY [--chown=<user>:<group>] ["<源路径1>",... "<目标路径>"]
和RUN指令一样,有两种格式,一种类似命令行,一种类似于函数调用。
COPY 指令将从构建的上下文目录中文件或目录拷贝到新一层的镜像内指定的位置。比如:
COPY nginx.tar.gz /opt/
# 可以指定多个文件进行拷贝,甚至可以是通配符,只要满足Go 的 filepath.Match
COPY *.conf /etc/nginx/conf.d/
注意:目标目录不需要事先创建,目标目录不存在会在复制文件前先进行创建缺失的目录。
而且,源文件的各种文件权限都会保留,比如读写执行权限,文件的变更时间等,特别是构建相关文件都是在使用git进行管理的时候,这个特性对于定制镜像很有用。在使用该指令的时候,还可以加上 --chown=<user>:<group>选项来改变文件的所属用户以及所属组。
COPY --chown=55:mygroup files* /mydir/
COPY --chown=bin files* /mydir/
COPY --chown=1 files* /mydir/
COPY --chown=10:11 files* /mydir/
如果源文件为文件夹,复制时不是复制该文件夹,而是将文件夹的内容复制到目标路径。
ADD 更加高级的复制指令
ADD 指令和 COPY 指令的格式和性质基本一样,但是ADD 多了一些功能。
比如源文件可以是一个URL,这时Docker引擎会试图拉去并下载这个链接文件,并放到目标目录,下载后的权限自动设置为600,如果这并不是想要的权限,那么还需要增加额外的一层 RUN 指令进行权限调整,如果下载的是个压缩包,会自动解压。在 Docker 官方的 Dockerfile 最佳实践文档 中要求,尽可能的使用 COPY,因为 COPY 的语义很明确,就是复制文件而已,而 ADD 则包含了更复杂的功能,其行为也不一定很清晰。最适合使用 ADD 的场合,就是所提及的需要自动解压缩的场合。
CMD 容器启动命令
CMD 指令格式:
# 1、shell格式:CMD <命令>
CMD

exec

 浙公网安备 33010602011771号