04-vue项目相关和样式库
掌握的命令
npm install xx
cnpm install xx
vue create 项目名称
npm run serve
环境搭建
# 1 工程化---》创建vue项目
-要按vue要求的套路写代码--》写的都是vue的东西
-最终上线--》要编译---》把vue的代码--》编译成 html,css,js
-创建工程,编译需要使用:nodejs--》webpack
# 2 安装node环境
-官网下载一路下一步安装
-两个命令
npm---->pip
node--->python
# 3 搭建vue的环境
#1 装cnpm 这个包---》淘宝提供的--》以后有了它--》装模块 cnpm替代npm
npm install -g cnpm --registry=https://registry.npmmirror.com
### 解决方案1:
// 1. 清空缓存
npm cache clean --force
// 2. 关闭SSL验证
npm config set strict-ssl false
// 3. 安装
到这里就可以正常使用npm命令安装需要的工具了。如(npm install -g cnpm )
### 解决方案2:
// 1. 清空缓存
npm cache clean --force
// 2. 切换新源
npm config set registry https://registry.npmmirror.com
// 3. 查看源是否设置成功
npm config get registry
// 4. 安装
到这里就可以正常使用npm命令安装需要的工具了。如(npm install -g cnpm )
# 2 安装vue脚手架
cnpm install -g @vue/cli
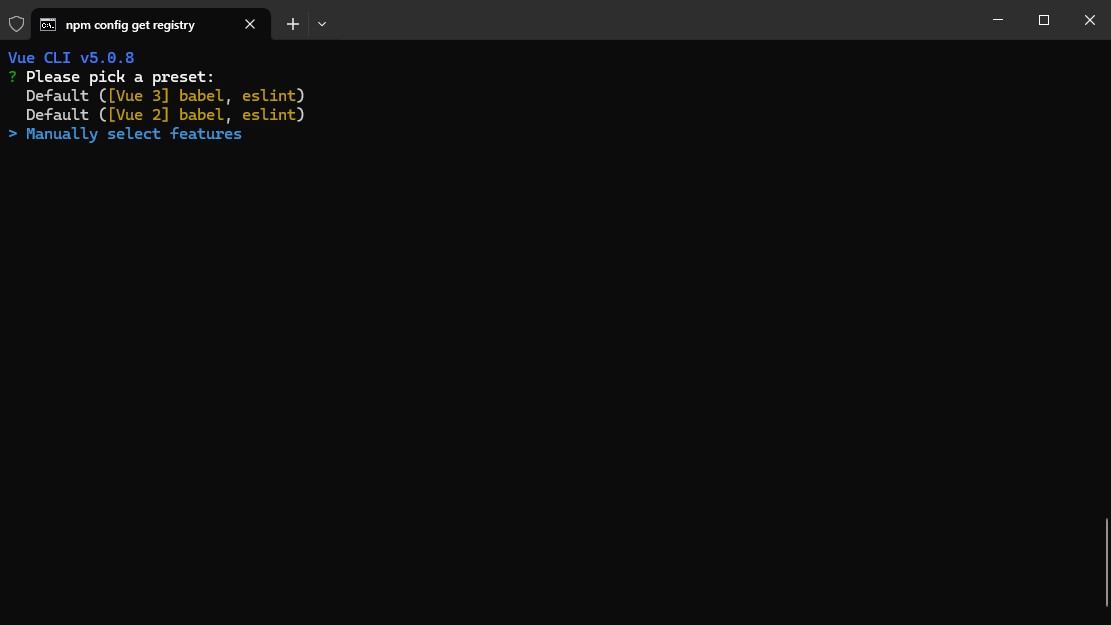
# 3 装完脚手架,就会有个vue名令,通过vue命令创建vue项目
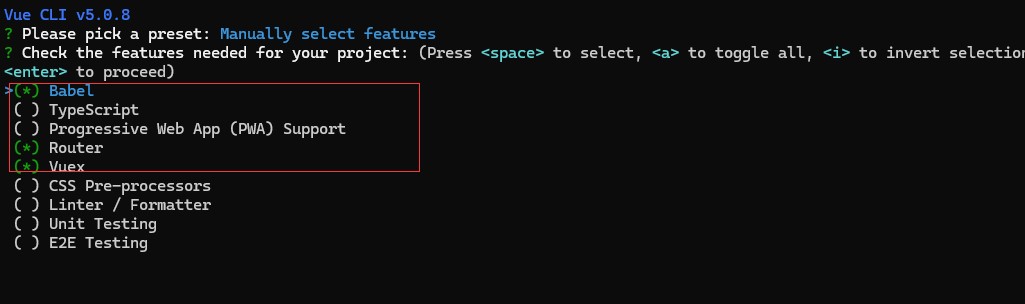
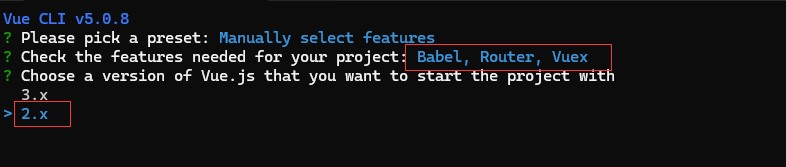
vue create myfirstvue # 按下面步骤
# 4 使用webstorm打开项目
# 5 运行项目
-1 在命令行中[项目跟路径]:使用npm run serve
-2 配置webstorm--》点绿色箭头执行
新建一个npm命令--》执行 serve脚本

vue项目目录结构
myfirstvue # 项目名
-node_modules # 等同于python的venv--》虚拟环境-->里面有很多js,项目的依赖-》可以删除---》项目就不能运行了--》在你本地--》cnpm install--》根据package.json项目的依赖,再重新安装--》又可以运行了
-public # 文件夹,一般不动
-favicon.ico # 小图标
-index.html # spa--》单页面应用--》整个vue项目,就只有这一个html-如果禁用了js--》整个vue都用不了
-src # 文件夹---》核心代码
-assets #文件夹,都放静态文件--》图片,css,js。。。
-logo.png # 静态图片
-components # 小组件,给页面组件使用
HelloWorld.vue # HelloWorld 组件
-views # 页面组件,页面跳转,实现像 html跳转一样的效果
AboutView.vue # 关于页面
HomeView.vue # 首页
-store # vuex--》状态管理器
index.js
-router # vue-router---》路由配置文件
index.js
-App.vue # 根组件
-main.js # 整个项目入口
-.gitignore # git忽略文件,学了git就会了
-babel.config.js # 装了bable配置文件--》把高版本es语法转成es5
-jsconfig.json # 不管
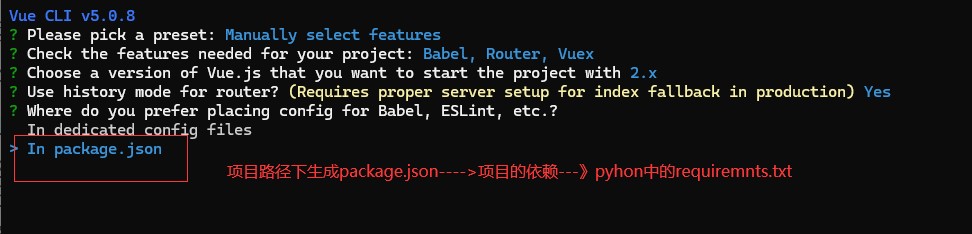
-package.json # 项目依赖文件--》项目依赖--》npm install--》根据他装
-package-lock.json # 锁定文件,之前项目中使用模块版本
-README.md # 项目介绍
-vue.config.js # vue整体配置文件
vue项目运行机制
# 1 main.js--->指定了index.html--->id为app的div---》根App.vue 这个组件做了关联
# App是 个组件
new Vue({
  render: h => h(App)  # 代指 el
}).$mount('#app')

new Vue({
    el:'#app'
})
组件写法
# template 写之前我们方在template标签的模版字符串
<template>
  <div id="app">
    <h1>我是根组件</h1>
    <button @click="haneldShow">点我弹alert</button>
  </div>
</template>

# script标签--》原来js代码都写在这里、
<script>
export default {
  name: 'HelloWorld', // 组件名字
  data() {
    return {}
  },
  methods: {
    haneldShow() {
      alert('111')
    }
  }
}
</script>


#style
<style>

button{
  background-color: aqua;
}
</style
main.js
main.js 是 Vue 项目的入口文件,通常用来创建 Vue 实例以及配置一些全局设置。以下是一个典型的 main.js 文件的示例:
import Vue from 'vue'
import App from './App.vue'
import router from './router'
import store from './store'

Vue.config.productionTip = false

new Vue({
  router,
  store,
  render: h => h(App)
}).$mount('#app')
这里是一些主要内容的解释:
import Vue from 'vue': 导入 Vue 库。import App from './App.vue': 导入根组件App.vue。import router from './router': 导入路由配置。import store from './store': 导入 Vuex 状态管理配置。Vue.config.productionTip = false: 设置 Vue 的生产提示,关闭开发模式下的提示。new Vue({ ... }): 创建一个 Vue 实例,包含了根组件、路由和状态管理。router: 使用导入的路由配置。store: 使用导入的状态管理配置。render: h => h(App): 渲染根组件App.vue。.$mount('#app'): 手动挂载 Vue 实例到 DOM 元素#app上。
通过vue ui创建项目
// 控制台直接运行vue ui 然后进入网页操作即可
xx.vue
注意:
- template必须放在一个容器里面,一般都是div
- script必须要export出出去
<template>
    <!-- 必须放在一个容器里面,这里一般都是放div里面 -->
 	<div>
        <!-- 所有的视图代码写这里 -->
    </div>
</template>

<script>
	// 所有的js代码写这里
    // 这里必须要导出,然后app.vue才能正常导入
    export default {
		name: "组件名称",
		// ...
</script>

<style>
    /* 所有的css样式写这里 */
</style>
最终流程
- 在views下面写全局组件,在components下面写局部组件。
- 在router.js下面注册路由
- app.vue下面不要放多余的东西。写上
<router-view/>即可。
<!--
	views/LoginView.vue
	视图层
-->
<template>
	<div>
		请输入账号:<input type="text" v-model="username"/><br><br>
		请输入密码:<input type="password" v-model="password"/><br><br>
		<button @click="handleLogin" class="btn btn-primary">点击登录</button>
	</div>
</template>

<script>
	import axios from 'axios'
	// import bootstrap from 'bootstrap'

	export default {
		name: "LoginView",
		data(){
			return {
				username: "",
				password: ""
			}
		},
		methods: {
			handleLogin(){
				axios.post("http://127.0.0.1:8000/api/v1/login/", {
					username: this.username,
					password:this.password
				}).then((response)=>{
					let data = response.data
					if ((data.code) === 100){
						console.log(data.msg)
					}else{
						console.log(data.msg)
					}
				})
			}
		}
	}

</script>

<style scoped>
	@import "~bootstrap/dist/css/bootstrap.css"
</style>
// router/index.js
// 路由层
import Vue from 'vue'
import VueRouter from 'vue-router'
import LoginView from "../views/LoginView.vue"
import HelloWorld from '@/components/HelloWorld.vue'

Vue.use(VueRouter)

const routes = [
  {
	path: "/",
	name: "login",
	component: LoginView
  },
  {
	path: "/hello",
	name: "helloword",
	component:HelloWorld
  }

]

const router = new VueRouter({
  mode: 'history',
  base: process.env.BASE_URL,
  routes
})

export default router
<!-- App.vue-->
<template>
  <div id="app">
    <router-view/>
  </div>
</template>
vue项目中组件的使用
<!-- 视图 -->
<template>
	<div>
		<h3>成功运行了</h3>
		{{text}}
		<img :src="src" alt="">
	</div>
</template>

<script>
	export default {
		name: "Task",
		data(){
			return {
				text: "小满",
				src: "https://pic.qqtn.com/up/2016-1/2016010617205745169.jpg"
			}
		}
	}
</script>
// router/index.js
import Vue from 'vue'
import VueRouter from 'vue-router'
import Task from "../views/Task.vue"

Vue.use(VueRouter)

const routes = [
  {
	  path: '/task', // 访问的路径
	  name: "task", // 别名,解析会用到
	  component: Task  // 这个就是组件对象
  }

]

const router = new VueRouter({
  mode: 'history',
  base: process.env.BASE_URL,
  routes
})

export default router
<!-- App.vue -->
<template>
  <div id="app">
    <router-view/>
  </div>
</template>
views和components的区别
views是和components是可以修改名称的,一般不需要去修改。
- views放的是页面的组件
- components放的是小组件
- 小组件的意思是,放在页面中的
vue-router实现组件切换
# 1 单页面应用,就无法实现页面的跳转
# 2 借助于 vue-router-->实现组件切换--》效果就是页面跳转

# 3 使用
### 3.1 App.vue--->固定成
<template>
  <div id="app">
    # 全局组件---》访问某个路径--》这个位置就替换成页面组件的内容
    <router-view></router-view>
  </div>
</template>


### 3.2 写页面组件:HomeView  AboutView


### 3.2 注册路由:router/index.js
const routes = [
  {
    path: '/',
    name: 'home',
    component: HomeView
  },
  {
    path: '/about',
    name: 'about',
    component: AboutView
  },
]

### 3.4 以后访问
	/      显示HomeView
    /about 显示AboutView
$router.push("path")跳转
this.$router.push("task")
案例,登录发送Ajax请求,登录成功跳转到电影页面。
# 后端 视图层
import json
from rest_framework.response import Response
from rest_framework.viewsets import ViewSet


class LoginView(ViewSet):
    def create(self, request, *args, **kwargs):
        username = request.data.get("username")
        password = request.data.get("password")

        if username == "小满" and password == "123":
            return Response({"code": 100, "msg": "登录成功"})
        else:
            return Response({"code": 101, "msg": "用户名或密码错误"})


class FilmsView(ViewSet):
    def list(self, request, *args, **kwargs):
        with open("movies.json", encoding="utf-8") as file:
            data = json.load(file)
        return Response(data)

# 路由层
from django.urls import path, include
from rest_framework.routers import DefaultRouter
from .views import LoginView, FilmsView

router = DefaultRouter()
router.register("login", LoginView, basename="login")
router.register("films", FilmsView, basename="films")

urlpatterns = [
    path("", include(router.urls))
]

# 主路由
from django.contrib import admin
from django.urls import path, include

urlpatterns = [
    path("admin/", admin.site.urls),
    path("api/v1/", include("app01.urls"))
]
<!--
	视图层
	LoginView.vue
-->
<template>
	<div>
		请输入账号:<input type="text" v-model="username"/><br><br>
		请输入密码:<input type="password" v-model="password"/><br><br>
		<button @click="handleLogin" class="btn btn-primary">点击登录</button>
	</div>
</template>

<script>
	import axios from 'axios'
	// import bootstrap from 'bootstrap'

	export default {
		name: "LoginView",
		data(){
			return {
				username: "",
				password: ""
			}
		},
		methods: {
			handleLogin(){
				axios.post("http://127.0.0.1:8000/api/v1/login/", {
					username: this.username,
					password:this.password
				},{
					headers:{"Content-Type": "application/json"}
				}
				).then((response)=>{
					let data = response.data
					if ((data.code) === 100){
						console.log(data.msg)
                        // 这里之所以能跳转是因为路由层的name设置
						this.$router.push("task")
					}else{
						console.log(data.msg)
					}
				})
			}
		}
	}

</script>

<style scoped>
	@import "~bootstrap/dist/css/bootstrap.css"
</style>
<!--
	视图层 电影视图
	Task.vue
-->
<template>
	<div>
		<ul v-for="item in films">
			<li>名称:{{item.name}}</li>
			<img :src="item.poster" width="200">
			<hr>
		</ul>
	</div>
</template>

<script>
	import axios from 'axios'

	export default {
		name: "Task",
		data() {
			return {
				films: []
			}
		},
		created() {
			this.Data()
		},
		methods: {
			Data() {
				axios("http://127.0.0.1:8000/api/v1/films/").then((response) => {
					let data = response.data
					this.films = data.results
					// return data.results
				})
			}
		}
	}
</script>

<style>
	div{
		margin: 20px;
	}
</style>
// 路由层
// router/index.js
import Vue from 'vue'
import VueRouter from 'vue-router'
import LoginView from "../views/LoginView.vue"
import HelloWorld from '@/components/HelloWorld.vue'
import Task from "../views/Task.vue"

Vue.use(VueRouter)

const routes = [
  {
	path: "/",
	name: "login",
	component: LoginView
  },
  {
	path: "/hello",
	name: "helloword",
	component:HelloWorld
  },
  {
	  path: '/task',
	  name: "task",
	  component: Task
  }

]

const router = new VueRouter({
  mode: 'history',
  base: process.env.BASE_URL,
  routes
})

export default router
<!-- App.vue -->
<template>
  <div id="app">
    <router-view/>
  </div>
</template>
scoped 加上后样式只在当前组件生效
<style scoped>

</style>
下面修改的是task.vue的style

如果在app.vue上加上一些标签或组件,全部页面都会生效,这样方便了后续代码的复用。
<template>
  <div id="app">
    <!-- 所有的页面都会有这个 1 -->
	<h1>1</h1>
    <router-view/>
  </div>
</template>
vue样式库
# 1 开源的样式库,方便在vue中使用
	-elementui:饿了么团队开源的  web端
    	https://element.eleme.cn/#/zh-CN
    -vant:有赞团队,移动端
    	https://vant-ui.github.io/vant/#/zh-CN
    -ant design:阿里团队
    	https://1x.antdv.com/docs/vue/introduce-cn/
    -iView
    	https://v2.iviewui.com/components/grid
    -nutui:京东团队
    	https://nutui.jd.com/2x/#/dialog

# 2 项目中集成
	1 安装:cnpm i element-ui -S
    2 集成到项目:main.js 中加入
    import ElementUI from 'element-ui';
    import 'element-ui/lib/theme-chalk/index.css';
    Vue.use(ElementUI); // 使用插件
    3 去官网,找样式,复制,粘贴

 浙公网安备 33010602011771号