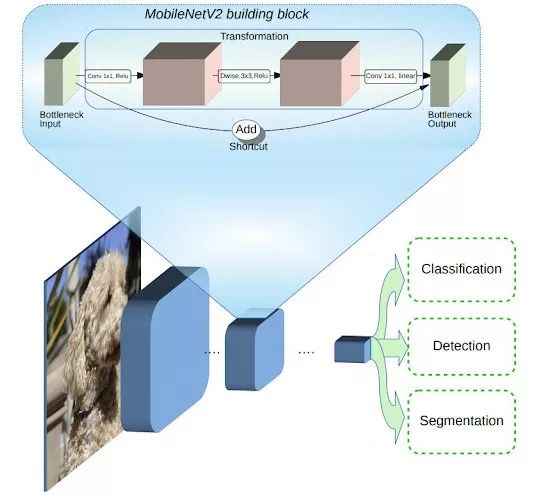
《MobileNetV2: Inverted Residuals and Linear Bottlenecks》论文阅读
《MobileNetV2: Inverted Residuals and Linear Bottlenecks》论文阅读
一、引言
- 在MobileNetV1(深度可分离卷积)的基础上,延续了它的简单性,不添加任何特殊的操作,提高准确性。
- Inverted Resduals 和 Linear Bottlenecks
- Inverted Resduals:加入了ResNet的shotcut结构
- Linear Bottlenecks:将bottleneck中的最后的通道数较少的feature map后面跟的relu6激活函数去掉,即去掉非线性。
- 问题:输入流形可以嵌入到激活空间的低维子空间中,那么ReLU变换在将所需的复杂性引入可表达函数集的同时保留了信息(if the input manifold can be embedded into a significantly lower-dimensional subspace of the activation space then the ReLU transformation preserves the information while introducing the needed complexity into the set of expressible functions.)//没读懂
- MobileNetV2基于反转残差结构,其中的跳跃连接位于较瘦的瓶颈层之间。中间的扩展层利用轻量级的深度卷积来提取特征引入非线性,为了维持网络的表示能力,去除了较窄层的非线性激活函数。
二、详细内容
2.1 MobileNetV2架构(蓝色模块代表深度可分离卷积层)

2.2 线性瓶颈(Linear Bottlenecks)结构
MobileNetV2相比于MobileNetV1引入了线性瓶颈的概念。因为Depthwise Convolution没有改变通道数的能力,如果输入通道数很少的话,Depthwise Convolution只能在低维空间提取特征,得不到很好的效果。因此,V2在Depthwise convolution前面加入了Pointwise Convolution升维。

作者去掉了第二个Pointwise Convolution的激活函数ReLU,作者认为激活函数在高维空间能够有效增加非线性,在低维空间会破坏特征。
下图为ReLU会对channel数较低的manifolds造成较大的信息损耗,当输出维度增加到15以后,ReLU才基本不会丢失太多信息。

2.3 反转残差

- 蓝色方块的厚度代表通道数的大小
- 图(a)残差结构
- 用Pointwise Convolution来降低通道数
- 用3×3卷积核进行卷积操作
- 再用Pointwise Convolution将通道数恢复到原来大小
- 跳跃连接建立在两个通道数比较多的层之间
- 每一层都用ReLU函数激活
- 图(b)反转残差结构
- 用Pointwise Convolution提高通道数
- 进行深度卷积操作
- 再用Pointwise Convolution将通道数降低到原始大小
- 跳跃连接建立在两个通道数比较少的瓶颈层之间
- 阴影的两个块没有ReLU激活函数
2.4 网络结构

- 第一层为标准的卷积操作
- 后面是瓶颈结构
- t:扩展因子;c:输出通道数;n:重复次数;s:步长;(如果步长为2,代表当前重复结构的第一个步块长为2,其余的步长为1,步长为2时没有跳跃连接,如下图所示)

三、代码练习
import torch
import torch.nn as nn
import torch.nn.functional as F
import torchvision
import torchvision.transforms as transforms
import matplotlib.pyplot as plt
import numpy as np
import torch.optim as optim

class Block(nn.Module):
    '''expand + depthwise + pointwise'''
    def __init__(self, in_planes, out_planes, expansion, stride):
        super(Block, self).__init__()
        self.stride = stride
        # 通过 expansion 增大 feature map 的数量
        planes = expansion * in_planes
        self.conv1 = nn.Conv2d(in_planes, planes, kernel_size=1, stride=1, padding=0, bias=False)
        self.bn1 = nn.BatchNorm2d(planes)
        self.conv2 = nn.Conv2d(planes, planes, kernel_size=3, stride=stride, padding=1, groups=planes, bias=False)
        self.bn2 = nn.BatchNorm2d(planes)
        self.conv3 = nn.Conv2d(planes, out_planes, kernel_size=1, stride=1, padding=0, bias=False)
        self.bn3 = nn.BatchNorm2d(out_planes)

        # 步长为 1 时,如果 in 和 out 的 feature map 通道不同,用一个卷积改变通道数
        if stride == 1 and in_planes != out_planes:
            self.shortcut = nn.Sequential(
                nn.Conv2d(in_planes, out_planes, kernel_size=1, stride=1, padding=0, bias=False),
                nn.BatchNorm2d(out_planes))
        # 步长为 1 时,如果 in 和 out 的 feature map 通道相同,直接返回输入
        if stride == 1 and in_planes == out_planes:
            self.shortcut = nn.Sequential()

    def forward(self, x):
        out = F.relu(self.bn1(self.conv1(x)))
        out = F.relu(self.bn2(self.conv2(out)))
        out = self.bn3(self.conv3(out))
        # 步长为1,加 shortcut 操作
        if self.stride == 1:
            return out + self.shortcut(x)
        # 步长为2,直接输出
        else:
            return out
创建MobileNetV2网络
class MobileNetV2(nn.Module):
    # (expansion, out_planes, num_blocks, stride)
    cfg = [(1,  16, 1, 1),
           (6,  24, 2, 1),
           (6,  32, 3, 2),
           (6,  64, 4, 2),
           (6,  96, 3, 1),
           (6, 160, 3, 2),
           (6, 320, 1, 1)]

    def __init__(self, num_classes=10):
        super(MobileNetV2, self).__init__()
        self.conv1 = nn.Conv2d(3, 32, kernel_size=3, stride=1, padding=1, bias=False)
        self.bn1 = nn.BatchNorm2d(32)
        self.layers = self._make_layers(in_planes=32)
        self.conv2 = nn.Conv2d(320, 1280, kernel_size=1, stride=1, padding=0, bias=False)
        self.bn2 = nn.BatchNorm2d(1280)
        self.linear = nn.Linear(1280, num_classes)

    def _make_layers(self, in_planes):
        layers = []
        for expansion, out_planes, num_blocks, stride in self.cfg:
            strides = [stride] + [1]*(num_blocks-1)
            for stride in strides:
                layers.append(Block(in_planes, out_planes, expansion, stride))
                in_planes = out_planes
        return nn.Sequential(*layers)

    def forward(self, x):
        out = F.relu(self.bn1(self.conv1(x)))
        out = self.layers(out)
        out = F.relu(self.bn2(self.conv2(out)))
        out = F.avg_pool2d(out, 4)
        out = out.view(out.size(0), -1)
        out = self.linear(out)
        return out
创建DataLoader
# 使用GPU训练,可以在菜单 "代码执行工具" -> "更改运行时类型" 里进行设置
device = torch.device("cuda:0" if torch.cuda.is_available() else "cpu")

transform_train = transforms.Compose([
    transforms.RandomCrop(32, padding=4),
    transforms.RandomHorizontalFlip(),
    transforms.ToTensor(),
    transforms.Normalize((0.4914, 0.4822, 0.4465), (0.2023, 0.1994, 0.2010))])

transform_test = transforms.Compose([
    transforms.ToTensor(),
    transforms.Normalize((0.4914, 0.4822, 0.4465), (0.2023, 0.1994, 0.2010))])

trainset = torchvision.datasets.CIFAR10(root='./data', train=True,  download=True, transform=transform_train)
testset  = torchvision.datasets.CIFAR10(root='./data', train=False, download=True, transform=transform_test)

trainloader = torch.utils.data.DataLoader(trainset, batch_size=128, shuffle=True, num_workers=2)
testloader = torch.utils.data.DataLoader(testset, batch_size=128, shuffle=False, num_workers=2)
实例化网络
# 网络放到GPU上
net = MobileNetV2().to(device)
criterion = nn.CrossEntropyLoss()
optimizer = optim.Adam(net.parameters(), lr=0.001)
模型训练
for epoch in range(10):  # 重复多轮训练
    for i, (inputs, labels) in enumerate(trainloader):
        inputs = inputs.to(device)
        labels = labels.to(device)
        # 优化器梯度归零
        optimizer.zero_grad()
        # 正向传播 + 反向传播 + 优化
        outputs = net(inputs)
        loss = criterion(outputs, labels)
        loss.backward()
        optimizer.step()
        # 输出统计信息
        if i % 100 == 0:
            print('Epoch: %d Minibatch: %5d loss: %.3f' %(epoch + 1, i + 1, loss.item()))

print('Finished Training')
模型测试
correct = 0
total = 0

for data in testloader:
    images, labels = data
    images, labels = images.to(device), labels.to(device)
    outputs = net(images)
    _, predicted = torch.max(outputs.data, 1)
    total += labels.size(0)
    correct += (predicted == labels).sum().item()

print('Accuracy of the network on the 10000 test images: %.2f %%' % (
    100 * correct / total))


