oracle11G的linux下的离线安装教程
最近公司要进行oracle11G的现网环境的搭建,对于oracle的windows安装来讲简单化的图形化界面比较容易,但是对于linux来讲,之前没有搭建过,结合在博客园以及csdn博客园的资料查询,今天大半夜我要在没有外网的环境下,对centos7 64位的系统进行oracle11G的搭建。
首先申明,由于公司的linux机器不允许连接外网,所以一切工作都在离线环境下进行,所以我们需要第一步做的就是下载所有oracle的离线安装包。
记录:离线安装依赖包放置于:百度云盘\我的网盘\我的资源\oracle-linux环境下离线依赖所有包。有c币的童鞋可以到下方下载,没有的需要下载的可私信我我单发。
依赖包下载地址:https://download.csdn.net/download/qq_35907918/13218158
推荐资源网站: 技术记录系统
首先我们将下载好的离线包放置于我们要部署搭建的对应的linux机器上。接下来我们按照下面的步骤进行离线安装。
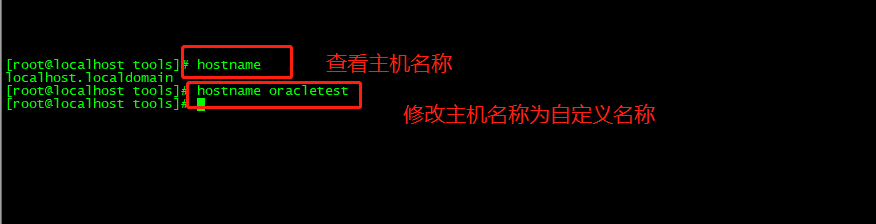
1:查看主机名将主机名称改成自定义的名称之后可做使用。
查看主机名称:hostname 修改主机名称: hostname 要修改的名称
2:添加主机名与ip对应:
vi /etc/hosts
在下面添加自己ip和自定义的主机名

3:关闭selinux
sed -i "s/SELINUX=enforcing/SELINUX=disabled/" /etc/selinux/config
setenforce 0

4:安装oracle依赖包:
cd /tools/oracle-yilai/
rpm -ivh ./* --nodeps --force

安装完后检测有没有未安装成功的依赖包:
rpm -q binutils compat-libcap1 compat-libstdc++-33 gcc gcc-c++ glibc glibc-devel ksh libaio libaio-devel libgcc libstdc++ libstdc++-devel libXi libXtst make sysstat unixODBC unixODBC-devel |grep "not installed"

命令执行完未收到响应证明安装成功无缺失
5:关闭linux的防火墙:
systemctl disable firewalld.service

6:添加oinstall,dba 组,新建oracle用户并将oracle用户加入oinstall,dba 组中。
groupadd oinstall //添加oinstall组
groupadd dba //添加dba组
useradd -g oinstall -G dba oracle //创建oracle用户并加入这两个组中
passwd oracle 给oracle用户设置密码
id oracle //测试刚刚上面的操作是否成功

7:创建oracle安装目录,给相关权限
mkdir -p /u01/app/oracle/product/11.2.0/db_1
mkdir /u01/app/oracle/oradata
mkdir /u01/app/oracle/oraInventory
mkdir /u01/app/oracle/fast_recovery_area
chown -R oracle:oinstall /u01/app
chmod -R 775 /u01/app
![]()

8:配置调整内存参数
vim /etc/sysctl.conf
在文件中添加如下设置:(其中kernel.shmmax = 1073741824为本机物理内存(2G)的一半,单位为byte。)
fs.file-max = 6815744
kernel.shmall = 2097152
kernel.shmmax = 1073741824
kernel.shmmni = 4096
kernel.sem = 250 32000 100 128
net.ipv4.ip_local_port_range = 9000 65500
net.core.rmem_default = 262144
net.core.rmem_max = 4194304
net.core.wmem_default = 262144
net.core.wmem_max = 1048576
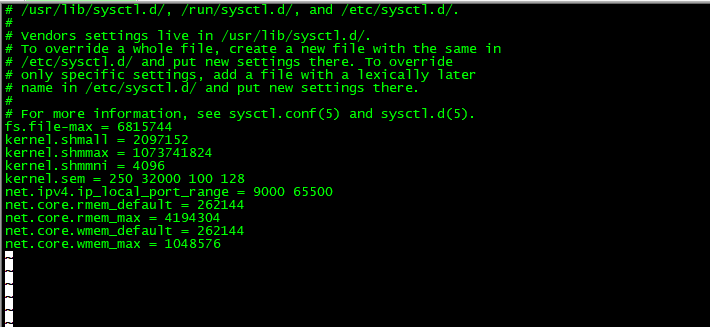
执行命令使配置生效 :sysctl -p
9:修改用户的限制文件
vi /etc/security/limits.conf
在文件里添加如下内容
oracle soft nproc 2047
oracle hard nproc 16384
oracle soft nofile 1024
oracle hard nofile 65536
oracle soft stack 10240
10:修改/etc/pam.d/login文件
vim /etc/pam.d/login添加内容如下
session required /lib64/security/pam_limits.so
session required pam_limits.so
11:修改/etc/profile 文件
vim /etc/profile
添加如下内容:
if [ $USER = "oracle" ];
then if [ $SHELL = "/bin/ksh" ];then
ulimit -p 16384
ulimit -n 65536
else ulimit -u 16384 -n 65536
fi
fi
12:解压oracle11G的安装包
cd /tools
unzip linux.x64_11gR2_database_1of2.zip
unzip linux.x64_11gR2_database_2of2.zip
修改目录的属性
chmod -R 775 /tools
chown -R oracle:oinstall /tools

开始静默安装oracle
1.切换到oracle用户,设置oracle用户环境变量
su - oracle
vim .bash_profile
添加以下内容
#for oracle
export ORACLE_BASE=/u01/app/oracle
export ORACLE_HOME=/u01/app/oracle/product/11.2.0/db_1
export ORACLE_PID=orcl
export ORACLE_SID=orcl
#export NLS_LANG=AMERICAN_AMERICA.AL32UTF8
export PATH=$PATH:$HOME/bin:$ORACLE_HOME/bin
export LD_LIBRARY_PATH=$ORACLE_HOME/lib:/usr/lib
export LANG="zh_CN.UTF-8"
export NLS_LANG="SIMPLIFIED CHINESE_CHINA.AL32UTF8"
export NLS_DATE_FORMAT='yyyy-mm-dd hh24:mi:ss'
执行以下命令使环境变量生效
source ~/.bash_profile
2.修改应答文件
cd /home/oracle
vi db_install.rsp
添加以下内容:
oracle.install.option=INSTALL_DB_SWONLY
ORACLE_HOSTNAME= oracletest   //这个是hostname
UNIX_GROUP_NAME=oinstall
INVENTORY_LOCATION=/u01/app/oraInventory
SELECTED_LANGUAGES=en,zh_CN
ORACLE_HOME=/u01/app/oracle/product/11.2.0/db_1
ORACLE_BASE=/u01/app/oracle
oracle.install.db.InstallEdition=EE
oracle.install.db.DBA_GROUP=dba
oracle.install.db.OPER_GROUP=dba
DECLINE_SECURITY_UPDATES=true
3.执行静默安装
在静默安装之前建议先重启系统,使所有配置都生效。
具体命令如下方:
sudo reboot -----重启
su - oracle 切换到oracle用户
source .bash_profile 使环境变量生效
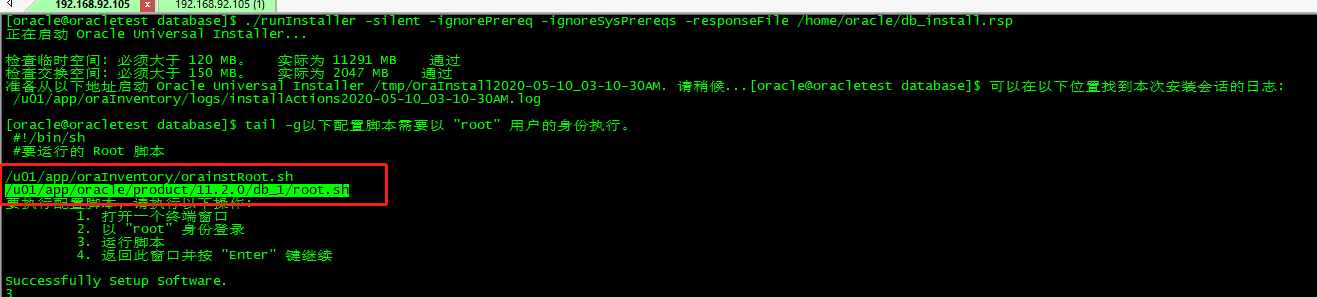
cd /tools/database/ 切换到oracle安装包解压后的目录下
./runInstaller -silent -ignorePrereq -ignoreSysPrereqs -responseFile /home/oracle/db_install.rsp 静默安装
当出现以下用root执行脚本的命令之后,切换root执行提示中的脚本内容。
4.静默配置监听
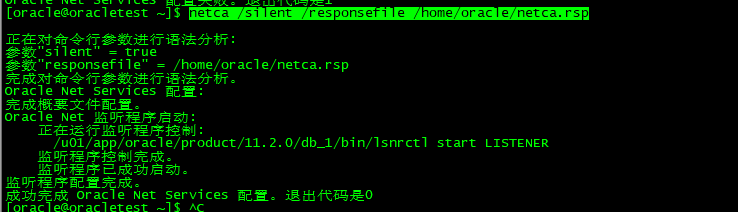
@1切换到oracle用户下:

netca /silent /responsefile /home/oracle/netca.rsp
![]()
@2检验:在 /u01/app/oracle/product/11.2.0/db_1/network/admin/ 中生成 listener.ora 和 sqlnet.ora

@3、通过netstat命令可以查看1521端口正在监听
netstat -tnul | grep 1521

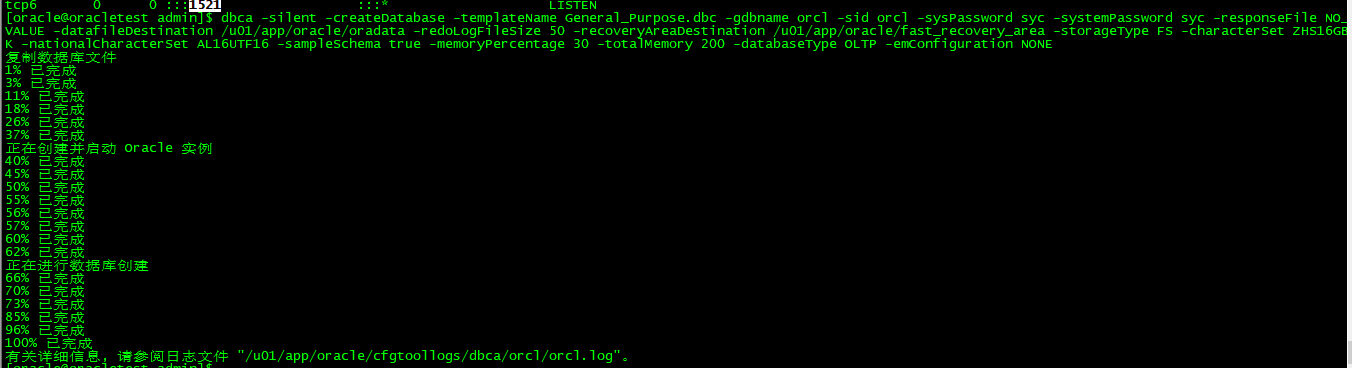
@4:通过命令直接建立oracle实例
dbca -silent -createDatabase -templateName General_Purpose.dbc -gdbname orcl -sid orcl -sysPassword syc -systemPassword syc -responseFile NO_VALUE -datafileDestination /u01/app/oracle/oradata -redoLogFileSize 50 -recoveryAreaDestination /u01/app/oracle/fast_recovery_area -storageType FS -characterSet ZHS16GBK -nationalCharacterSet AL16UTF16 -sampleSchema true -memoryPercentage 30 -totalMemory 200 -databaseType OLTP -emConfiguration NONE
@5:检查监听的启动与启动oracle监听
lsnrctl status
![]()
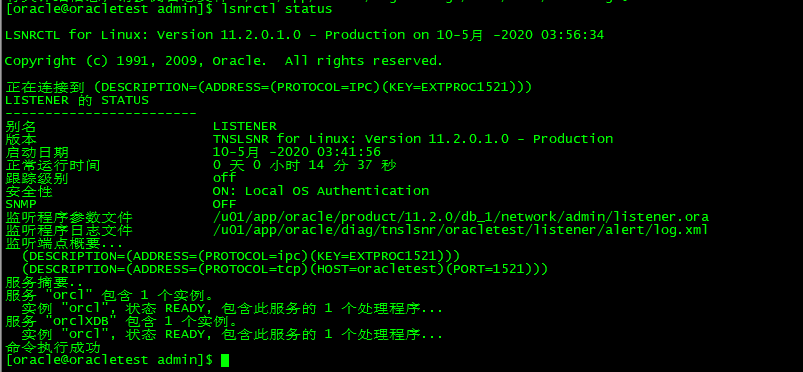
未启动可执行命令:lsnrctl start
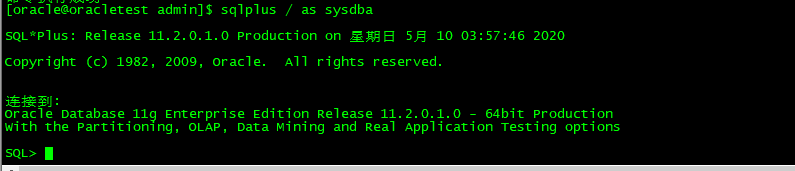
至此oracle数据库已经安装完成,可以使用 sqlplus执行命令了
<<<<<<<<<<<<<<<<<<<<<<<<<<<额外补充>>>>>>>>>>>>>>>>>>>>>>>>>>
设置开机自启动:
修改ORACLE_HOME_LISTNER
将下面两个文件的ORACLE_HOME_LISTNER=$1修改为ORACLE_HOME_LISTNER=$ORACLE_HOME
vim /u01/app/oracle/product/11.2.0/db_1/bin/dbstart
vim /u01/app/oracle/product/11.2.0/db_1/bin/dbshut
配置oratab
vi /etc/oratab
找到testsid:/opt/oracle/102:N,改为testsid:/opt/oracle/102:Y
配置rc.local
vi /etc/rc.d/rc.local
添加如下行
su oracle -lc "/u01/app/oracle/product/11.2.0/db_1/bin/lsnrctl start"
su oracle -lc /u01/app/oracle/product/11.2.0/db_1/bin/dbstart
增加权限
chmod +x /etc/rc.d/rc.local /u01/app/oracle/product/11.2.0/db_1
--------------------------------------------------------------------------------------------------------------------------------------------------

关于有的园友是新手静默安装的时候有报错

WARNING: Unable to find the namespace URI. Reason: Start of root element expected.
SEVERE: [FATAL] [INS-10105] 指定的响应文件/home/oracle/db_install.rsp无效。
原因: 响应文件在语法上不正确。在响应文件中指定了意外的变量或未指定预期的变量。
操作: 参阅最新的产品特定响应文件模板

解决办法:这个是因为我在博客园记录响应文件是参数不全的,仅做参考,由于出现了这个问题,
我这里给补充一下完整的应答文件按照完整的应答文件保存后再去静默安装。

以下是完整的应答文件以及说明参数

-------------------------------------------------------------完整的应答文件(/home/oracle/db_install.rsp)------------------------------
####################################################################
## Copyright(c) Oracle Corporation1998,2008. All rights reserved. ##
## Specify values for the variables listedbelow to customize your installation. ##
## Each variable is associated with acomment. The comment ##
## can help to populate the variables withthe appropriate values. ##
## IMPORTANT NOTE: This file contains plaintext passwords and ##
## should be secured to have readpermission only by oracle user ##
## or db administrator who owns thisinstallation. ##
##对整个文件的说明,该文件包含参数说明,静默文件中密码信息的保密 ##
####################################################################
#------------------------------------------------------------------------------
# Do not change the following system generatedvalue. 标注响应文件版本,这个版本必须和要#安装的数据库版本相同,安装检验无法通过,不能更改
#------------------------------------------------------------------------------
oracle.install.responseFileVersion=/oracle/install/rspfmt_dbinstall_response_schema_v11_2_0
#------------------------------------------------------------------------------
# Specify the installation option.
# It can be one of the following:
# 1. INSTALL_DB_SWONLY
# 2. INSTALL_DB_AND_CONFIG
# 3. UPGRADE_DB
#选择安装类型:1.只装数据库软件 2.安装数据库软件并建库 3.升级数据库
#-------------------------------------------------------------------------------
oracle.install.option=INSTALL_DB_AND_CONFIG
#-------------------------------------------------------------------------------
# Specify the hostname of the system as setduring the install. It can be used
# to force the installation to use analternative hostname rather than using the
# first hostname found on the system.(e.g., for systems with multiple hostnames
# and network interfaces)指定操作系统主机名,通过hostname命令获得
#-------------------------------------------------------------------------------
ORACLE_HOSTNAME=oracletest
#-------------------------------------------------------------------------------
# Specify the Unix group to be set for theinventory directory.
#指定oracle inventory目录的所有者,通常会是oinstall或者dba
#-------------------------------------------------------------------------------
UNIX_GROUP_NAME=oinstall
#-------------------------------------------------------------------------------
# Specify the location which holds theinventory files.
#指定产品清单oracle inventory目录的路径,如果是Win平台下可以省略
#-------------------------------------------------------------------------------
INVENTORY_LOCATION=/u01/app/oracle/oraInventory
#-------------------------------------------------------------------------------
# Specify the languages in which thecomponents will be installed.
# en : English ja : Japanese
# fr : French ko : Korean
# ar : Arabic es : Latin American Spanish
# bn : Bengali lv : Latvian
# pt_BR: Brazilian Portuguese lt : Lithuanian
# bg : Bulgarian ms : Malay
# fr_CA: Canadian French es_MX: Mexican Spanish
# ca : Catalan no : Norwegian
# hr : Croatian pl : Polish
# cs : Czech pt : Portuguese
# da : Danish ro : Romanian
# nl : Dutch ru : Russian
# ar_EG: Egyptian zh_CN: Simplified Chinese
# en_GB: English (Great Britain) sk :Slovak
# et : Estonian sl : Slovenian
# fi : Finnish es_ES: Spanish
# de : German sv : Swedish
# el : Greek th : Thai
# iw : Hebrew zh_TW:Traditional Chinese
# hu : Hungarian tr : Turkish
# is : Icelandic uk : Ukrainian
# in : Indonesian vi :Vietnamese
# it : Italian
# Example : SELECTED_LANGUAGES=en,fr,ja
#指定数据库语言,可以选择多个,用逗号隔开。选择en, zh_CN(英文和简体中文)
#------------------------------------------------------------------------------
SELECTED_LANGUAGES=en,zh_CN
#------------------------------------------------------------------------------
# Specify the complete path of the OracleHome.设置ORALCE_HOME的路径
#------------------------------------------------------------------------------
ORACLE_HOME=/u01/app/oracle/product/11.2.0/db_1
#------------------------------------------------------------------------------
# Specify the complete path of the OracleBase. 设置ORALCE_BASE的路径
#------------------------------------------------------------------------------
ORACLE_BASE=/u01/app/oracle
#------------------------------------------------------------------------------
# Specify the installation edition of thecomponent.
# The value should contain only one ofthese choices.
# EE : EnterpriseEdition
# SE : Standard Edition
# SEONE Standard Edition One
# PE : Personal Edition (WINDOWS ONLY)
#选择Oracle安装数据库软件的版本(企业版,标准版,标准版1),不同的版本功能不同
#详细的版本区别参考附录D
#------------------------------------------------------------------------------
oracle.install.db.InstallEdition=EE
#------------------------------------------------------------------------------
# This variable is used to enable ordisable custom install.
# true : Components mentioned as part of 'customComponents' property
#are considered for install.
# false : Value for 'customComponents' isnot considered.
#是否自定义Oracle的组件,如果选择false,则会使用默认的组件
#如果选择true否则需要自己在下面一条参数将要安装的组件一一列出。
#安装相应版权后会安装所有的组件,后期如果缺乏某个组件,再次安装会非常的麻烦。
#------------------------------------------------------------------------------
#oracle.install.db.isCustomInstall=false
#------------------------------------------------------------------------------
# This variable is considered only if'IsCustomInstall' is set to true.
# Description: List of Enterprise EditionOptions you would like to install.
# The following choices areavailable. You may specify any
# combination of thesechoices. The components you chooseshould
# be specified in the form"internal-component-name:version"
# Below is a list of components youmay specify to install.
# oracle.rdbms.partitioning:11.2.0.1.0- Oracle Partitioning
# oracle.rdbms.dm:11.2.0.1.0- Oracle Data Mining
# oracle.rdbms.dv:11.2.0.1.0- Oracle Database Vault
# oracle.rdbms.lbac:11.2.0.1.0- Oracle Label Security
# oracle.rdbms.rat:11.2.0.1.0- Oracle Real Application Testing
# oracle.oraolap:11.2.0.1.0- Oracle OLAP
# oracle.install.db.isCustomInstall=true的话必须手工选择需要安装组件的话
#------------------------------------------------------------------------------
#oracle.install.db.customComponents=oracle.server:11.2.0.1.0,oracle.sysman.ccr:10.2.7.0.0,oracle.xdk:11.2.0.1.0,oracle.rdbms.oci:11.2.0.1.0,oracle.network:11.2.0.1.0,oracle.network.listener:11.2.0.1.0,oracle.rdbms:11.2.0.1.0,oracle.options:11.2.0.1.0,oracle.rdbms.partitioning:11.2.0.1.0,oracle.oraolap:11.2.0.1.0,oracle.rdbms.dm:11.2.0.1.0,oracle.rdbms.dv:11.2.0.1.0,orcle.rdbms.lbac:11.2.0.1.0,oracle.rdbms.rat:11.2.0.1.0
###############################################################################
# PRIVILEGED OPERATING SYSTEM GROUPS
# Provide values for the OS groups to whichOSDBA and OSOPER privileges #
# needs to be granted. If the install isbeing performed as a member of the #
# group "dba", then that will beused unless specified otherwise below. #
#指定拥有OSDBA、OSOPER权限的用户组,通常会是dba组
###############################################################################
#------------------------------------------------------------------------------
# The DBA_GROUP is the OS group which is tobe granted OSDBA privileges.
#------------------------------------------------------------------------------
oracle.install.db.DBA_GROUP=dba
#------------------------------------------------------------------------------
# The OPER_GROUP is the OS group which isto be granted OSOPER privileges.
#------------------------------------------------------------------------------
oracle.install.db.OPER_GROUP=oinstall
#------------------------------------------------------------------------------
# Specify the cluster node names selectedduring the installation.
#如果是RAC的安装,在这里指定所有的节点
#------------------------------------------------------------------------------
#oracle.install.db.CLUSTER_NODES=
#------------------------------------------------------------------------------
# Specify the type of database to create.
# It can be one of the following:
# - GENERAL_PURPOSE/TRANSACTION_PROCESSING
# - DATA_WAREHOUSE
#选择数据库的用途,一般用途/事物处理,数据仓库
#------------------------------------------------------------------------------
oracle.install.db.config.starterdb.type=GENERAL_PURPOSE
#------------------------------------------------------------------------------
# Specify the Starter Database GlobalDatabase Name. 指定GlobalName
#------------------------------------------------------------------------------
oracle.install.db.config.starterdb.globalDBName=orcl
#------------------------------------------------------------------------------
# Specify the Starter Database SID.指定SID
#------------------------------------------------------------------------------
oracle.install.db.config.starterdb.SID=orcl
#------------------------------------------------------------------------------
# Specify the Starter Database characterset.
# It can be one of the following:
# AL32UTF8, WE8ISO8859P15, WE8MSWIN1252,EE8ISO8859P2,
# EE8MSWIN1250, NE8ISO8859P10,NEE8ISO8859P4, BLT8MSWIN1257,
# BLT8ISO8859P13, CL8ISO8859P5,CL8MSWIN1251, AR8ISO8859P6,
# AR8MSWIN1256, EL8ISO8859P7, EL8MSWIN1253,IW8ISO8859P8,
# IW8MSWIN1255, JA16EUC, JA16EUCTILDE,JA16SJIS, JA16SJISTILDE,
# KO16MSWIN949, ZHS16GBK, TH8TISASCII,ZHT32EUC, ZHT16MSWIN950,
# ZHT16HKSCS, WE8ISO8859P9, TR8MSWIN1254,VN8MSWIN1258
#选择字符集。不正确的字符集会给数据显示和存储带来麻烦无数。
#通常中文选择的有ZHS16GBK简体中文库,建议选择unicode的AL32UTF8国际字符集
#------------------------------------------------------------------------------
oracle.install.db.config.starterdb.characterSet=AL32UTF8
#------------------------------------------------------------------------------
# This variable should be set to true ifAutomatic Memory Management
# in Database is desired.
# If Automatic Memory Management is notdesired, and memory allocation
# is to be done manually, then set it tofalse.
#11g的新特性自动内存管理,也就是SGA_TARGET和PAG_AGGREGATE_TARGET都#不用设置了,Oracle会自动调配两部分大小。
#------------------------------------------------------------------------------
#oracle.install.db.config.starterdb.memoryOption=true
#------------------------------------------------------------------------------
# Specify the total memory allocation forthe database. Value(in MB) should be
# at least 256 MB, and should not exceedthe total physical memory available on the system.
# Example:oracle.install.db.config.starterdb.memoryLimit=512
#指定Oracle自动管理内存的大小,最小是256MB
#------------------------------------------------------------------------------
oracle.install.db.config.starterdb.memoryLimit=2048
#------------------------------------------------------------------------------
# This variable controls whether to loadExample Schemas onto the starter
# database or not.是否载入模板示例
#------------------------------------------------------------------------------
#oracle.install.db.config.starterdb.installExampleSchemas=true
#------------------------------------------------------------------------------
# This variable includes enabling auditsettings, configuring password profiles
# and revoking some grants to public. Thesesettings are provided by default.
# These settings may also be disabled. 是否启用安全设置
#------------------------------------------------------------------------------
#oracle.install.db.config.starterdb.enableSecuritySettings=true
###############################################################################
# Passwords can be supplied for thefollowing four schemas in the #
# starter database: #
# SYS #
# SYSTEM #
# SYSMAN (used by Enterprise Manager) #
# DBSNMP (used by Enterprise Manager) #
# Same password can be used for allaccounts (not recommended) #
# or different passwords for each accountcan be provided (recommended) #
#设置数据库用户密码
###############################################################################
#------------------------------------------------------------------------------
# This variable holds the password that isto be used for all schemas in the
# starter database.
#设定所有数据库用户使用同一个密码,其它数据库用户就不用单独设置了。
#-------------------------------------------------------------------------------
oracle.install.db.config.starterdb.password.ALL=Oracle_2021
#-------------------------------------------------------------------------------
# Specify the SYS password for the starterdatabase.
#-------------------------------------------------------------------------------
#oracle.install.db.config.starterdb.password.SYS=oracle
#-------------------------------------------------------------------------------
# Specify the SYSTEM password for thestarter database.
#-------------------------------------------------------------------------------
#oracle.install.db.config.starterdb.password.SYSTEM=oracle
#-------------------------------------------------------------------------------
# Specify the SYSMAN password for thestarter database.
#-------------------------------------------------------------------------------
#oracle.install.db.config.starterdb.password.SYSMAN=oracle
#-------------------------------------------------------------------------------
# Specify the DBSNMP password for thestarter database.
#-------------------------------------------------------------------------------
#oracle.install.db.config.starterdb.password.DBSNMP=oracle
#-------------------------------------------------------------------------------
# Specify the management option to beselected for the starter database.
# It can be one of the following:
# 1. GRID_CONTROL
# 2. DB_CONTROL
#数据库本地管理工具DB_CONTROL,远程集中管理工具GRID_CONTROL
#-------------------------------------------------------------------------------
#oracle.install.db.config.starterdb.control=DB_CONTROL
#-------------------------------------------------------------------------------
# Specify the Management Service to use ifGrid Control is selected to manage
# the database. GRID_CONTROL需要设定grid control的远程路径URL
#-------------------------------------------------------------------------------
#oracle.install.db.config.starterdb.gridcontrol.gridControlServiceURL=
#-------------------------------------------------------------------------------
# This variable indicates whether toreceive email notification for critical
# alerts when using DB control.是否启用Email通知, 启用后会将告警等信息发送到指定邮箱
#-------------------------------------------------------------------------------
#oracle.install.db.config.starterdb.dbcontrol.enableEmailNotification=false
#-------------------------------------------------------------------------------
# Specify the email address to which thenotifications are to be sent.设置通知EMAIL地址
#-------------------------------------------------------------------------------
#oracle.install.db.config.starterdb.dbcontrol.emailAddress=
#-------------------------------------------------------------------------------
# Specify the SMTP server used for emailnotifications.设置EMAIL邮件服务器
#-------------------------------------------------------------------------------
#oracle.install.db.config.starterdb.dbcontrol.SMTPServer=
###############################################################################
# SPECIFY BACKUP AND RECOVERY OPTIONS #
# Out-of-box backup and recovery optionsfor the database can be mentioned #
# using the entries below. #
#安全及恢复设置(默认值即可)out-of-box(out-of-box experience)缩写为OOBE
#产品给用产品给用户良好第一印象和使用感受
###############################################################################
#------------------------------------------------------------------------------
# This variable is to be set to false ifautomated backup is not required. Else
# this can be set to true.设置自动备份,和OUI里的自动备份一样。
#------------------------------------------------------------------------------
#oracle.install.db.config.starterdb.automatedBackup.enable=false
#------------------------------------------------------------------------------
# Regardless of the type of storage that ischosen for backup and recovery, if
# automated backups are enabled, a job willbe scheduled to run daily at
# 2:00 AM to backup the database. This jobwill run as the operating system
# user that is specified in this variable.自动备份会启动一个job,指定启动JOB的系统用户ID
#------------------------------------------------------------------------------
#oracle.install.db.config.starterdb.automatedBackup.osuid=
#-------------------------------------------------------------------------------
# Regardless of the type of storage that ischosen for backup and recovery, if
# automated backups are enabled, a job willbe scheduled to run daily at
# 2:00 AM to backup the database. This jobwill run as the operating system user
# specified by the above entry. Thefollowing entry stores the password for the
# above operating system user.自动备份会开启一个job,需要指定OSUser的密码
#-------------------------------------------------------------------------------
#oracle.install.db.config.starterdb.automatedBackup.ospwd=
#-------------------------------------------------------------------------------
# Specify the type of storage to use forthe database.
# It can be one of the following:
# - FILE_SYSTEM_STORAGE
# - ASM_STORAGE
#自动备份,要求指定使用的文件系统存放数据库文件还是ASM
#------------------------------------------------------------------------------
oracle.install.db.config.starterdb.storageType=FILE_SYSTEM_STORAGE
#-------------------------------------------------------------------------------
# Specify the database file location whichis a directory for datafiles, control
# files, redo logs.
# Applicable only when oracle.install.db.config.starterdb.storage=FILE_SYSTEM
#使用文件系统存放数据库文件才需要指定数据文件、控制文件、Redo log的存放目录
#-------------------------------------------------------------------------------
oracle.install.db.config.starterdb.fileSystemStorage.dataLocation=/u01/app/oracle/fast_recovery_area
#-------------------------------------------------------------------------------
# Specify the backup and recovery location.
# Applicable only whenoracle.install.db.config.starterdb.storage=FILE_SYSTEM
#使用文件系统存放数据库文件才需要指定备份恢复目录
#-------------------------------------------------------------------------------
oracle.install.db.config.starterdb.fileSystemStorage.recoveryLocation=/u01/app/oracle/fast_recovery_area
#-------------------------------------------------------------------------------
# Specify the existing ASM disk groups tobe used for storage.
# Applicable only whenoracle.install.db.config.starterdb.storage=ASM
#使用ASM存放数据库文件才需要指定存放的磁盘组
#-------------------------------------------------------------------------------
#oracle.install.db.config.asm.diskGroup=
#-------------------------------------------------------------------------------
# Specify the password for ASMSNMP user ofthe ASM instance.
# Applicable only whenoracle.install.db.config.starterdb.storage=ASM_SYSTEM
#使用ASM存放数据库文件才需要指定ASM实例密码
#-------------------------------------------------------------------------------
#oracle.install.db.config.asm.ASMSNMPPassword=
#------------------------------------------------------------------------------
# Specify the My Oracle Support AccountUsername.
# Example :MYORACLESUPPORT_USERNAME=metalink
#指定metalink账户用户名
#------------------------------------------------------------------------------
#MYORACLESUPPORT_USERNAME=
#------------------------------------------------------------------------------
# Specify the My Oracle Support AccountUsername password.
# Example : MYORACLESUPPORT_PASSWORD=password
# 指定metalink账户密码
#------------------------------------------------------------------------------
#MYORACLESUPPORT_PASSWORD=
#------------------------------------------------------------------------------
# Specify whether to enable the user to setthe password for
# My Oracle Support credentials. The valuecan be either true or false.
# If left blank it will be assumed to befalse.
# Example : SECURITY_UPDATES_VIA_MYORACLESUPPORT=true
# 用户是否可以设置metalink密码
#------------------------------------------------------------------------------
SECURITY_UPDATES_VIA_MYORACLESUPPORT=false
#------------------------------------------------------------------------------
# Specify whether user wants to give anyproxy details for connection.
# The value can be either true or false. Ifleft blank it will be assumed to be false.
# Example : DECLINE_SECURITY_UPDATES=false
# False表示不需要设置安全更新,注意,在11.2的静默安装中疑似有一个BUG
# Response File中必须指定为true,否则会提示错误,不管是否正确填写了邮件地址
#------------------------------------------------------------------------------
DECLINE_SECURITY_UPDATES=true
#------------------------------------------------------------------------------
# Specify the Proxy server name. Lengthshould be greater than zero.
#代理服务器名
# Example : PROXY_HOST=proxy.domain.com
#------------------------------------------------------------------------------
#PROXY_HOST=
#------------------------------------------------------------------------------
# Specify the proxy port number. Should beNumeric and atleast 2 chars.
#代理服务器端口
# Example : PROXY_PORT=25
#------------------------------------------------------------------------------
#PROXY_PORT=
#------------------------------------------------------------------------------
# Specify the proxy user name. LeavePROXY_USER and PROXY_PWD
# blank if your proxy server requires noauthentication.
#代理服务器用户名
# Example : PROXY_USER=username
#------------------------------------------------------------------------------
#PROXY_USER=
#------------------------------------------------------------------------------
# Specify the proxy password. LeavePROXY_USER and PROXY_PWD
# blank if your proxy server requires noauthentication.
#代理服务器密码
# Example : PROXY_PWD=password
#------------------------------------------------------------------------------
#PROXY_PWD=
-----------------------------------------结尾-----------------------------------------------------
复制保存后进行重新执行静默安装命令即可,保证安装空间充足!!!
给新手的建议: 有问题的时候应该先自己思考,再去一一处理问题,对自己的提升会有很大的帮助!

 浙公网安备 33010602011771号