深度学习--风格迁移 原理以及实现--84
参考链接:https://blog.csdn.net/ssshyeong/article/details/127092354
1. 简介
Image Style Transfer Using Convolutional Neural Networks:Gram矩阵(CVPR2016)
链接
Texture Synthesis Using Convolutional Neural Networks
图像经过卷积层后得到的特征图的协方差矩阵可以很好地表征图像的纹理特征,但是会损失位置信息。
纹理特征--风格特征
不过在风格迁移的任务中,我们可以忽略位置信息损失这个缺点,只需要找到一个方法可以表征图像的纹理信息,并把它这些纹理信息迁移到需要被风格迁移的图像中,完成风格迁移的任务;
而现在,利用协方差矩阵可以得到纹理信息,我们就可以完成风格迁移。
协方差是一个二阶的统计信息,这里使用Gram matrix来代替协方差矩阵----(其实就是没有减去均值的协方差矩阵)
理解(重点):假设图片经过某层卷积层后得到了[height, width, channel]的特征图,为了进行Gram matrix的操作,需要将特征图进行flatten,
得到 F=[heightwidth, channel] 的特征图,那么这里的G=F.transpose F, 得到size为[channel, channel]的G矩阵,表达特征图里面的自相关。
Gram matrix 的表达式:
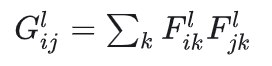
从直观上理解  记录了特征图的值,
如果两列都是比较大的值(风格特征明显),那么相乘之后的响应也会变大(即风格得到了放大);
相反则是比较小的值,根本不需要管,于是我们的G就记录了图片的风格信息。

上面的图片是风格图,下面的是内容图,各自作为输入,经过VGG19网络(或者VGG16网络),得到各层卷积层的特征图,
从下半部分看到,层数越浅,记录内容图的特征图越具体,越深则越抽象;
从上半部分(风格图)角度来说,越浅层的特征图则记录着颜色纹理等信息,而越深的层得到的特征图则会记录更高级的信息。
Gram matrix这个过程:越浅层的特征图,得到的风格表示矩阵的size非常小,是因为还没有经过很多卷积操作,还没有将特征图的通道数增加,而我们的结论是Gram matrix最后的size表示为[channel, channel],这就与我们的结论一致。
为了实现风格迁移,我们需要得到内容图和风格图各自经过VGG网络后得到的各层特征图,这将是计算损失函数的重要参考。
2. 损失函数

内容损失:

内容图(content),生成图(target)经过卷积层生成的特征图,
把他们两个作差并平方求和(不仅记录一层卷积层特征图的差异),使生成图的特征图越接近于内容图的特征图,这样就可以保留内容信息。
一般来说,可选择比较浅的层数但别选第一层得到的特征图,因为这样会过于保留内容导致风格信息无法融入到特征图中。
一般也只是选择两到三层作为内容损失函数。内容损失并没有用到Gram matrix。
风格损失:

生成图和风格图经过卷积层得到的特征图、然后自相关得到的Gram matrix。一样用平方误差作为损失函数来使两者接近。
生成图的size和内容图的size一致(因为风格是要迁移到内容图上),生成图初始化是一个高斯白噪声的图片,它经过VGG网络后同样也生成了特征图,它既要与内容图生成的特征图计算内容损失,也要和风格图生成的Gram matrix计算风格损失,而每次前向传播得到的loss,终将反馈到它自身,然后它开始变化、接近于我们想要的结果,
即这个风格迁移的网络其实并不需要训练网络结构内的任何权重参数,需要训练的是生成图里面的元素(在tensorflow里就是tf.Variable初始化的是生成图,而不是任何weight)。
得到生成图的过程时间花费长,训练过程就是生成过程,跟以往的神经网络不太一样——一般是训练好之后网络模型可以立即投入使用,
所以2017年又有新的一篇文章描述快速风格迁移:Perceptual Losses for Real-Time Style Transfer and Super-Resolution。
3. 实现
import tensorflow as tf
import numpy as np
import PIL.Image
import matplotlib.pyplot as plt
import IPython.display as display


# 将Tensor转换为PIL图像
def tensor_to_image(tensor):
    tensor = tensor * 255
    tensor = np.array(tensor, dtype=np.uint8)
    if np.ndim(tensor)>3:
        assert tensor.shape[0] == 1
        tensor = tensor[0]
    return PIL.Image.fromarray(tensor)


# 加载内容图像和风格图像
def load_img(path_to_img):
    max_dim = 512
    img = tf.io.read_file(path_to_img)
    img = tf.image.decode_image(img, channels=3)
    img = tf.image.convert_image_dtype(img, tf.float32)

    shape = tf.cast(tf.shape(img)[:-1], tf.float32)
    long_dim = max(shape)
    scale = max_dim / long_dim

    new_shape = tf.cast(shape * scale, tf.int32)

    img = tf.image.resize(img, new_shape)
    img = img[tf.newaxis, :]
    return img


# 显示图像
def imshow(image, title=None):
    if len(image.shape) > 3:
        image = tf.squeeze(image, axis=0)

    plt.imshow(image)
    if title:
        plt.title(title)


def gram_matrix(input_tensor):
    print(tf.shape(input_tensor))
    # 计算 Gram 矩阵
    result = tf.linalg.einsum('ijc,ijd->cd', input_tensor, input_tensor)
    # 获取特征映射的形状
    input_shape = tf.shape(input_tensor)
    # 计算特征映射的元素数量
    num_locations = tf.cast(input_shape[0] * input_shape[1], tf.float32)
    # 归一化 Gram 矩阵
    return result / num_locations


# 扩展维度以匹配预期输入
class StyleContentModel(tf.keras.models.Model):
    def __init__(self, style_layers, content_layers):
        super(StyleContentModel, self).__init__()
        self.vgg = tf.keras.applications.VGG19(include_top=False, weights='imagenet')
        self.vgg.trainable = False
        self.style_layers = style_layers
        self.content_layers = content_layers
        self.num_style_layers = len(style_layers)
        self.vgg.save_weights('vgg_weights.h5')

    def call(self, inputs):
        "Expects float input in [0,1]"
        inputs = inputs * 255.0
        preprocessed_input = tf.keras.applications.vgg19.preprocess_input(inputs)
        outputs = self.vgg(preprocessed_input)
        style_outputs, content_outputs = (outputs[:self.num_style_layers], outputs[self.num_style_layers:])

        style_outputs = [gram_matrix(style_output)
                         for style_output in style_outputs]

        content_dict = {content_name: value
                        for content_name, value
                        in zip(self.content_layers, content_outputs)}

        style_dict = {style_name: value
                      for style_name, value
                      in zip(self.style_layers, style_outputs)}

        return {'content': content_dict, 'style': style_dict}


# 计算总损失
def compute_loss(outputs, style_targets, content_targets, style_weight, content_weight):
    style_outputs = outputs['style']
    content_outputs = outputs['content']
    style_loss = tf.add_n([tf.reduce_mean((style_outputs[name] - style_targets[name]) ** 2)
                           for name in style_outputs.keys()])
    style_loss *= style_weight / len(style_layers)

    content_loss = tf.add_n([tf.reduce_mean((content_outputs[name] - content_targets[name]) ** 2)
                             for name in content_outputs.keys()])
    content_loss *= content_weight / len(content_layers)
    loss = style_loss + content_loss
    return loss


@tf.function()
def train_step(image, extractor, optimizer, style_targets, content_targets, style_weight, content_weight):
    with tf.GradientTape() as tape:
        outputs = extractor(image)
        loss = compute_loss(outputs, style_targets, content_targets, style_weight, content_weight)

    grad = tape.gradient(loss, image)
    optimizer.apply_gradients([(grad, image)])
    image.assign(tf.clip_by_value(image, clip_value_min=0.0, clip_value_max=1.0))


# 加载内容和风格图像
content_path = tf.keras.utils.get_file('YellowLabradorLooking_new.jpg',
                                       'https://storage.googleapis.com/download.tensorflow.org/example_images/YellowLabradorLooking_new.jpg')
style_path = tf.keras.utils.get_file('kandinsky5.jpg',
                                     'https://storage.googleapis.com/download.tensorflow.org/example_images/Vassily_Kandinsky%2C_1913_-_Composition_7.jpg')

content_image = load_img(content_path)
style_image = load_img(style_path)

# 显示内容和风格图像
plt.subplot(1, 2, 1)
imshow(content_image, 'Content Image')

plt.subplot(1, 2, 2)
imshow(style_image, 'Style Image')

# 定义层名称
content_layers = ['block5_conv2']

style_layers = ['block1_conv1',
                'block2_conv1',
                'block3_conv1',
                'block4_conv1',
                'block5_conv1']

num_content_layers = len(content_layers)
num_style_layers = len(style_layers)

# 创建模型
extractor = StyleContentModel(style_layers, content_layers)

# 计算风格和内容目标值
style_targets = extractor(style_image)['style']
content_targets = extractor(content_image)['content']

# 定义优化器
optimizer = tf.optimizers.Adam(learning_rate=0.02, beta_1=0.99, epsilon=1e-1)

# 定义风格权重和内容权重
style_weight = 1e-2
content_weight = 1e4

# 创建一张空白图像作为目标图像
target_image = tf.Variable(content_image)

# 训练模型
epochs = 10
steps_per_epoch = 100

step = 0
for n in range(epochs):
    for m in range(steps_per_epoch):
        step += 1
        train_step(target_image, extractor, optimizer, style_targets, content_targets, style_weight, content_weight)
        print(".", end='')
    display.clear_output(wait=True)
    display.display(tensor_to_image(target_image))
    print("Train step: {}".format(step))

# 显示最终的风格迁移图像
plt.figure(figsize=(10, 5))
imshow(target_image, 'Stylized Image')


【推荐】国内首个AI IDE,深度理解中文开发场景,立即下载体验Trae
【推荐】编程新体验,更懂你的AI,立即体验豆包MarsCode编程助手
【推荐】抖音旗下AI助手豆包,你的智能百科全书,全免费不限次数
【推荐】轻量又高性能的 SSH 工具 IShell:AI 加持,快人一步
· 震惊!C++程序真的从main开始吗?99%的程序员都答错了
· winform 绘制太阳,地球,月球 运作规律
· 【硬核科普】Trae如何「偷看」你的代码?零基础破解AI编程运行原理
· 上周热点回顾(3.3-3.9)
· 超详细:普通电脑也行Windows部署deepseek R1训练数据并当服务器共享给他人