深度学习-卷积神经网络--Unet训练推理-60
目录
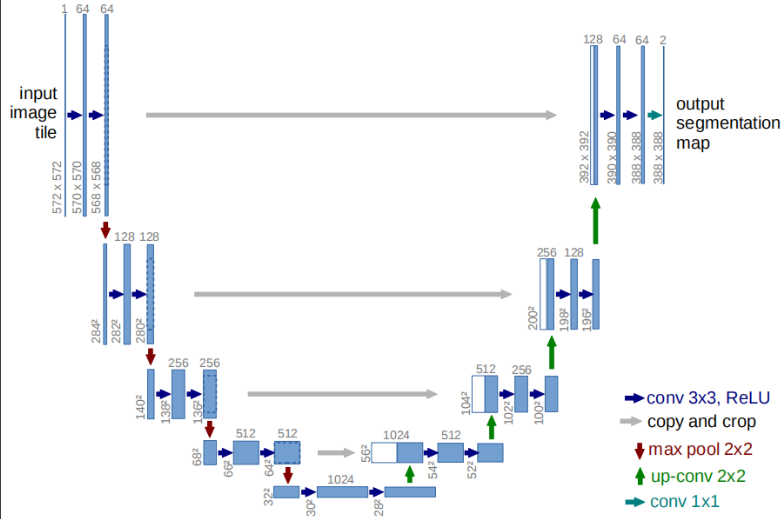
网络结构
import tensorflow as tf
import os
import sys
import numpy as np
from tqdm import tqdm
from itertools import chain
from skimage.io import imread, imshow
from skimage.transform import resize
import random
import matplotlib.pyplot as plt
print(tf.__version__)
"""
tf.enable_eager_execution() 方法是用来启用 TensorFlow 的动态图机制的。在 TensorFlow 的早期版本中,
TensorFlow 的计算图是静态的,需要先定义计算图,然后再运行计算图。而动态图机制则是在运行时动态地构建计算图,
这使得 TensorFlow 更加易于使用和调试。
启用动态图机制后,TensorFlow 可以像普通 Python 代码一样执行计算,同时也可以使用 TensorFlow 提供的各种 API 和工具来构建和训练模型。
此外,动态图机制还支持更灵活的控制流和条件语句,使得模型的定义更加自由和灵活。
TensorFlow2.0中将对部分机制做出重大调整,其中之一就是将原有的静态图机制调整为动态图机制,
这将使得TensorFlow更加灵活和易用,在2.0版本到来之前,我们可以通过 tf.enable_eager_execution() 方法来启用动态图机制
"""
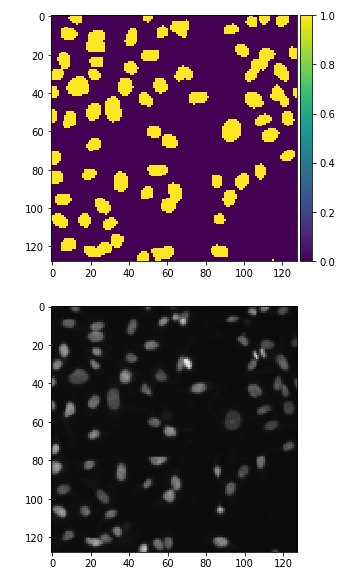
IMG_WIDTH = 128
IMG_HEIGHT = 128
IMG_CHANNELS = 3
DATA_PATH = 'stage1_train/'
seed = 42
random.seed = seed
np.random.seed = seed
image_ids = next(os.walk(DATA_PATH))[1]
# X Y的初始化
X = np.zeros((len(image_ids), IMG_HEIGHT, IMG_WIDTH, IMG_CHANNELS), dtype=np.uint8)
Y = np.zeros((len(image_ids), IMG_HEIGHT, IMG_WIDTH, 1), dtype=np.bool) # 就是一个单通道的 image
# tqdm 是一个 Python 库,用于进度条的可视化,可以用于在 Python 程序中显示进度。
# 在这个特定的代码中,tqdm 被用来显示在循环中的进度。
# 具体来说,代码中的`enumerate(image_ids)`会返回一个可迭代的对象,每次迭代都会返回一个索引和对应的元素。
# `tqdm(enumerate(image_ids), total=len(image_ids))`会将这个可迭代对象和总数作为参数传递给`tqdm`函数,
# 然后`tqdm`函数会返回一个进度条的可视化对象,可以用来显示循环的进度。
# 在这个特定的代码中,进度条会显示每次迭代的索引和总数,以及当前迭代的进度。
for n, id_ in tqdm(enumerate(image_ids), total=len(image_ids)):
path = DATA_PATH + id_
img = imread(path + '/images/' + id_ + '.png')[:, :, :IMG_CHANNELS]
img = resize(img, (IMG_HEIGHT, IMG_WIDTH), mode='constant',
preserve_range=True)
X[n] = img
mask = np.zeros((IMG_HEIGHT, IMG_WIDTH, 1), dtype=np.bool)
for mask_file in next(os.walk(path + '/masks/'))[2]:
mask_ = imread(path + '/masks/' + mask_file)
mask_ = np.expand_dims(resize(mask_, (IMG_HEIGHT, IMG_WIDTH), mode='constant',
preserve_range=True), axis=-1)
mask = np.maximum(mask, mask_) # 读取该图像对应的所有掩膜数据,并将它们合并成一个掩膜图像 初始值全部为0 maximum则会将新的mask_ 加上去
Y[n] = mask
x_train = X
y_train = Y
"""
读取图像数据和对应的掩膜数据,并将它们存储在X和Y数组中,以便用于训练图像分割模型。具体来说,它做了以下几个步骤:
读取数据路径下的所有图像id,并将它们存储在image_ids数组中。
对于每个图像id,读取该图像的原始数据,并将其调整为指定的高度和宽度,存储在X数组中。
对于每个图像id,读取该图像对应的所有掩膜数据,并将它们合并成一个掩膜图像,存储在Y数组中。
最后,将X和Y数组分别存储在x_train和y_train变量中,以便用于训练模型。
"""
# 注意 这一行
tf.keras.layers.Concatenate(axis=-1)
# Build U-Net model
inputs = tf.keras.layers.Input((IMG_HEIGHT, IMG_WIDTH, IMG_CHANNELS))
s = tf.keras.layers.Lambda(lambda x: x / 255)(inputs)
c1 = tf.keras.layers.Conv2D(16, (3, 3), activation=tf.keras.activations.elu,
kernel_initializer='he_normal',
padding='same')(s)
c1 = tf.keras.layers.Dropout(0.1)(c1)
c1 = tf.keras.layers.Conv2D(16, (3, 3), activation=tf.keras.activations.elu,
kernel_initializer='he_normal',
padding='same')(c1)
p1 = tf.keras.layers.MaxPooling2D((2, 2))(c1)
c2 = tf.keras.layers.Conv2D(32, (3, 3), activation=tf.keras.activations.elu,
kernel_initializer='he_normal',
padding='same')(p1)
c2 = tf.keras.layers.Dropout(0.1)(c2)
c2 = tf.keras.layers.Conv2D(32, (3, 3), activation=tf.keras.activations.elu,
kernel_initializer='he_normal',
padding='same')(c2)
p2 = tf.keras.layers.MaxPooling2D((2, 2))(c2)
c3 = tf.keras.layers.Conv2D(64, (3, 3), activation=tf.keras.activations.elu,
kernel_initializer='he_normal',
padding='same')(p2)
c3 = tf.keras.layers.Dropout(0.2)(c3)
c3 = tf.keras.layers.Conv2D(64, (3, 3), activation=tf.keras.activations.elu,
kernel_initializer='he_normal',
padding='same')(c3)
p3 = tf.keras.layers.MaxPooling2D((2, 2))(c3)
c4 = tf.keras.layers.Conv2D(128, (3, 3), activation=tf.keras.activations.elu,
kernel_initializer='he_normal',
padding='same')(p3)
c4 = tf.keras.layers.Dropout(0.2)(c4)
c4 = tf.keras.layers.Conv2D(128, (3, 3), activation=tf.keras.activations.elu,
kernel_initializer='he_normal',
padding='same')(c4)
p4 = tf.keras.layers.MaxPooling2D(pool_size=(2, 2))(c4)
c5 = tf.keras.layers.Conv2D(256, (3, 3), activation=tf.keras.activations.elu,
kernel_initializer='he_normal',
padding='same')(p4)
c5 = tf.keras.layers.Dropout(0.3)(c5)
c5 = tf.keras.layers.Conv2D(256, (3, 3), activation=tf.keras.activations.elu,
kernel_initializer='he_normal',
padding='same')(c5)
u6 = tf.keras.layers.Conv2DTranspose(128, (2, 2), strides=(2, 2),
padding='same')(c5)
# 上采样之后与拼接 再接两次卷积
u6 = tf.keras.layers.concatenate([u6, c4])
c6 = tf.keras.layers.Conv2D(128, (3, 3), activation=tf.keras.activations.elu,
kernel_initializer='he_normal',
padding='same')(u6)
c6 = tf.keras.layers.Dropout(0.2)(c6)
c6 = tf.keras.layers.Conv2D(128, (3, 3), activation=tf.keras.activations.elu,
kernel_initializer='he_normal',
padding='same')(c6)
u7 = tf.keras.layers.Conv2DTranspose(64, (2, 2), strides=(2, 2),
padding='same')(c6)
u7 = tf.keras.layers.concatenate([u7, c3])
c7 = tf.keras.layers.Conv2D(64, (3, 3), activation=tf.keras.activations.elu,
kernel_initializer='he_normal',
padding='same')(u7)
c7 = tf.keras.layers.Dropout(0.2)(c7)
c7 = tf.keras.layers.Conv2D(64, (3, 3), activation=tf.keras.activations.elu,
kernel_initializer='he_normal',
padding='same')(c7)
u8 = tf.keras.layers.Conv2DTranspose(32, (2, 2), strides=(2, 2),
padding='same')(c7)
u8 = tf.keras.layers.concatenate([u8, c2])
c8 = tf.keras.layers.Conv2D(32, (3, 3), activation=tf.keras.activations.elu,
kernel_initializer='he_normal',
padding='same')(u8)
c8 = tf.keras.layers.Dropout(0.1)(c8)
c8 = tf.keras.layers.Conv2D(32, (3, 3), activation=tf.keras.activations.elu,
kernel_initializer='he_normal',
padding='same')(c8)
u9 = tf.keras.layers.Conv2DTranspose(16, (2, 2), strides=(2, 2),
padding='same')(c8)
u9 = tf.keras.layers.concatenate([u9, c1], axis=3)
c9 = tf.keras.layers.Conv2D(16, (3, 3), activation=tf.keras.activations.elu,
kernel_initializer='he_normal',
padding='same')(u9)
c9 = tf.keras.layers.Dropout(0.1)(c9)
c9 = tf.keras.layers.Conv2D(16, (3, 3), activation=tf.keras.activations.elu,
kernel_initializer='he_normal',
padding='same')(c9)
# 最后接一个1*1卷积 sigmoid输出 每一个像素点是检测对象 不是检测对象
outputs = tf.keras.layers.Conv2D(1, (1, 1), activation='sigmoid')(c9)
model = tf.keras.Model(inputs=[inputs], outputs=[outputs])
model.compile(optimizer='adam', loss='binary_crossentropy',
metrics=['accuracy'])
model.summary()
checkpoint_path = "training_1/cp.ckpt"
checkpoint_dir = os.path.dirname(checkpoint_path)
# Create checkpoint callback
cp_callback = tf.keras.callbacks.ModelCheckpoint(checkpoint_path,
save_weights_only=True,
verbose=1)
callbacks = [
tf.keras.callbacks.EarlyStopping(patience=2, monitor='val_loss'),
tf.keras.callbacks.TensorBoard(log_dir='./logs'), # 打印日志
cp_callback # 保存中间训练结果
]
# 训练
results = model.fit(x_train, y_train, validation_split=0.1, batch_size=16, epochs=20,
callbacks=callbacks)
# 模型的推理使用
idx = random.randint(0, len(x_train) - 1)
x = np.array(x_train[idx])
x = np.expand_dims(x, axis=0)
predict = model.predict(x, verbose=1)
predict = (predict > 0.5).astype(np.uint8)
imshow(np.squeeze(predict[0]))
plt.show()
imshow(x_train[idx])
plt.show()

 浙公网安备 33010602011771号