深度学习-卷积神经网络--上采样 转置卷积-58
上采样
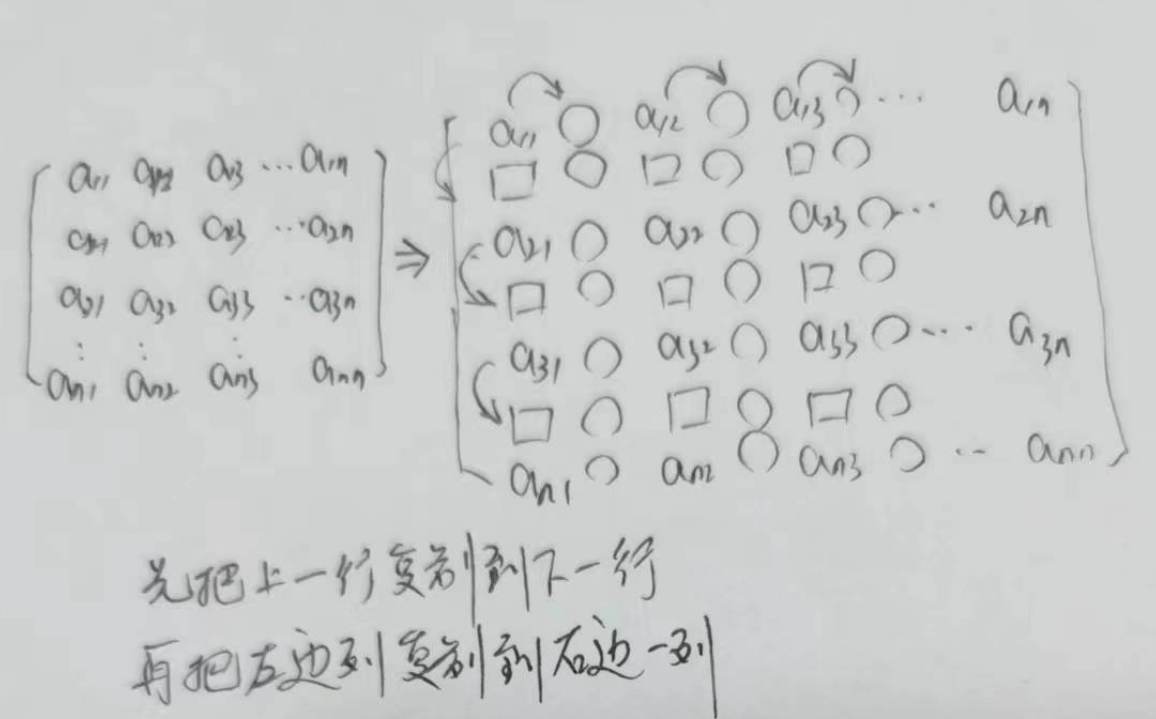
1. copy实现
2. 线性差值
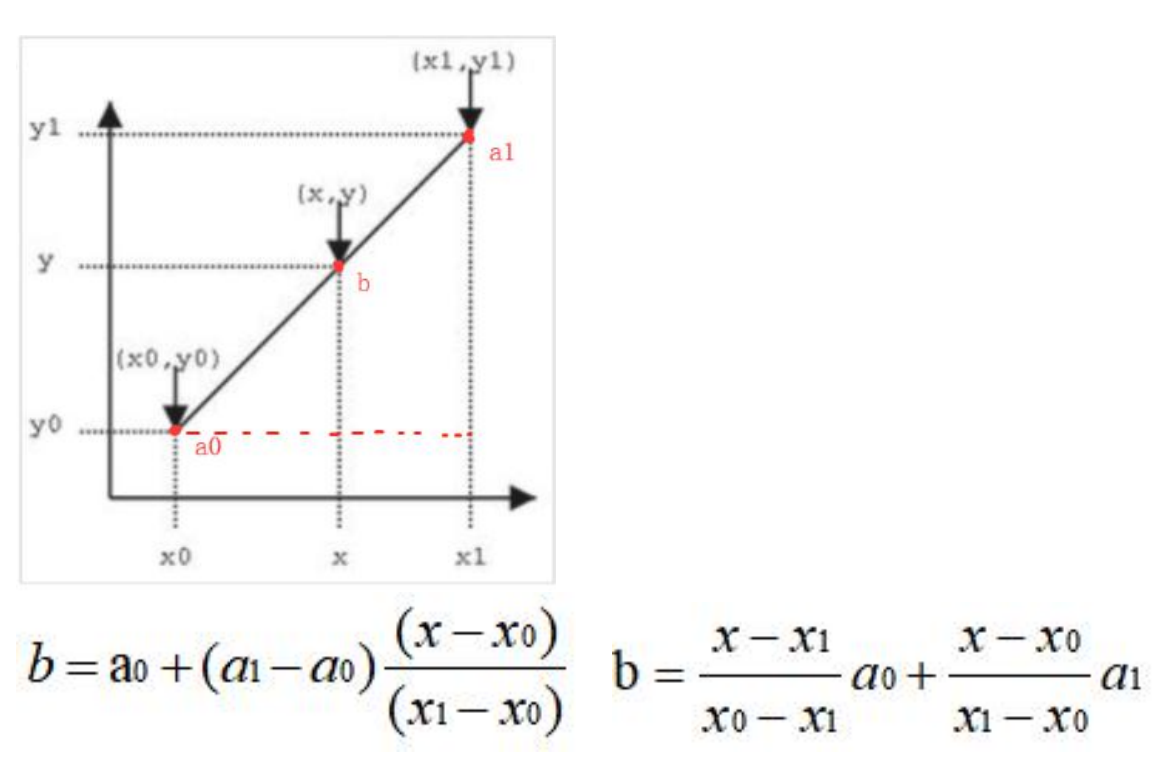
又称为双线性内插。在数学上,双线性插值是有两个变量的插值函数的线性插值扩展,
其核心思想是在两个方向分别进行一次线性插值
双线性差值
首先在 x 方向进行线性插值,得到:

然后在 y 方向进行线性插值,得到

最后得到:

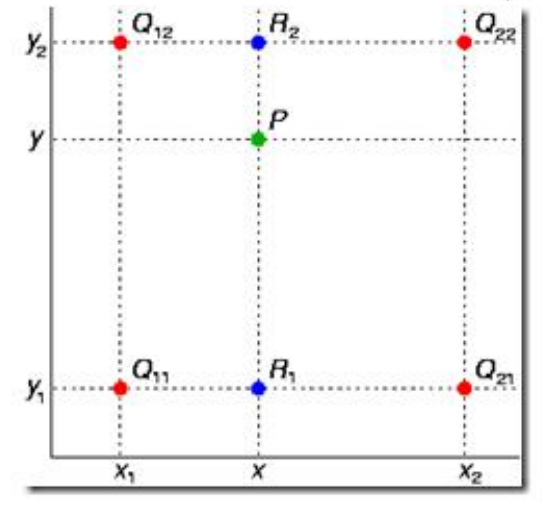
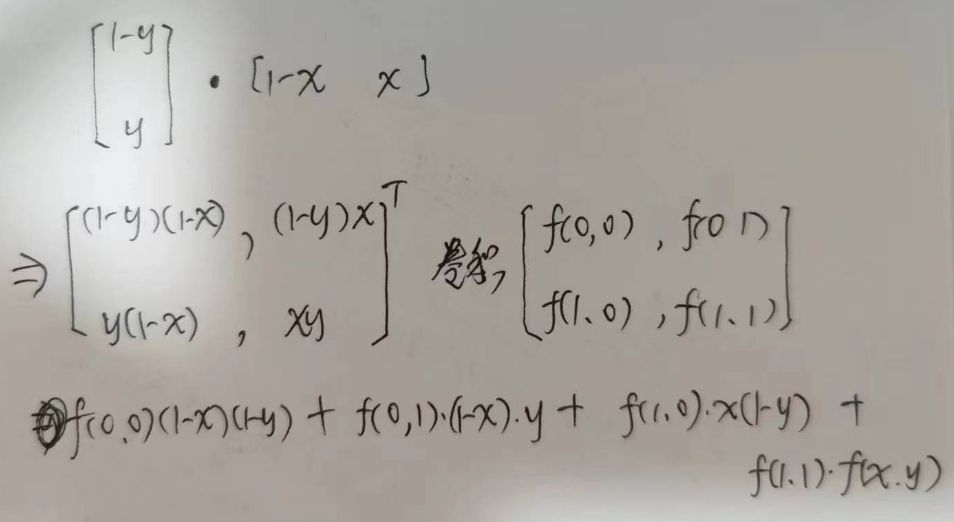
如果选择一个坐标系统使得 f 的四个已知点坐标分别为 (0, 0)、(0, 1)、(1, 0) 和 (1, 1),那么插值公式就可以化简为

矩阵表示:

卷积表示:
3. 转置卷积
参考: https://blog.csdn.net/qq_37541097/article/details/120709865
import tensorflow as tf
import numpy as np
from skimage.io import imread, imshow, show

# 输入:1张图片,尺寸28*28 高宽,通道数3
# x = np.ones((1, 28, 28, 3), dtype=np.float32)
x = imread('./MNIST_data_bak/raw/mnist_train_0.jpg')
imshow(x)
show()
x = x.astype('float32')
x = x[:, :, 0]
x = tf.reshape(x, (1, 28, 28, 1))

# 卷积核尺寸4x4 ,5表输出通道数,3代表输入通道数
# w = np.ones((4, 4, 5, 3), dtype=np.float32)
w = np.ones((4, 4, 1, 1), dtype=np.float32)
# 扩大2倍
output = tf.nn.conv2d_transpose(x, w, (1, 56, 56, 1), [1, 2, 2, 1], padding='SAME')

with tf.Session() as sess:
    m = sess.run(output)
    print(m.shape)

imshow(m[0, :, :, 0].astype('uint8'))
show()
from tensorflow.examples.tutorials.mnist import input_data
from matplotlib import image
import os

# 读取MNIST数据集。如果不存在会事先下载。
mnist = input_data.read_data_sets("MNIST_data_bak/", one_hot=True)

# 我们把原始图片保存在MNIST_data/raw/文件夹下
# 如果没有这个文件夹会自动创建
save_dir = 'MNIST_data_bak/raw/'
if os.path.exists(save_dir) is False:
    os.makedirs(save_dir)

# 保存前20张图片
for i in range(20):
    # 请注意,mnist.train.images[i, :]就表示第i张图片(序号从0开始)
    image_array = mnist.train.images[i, :]
    # TensorFlow中的MNIST图片是一个784维的向量,我们重新把它还原为28x28维的图像。
    image_array = image_array.reshape(28, 28)
    # 保存文件的格式为 mnist_train_0.jpg, mnist_train_1.jpg, ... ,mnist_train_19.jpg
    filename = save_dir + 'mnist_train_%d.jpg' % i
    # 将image_array保存为图片
    # 先用scipy.misc.toimage转换为图像,再调用save直接保存。
    # scipy.misc.toimage(image_array, cmin=0.0, cmax=1.0).save(filename) #已弃用
    image.imsave(filename, image_array, cmap='gray')  # 存成三个通道


print('Please check: %s ' % save_dir)
import tensorflow as tf
import numpy as np
from skimage.io import imshow, imread, show


def produce_image():
    ori_image = imread('./MNIST_data_bak/raw/mnist_train_0.jpg')
    print(type(ori_image))
    print(ori_image.shape)
    imshow(ori_image)
    show()
    return ori_image[:, :, 0]  # 只取一个通道


def upsample_filt(size):
    '''
    生成一个 size*size的方阵 中心点值为1
    [[0.11111111 0.22222222 0.33333333 0.22222222 0.11111111]
     [0.22222222 0.44444444 0.66666667 0.44444444 0.22222222]
     [0.33333333 0.66666667 1.         0.66666667 0.33333333]
     [0.22222222 0.44444444 0.66666667 0.44444444 0.22222222]
     [0.11111111 0.22222222 0.33333333 0.22222222 0.11111111]]

    :param size:
    :return:
    '''
    factor = (size + 1) // 2  # 宽度的1/2
    print('factor: %s' % factor)
    if size % 2 == 1:
        center = factor - 1
    else:
        center = factor - 0.5
    print('center: %s' % center)
    og = np.ogrid[:size, :size]
    '''
    [array([[0],
       [1],
       [2],
       [3],
       [4]]), array([[0, 1, 2, 3, 4]])]
    '''

    print(og[0])
    '''
    [[0]
     [1]
     [2]
     [3]
     [4]]
    '''

    print(og[1])
    '''
    [[0 1 2 3 4]]
    '''

    y_relate_dist = (1 - abs(og[0] - center) / factor)
    print(y_relate_dist)  # 竖直方向举例中心的相对距离
    '''
    [[0.33333333]
     [0.66666667]
     [1.        ]
     [0.66666667]
     [0.33333333]]
    '''
    x_relate_dist = (1 - abs(og[1] - center) / factor)
    print(x_relate_dist)  # 水平方向距离中心的相对距离
    '''
    [[0.33333333 0.66666667 1.         0.66666667 0.33333333]]
    '''

    return y_relate_dist * x_relate_dist  # 广播后对应位置相乘  二维 相对中心点的距离


# 进行上采样卷积核
def bilinear_upsample_weights(kernel_size, channels):
    print('filter_size: %s' % kernel_size)
    w = np.zeros((kernel_size, kernel_size,
                  channels, channels), dtype=np.float32)
    upsample_kernel = upsample_filt(kernel_size)
    print(upsample_kernel)
    for i in range(channels):
        w[:, :, i, i] = upsample_kernel
    return w


def upsampling_bilinear():
    return bilinear_upsample_weights(2, 1)


if __name__ == '__main__':
    image = produce_image()
    img = tf.cast(image, dtype=tf.float32)  # numpy的数据类型转换成 tf.float32
    img = tf.reshape(img, (1, 28, 28, 1))  # 扩展成m*h*w*c
    # 产生卷积核
    kerenel = upsampling_bilinear()

    # 反卷积处理
    # img: 1*28*28*1  NHWC
    # kernel: 2*2*1*1   HW*out_channel*in_channel
    # output_shape: the output shape of the deconvolution op.

    # strides=[1, 2, 2, 1]
    # N H W C 四个方向 NC 一般是1  H-1 W-1为填充0的值的个数 再做stride=1正常的卷积
    # HM取2 则会填充1个 --> 原图*2    HM取3 则会填充2个 原图*3  所以HM也就是原图放大的倍数

    res = tf.nn.conv2d_transpose(img, kerenel, output_shape=[1, 56, 56, 1], strides=[1, 2, 2, 1], padding='SAME')
    with tf.Session() as sess:
        img = sess.run(res)
    imshow(img[0, :, :, 0].astype('uint8'))
    show()

 浙公网安备 33010602011771号