
git的使用
在工作中,有的开发弄分支,代码不更新,最后合并代码时,与主线产生很多冲突,为了避免冲突问题过多,
尽量保持自己的代码与主线同步,这样不但可以减少冲突,在出现冲突时,也可以更早,更快的解决。
1、创建新分支
git branch test
2、切换分支
git checkout test
3、创建新分支并切换到新分支
git checkout -b test

命令相当于:

git branch test

git checkout test
4、将本地分支代码推送到远程分支
git push origin test

在本地新创建分支后,须将本地分支推送到远程本地分支,然后再执行分支关联操作,

创建本地分支后,马上使用git push命令,执照提示使用此命令关联远程分支:git push --set-upstream origin test
5、新建的本地分支与远程分支关联
# 可以根据提示操作。一般新创建本地分支后,马上git push到远程,会提示使用下面第一个命令关联分支即可。

$git push --set-upstream origin test

$git branch --set-upstream test origin/test

$git branch --set-upstream-to=origin/<branch> test

在本地新建分支后,必须要做远程分支关联。比如:本地新创建了test分支,就要使用此命令跟远程分支origin/test做关联,
否则,git pull 和 git push代码时,会报错。
6、查看当前分支、本地分支
git branch
7、查看远程分支
git branch –r
8、查看所有分支
git branch –a
9、删除本地分支
git branch -d test
或者
git branch -D test
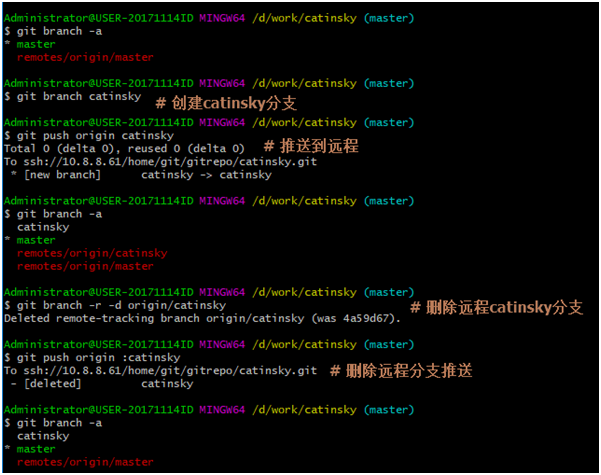
10、删除远程分支
两条命令:

$git branch -r -d origin/test

$git push origin :test

# 删除分支后,一定要使用git push origin :test命令。

# 删除掉远程分支后,在其他的git客户端,使用git branch –a还是可以看到删除的分支存在。

使用以下两条命令可以完全清除:

使用命令 git remote show origin 可以查看分支信息。

根据提示,使用 git remote prune origin 命令清除删除的远程分支。

至此,才可以彻底删除分支,不然git pull被删的分支又回来了。
11、保持本地分支代码与主线最新
# 可以合并别人的分支到我的分支。即分支与分支之间的合并。

# 在日常工作中,一般经常将主线master代码合并到自己的分支,当自己分支的项目代码完成后,再合并到主线,再推送代码到远程主线。

方法一:

    在本地分支,拉远程主线的代码。合并前先git pull,合并合再git push。

$ git pull origin master   #在分支操作,将远程master主线代码合并到当前分支

$ git push # 合并后如果有冲突,会提示。如果有冲突,会报错,然后处理冲突。

方法二:

    在本地分支,拉远程主线的代码。合并前先git pull。

$ git merge <branch>        #合并指定分支到当前分支
$ git push     # 合并代码后,一定要git push推送到远程分支
例如: git merge origin/master #合并远程主线代码到当前分支,合并之前,先git pull,合并之后再git push。如有冲突,解决冲突后git push。

    这样就可以保持本地分支的代码与主线同步,且优先于主线,因为本地分支的代码未合并到主线。当本地分支项目完成后,再合并直主线,再推送代码,测试后上生产。
12、操作示例
[root@git catinsky]# git branch        # 查看本地分支

* master

[root@git catinsky]# git branch -a # 查看远程分支

* master

  remotes/origin/master

[root@git catinsky]# git branch cat   # 创建本地分支

[root@git catinsky]# git branch -a # 查看远程分支,此时没有远程cat分支

  cat

* master

  remotes/origin/master

[root@git catinsky]# git checkout cat   # 切换到cat分支

Switched to branch 'cat'

[root@git catinsky]# ll

total 0

-rw-r--r--. 1 root root 0 Aug  7 03:53 win10.txt

[root@git catinsky]# touch vmware.txt

[root@git catinsky]# git add .

[root@git catinsky]# git commit -m "vmware增加文件"


*** Please tell me who you are.


Run


  git config --global user.email "you@example.com"

  git config --global user.name "Your Name"


to set your account's default identity.

Omit --global to set the identity only in this repository.


fatal: unable to auto-detect email address (got 'root@git.(none)')

[root@git catinsky]# git config --global user.email "vmware@gmail.com"

[root@git catinsky]# git config --global user.name "虚拟机"

[root@git catinsky]# git commit -m "vmware增加文件"

[cat 406b026] vmware增加文件

 1 file changed, 0 insertions(+), 0 deletions(-)

 create mode 100644 vmware.txt

[root@git catinsky]# git push   # 推送代码到远程,提示设置

warning: push.default is unset; its implicit value is changing in

Git 2.0 from 'matching' to 'simple'. To squelch this message

and maintain the current behavior after the default changes, use:


  git config --global push.default matching


To squelch this message and adopt the new behavior now, use:


  git config --global push.default simple


See 'git help config' and search for 'push.default' for further information.

(the 'simple' mode was introduced in Git 1.7.11. Use the similar mode

'current' instead of 'simple' if you sometimes use older versions of Git)


Everything up-to-date

[root@git catinsky]# git config --global push.default simple

[root@git catinsky]# git push   # 提示设置远程关联分支

fatal: The current branch cat has no upstream branch.

To push the current branch and set the remote as upstream, use


    git push --set-upstream origin cat


[root@git catinsky]# git push --set-upstream origin cat

Counting objects: 3, done.

Compressing objects: 100% (2/2), done.

Writing objects: 100% (2/2), 262 bytes | 0 bytes/s, done.

Total 2 (delta 0), reused 0 (delta 0)

To ssh://git@10.8.8.61/home/git/gitrepo/catinsky.git

 * [new branch]      cat -> cat

Branch cat set up to track remote branch cat from origin.

[root@git catinsky]# git branch –a

* cat

  master

  remotes/origin/cat

  remotes/origin/master

[root@git catinsky]# git pull

Already up-to-date.

至此,新建分支,推送、拉取代码,关联远程分支,设置邮箱、名称等已完成。

下面演示删除远程分支后,使用git branch –a还是可以查看到,然后使用清除命令:

在win10客户端创建分支,删除,然后在linux客户端查看分支:
上图已经做了删除操作,现在在Linux客户端查看远程分支是否存在。

[root@git catinsky]# git branch -a

* master

  remotes/origin/cat2

  remotes/origin/catinsky

  remotes/origin/master

[root@git catinsky]# git remote show origin

* remote origin

  Fetch URL: ssh://git@10.8.8.61/home/git/gitrepo/catinsky.git

  Push  URL: ssh://git@10.8.8.61/home/git/gitrepo/catinsky.git

  HEAD branch: master

  Remote branches:

    master                       tracked

    refs/remotes/origin/cat2     stale (use 'git remote prune' to remove)

    refs/remotes/origin/catinsky stale (use 'git remote prune' to remove)

  Local branch configured for 'git pull':

    master merges with remote master

  Local ref configured for 'git push':

    master pushes to master (up to date)

[root@git catinsky]# git remote prune origin

Pruning origin

URL: ssh://git@10.8.8.61/home/git/gitrepo/catinsky.git

 * [pruned] origin/cat2

 * [pruned] origin/catinsky

[root@git catinsky]# git branch -a

* master

  remotes/origin/master

已经删除成功!

[root@gitlab gitlab_t1]# git merge origin/master # 合并主线代码到当前分支

Updating 489ec68..33aee32

Fast-forward

 cat3/1.txt | 1 +

 1 file changed, 1 insertion(+)

[root@gitlab gitlab_t1]# git push  # 合并后,需要推送

Total 0 (delta 0), reused 0 (delta 0)

remote:

remote: To create a merge request for catinsky, visit:

remote:   http://gitlab.test/root/gitlab_t1/merge_requests/new?merge_request%5Bsource_branch%5D=catinsky

remote:

To git@gitlab.test:root/gitlab_t1.git

   489ec68..33aee32  catinsky -> catinsky

完成。

 浙公网安备 33010602011771号