centos7安装zookeeper,单机和伪集群部署
zookeeper安装和部署
一、zookeeper安装
1、基本环境:vbox+centos7
2、准备工作:
安装java环境:yum -y install java
安装wget:yum -y install wget
(可选)安装vim:yum -y install vim*
3、下载zookeeper
进入下载目录: cd /home/zookeeper
wget https://mirrors.tuna.tsinghua.edu.cn/apache/zookeeper/zookeeper-3.6.2/apache-zookeeper-3.6.2-bin.tar.gz
下载成功后,解压到当前文件夹 :tar -zxvf apache-zookeeper-3.6.2-bin.tar.gz,效果如下:

4、问题说明:若解压失败报:
gzip: stdin: not in gzip format
tar: Child returned status 1
tar: Error is not recoverable: exiting now
可通过命令查看下载文件类型 :file apache-zookeeper-3.6.2.tar.gz,正确类型如下:

若不是压缩文件类型,可删除下载文件,重新找其他地址下载
二、zookeeper单机启动
1、修改配置
进入解压文件,拷贝示例配置文件,作为默认配置
cd apache-zookeeper-3.6.2
cp conf/zoo_sample.cfg conf/zoo.cfg
编辑zoo.cfg文件:vim conf/zoo.cfg

修改dataDir值为:/home/zookeeper/zookeeper/data
添加:dataLogDir=/home/zookeeper/zookeeper/log
添加:server.1=本机ip:2888:3888
2888是该server和集群中的leader通信端口,3888是选举leader的端口

创建dataDir目录:mkdir data
创建dataLogDir目录:mkdir log

创建myid文件:touch data/myid
编辑myid文件:vim data/myid ,保存数据 1
2、启用zookeeper服务
启用服务:
bin/zkServer.sh start

上图代表启动成功了!
查看服务启用状态:
bin/zkServer.sh status

单机模式:standalone
这里发现踩了一个坑:

无法启动的原因:
现了这个问题,我检查了zoo.cfg和profile并没有发现问题,后来找到以下解决方案,
官网上有两个tar.gz文件,从目前的最新版本3.5.5开始,带有bin名称的包才是我们想要的下载可以直接使用的里面有编译后的二进制的包,而之前的普通的tar.gz的包里面是只是源码的包无法直接使用。
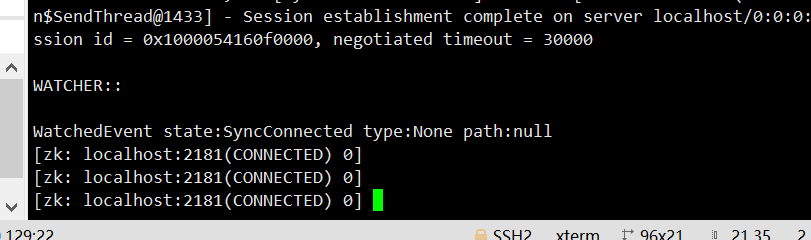
3、打开本地客户端
bin/zkCli.sh
或者 bin/zkCli.sh -server localhost:2181 ,
或者 bin/zkCli.sh -server 127.0.0.1:2181

4、访问远程zookeeper服务报错问题:
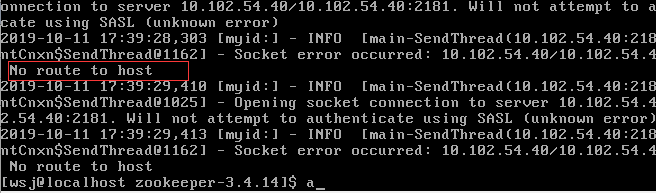
解决:
方法一、服务端防火墙关闭:
systemctl stop firewalld
方法二、开放zookeeper相关端口
firewall-cmd --zone=public --add-port=2181/tcp --permanent
firewall-cmd --zone=public --add-port=2888/tcp --permanent
firewall-cmd --zone=public --add-port=3888/tcp --permanent
------------------------------------------------------------------------------------------------------------------------------------------------------------------------------------------------------------------------------------------------------------------------------------------------------------------------
三、zookeeper伪集群部署
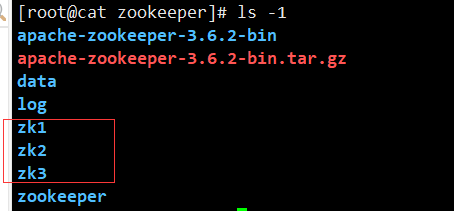
1、准备3台服务器或者虚拟机,各自部署好单机模式(或者通过scp命令将zookeeper配置分发其他节点)
·2、3台机器上myid保存的数据分别为1,2,3,与3台机器上的zoo.cfg配置对应
新建zk1,zk2,zk3三个目录,每个里面都复制一份zk的包解压,如下:
分别创建zoo.cfg文件,并且修改每个的配置,如下:
# The number of milliseconds of each tick
tickTime=2000
# The number of ticks that the initial
# synchronization phase can take
initLimit=10
# The number of ticks that can pass between
# sending a request and getting an acknowledgement
syncLimit=5
# the directory where the snapshot is stored.
# do not use /tmp for storage, /tmp here is just
# example sakes.
dataDir=/home/zookeeper/zk1/data
dataLogDir=/homie/zookeeper/zk1/log
# the port at which the clients will connect

clientPort=2171
server.81=localhost:2281:3381
server.82=localhost:2282:3382
server.83=localhost:2283:3383
# the maximum number of client connections.
# increase this if you need to handle more clients
# The number of milliseconds of each tick
tickTime=2000
# The number of ticks that the initial
# synchronization phase can take
initLimit=10
# The number of ticks that can pass between
# sending a request and getting an acknowledgement
syncLimit=5
# the directory where the snapshot is stored.
# do not use /tmp for storage, /tmp here is just
# example sakes.
dataDir=/home/zookeeper/zk2/data
dataLogDir=/homie/zookeeper/zk2/log
# the port at which the clients will connect

clientPort=2172
server.81=localhost:2281:3381
server.82=localhost:2282:3382
server.83=localhost:2283:3383
# the maximum number of client connections.
# increase this if you need to handle more clients
# The number of milliseconds of each tick
tickTime=2000
# The number of ticks that the initial
# synchronization phase can take
initLimit=10
# The number of ticks that can pass between
# sending a request and getting an acknowledgement
syncLimit=5
# the directory where the snapshot is stored.
# do not use /tmp for storage, /tmp here is just
# example sakes.
dataDir=/home/zookeeper/zk3/data
dataLogDir=/homie/zookeeper/zk3/log
# the port at which the clients will connect

clientPort=2173
server.81=localhost:2281:3381
server.82=localhost:2282:3382
server.83=localhost:2283:3383
# the maximum number of client connections.
# increase this if you need to handle more clients
3、将3台机器的zookeeper服务启用
使用命令,分别在不同zk1,2,3的目录下执行三次,也可以写脚本一起启动:
bin/zkServer.sh start
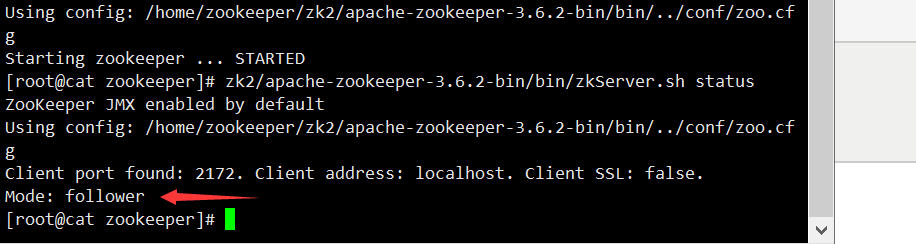
4、查看3台机器zookeeper的启用状态,发现01机器(启动服务的第一台机器)为leader,其他两个为follower
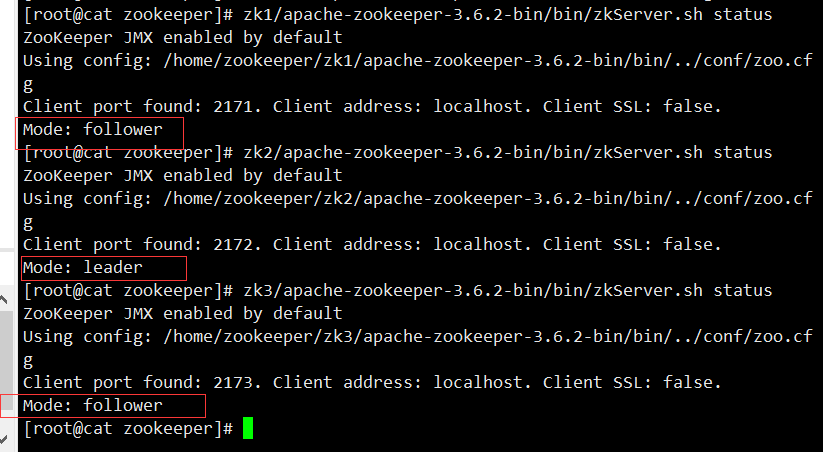
查看状态,一台leader,两台follower都启动起来了。
5、登录集群客户端
执行命令:
zk1/apache-zookeeper-3.6.2-bin/bin/zkCli.sh -server localhost:2171,localhost:2172,localhost:2173

随机分配ip,可测试添加一个节点,会发现,所有机器上的zookeeperd都会同步
6、关闭作为leader的zookeeper服务,查看另两台zookeeper状态
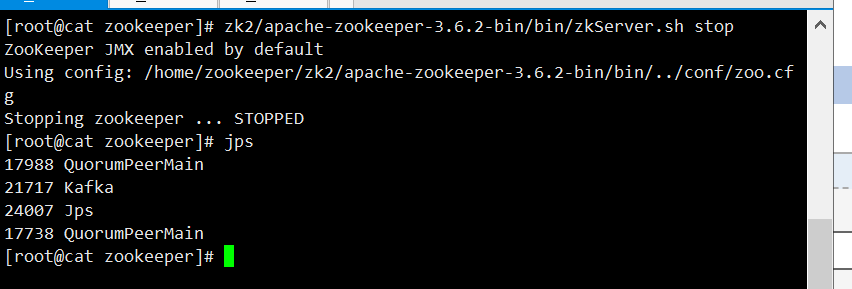
leader机器服务关闭后,leader角色随机分配给了03机器,登录集群客户端,也不再分配01机器
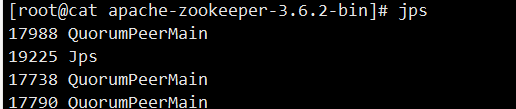
7、重新启用刚刚关闭的zookeeper服务
刚刚关闭的服务已经作为follower角色,添加进集群,并且会同步集群的最新数据
----------------------------------------
其实这是QuorumPeerMain是zookeeper集群的启动入口类,是用来加载配置启动QuorumPeer线程的。
QuorumPeer, 谷歌翻译quorum是法定人数,定额的意思, peer是对等的意思,那么QuorumPeer中quorum代表的意思就是每个zookeeper集群启动的时候集群中zookeeper服务数量就已经确定了,zookeeper是基于paxos算法实现的,那是一个唯一的分布式集群一致性算法,在zookeeper中将这一算法演绎为集群分布式协调可持续服务。在每个zookeeper的配置文件中配置集群中的所有机器
server.1=127.0.0.1:2888:3888
server.2=127.0.0.1:2888:3888
server.3=127.0.0.1:2888:3888
配置中每个server.X记录代表集群中的一个服务,QuorumPeerConfig会构建一个QuorumServer对象,其中的server.X中的X代表zookpeer的sid,每个zookeeper都会编辑自己的sid在dataDir目下的myid文件中,sid标记每个服务,在快速选举中起作用。
所以对这个进程不应该陌生,如果你要关闭,就直接zkServer.sh stop 就可以了。

 浙公网安备 33010602011771号