基于springmvc的websocket的配置
由于学东西有点慢,所以特将其详细写出:
共分为:web.xml的编写,xmlspringweb-servlet.xml,前端的编写,后台的编写,四个部分
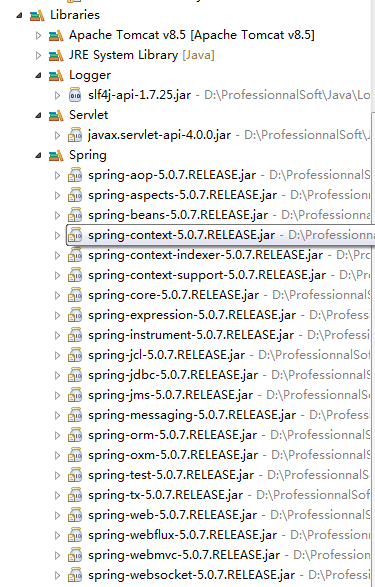
首先将所需的包列出,其中包括了所有的springmvc所需要的包:

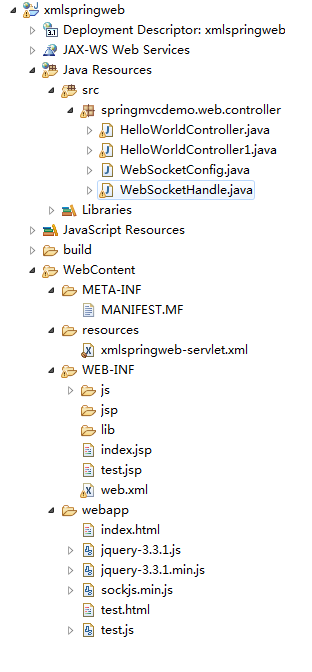
1.这个工程的路径图片示意:

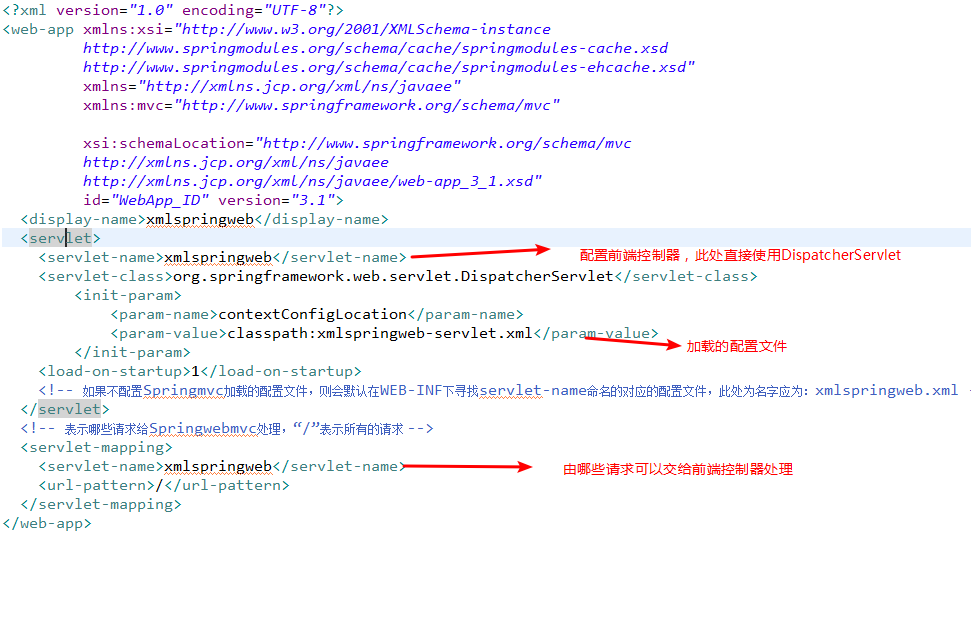
2.配置文件,web.xml的编写

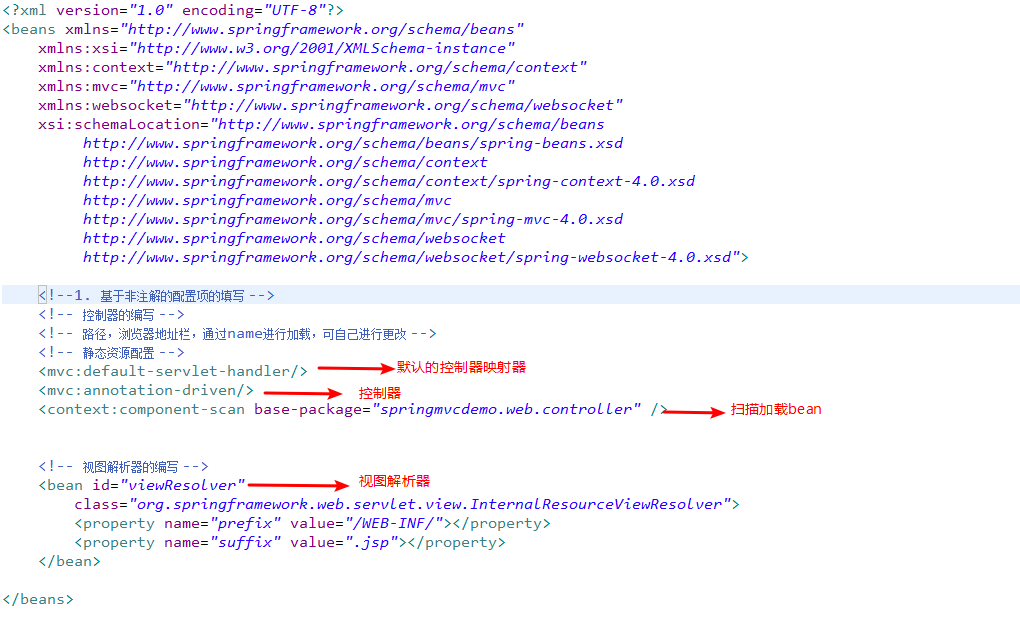
2.对应的xmlspringweb-servlet.xml的编写:

3.前端的编写:
<!DOCTYPE HTML>
<html>
    <head>
        <title>首页</title>
        <meta charset="utf-8">
        <meta name="viewport" content="width=device-width, initial-scale=1.0">
        <meta name="renderer" content="webkit">
        <!-- 引入 JQuery  -->
        <script type="text/javascript" src="jquery-3.3.1.min.js"></script>
        <!-- 引入 sockJS  -->
       <script type="text/javascript" src="sockjs.min.js" ></script>
        <!-- 自定义JS文件 -->
        <script >
            var url='ws://'+window.location.host+"/xmlspringweb/websocket";
            var websocket=new WebSocket(url);
            // 打开时
            websocket.onopen = function(evnt) {
                console.log("  websocket.onopen  ");
            };
            // 处理消息时
            websocket.onmessage = function(evnt) {
                $("#msg").append("<p>(<font color='red'>" + evnt.data + "</font>)</p>");
                console.log("  websocket.onmessage   ");
            };
            websocket.onerror = function(evnt) {
                console.log("  websocket.onerror  ");
            };
            websocket.onclose = function(evnt) {
                console.log("  websocket.onclose  ");
            };
            // 点击了发送消息按钮的响应事件
            $("#TXBTN").click(function(){
                // 获取消息内容
                var text = $("#tx").val();
                // 判断
                if(text == null || text == ""){
                    alert(" content  can not empty!!");
                    return false;
                }
                var msg = {
                    msgContent: text,
                    postsId: 1
                };
                // 发送消息
                websocket.send(JSON.stringify(msg));

            });
        </script>
    </head>
    <body>
        <!-- 最外边框 -->
        <div style="margin: 20px auto; border: 1px solid blue; width: 300px; height: 500px;">
            <!-- 消息展示框 -->
            <div id="msg" style="width: 100%; height: 70%; border: 1px solid yellow;overflow: auto;"></div>
            <!-- 消息编辑框 -->
            <textarea id="tx" style="width: 100%; height: 20%;"></textarea>
            <!-- 消息发送按钮 -->
            <button id="TXBTN" style="width: 100%; height: 8%;">发送数据</button>
        </div>
    </body>
</html>
其中还需要两个js文件:
jquery-3.3.1.min.js,sockjs.min.js(暂可不用,是为了兼容无法使用WebSocket而添加的,此前端并未体现)
4.后端程序,需要两个程序,
1)Handler的编写:
package springmvcdemo.web.controller; import java.util.ArrayList; import java.util.Collections; import java.util.List; import org.springframework.web.socket.CloseStatus; import org.springframework.web.socket.TextMessage; import org.springframework.web.socket.WebSocketSession; import org.springframework.web.socket.handler.TextWebSocketHandler; public class WebSocketHandle extends TextWebSocketHandler{ private final static List<WebSocketSession> sessions = Collections.synchronizedList(new ArrayList<WebSocketSession>()); //鎺ユ敹鏂囨湰娑堟伅锛屽苟鍙戦�佸嚭鍘� @Override protected void handleTextMessage(WebSocketSession session, TextMessage message) throws Exception { //chatTextMessageHandler(message.getPayload()); super.handleTextMessage(session, message); } //杩炴帴寤虹珛鍚庡鐞� @SuppressWarnings("unchecked") @Override public void afterConnectionEstablished(WebSocketSession session) throws Exception { System.out.println("connect to the websocket chat success......"); System.out.println(session.toString()); sessions.add(session); //澶勭悊绂荤嚎娑堟伅 } //鎶涘嚭寮傚父鏃跺鐞� @Override public void handleTransportError(WebSocketSession session, Throwable exception) throws Exception { if(session.isOpen()){ session.close(); } System.out.println("websocket chat connection closed......"); sessions.remove(session); } //杩炴帴鍏抽棴鍚庡鐞� @Override public void afterConnectionClosed(WebSocketSession session, CloseStatus closeStatus) throws Exception { System.out.println("websocket chat connection closed......"); sessions.remove(session); } @Override public boolean supportsPartialMessages() { return false; } }
2)配置文件的编写:
package springmvcdemo.web.controller;

import org.springframework.context.annotation.Bean;
import org.springframework.context.annotation.Configuration;
import org.springframework.web.socket.WebSocketHandler;
import org.springframework.web.socket.config.annotation.EnableWebSocket;
import org.springframework.web.socket.config.annotation.WebSocketConfigurer;
import org.springframework.web.socket.config.annotation.WebSocketHandlerRegistry;


@Configuration
@EnableWebSocket
public class WebSocketConfig  implements WebSocketConfigurer {

        @Override
        public void registerWebSocketHandlers(WebSocketHandlerRegistry registry) {
            System.out.println("....注册......");
            //前台 可以使用websocket环境
           registry.addHandler(myWebSocketHandler(),"/websocket");

        }
        // websocket 处理类
        @Bean
        public WebSocketHandler myWebSocketHandler(){
            return new WebSocketHandle();
        }


}
这样整个的一个简单的websocket的程序就写完了。


