Springboot2本地锁实践
在平时开发中,如果网速比较慢的情况下,用户提交表单后,发现服务器半天都没有响应,那么用户可能会以为是自己没有提交表单,就会再点击提交按钮重复提交表单,我们在开发中必须防止表单重复提交….
下面我们利用自定义注解、Spring Aop、Guava Cache 实现表单防重复提交
一、导入依赖
创建springboot项目,在pom.xml文件中加入以下内容
<dependencies>
    <dependency>
        <groupId>org.springframework.boot</groupId>
        <artifactId>spring-boot-starter-web</artifactId>
    </dependency>
    <dependency>
        <groupId>org.springframework.boot</groupId>
        <artifactId>spring-boot-starter-aop</artifactId>
    </dependency>
    <dependency>
        <groupId>com.google.guava</groupId>
        <artifactId>guava</artifactId>
        <version>21.0</version>
    </dependency>
</dependencies>
二、Lock注解
创建一个 LocalLock 注解,就一个 key 可以了
 1 package com.carry.annotation;
 2
 3 import java.lang.annotation.Documented;
 4 import java.lang.annotation.ElementType;
 5 import java.lang.annotation.Inherited;
 6 import java.lang.annotation.Retention;
 7 import java.lang.annotation.RetentionPolicy;
 8 import java.lang.annotation.Target;
 9
10 /**
11  * 锁的注解
12  *
13  */
14 @Target(ElementType.METHOD)
15 @Retention(RetentionPolicy.RUNTIME)
16 @Documented
17 @Inherited
18 public @interface LocalLock {
19
20     String key() default "";
21 }
三、Lock拦截器(AOP)
首先通过 CacheBuilder.newBuilder() 构建出缓存对象,设置好过期时间;其目的就是为了防止因程序崩溃锁得不到释放,然后在具体的 interceptor() 方法上采用的是 Around(环绕增强) ,所有带 LocalLock 注解的都将被切面处理
具体代码
 1 package com.carry.interceptor;
 2
 3 import java.lang.reflect.Method;
 4 import java.util.concurrent.TimeUnit;
 5 import org.aspectj.lang.ProceedingJoinPoint;
 6 import org.aspectj.lang.annotation.Around;
 7 import org.aspectj.lang.annotation.Aspect;
 8 import org.aspectj.lang.reflect.MethodSignature;
 9 import org.springframework.context.annotation.Configuration;
10 import org.springframework.util.StringUtils;
11 import com.carry.annotation.LocalLock;
12 import com.google.common.cache.Cache;
13 import com.google.common.cache.CacheBuilder;
14
15 @Aspect
16 @Configuration
17 public class LockMethodInterceptor {
18
19     private static final Cache<String, Object> CACHES = CacheBuilder.newBuilder()
20             // 最大缓存 100 个
21             .maximumSize(100)
22             // 设置写缓存后 5 秒钟过期
23             .expireAfterWrite(5, TimeUnit.SECONDS).build();
24
25     @Around("execution(public * *(..)) && @annotation(com.carry.annotation.LocalLock)")
26     public Object interceptor(ProceedingJoinPoint pjp) {
27         MethodSignature signature = (MethodSignature) pjp.getSignature();
28         Method method = signature.getMethod();
29         LocalLock localLock = method.getAnnotation(LocalLock.class);
30         String key = getKey(localLock.key(), pjp.getArgs());
31         if (!StringUtils.isEmpty(key)) {
32             if (CACHES.getIfPresent(key) != null) {
33                 throw new RuntimeException("请勿重复请求");
34             }
35             // 如果是第一次请求,就将 key 当前对象压入缓存中
36             CACHES.put(key, key);
37         }
38         try {
39             return pjp.proceed();
40         } catch (Throwable throwable) {
41             throw new RuntimeException("服务器异常");
42         } finally {
43             // TODO
44         }
45     }
46
47     /**
48      * key 的生成策略,如果想灵活可以写成接口与实现类的方式
49      *
50      * @param keyExpress
51      *            表达式
52      * @param args
53      *            参数
54      * @return 生成的key
55      */
56     private String getKey(String keyExpress, Object[] args) {
57         for (int i = 0; i < args.length; i++) {
58             keyExpress = keyExpress.replace("arg[" + i + "]", args[i].toString());
59         }
60         return keyExpress;
61     }
62 }
四、控制层
在接口方法上添加 @LocalLock(key = "book:arg[0]");意味着会将 arg[0] 替换成第一个参数的值,生成后的新 key 将被缓存起来
具体代码
 1 package com.carry.controller;
 2
 3 import org.springframework.web.bind.annotation.GetMapping;
 4 import org.springframework.web.bind.annotation.RequestMapping;
 5 import org.springframework.web.bind.annotation.RequestParam;
 6 import org.springframework.web.bind.annotation.RestController;
 7
 8 import com.carry.annotation.LocalLock;
 9
10 @RestController
11 @RequestMapping("/test")
12 public class LocalLockController {
13
14     @LocalLock(key = "key:arg[0]")
15     @GetMapping
16     public String query(@RequestParam String token) {
17         return "success - " + token;
18     }
19 }
五、测试
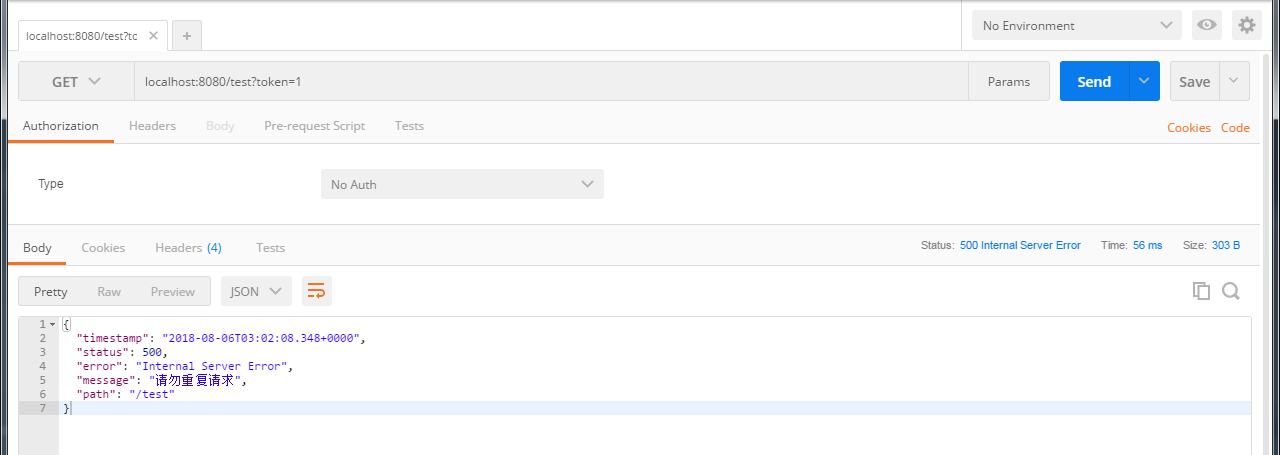
启动项目,在postman中输入url:localhost:8080/test?token=1
第一次请求结果:

第二次请求结果:


