BMP图像解析,基本照抄关于Java读取和编写BMP文件的总结
直方图均衡化没抄着,自己写了一个。
代码结构:
GUI:
Java Swing实现


import Utils.BMPImage;
import Utils.GraphUtil;

import javax.swing.*;
import java.awt.*;

public class GUI extends JFrame {
    public String path="./src/main/resources/Panda4.bmp";

    public void init(){
        this.setTitle("BMP解析");//设置标题
        this.setSize(600,350);//设置窗体大小
        this.setDefaultCloseOperation(3);//点击关闭,程序自动退出。
        this.setResizable(false);//设置窗体大小不可以调节
        this.setLocationRelativeTo(null);//设置窗体出现在屏幕中间
        this.setLayout(new BorderLayout());

        JPanel panel1=new JPanel();
        panel1.setBorder(BorderFactory.createEmptyBorder(10,10,0,10));
        panel1.setLayout(new GridLayout(1,2,0,5));
        BMPImage bmpImage = new BMPImage(this.path);
        panel1.add(bmpImage);

        JPanel panel2=new JPanel();
        JButton button1=new JButton("直方图均衡化");
        button1.setFocusable(false);
        panel2.add(button1);
        button1.addActionListener(e -> {
            BMPImage bmpImage2=GraphUtil.HistogramEqualization(bmpImage);
            panel1.add(bmpImage2);
            SwingUtilities.updateComponentTreeUI(panel1);
        });

        this.add(panel1,BorderLayout.CENTER);
        this.add(panel2,BorderLayout.SOUTH);

        this.setVisible(true);
    }
    public static void main(String[] args) {
        GUI gui = new GUI();
        gui.init();
    }
}
BMPImage:
重载paint函数来显示图片。注意这段代码只能打开24-bit的bmp。
package Utils;

import javax.swing.*;
import java.awt.*;
import java.io.IOException;

public class BMPImage extends JPanel {
    public int width;

    public int height;

    public int[][] red, green, blue;

    public BMPImage(String fileName) {
        try {
            java.io.FileInputStream fin = new java.io.FileInputStream(fileName);

            java.io.BufferedInputStream bis = new java.io.BufferedInputStream(
                    fin);

            // 建立两个字节数组来得到文件头和信息头的数据
            byte[] array1 = new byte[14];
            bis.read(array1, 0, 14);

            byte[] array2 = new byte[40];
            bis.read(array2, 0, 40);

            // 翻译bmp文件的数据,即将字节数据转化为int数据
            // 通过翻译得到位图数据的宽和高
            width = ChangeInt(array2, 7);
            height = ChangeInt(array2, 11);

            // 调用可以将整个位图数据读取成byte数组的方法
            getInf(bis);

            fin.close();
            bis.close();
        } catch (Exception e) {
            e.printStackTrace();
        }
    }

    public BMPImage(int width,int height){
        this.width=width;
        this.height=height;
        red = new int[height][width];
        green = new int[height][width];
        blue = new int[height][width];
    }

    public int ChangeInt(byte[] array2, int start) {
        // 因为char,byte,short这些数据类型经过运算符后会自动转为成int数据类,
        // 所以array2[start]&0xff的实际意思就是通过&0xff将字符数据转化为正int数据,然后在进行位运算。
        // 这里需要注意的是<<的优先级别比&高,所以必须加上括号。

        int i = (int) ((array2[start] & 0xff) << 24)
                | ((array2[start - 1] & 0xff) << 16)
                | ((array2[start - 2] & 0xff) << 8)
                | (array2[start - 3] & 0xff);
        return i;
    }

    public void getInf(java.io.BufferedInputStream bis) {
        // 给数组开辟空间
        red = new int[height][width];
        green = new int[height][width];
        blue = new int[height][width];

        // 通过计算得到每行计算机需要填充的字符数。
        // 为什么要填充?这是因为windows系统在扫描数据的时候,每行都是按照4个字节的倍数来读取的。
        // 因为图片是由每个像素点组成。而每个像素点都是由3个颜色分量来构成的,而每个分量占据1个字节。
        // 因此在内存存储中实际图片数据每行的长度是width*3。
        int skip_width = 0;
        int m = width * 3 % 4;
        if (m != 0) {
            skip_width = 4 - m;
        }

        // 通过遍历给数组填值
        // 这里需要注意,因为根据bmp的保存格式。
        // 位图数据中height的值如果是正数的话:
        // 那么数据就是按从下到上,从左到右的顺序来保存。这个称之为倒向位图。
        // 反之就是按从上到下,从左到右的顺序来保存。这个则称之为正向位图。
        for (int i = height - 1; i >= 0; i--) {
            for (int j = 0; j < width; j++) {
                try {
                    // 这里遍历的时候,一定要注意本来像素是有RGB来表示,
                    // 但是在存储的时候由于windows是小段存储,所以在内存中是BGR顺序。
                    blue[i][j] = bis.read();
                    green[i][j] = bis.read();
                    red[i][j] = bis.read();

                    // 这里一定要知道,其实系统在给位图数据中添加填充0的时候,都是加在每行的最后。
                    // 但是我们在使用dis.skipBytes()这个方法的时候,却不一定要在最后一列。
                    // 系统在填充数据的时候,在数据上加了标记。
                    // 所以dis.skipBytes()这个方法只要调用了,那么系统就会自动不读取填充数据。
                    if (j == 0) {
                        bis.skip(skip_width);
                    }
                } catch (IOException e) {
                    e.printStackTrace();
                }
            }
        }
    }

    @Override
    public void paint(Graphics g) {
        super.paint(g);
        for (int i = 0; i < height; i++) {
            for (int j = 0; j < width; j++) {
                try {
                    g.setColor(new Color(red[i][j], green[i][j], blue[i][j]));
                    g.fillRect(j, i, 1, 1);// 这里可以使用画点的任何方法,除了上面那种特例。
                }catch (Exception e){
                    continue;
                }
            }
        }
    }
}
GraphUtil放处理图片的方法。
HistogramEqualization: 直方图均衡化
灰度计算公式:
red * 0.3 + green * 0.59 + blue * 0.11
直方图均衡化过程:计算每一灰度值所拥有像素在全部像素中比例,依次进行累加,将其前缀和作为该灰度在新图像中的映射值。原理大概是累计分布函数大致是均匀的。
package Utils;

import java.util.HashMap;
import java.util.Map;

public class GraphUtil {
    public static BMPImage HistogramEqualization(BMPImage img){
        int[][] gray=new int[img.height][img.width];
        Map<Integer,Integer> map=new HashMap<>();
        for(int i=0;i<img.height;i++){
            for(int j=0;j<img.width;j++){
                try {
                    gray[i][j] = (int) (img.red[i][j] * 0.3 + img.green[i][j] * 0.59 + img.blue[i][j] * 0.11);
                    if (map.containsKey(gray[i][j])) {
                        map.put(gray[i][j], map.get(gray[i][j]) + 1);
                    } else {
                        map.put(gray[i][j], 1);
                    }
                }catch (Exception e){
                    System.out.println(i+" "+j);
                }
            }
        }
        Map<Integer,Integer> map2=new HashMap<>();
        int ans=0;
        int cnt=img.width*img.height;
        for(Map.Entry<Integer,Integer> entry:map.entrySet()) {
            ans+=entry.getValue();
            int newval=(int)(((double)ans/cnt)*256);
            map2.put(entry.getKey(),newval);
        }
        for(int i=0;i<img.height;i++){
            for(int j=0;j<img.width;j++){
                gray[i][j]=map2.get(gray[i][j]);
            }
        }
        BMPImage img2=new BMPImage(img.width,img.height);
        for(int i=0;i<img.height;i++){
            for(int j=0;j<img.width;j++){
                img2.red[i][j]=gray[i][j];
                img2.green[i][j]=gray[i][j];
                img2.blue[i][j]=gray[i][j];
            }
        }
        return img2;
    }
}
放两张运行结果图:
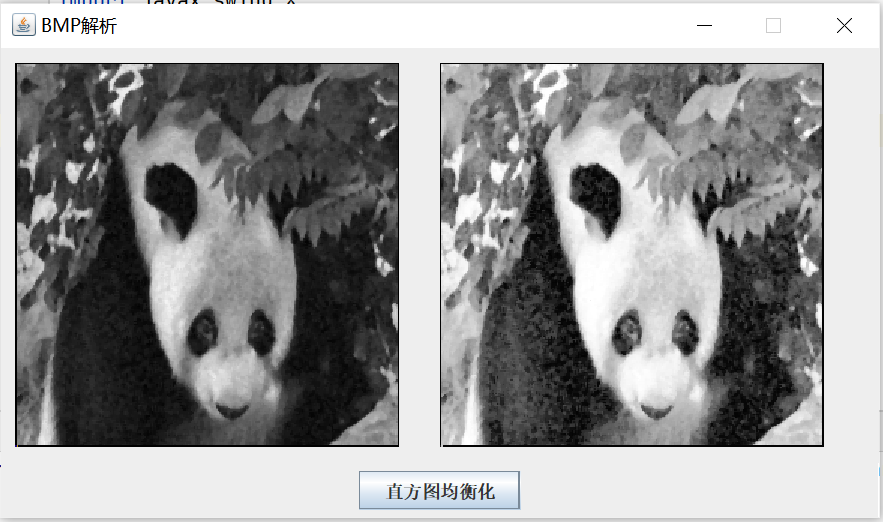

熊猫的眼睛和猫猫条纹都出来了,不错。

 浙公网安备 33010602011771号