
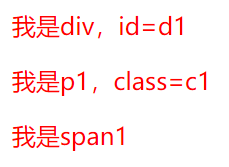
一、并列选择器
<style>
    #d1,.c1,span {  /*用逗号隔开表示并列,会同时匹配后面的设置*/
        color: red;
    }
</style>
<!--头结束-->
</head>
<body>
<!--主体开始-->
<div id="d1">我是div,id=d1</div>
<p class="c1">我是p1,class=c1</p>
<span>我是span1</span>
二、伪选择器
<style>
    .c1:link {  /*初始态,首次点击之前的状态*/
        color: blue;
    }
    .c1:hover {  /*悬浮态,光标悬于标签时的状态*/
        color: green;
    }
    .c1:active {  /*激活态,点击而未弹起的状态*/
        color: orange;
    }
    .c1:visited {  /*完成态,首次点击完成后的状态*/
        color: red;
    }
</style>
<!--头结束-->
</head>
<body>
<!--主体开始-->
<a href="http://www.baidu.com" class="c1">我是a1,class=c1</a>
<a href="http://www.baidu.com" class="c1">我是a2,class=c1</a>
<a href="http://www.baidu.com" class="c1">我是a3,class=c1</a>


<style>
#d1:focus {  /*定位态,光标定位于某个可输入标签时的输入框状态*/
    background: cadetblue;
}
</style>
<!--头结束-->
</head>
<body>
<!--主体开始-->
输入账号 <input type="text" id="d1">

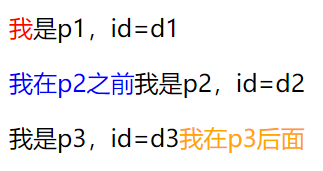
三、伪元素选择器
<style>
    #d1:first-letter {  /*只设置文本首字*/
        color: red;
    }
    #d2:before {  /*文本前面添加内容,该内容无法选中*/
        content: '我在p2之前';
        color: blue;
    }
    #d3:after {  /*文本后面添加内容,该内容无法选中*/
        content: '我在p3后面';
        color: orange;
    }
</style>
<!--头结束-->
</head>
<body>
<!--主体开始-->
<p id="d1">我是p1,id=d1</p>
<p id="d2">我是p2,id=d2</p>
<p id="d3">我是p3,id=d3</p>
四、选择器优先级
1、选择器相同,按CSS语句距离标签距离排序:行内式 > 较近内部CSS > 较远内部CSS > 外部CSS
2、选择器不同,按匹配精确度排序:行内式 > id选择器 > class选择器 > 标签选择器
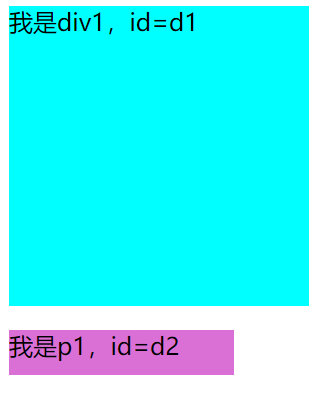
五、标签的长宽及背景色设置:只有板块标签和行段标签可以设置,行内标签设置了也无效。
<style>
    #d1 {
        height: 200px;
        width: 200px;
        background-color: cyan;
    }
    #d2 {
        height: 30px;
        width: 150px;
        background-color: orchid;
    }
</style>
<!--头结束-->
</head>
<body>
<!--主体开始-->
<div id="d1">我是div1,id=d1</div>
<p id="d2">我是p1,id=d2</p>
六、文本字体属性设置
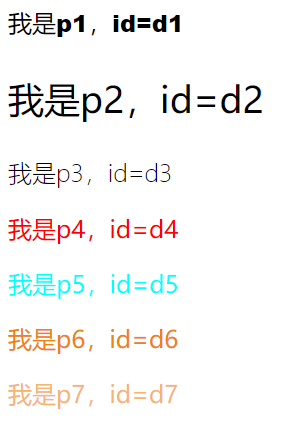
<style>
    #d1 {
        font-family: "Arial Black";  /*设置字体样式*/
    }
    #d2 {
        font-size: 24px;  /*设置字体大小*/
    }
    #d3 {
        font-weight: 200;  /*设置字体粗细,范围100~900,如果声明为inherit,则代表继承父标签的粗细值*/
    }
    #d4 {
        color: red;  /*用颜色对应单词设置字体颜色*/
    }
    #d5 {
        color: #00ffff;  /*用色号设置字体颜色*/
    }
    #d6 {
        color: rgb(240, 130, 15);  /*用三基色设置字体颜色,数字范围0~255*/
    }
    #d7 {
        color: rgba(240, 130, 15, 0.6);  /*在三基色的基础上,添加透明度,范围0~1.0*/
    }
</style>
<!--头结束-->
</head>
<body>
<!--主体开始-->
<p id="d1">我是p1,id=d1</p>
<p id="d2">我是p2,id=d2</p>
<p id="d3">我是p3,id=d3</p>
<p id="d4">我是p4,id=d4</p>
<p id="d5">我是p5,id=d5</p>
<p id="d6">我是p6,id=d6</p>
<p id="d7">我是p7,id=d7</p>
七、文本其他属性设置
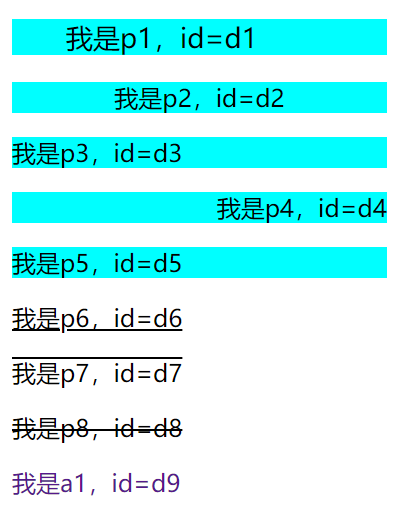
<style>
    #d1 {
        width: 250px;
        background-color: cyan;
        font-size: 18px;
        text-indent: 36px;  /*文本首行缩进36px,也可以写作2em*/
    }
    #d2 {
        width: 250px;
        background-color: cyan;
        text-align: center;  /*文本左右居中*/
    }
    #d3 {
        width: 250px;
        background-color: cyan;
        text-align: left;  /*文本左对齐*/
    }
    #d4 {
        width: 250px;
        background-color: cyan;
        text-align: right;  /*文本右对齐*/
    }
    #d5 {
        width: 250px;
        background-color: cyan;
        text-align: justify;  /*文本两端对齐,不常用*/
    }
    #d6 {
        text-decoration: underline;  /*文本加下划线*/
    }
    #d7 {
        text-decoration: overline;  /*文本加上划线*/
    }
    #d8 {
        text-decoration: line-through;  /*文本加删除线*/
    }
    #d9 {
        text-decoration: none;  /*文本去除默认的下划线,主要用于a标签*/
    }
</style>
<!--头结束-->
</head>
<body>
<!--主体开始-->
<p id="d1">我是p1,id=d1</p>
<p id="d2">我是p2,id=d2</p>
<p id="d3">我是p3,id=d3</p>
<p id="d4">我是p4,id=d4</p>
<p id="d5">我是p5,id=d5</p>
<p id="d6">我是p6,id=d6</p>
<p id="d7">我是p7,id=d7</p>
<p id="d8">我是p8,id=d8</p>
<a href="http://www.baidu.com" id="d9">我是a1,id=d9</a>
八、标签的背景图片设置
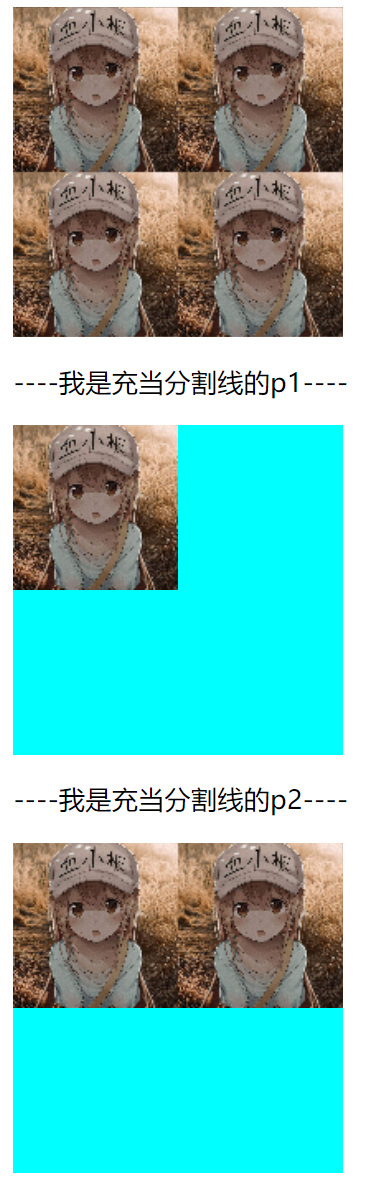
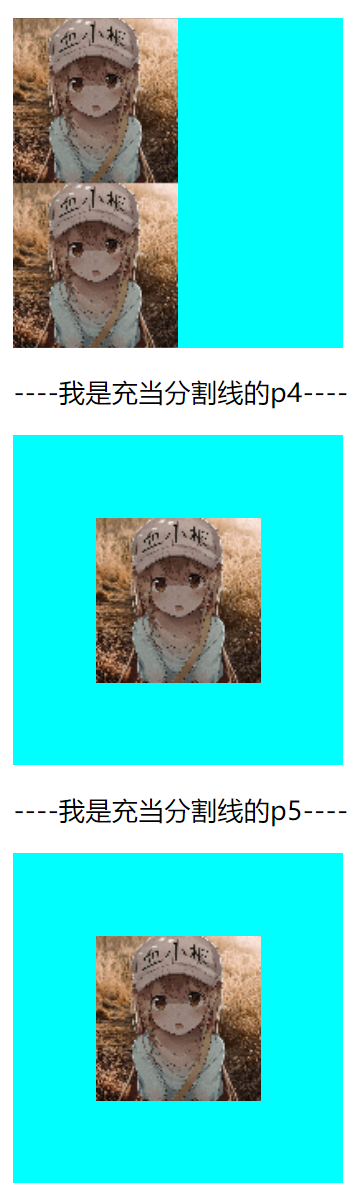
<style>
    #d1 {
        height: 200px;
        width: 200px;
        background-image: url("背景图片100x100.png");  /*默认铺满*/
    }
    #d2 {
        height: 200px;
        width: 200px;
        background-color: cyan;
        background-image: url("背景图片100x100.png");
        background-repeat: no-repeat;  /*做此声明则不铺满*/
    }
    #d3 {
        height: 200px;
        width: 200px;
        background-color: cyan;
        background-image: url("背景图片100x100.png");
        background-repeat: repeat-x;  /*水平铺满*/
    }
    #d4 {
        height: 200px;
        width: 200px;
        background-color: cyan;
        background-image: url("背景图片100x100.png");
        background-repeat: repeat-y;  /*垂直铺满*/
    }
    #d5 {
        height: 200px;
        width: 200px;
        background-color: cyan;
        background-image: url("背景图片100x100.png");
        background-repeat: no-repeat;
        background-position: center center /*居中,前一个控制水平,后一个控制垂直*/
    }
    #d6 {
        height: 200px;
        width: 200px;
        background: cyan url("背景图片100x100.png") no-repeat center center;
        /*同一个参数组,可以只写组名,后面直接写参数值,顺序无所谓*/
    }
</style>
<!--头结束-->
</head>
<body>
<!--主体开始-->
<div id="d1"></div>
<p>----我是充当分割线的p1----</p>
<div id="d2"></div>
<p>----我是充当分割线的p2----</p>
<div id="d3"></div>
<p>----我是充当分割线的p3----</p>
<div id="d4"></div>
<p>----我是充当分割线的p4----</p>
<div id="d5"></div>
<p>----我是充当分割线的p5----</p>
<div id="d6"></div>
九、标签的边框设置
<style>
    #d1 {
        height: 200px;
        width: 200px;
        background: cyan;
        border-width: 3px;  /*设置边框粗细*/
        border-style: solid;  /*设置边框样式*/
        border-color: orange;  /*设置边框颜色*/
        /*border: 3px solid orange;  !*简写,效果等同于上面3条语句*!*/
    }
    #d2 {
        height: 200px;
        width: 200px;
        background: cyan;
        border-left: 5px solid red;
        border-right: 10px dotted blue;
        border-top: 15px double orange;
        border-bottom: 20px ridge pink;
        /*可以给四个边分别设置*/
    }
    #d3 {
        height: 200px;
        width: 200px;
        background: cyan;
        border: 3px solid orange;
        border-radius: 50%;  /*如此声明,则变为原形,长宽一直是正圆,长宽不一致是椭圆*/
    }
</style>
<!--头结束-->
</head>
<body>
<!--主体开始-->
<div id="d1"></div>
<p>-----我是充当分割线的p1-----</p>
<div id="d2"></div>
<p>-----我是充当分割线的p1-----</p>
<div id="d3"></div>

十、标签的显示模式设置
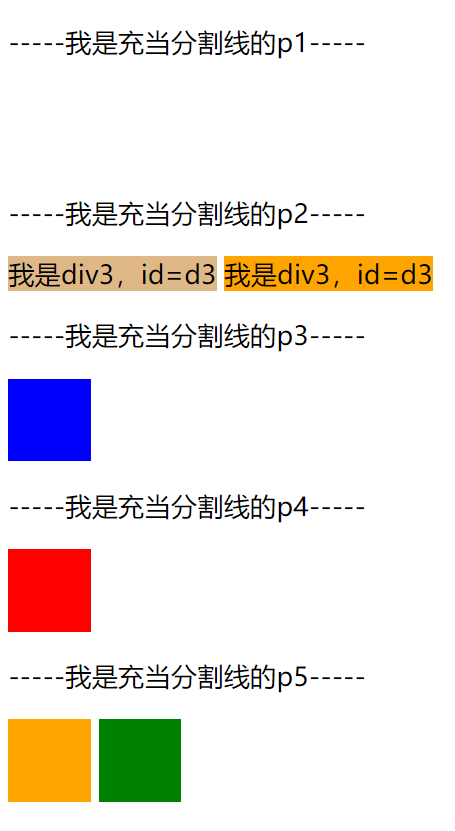
<style>
    #d1 {
        height: 50px;
        width: 50px;
        display: none;  /*完全隐藏,不显示也不占位,只存在于文件语句中*/
    }
    #d2 {
        height: 50px;
        width: 50px;
        visibility: hidden;  /*不完全隐藏,不显示但是占位*/
    }
    #d3 {
        background: burlywood;
        display: inline;  /*将板块标签设置成行内标签的形式,如此声明,长宽设置则失效*/
    }
    #d4 {
        background: orange;
        display: inline;
    }
    #d5 {
        height: 50px;
        width: 50px;
        background: blue;
        display: block;  /*将行内标签设置成板块标签的形式,如此声明,变得可以设置长宽*/
    }
    #d6 {
        height: 50px;
        width: 50px;
        background: red;
        display: block;  /*将行内标签设置成板块标签的形式,如此声明,变得可以设置长宽*/
    }
    #d7 {
        height: 50px;
        width: 50px;
        background: orange;
        display: inline-block;  /*设置成既可以在一行显示,又可以设置长宽*/
    }
    #d8 {
        height: 50px;
        width: 50px;
        background: green;
        display: inline-block;  /*设置成既可以在一行显示,又可以设置长宽*/
    }
</style>
<!--头结束-->
</head>
<body>
<!--主体开始-->
<div id="d1"></div>
<p>-----我是充当分割线的p1-----</p>
<div id="d2"></div>
<p>-----我是充当分割线的p2-----</p>
<div id="d3">我是div3,id=d3</div>
<div id="d4">我是div3,id=d3</div>
<p>-----我是充当分割线的p3-----</p>
<span id="d5"></span>
<p>-----我是充当分割线的p4-----</p>
<span id="d6"></span>
<p>-----我是充当分割线的p5-----</p>
<div id="d7"></div>
<div id="d8"></div>
十一、盒子模型
1、margin:标签之间的外边距---盒子与盒子之间的距离。
2、border:标签的边框粗细---盒子的厚度。
3、padding:标签内容与边框的距离---盒子里面物品与盒子外壳的距离。
4、content:标签内容的各项属性---盒子里面物品的各项属性。
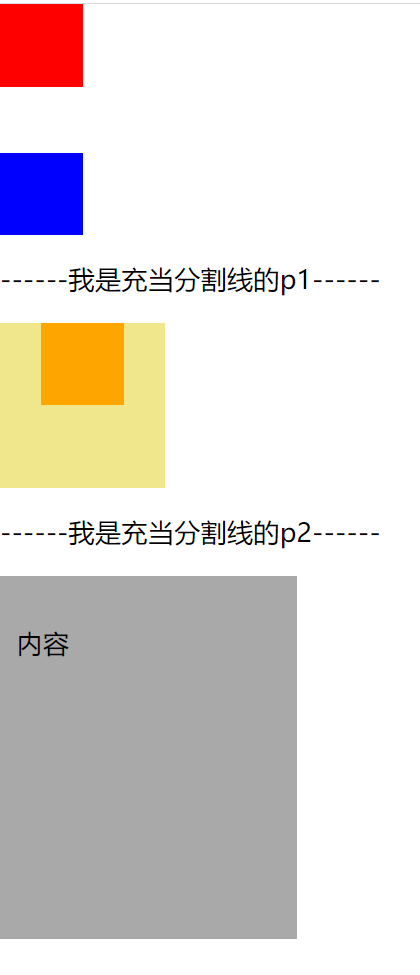
<style>
    body {  /*把浏览器自带的稿纸边框去除*/
        margin: 0;  /*上下左右全是0*/
        /*margin: 10px 20px;  !* 第一个上下 第二个左右*!*/
        /*margin: 10px 20px 30px;  !*第一个上  第二个左右  第三个下*!*/
        /*margin: 10px 20px 30px 40px;  !*上 右 下 左*!*/
    }
    #d1 {
        background: cyan;
        margin-left: 0;
        margin-right: 0;
        margin-top: 0;
        margin-bottom: 0;
        /*分别设置四个方向的外边距*/
    }
    #d2 {
        height: 50px;
        width: 50px;
        background: red;
        margin-bottom: 20px;
    }
    #d3 {
        height: 50px;
        width: 50px;
        background: blue;
        margin-top: 40px;  /*两个相对测距时,只取大的,不会叠加*/
    }
    #d4 {
        height: 100px;
        width: 100px;
        background: khaki;
    }
    #d5 {
        height: 50px;
        width: 50px;
        background: orange;
        margin: auto auto;  /*只能水平居中*/
    }
    #d6 {
        height: 150px;
        width: 150px;
        background: darkgray;
        /*padding: 10px 20px;  !* 第一个上下 第二个左右*!*/
        /*padding: 10px 20px 30px;  !*第一个上  第二个左右  第三个下*!*/
        /*padding: 10px 20px 30px 40px;  !*上 右 下 左*!*/
        padding-left: 10px;
        padding-right: 20px;
        padding-top: 30px;
        padding-bottom: 40px;
        /*分别设置四个方向的内边距*/
    }
</style>
<!--头结束-->
</head>
<body>
<!--主体开始-->
<!--<p id="d1">我是p1,id=d1</p>-->
<div id="d2"></div>
<div id="d3"></div>
<p>------我是充当分割线的p1------</p>
<div id="d4">
    <div id="d5"></div>
</div>
<p>------我是充当分割线的p2------</p>
<div id="d6">内容</div>
十二、浮动
1、设置为浮动的标签就相当于脱离了稿纸平面,没有占行这一说了,一般页面开始布局都会把板块设置为浮动来规划。
<style>
    #d1 {
        height: 300px;
        width: 10%;
        background: red;
        float: left;
    }
    #d2 {
        height: 300px;
        width: 20%;
        background: green;
        float: left;
    }
    #d3 {
        height: 300px;
        width: 30%;
        background: blue;
        float: left;
    }
</style>
<!--头结束-->
</head>
<body>
<!--主体开始-->
<div id="d1"></div>
<div id="d2"></div>
<div id="d3"></div>

2、浮动可能会造成父标签塌陷的问题,可以事先设置一个通用的CSS样式,需要使用该样式的标签直接继承即可。
.clearfix:after {
            content: '';
            display: block;
            clear:both;  /*该标签的两边(稿纸和空中)都不能有浮动的元素*/
        }
/*class名约定就用clearfix*/

 浙公网安备 33010602011771号