
ElasticSearch——集群搭建
1.准备
1.1.组件
JDK:1.8版本及以上;
ElasticSearch:6.2.4版本;
1.2.服务器
3台服务器
2.安装
2.1.下载解压
wget https://artifacts.elastic.co/downloads/elasticsearch/elasticsearch-6.2.4-linux-x86_64.tar.gz
mkdir /opt/elk/elasticsearch-6.2.4
tar zxvf elasticsearch-6.2.4.tar.gz  -C /opt/elk/elasticsearch-6.2.4
2.2.配置
cd /opt/elk/elasticsearch-6.2.4/config
vi elasticsearch.yml
标红的需要我们重点关注的,也是平常修改最多的参数:
# ======================== Elasticsearch Configuration =========================
#
# NOTE: Elasticsearch comes with reasonable defaults for most settings.
#       Before you set out to tweak and tune the configuration, make sure you
#       understand what are you trying to accomplish and the consequences.
#
# The primary way of configuring a node is via this file. This template lists
# the most important settings you may want to configure for a production cluster.
#
# Please consult the documentation for further information on configuration options:
# https://www.elastic.co/guide/en/elasticsearch/reference/index.html
#
# ---------------------------------- Cluster -----------------------------------
#
# Use a descriptive name for your cluster:
#
cluster.name: log-es-cluster  #集群名称
#
# ------------------------------------ Node ------------------------------------
#
# Use a descriptive name for the node:
#
node.name: node-100  #节点名称
node.master: true    #是否master
node.data: true     #是否数据节点
#
# Add custom attributes to the node:
#
#node.attr.rack: r1
#
# ----------------------------------- Paths ------------------------------------
#
# Path to directory where to store the data (separate multiple locations by comma):
#
#path.data: /path/to/data
#
# Path to log files:
#
#path.logs: /path/to/logs
#
# ----------------------------------- Memory -----------------------------------
#
# Lock the memory on startup:
#
bootstrap.memory_lock: false  #默认为true,值改为false
#
# Make sure that the heap size is set to about half the memory available
# on the system and that the owner of the process is allowed to use this
# limit.
#
# Elasticsearch performs poorly when the system is swapping the memory.
#
# ---------------------------------- Network -----------------------------------
#
# Set the bind address to a specific IP (IPv4 or IPv6):
#
network.host: 10.0.101.100  #本机服务器IP
#
# Set a custom port for HTTP:
#
http.port: 9200  #端口
#
# For more information, consult the network module documentation.
#
# --------------------------------- Discovery ----------------------------------
#
# Pass an initial list of hosts to perform discovery when new node is started:
# The default list of hosts is ["127.0.0.1", "[::1]"]
#
discovery.zen.ping.unicast.hosts: ["10.0.101.100", "10.0.101.101", "10.0.101.102"]  #集群服务器IP
#
# Prevent the "split brain" by configuring the majority of nodes (total number of master-eligible nodes / 2 + 1):
#
discovery.zen.minimum_master_nodes: 3  #集群节点数
#
# For more information, consult the zen discovery module documentation.
#
# ---------------------------------- Gateway -----------------------------------
#
# Block initial recovery after a full cluster restart until N nodes are started:
#
#gateway.recover_after_nodes: 3
#
# For more information, consult the gateway module documentation.
#
# ---------------------------------- Various -----------------------------------
#
# Require explicit names when deleting indices:
#
#action.destructive_requires_name: true
#增加以下属性,3台服务器一样
bootstrap.system_call_filter: false
transport.tcp.port: 9300
transport.tcp.compress: true
http.cors.enabled: true
http.cors.allow-origin: "*"
2.3.同步
将安装配置好的组件包,用以下命令同步到另外2台服务器:
scp -r /opt/elk/elasticsearch-6.2.4/ root@172.16.10.92:/opt/elk/elasticsearch-6.2.4/
scp -r /opt/elk/elasticsearch-6.2.4/ root@172.16.10.93:/opt/elk/elasticsearch-6.2.4/
在另外2台服务器上修改elasticsearch.yml文件的以下2个属性值,其它的3台服务器一样:
node.name: node-101
network.host: 10.0.101.101
2.4.创建用户
由于elasticsearch不能使用root账户启动,用以下命令需要新建一个用户:
#创建用户
useradd elasticsearch

#设置密码
passwd elasticsearch

#用户授权
chown -R elasticsearch:elasticsearch /opt/elk/elasticsearch-6.2.4
chmod 777 /opt/elk/elasticsearch-6.2.4

#切换用户
su elasticsearch
2.5.内存配置
es默认会给jvm heap分配2个G的大小,对于几乎所有的生产环境来说,这个内存都太小了。如果用这个默认的heap size,在生产环境的集群肯定表现不会太好。
调节有两个方式:
- 启动时,比如:ES_JAVA_OPTS="-Xms10g -Xmx10g" ./bin/elasticsearch。
- es 5.x以上,一般推荐在jvm.options文件里面去设置jvm相关的参数。
设置多大内存给es?
将机器上少于一半的内存分配给es,但是还有个觉得es读写搜索的用户lucene,是要使用底层的os filesystem cache来缓存数据结构,es的性能很大的一块,
其实是由有多少内存留给操作系统的os cache,供lucene去缓存索引文件,来决定的。所以说lucene的os cache有多少是非常重要的。
一般建议的是,将50%的内存分配给es jvm heap,然后留50%的内存给os cache。
不要超过32G内存?
不要将超过32G内存的内存分配给es的jvm heap 如果heap小于32G的化,jvm会用一种技术来压缩对象的指针,会自动采用32位pointer,
如果你给jvm heap分配超过32G的内存,实际上是没有什么意义的,因为用64位的pointer,1/3的内存都给object pointer给占据了,超过32G,就没法用32位pointer。
不用32位pointer,就只能用64位pointer,此时object pinter的大小会急剧增长,更多的cpu到内存的带宽会被占据,更多的内存被耗费。
可以给jvm option加入:
-XX:+PrintFlagsFinal
然后可以打印出来UseCompressedOops是否为true。这就可以让我们找到最佳的内存设置。可以不断调节内存大小,然后观察是否启用compressed oops。

2.6.系统配置(root用户下)
-
File Descriptors(文件描述符)
Elasticsearch使用了很多文件描述符或文件句柄。耗尽文件描述符可能是灾难性的,很可能会导致数据丢失。确保将运行Elasticsearch的用户打开文件描述符数量的限制增加到65536或更高。
vim /etc/security/limits.conf
增加以下属性:
elasticsearch soft nofile 65535
elasticsearch hard nofile 65535
检查: GET _nodes/stats/process?filter_path=**.max_file_descriptors
- Disable swapping(禁用内存交换)
大多数操作系统都会使用尽量多的内存来进行file system cache,并且尽量将不经常使用的java应用的内存swap到磁盘中去。这会导致jvm heap的部分内存,甚至是用来执行代码的内存页被swap到磁盘中去。性能会有多差。
因此通常建议彻底关闭机器上的swap 禁止的方式(有以下3种方式可以禁止):
-
- 1、临时性禁止swap:swapoff -a,要永久性的禁止swap,需要修改/etc/fstab文件,然后将所有包含swap的行都注释掉
- 2、配置swappiness,通过sysctl,将vm.swappiness设置为1,sysctl -w vm.swappiness=1
- 3、启用bootstrap.memory_lock 将es jvm进程的address space锁定在内存中,阻止es内存被swap out到磁盘上去。 在config/elasticsearch.yml中,可以配置:bootstrap.memory_lock: true 启动会报锁定内存失败错误:

这时,需要设置/etc/security/limits.conf权限:
#授予Elasticsearch用户锁定内存的权限,跟(bootstrap.memory_lock: true)参数有关
elasticsearch soft memlock unlimited
elasticsearch hard memlock unlimited
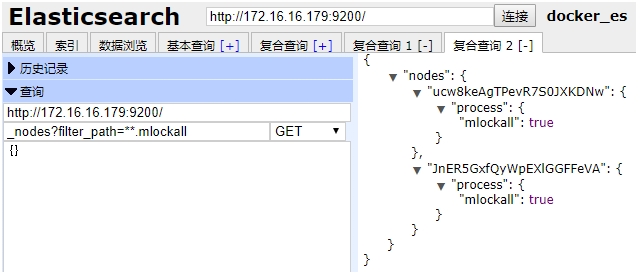
查看配置是否成功:
GET _nodes?filter_path=**.mlockall
- Virtual memory(虚拟内存)
Elasticsearch默认使用一个mappfs目录来存储索引。默认操作系统对mmap计数的限制可能太低,这可能会导致内存不足异常。
-
- 暂时设置
sysctl -w vm.max_map_count=655360 - 永久设置:
- 暂时设置
vim /etc/sysctl.conf
vm.max_map_count=655360
- Number of threads(线程数)
Elasticsearch为不同类型的操作使用了许多线程池。它能够在需要时创建新线程,这一点很重要。确保Elasticsearch用户可以创建的线程数量至少是4096个。
vim /etc/security/limits.conf
增加以下属性:
elasticsearch soft nproc 4096
elasticsearch hard nproc 4096
-
TCP retransmission timeout(TCP重传超时)
集群中的每一对节点通过许多TCP连接进行通信,这些TCP连接一直保持打开状态,直到其中一个节点关闭或由于底层基础设施中的故障而中断节点之间的通信。
TCP通过对通信应用程序隐藏临时的网络中断,在偶尔不可靠的网络上提供可靠的通信。在通知发送者任何问题之前,您的操作系统将多次重新传输任何丢失的消息。
大多数Linux发行版默认重传任何丢失的数据包15次。重传速度呈指数级下降,所以这15次重传需要900秒才能完成。这意味着Linux使用这种方法需要花费许多分钟来检测网络分区或故障节点。
Windows默认只有5次重传,相当于6秒左右的超时。Linux默认允许在可能经历很长时间包丢失的网络上进行通信,但是对于单个数据中心内的生产网络来说,这个默认值太大了,
就像大多数Elasticsearch集群一样。高可用集群必须能够快速检测节点故障,以便它们能够通过重新分配丢失的碎片、重新路由搜索以及可能选择一个新的主节点来迅速作出反应。
因此,Linux用户应该减少TCP重传的最大数量。
vim /etc/sysctl.conf
增加以下属性:
net.ipv4.tcp_retries2 = 5
2.7.启动
切换为elk用户,输入以下命令启动:
su elasticsearch
cd /opt/elk/elasticsearch-6.2.4/bin
./elasticsearch
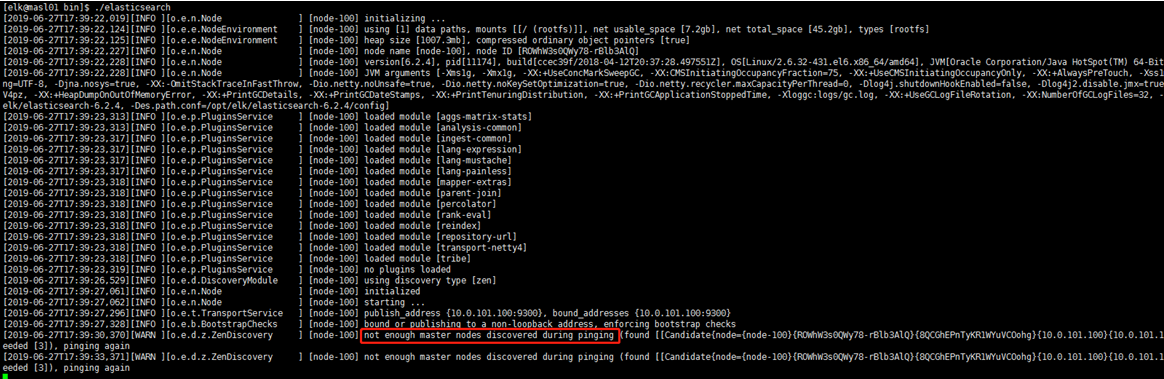
- 第1台启动成功,没有报错,提示以下信息属于正常现像,因为另外2台服务器还没有启动:
- 第2台启动成功,情况跟第1台一样:

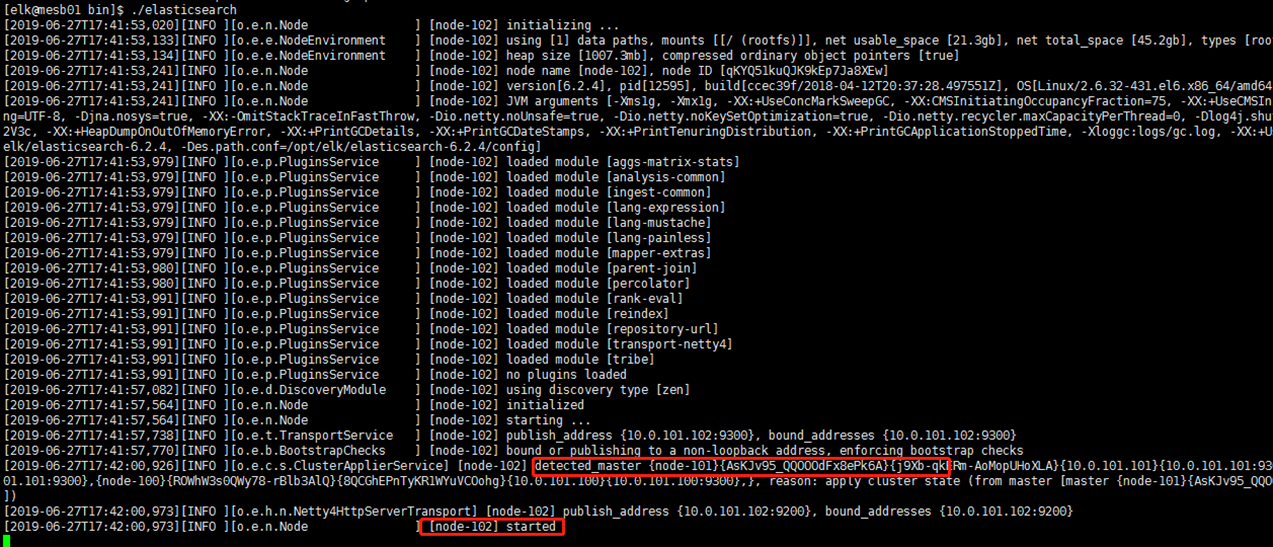
- 第3台启动成功
3.验证
- 在其中一台服务器上,输入以下命令,IP要改成相应环境的:
curl '10.0.101.100:9200/_cluster/health?pretty'

- 输入以下命令,检查master节点是否成功创建:
curl '10.0.101.100:9200/_cat/master?v'

引用:
- https://link.zhihu.com/?target=https%3A//www.elastic.co/guide/en/elasticsearch/reference/7.11/system-config.html
- https://zhaheng.gitbooks.io/elasticsearch-book/content/elasticsearchyou-hua/elasticsearchnei-cun-you-hua.html

