spring零配置AOP踩坑指南
今天照着书,试着配了AOP(全注解),结果踩了各种坑,后来参考书附带的源码,终于走出来了,现在总结一下
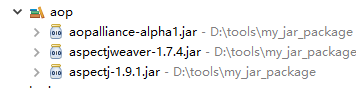
- 除了spring的jar包以外,还需要导入以下包:
1、Spring核心配置文件beans.xml(这里是大坑)
<?xml version="1.0" encoding="UTF-8"?>
<beans xmlns="http://www.springframework.org/schema/beans"
	xmlns:xsi="http://www.w3.org/2001/XMLSchema-instance"
	xmlns:context="http://www.springframework.org/schema/context"
	xmlns:aop="http://www.springframework.org/schema/aop"
	xsi:schemaLocation="http://www.springframework.org/schema/beans
	http://www.springframework.org/schema/beans/spring-beans-4.0.xsd
	http://www.springframework.org/schema/context
	http://www.springframework.org/schema/context/spring-context-4.0.xsd
	http://www.springframework.org/schema/aop
	http://www.springframework.org/schema/aop/spring-aop-4.0.xsd">
	<!-- 启动@AspectJ支持 -->
	<!-- <bean
		class="org.springframework.aop.aspectj.annotation.AnnotationAwareAspectJAutoProxyCreator" /> -->
	<context:component-scan
		base-package="com.sysker.bean,com.sysker.aspect">
		<context:include-filter type="annotation"
			expression="org.aspectj.lang.annotation.Aspect" />
	</context:component-scan>
<!-- 设置AOP为自动代理 -->
	<aop:aspectj-autoproxy />

</beans>
-
如果全部采用注解的话,bean是不需要在这里配置的,只需要在对应的类上面写上@Component("name")注解即可,前面不清楚,所以我在这个坑里呆了很久,书上也没说,自己也没去查
-
这里的另外一个坑就是这里:
<context:component-scan
		base-package="com.sysker.bean,com.sysker.aspect">
		<context:include-filter type="annotation"
			expression="org.aspectj.lang.annotation.Aspect" />
	</context:component-scan>
- 如果这里路径配置有问题的话,会提示找不到bean,错误信息大概如下:
Loading XML bean definitions from class path resource [beans.xml]
Exception in thread "main" org.springframework.beans.factory.NoSuchBeanDefinitionException: No bean named 'hello' availa
ble
	at org.springframework.beans.factory.support.DefaultListableBeanFactory.getBeanDefinition(DefaultListableBeanFactory.ja
va:686)
	at org.springframework.beans.factory.support.AbstractBeanFactory.getMergedLocalBeanDefinition(AbstractBeanFactory.java:
1210)
	at org.springframework.beans.factory.support.AbstractBeanFactory.doGetBean(AbstractBeanFactory.java:291)
	at org.springframework.beans.factory.support.AbstractBeanFactory.getBean(AbstractBeanFactory.java:204)
	at org.springframework.context.support.AbstractApplicationContext.getBean(AbstractApplicationContext.java:1095)
	at com.sysker.test.AspectJTest.main(AspectJTest.java:22)
- base-package里面可以配置多个路径,一定要完整
2、 Aspect类(这里有另外的大坑)
package com.sysker.aspect;

import org.aspectj.lang.annotation.Aspect;
import org.aspectj.lang.annotation.Before;

@Aspect
public class AuthAspect {
    @Before("execution(* com.sysker.impl.*.*(..))")
    public void authority() {
        System.out.println("模拟执行权限检查");
    }
}
- 这里就有另外一个大坑在等着你,主要会出错的地方还是路径的问题:
@Before("execution(* com.sysker.impl.*.*(..))")
- 路径必须正确,否则是没有效果了,比如我的路径,impl下的实现类要实现AOP,那么我的路径是要配到impl,然后还要有.. ,不然就是各种无效果,而且还不报错;
- 还要提一下,Aspect必须要注解,注解,注解,就这样的@Aspect,然后后面的@Before("execution(* com.sysker.impl..(..))"),就是要执行的操作
- 如果要针对某一个类,比如HelloImpl类,这需要写出具体的类:
@Before("execution(* com.sysker.impl.HelloImpl.*(..))")
- 如果要针对某一个的具体方法,就需要写出具体的类的方法:
@Before("execution(* com.sysker.impl.HelloImpl.foo(..))")
3、service及Impl
package com.sysker.bean;


public interface Hello {
    void foo();

    int addUser(String name, String pass);
}
package com.sysker.bean;


public interface World {
    public void bar();


}
- service是不要注解的,也没必要
package com.sysker.impl;

import org.springframework.stereotype.Component;

import com.sysker.bean.Hello;

@Component("hello")
public class HelloImpl implements Hello {
    @Override
    public void foo() {
        System.out.println("执行Hello组件的foo()方法");
    }
    @Override
    public int addUser(String name, String pass) {
        System.out.println("执行Hello组件的addUser添加用户:" + name);
        return 20;
    }
}
package com.sysker.impl;

import org.springframework.stereotype.Component;

import com.sysker.bean.World;
@Component("world")
public class WorldImpl implements World {

    @Override
    public void bar() {
        System.out.println("执行World组件的bar()方法");
    }

}
- 这里需要注意的就是上面提到的,要注解@Component("world"),后面通过Spring容器创建对象要用到
4、测试类
package com.sysker.test;
import org.springframework.context.ApplicationContext;
import org.springframework.context.support.ClassPathXmlApplicationContext;
import com.sysker.bean.Hello;
import com.sysker.bean.World;
import com.sysker.impl.HelloImpl;
import com.sysker.impl.WorldImpl;
public class AspectJTest {
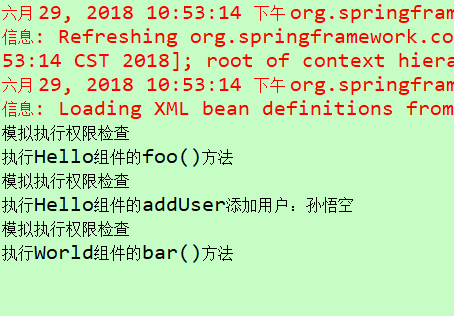
public static void main(String[] args) {
ApplicationContext ctx = new
ClassPathXmlApplicationContext("beans.xml");
Hello hello = ctx.getBean("hello" , Hello.class);
hello.foo();
hello.addUser("孙悟空" , "7788");
World world = ctx.getBean("world" , World.class);
world.bar();
}
}
正常运行结果:
总结
今天虽然在这个问题上快纠结了一天,但总算功夫没白费,终于把这个坑填平了,收获满满,继续加油,不说了,我要继续去写bug了!!!

 浙公网安备 33010602011771号