微服务之间的通讯安全(二)-使用JWT优化认证机制
1、使用JWT来解决认证中存在的问题
之前说认证中存在的问题是效率低,每次都要取认证服务器进行校验;不安全,传递用户信息是放到请求头中的明文。这两个问题的解决方案就是JWT。JWT官网扫盲连接https://jwt.io/introduction/。
因为我们之前发出去的令牌都是一些无意义的串,而JWT中可以包含一些用户信息,这样前端发请求过来,网关就不需要去认证服务器校验了,我们只需要校验这个JWT是否被串改,并且从里面将用户信息读出来就可以了,往下转发传递和服务与服务之间进行调用时,只需要传递JWT就可以了。并且Spring给我们提供了工具,不用我们自己写代码就可以完成。我们要将架构改成下图:

2、认证服务器改造,使其发送JWT令牌
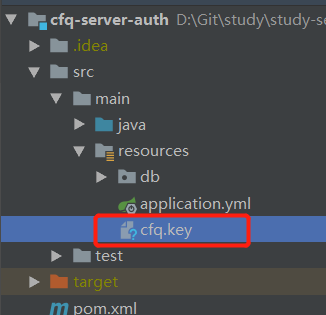
2.1、将之前API安全-https中使用keytool生成的证书copy到resources下

2.2、OAuth2认证服务器配置类,将tokenStore设置为JwtTokenStore,并对暴露获取令牌签名的验证密钥
/**
 * OAuth2认证服务器配置类
 * 需要继承AuthorizationServerConfigurerAdapter类,覆盖里面三个configure方法
 * 并添加@EnableAuthorizationServer注解,指定当前应用做为认证服务器
 *
 * @author caofanqi
 * @date 2020/1/31 18:04
 */
@Configuration
@EnableAuthorizationServer
public class OAuth2AuthServerConfig extends AuthorizationServerConfigurerAdapter {


    @Resource
    private AuthenticationManager authenticationManager;

    @Resource
    private DataSource dataSource;

    @Resource
    private UserDetailsService userDetailsService;

    /**
     * 配置授权服务器的安全性
     * checkTokenAccess:验证令牌需要什么条件,isAuthenticated():需要经过身份认证。
     * 此处的passwordEncoders是为client secrets配置的。
     * tokenKeyAccess:设置对获取令牌签名的验证密钥需要通过身份认证
     */
    @Override
    public void configure(AuthorizationServerSecurityConfigurer security) throws Exception {
        security
                .checkTokenAccess("isAuthenticated()")
                .passwordEncoder(new BCryptPasswordEncoder())
                .tokenKeyAccess("isAuthenticated()");
    }


    /**
     * 配置客户端服务
     */
    @Override
    public void configure(ClientDetailsServiceConfigurer clients) throws Exception {
        //从数据库中读取
        clients.jdbc(dataSource);
    }

    /**
     * 配置授权服务器终端的非安全特征
     * authenticationManager 校验用户信息是否合法
     * tokenStore:token存储
     * userDetailsService:配合刷新令牌使用
     * tokenEnhancer:令牌增强器
     */
    @Override
    public void configure(AuthorizationServerEndpointsConfigurer endpoints) throws Exception {
        endpoints
                .authenticationManager(authenticationManager)
//                .tokenStore(new JdbcTokenStore(dataSource))
                .tokenStore(new JwtTokenStore(jwtTokenEnhancer()))
                .tokenEnhancer(jwtTokenEnhancer())
                .userDetailsService(userDetailsService);
    }


    /**
     *  jwt令牌增强器,使用KeyPair提高安全度。
     *  声明为spring bean是为了让资源服务器可以获取令牌签名的验证密钥 ,TokenKeyEndpoint类中的 /oauth/token_key
     */
    @Bean
    public JwtAccessTokenConverter jwtTokenEnhancer() {
        JwtAccessTokenConverter jwtAccessTokenConverter = new JwtAccessTokenConverter();
        //jwtAccessTokenConverter.setSigningKey("123456");
        KeyStoreKeyFactory keyStoreKeyFactory = new KeyStoreKeyFactory(new ClassPathResource("cfq.key"), "123456".toCharArray());
        jwtAccessTokenConverter.setKeyPair(keyStoreKeyFactory.getKeyPair("cfq"));
        return jwtAccessTokenConverter;
    }

}
2.3、启动资源服务器获取令牌

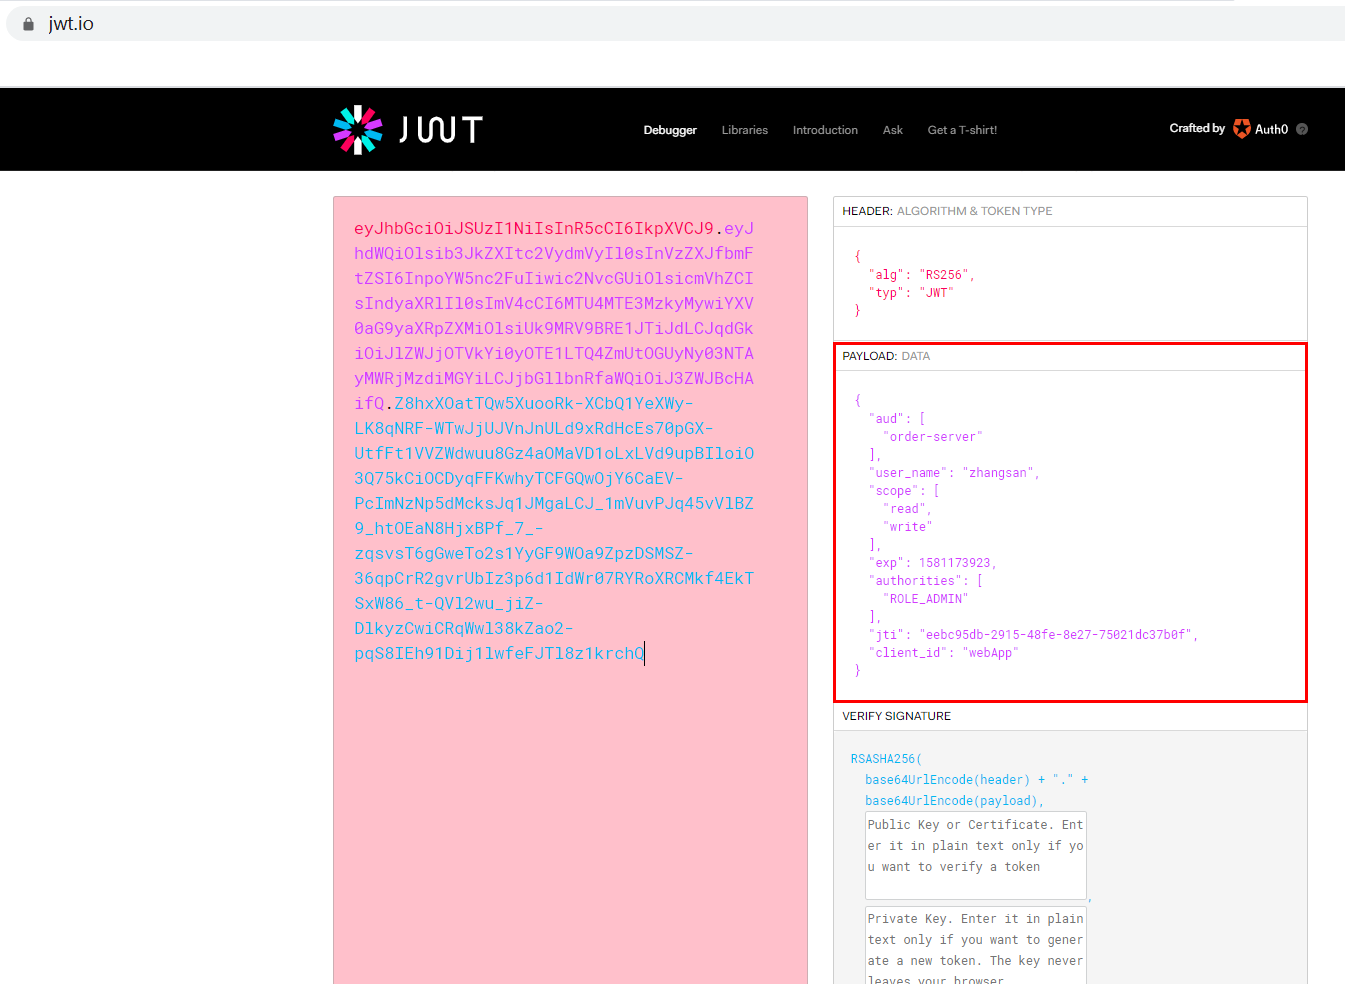
可以发现,我们现在获取到的令牌比以前长了,我们将他复制到jwt官网,可以看到如下,解析后JWT的PAYLOAD中存放这一些数据,aud:该令牌可以访问的资源服务器,user_name:申请令牌的用户,scope:令牌的scope,exp:令牌的过期时间,authorities:申请令牌用户的角色信息,client_id:申请令牌的客户端id,jti:相当于该令牌的id。当然,我们也可以在这里面加入一些信息,但是不建议,因为jwt只是防篡改,任何人都能看到里面的数据,往里面加入一些业务信息,有可能导致信息泄漏。


3.1.2、引入oauth2依赖
        <dependency>
            <groupId>org.springframework.cloud</groupId>
            <artifactId>spring-cloud-starter-oauth2</artifactId>
        </dependency>
3.1.3、application.yml配置获取令牌签名的验证密钥地址,因为认证服务器设置了需要认证,我们还要配上client-id和client-secret
server:
  port: 9010

zuul:
  routes:
    token:
      url: http://auth.caofanqi.cn:9020
      path: /token/**
    order:
      url: http://order.caofanqi.cn:9080
      path: /order/**
  sensitive-headers:

security:
  oauth2:
    client:
      client-id: gateway
      client-secret: 123456
    resource:
      jwt:
        key-uri: http://auth.caofanqi.cn:9020/oauth/token_key
3.1.4、网关资源服务器配置,放过申请令牌请求
/**
 * 网关资源服务器配置
 *
 * @author caofanqi
 * @date 2020/2/8 22:30
 */
@Configuration
@EnableResourceServer
public class GatewayResourceServerConfig extends ResourceServerConfigurerAdapter {


    @Override
    public void configure(ResourceServerSecurityConfigurer resources) throws Exception {
        resources.resourceId("gateway");
    }

    @Override
    public void configure(HttpSecurity http) throws Exception {
        http
                .authorizeRequests()
                //放过申请令牌的请求不需要身份认证
                .antMatchers("/token/**").permitAll()
                .anyRequest().authenticated();
    }

}
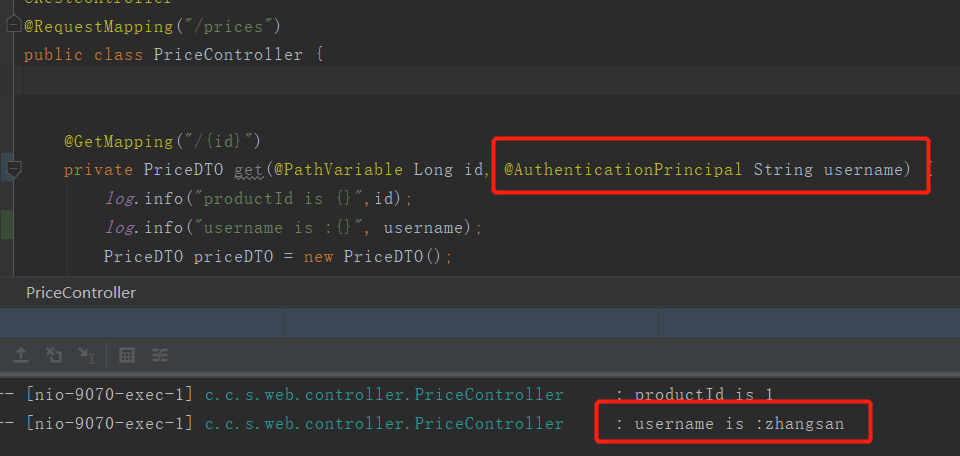
3.1.5、Order和Price资源服务器配置,也是需要引入oauth2依赖,配置获取令牌签名的验证密钥地址,client-id和client-secret,但是调用服务的请求需要由RestTemplate替换为OAuth2RestTemplate,这样就会将在我们调用别的服务时,将jwt一并传递过去。获取用户信息,通过@AuthenticationPrincipal注解进行获取。
/**
 * 订单微服务
 *
 * @author caofanqi
 * @date 2020/1/31 14:22
 */
@EnableResourceServer
@SpringBootApplication
public class OrderApiApplication {


    public static void main(String[] args) {
        SpringApplication.run(OrderApiApplication.class,args);
    }

    /**
     *  将OAuth2RestTemplate声明为spring bean,OAuth2ProtectedResourceDetails,OAuth2ClientContext springboot会自动帮我们注入
     */
    @Bean
    public OAuth2RestTemplate oAuth2RestTemplate(OAuth2ProtectedResourceDetails resource, OAuth2ClientContext context){
        return new OAuth2RestTemplate(resource,context);
    }

}
/**
 * 订单控制层
 *
 * @author caofanqi
 * @date 2020/1/31 14:26
 */
@Slf4j
@RestController
@RequestMapping("/orders")
public class OrderController {

    @Resource
    private OAuth2RestTemplate oAuth2RestTemplate;

    @PostMapping
    public OrderDTO create(@RequestBody OrderDTO orderDTO, @AuthenticationPrincipal String username) {
        log.info("username is :{}", username);
        PriceDTO price = oAuth2RestTemplate.getForObject("http://127.0.0.1:9070/prices/" + orderDTO.getProductId(), PriceDTO.class);
        log.info("price is : {}", price.getPrice());
        return orderDTO;
    }


    @GetMapping("/{id}")
    public OrderDTO get(@PathVariable Long id, @AuthenticationPrincipal String username) {
        log.info("username is :{}", username);
        OrderDTO orderDTO = new OrderDTO();
        orderDTO.setId(id);
        orderDTO.setProductId(5 * id);
        return orderDTO;
    }

}
3.1.6、测试,需要先启动认证服务器,因为各资源服务器需要在启动时获取令牌签名的验证密钥。
获取令牌,通过网关创建订单,报错403,是因为我们通过webApp申请的令牌可以访问的资源服务器没有添加gateway,


我们可以在resource_ids添加上gateway,也可以什么都不填,这样发出去的令牌就可以访问所有的资源服务器了。

我们这里,什么都不填写,然后重新申请令牌,再次通过网关创建订单,可以正常创建,并且在订单服务和价格服务中可以获取到username


我们传一个错误的令牌或者不传令牌进行访问,会返回401,这说明我们之前写的逻辑SpringSecurity和SpringSecurityOauth都已经帮我们实现好了。

项目源码:https://github.com/caofanqi/study-security/tree/dev-jwt-authentication


