Nginx 代理 ;nginx优化
一、Nginx代理理解
1. Nginx代理服务基本概述
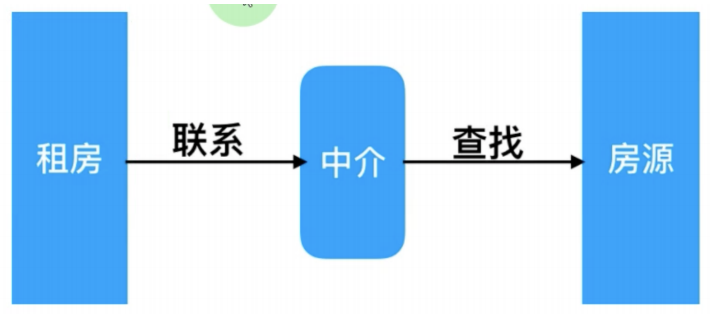
什么是代理
代理一词往往并不陌生, 该服务我们常常用到如(代理理财、代理租房、代理收货等等),如下图所示
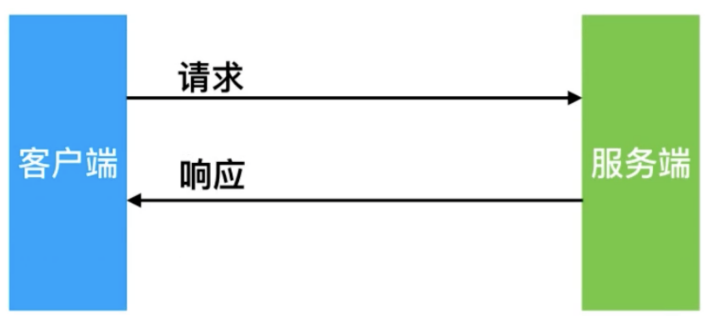
没有代理情景
在没有代理模式的情况下,客户端和Nginx服务端,都是客户端直接请求服务端,服务端直接响应客户端。
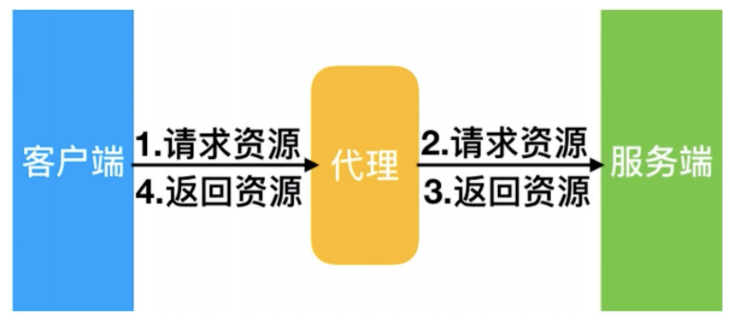
企业场景
那么在互联网请求里面,客户端往往无法直接向服务端发起请求,那么就需要用到代理服务,来实现客户端和服务通信,如下图所示
2. Nginx代理服务常见模式
Nginx作为代理服务,按照应用场景模式进行总结,代理分为正向代理、反向代理
1 )正向代理
正向代理,(内部上网)客户端<—>代理->服务端
2) 反向代理
反向代理,用于公司集群架构中,客户端->代理<—>服务端
3) 正向代理与反向代理的区别
1.区别在于形式上服务的”对象”不一样
2.正向代理代理的对象是客户端,为客户端服务
3.反向代理代理的对象是服务端,为服务端服务
3.Nginx代理服务支持协议
| 反向代理模式 | Nginx配置模块 |
|---|---|
| http、websocket、https、tomcat、Java程序 | ngx_http_proxy_module |
| fastcgi(php程序) | ngx_http_fastcgi_module |
| uwsgi(python程序) | ngx_http_uwsgi_module |
| grpc(golang程序) | ngx_http_v2_module |
4.Nginx配置代理语法
Syntax:	proxy_pass URL;
Default:	—
Context:	location, if in location, limit_except
二、配置nginx代理实践
1.环境准备
| 主机 | 外网 | 内网 |
|---|---|---|
| lb01 | 192.168.15.4 | 172.16.1.4 |
| web01 | 192.168.15..7 | 172.16.1.7 |
2.配置web01网站
[root@web01 conf.d]# vim proxy.conf
server {
    listen 80;
    server_name proxy.linux.com;

    location / {
        root /code/proxy;
        index index.html;
    }
}

[root@web01 ~]# systemctl restart nginx
3.编写网站
[root@web01 ~]# echo "web01 web01 web01 ........" > /code/proxy/index.html
4.配置代理
#安装nginx
#配置nginx
#创建用户
[root@lb01 ~]# vim /etc/nginx/conf.d/daili.conf
server {
    listen 80;
    server_name proxy.linux.com;

    location / {
        proxy_pass http://192.168.15.7;
    }
}

#启动nginx
5.配置hosts,域名指向代理服务器
192.168.15.4 proxy.linux.com
6.访问页面查看
访问页面不是域名对应的页面,是web01上面nginx第一个配置文件
使用wireshark抓包分析
可以看出,当我们只用proxy_pass代理的时候,会发现如下问题:
192.168.15.1请求192.168.15.4的时候使用的是域名
192.168.15.4请求192.168.15.7的时候使用的是IP:port

之前,当访问80端口的时候,没有域名的情况下,默认会去找排在最上面的那个配置文件。
所以我们需要解决这个问题,保留住最开始的请求头部信息。
proxy_set_header,这个模块可以帮我们解决这个问题
三、Nginx代理常用参数
1.添加发往后端服务器的请求头信息
Syntax:    proxy_set_header field value;
Default:    proxy_set_header Host $proxy_host;
            proxy_set_header Connection close;
Context:    http, server, location

# 用户请求的时候HOST的值是www.daili.com, 那么代理服务会像后端传递请求的还是www.daili.com
proxy_set_header Host $http_host;
# 将$remote_addr的值放进变量X-Real-IP中,$remote_addr的值为客户端的ip
proxy_set_header X-Real-IP $remote_addr;
# 客户端通过代理服务访问后端服务, 后端服务通过该变量会记录真实客户端地址
proxy_set_header X-Forwarded-For $proxy_add_x_forwarded_for;

日志里面还可以配置 "$httpd_x_real_ip"
2. 代理到后端的TCP连接、响应、返回等超时时间
#nginx代理与后端服务器连接超时时间(代理连接超时)
Syntax:  proxy_connect_timeout time;
Default: proxy_connect_timeout 60s;
Context: http, server, location

#nginx代理等待后端服务器的响应时间
Syntax:     proxy_read_timeout time;
Default:    proxy_read_timeout 60s;
Context:    http, server, location

#后端服务器数据回传给nginx代理超时时间
Syntax:  proxy_send_timeout time;
Default: proxy_send_timeout 60s;
Context: http, server, location
3.proxy_buffer代理缓冲区
#nignx会把后端返回的内容先放到缓冲区当中,然后再返回给客户端,边收边传, 不是全部接收完再传给客户端
Syntax:  proxy_buffering on | off;
Default: proxy_buffering on;
Context: http, server, location

#设置nginx代理保存用户头信息的缓冲区大小
Syntax:  proxy_buffer_size size;
Default: proxy_buffer_size 4k|8k;
Context: http, server, location

#proxy_buffers 缓冲区
Syntax:  proxy_buffers number size;
Default: proxy_buffers 8 4k|8k;
Context: http, server, location
4.常用的优化配置
[root@lb01 ~]# vim /etc/nginx/conf.d/www.daili.com.conf
server{
	listen 80;
	server_name www.daili.com;
    }
location / {
        proxy_pass http://127.0.0.1:8080;
        include proxy_params;
     }
}

[root@lb01 ~]# vim /etc/nginx/proxy_params
proxy_set_header Host $http_host;
proxy_set_header X-Real-IP $remote_addr;
proxy_set_header X-Forwarded-For $proxy_add_x_forwarded_for;

proxy_connect_timeout 30;
proxy_send_timeout 60;
proxy_read_timeout 60;

proxy_buffering on;
proxy_buffer_size 32k;
proxy_buffers 4 128k;
四、Nginx 优化
一、性能优化概述
1、首先需要了解我们当前系统的结构和瓶颈,了解当前使用的是什么,运行的是什么业务,都有哪些服务,了解每个服务最大能支撑多少并发。比如nginx作为静态资源服务并发是多少,最高瓶颈在哪里,能支持多少qps(每秒查询率)的访问请求,那我们怎么得出这组系统结构瓶颈呢,比如top查看系统的CPU负载、内存使用率、总得运行进程等,也可以通过日志去分析请求的情况,当然也可以通过我们前面介绍到的stub_status模块查看当前的连接情况,也可以对线上的业务进行压力测试(低峰期),去了解当前这套系统能承担多少的请求和并发,已做好响应的评估。这个是我们做性能优化最先考虑的地方。

2、其次我们需要了解业务模式,虽然我们是做性能优化,但每一个性能的优化都是为业务所提供的服务的,我们需要了解每个业务接口的类型,比如:电商网站中的抢购模式,这种情况下面,平时没什么流量,但到了抢购时间流量会突增。
我们还需要了解系统层次化的结构,比如:我们使用nginx做的是代理、还是动静分离、还是后端直接服务用户,那么这个就需要我们对每一层做好相应的梳理。以便更好的服务业务。

3、最后我们需要考虑性能与安全,往往注重了性能,但是忽略了安全。往往过于注重安全,对性能又会产生影响。比如:我们在设计防火墙功能时,检测过于严密,这样就会给性能带来影响。那么如果对于性能完全追求,却不顾服务的安全,这个也会造成很大的隐患,所以需要评估好两者的关系,把握好两者的孰重孰轻。以及整体的相关性,权衡好对应的点。


1.首先需要了解我们当前系统的结构和瓶颈
2.分析服务的限制和使用情况
3.了解业务模式
4.了解系统层次化的结构
5.考虑性能与安全
2.从哪些方面入手进行优化
OSI 七层模型:物理层,数据链路层,网络层,传输层,会话层,表示层,应用层

1.硬件 如果nginx做代理(CPU),静态资源(磁盘读写性能,磁盘大小),动态资源(CPU,内存)
2.网络 带宽,丢包,延迟
3.系统 文件描述符(文件句柄数)
4.应用 服务与服务保持长连接
5.服务 静态资源服务优化
3.压力测试工具(ab)
1)安装ab压力测试工具
[root@web01 ~]# yum install -y httpd-tools
2)测试工具参数
[root@web01 ~]# ab -n 200 -c 2 http://www.dan.com/

-n	指定请求次数
-c	指定并发数
-k	开启长连接

[root@web01 ~]# ab
Usage: ab [options] [http[s]://]hostname[:port]/path
3)配置nginx静态网站
#配置nginx
[root@web01 conf.d]# vim ab.linux.com.conf
server {
    listen 80;
    server_name ab.linux.com;

    location / {
        root /code/ab;
        try_files $uri $uri/ @java;
    }

    location @java {
        proxy_pass http://127.0.0.1:8080;
    }
}

#配置nginx站点目录文件
[root@web01 conf.d]# echo linux_nginx > /code/ab/index.html
[root@web01 conf.d]# systemctl restart nginx
4)压力测试静态网站
[root@web01 conf.d]# ab -n 10000 -c 200 http://ab.linux.com/index.html
This is ApacheBench, Version 2.3 <$Revision: 1430300 $>
Copyright 1996 Adam Twiss, Zeus Technology Ltd, http://www.zeustech.net/
Licensed to The Apache Software Foundation, http://www.apache.org/

Benchmarking ab.linux.com (be patient)
Completed 1000 requests
Completed 2000 requests
Completed 3000 requests
Completed 4000 requests
Completed 5000 requests
Completed 6000 requests
Completed 7000 requests
Completed 8000 requests
Completed 9000 requests
Completed 10000 requests
Finished 10000 requests


Server Software:        nginx/1.16.1
Server Hostname:        ab.linux.com
Server Port:            80

Document Path:          /index.html
Document Length:        12 bytes

Concurrency Level:      200
Time taken for tests:   4.195 seconds
Complete requests:      10000
Failed requests:        0
Write errors:           0
Total transferred:      2420000 bytes
HTML transferred:       120000 bytes
Requests per second:    2383.81 [#/sec] (mean)
Time per request:       83.899 [ms] (mean)
Time per request:       0.419 [ms] (mean, across all concurrent requests)
Transfer rate:          563.36 [Kbytes/sec] received
5)配置tomcat静态网站
#1.下载或上传tomcat包
[root@web01 ~]# mkdir /service
[root@web01 ~]# cd /service
[root@web01 service]# rz apache-tomcat-8.5.51.tar.gz

#2.解压代码包
[root@web01 service]# tar xf apache-tomcat-8.5.51.tar.gz

#3.配置java环境
1.上传并解压至指定文件夹
[root@web01 service]# tar xf jdk-8u40-linux-x64.gz -C /service/
[root@web01 service]# mv jdk1.8.0_40 java1.8
2.修改添加环境变量
[root@web01 service]# vim /etc/profile.d/java.sh
export JAVA_HOME=/service/java1.8
export JRE_HOME=/service/java1.8/jre
export CLASSPATH=.:$JAVA_HOME/lib/dt.jar:$JAVA_HOME/lib/tools.jar:$JAVA_HOME/lib:$JRE_HOME/lib:$CLASSPATH
export PATH=$PATH:$JAVA_HOME/bin
[root@web01 service]# source /etc/profile

#4.配置tomcat页面
[root@web01 service]# echo "linux_tomcat" > apache-tomcat-8.5.51/webapps/ROOT/index.html

#5.启动tomcat,启动的时候最好看着日志
[root@web01 service]# /service/apache-tomcat-8.5.51/bin/startup.sh && tail -f /service/apache-tomcat-8.5.51/logs/catalina.out
6)压力测试tomcat处理静态网站
[root@web01 service]# ab -n 10000 -c 200 http://ab.linux.com/index.html
This is ApacheBench, Version 2.3 <$Revision: 1430300 $>
Copyright 1996 Adam Twiss, Zeus Technology Ltd, http://www.zeustech.net/
Licensed to The Apache Software Foundation, http://www.apache.org/

Benchmarking ab.linux.com (be patient)
Completed 1000 requests
Completed 2000 requests
Completed 3000 requests
Completed 4000 requests
Completed 5000 requests
Completed 6000 requests
Completed 7000 requests
Completed 8000 requests
Completed 9000 requests
Completed 10000 requests
Finished 10000 requests


Server Software:        nginx/1.16.1
Server Hostname:        ab.linux.com
Server Port:            80

Document Path:          /index.html
Document Length:        13 bytes

Concurrency Level:      200
Time taken for tests:   19.267 seconds
Complete requests:      10000
Failed requests:        0
Write errors:           0
Total transferred:      2490000 bytes
HTML transferred:       130000 bytes
Requests per second:    519.01 [#/sec] (mean)
Time per request:       385.349 [ms] (mean)
Time per request:       1.927 [ms] (mean, across all concurrent requests)
Transfer rate:          126.20 [Kbytes/sec] received
7)结论
nginx处理静态资源速度比tomcat快很多
8)影响性能的指标
1、网络
    (1)网络的流量
    (2)网络是否丢包
    (3)这些会影响http的请求与调用
2、系统
    (1)硬件有没有磁盘损坏,磁盘速率
    (2)系统的负载、内存、系统稳定性
3、服务
    (1)连接优化。请求优化
    (2)根据业务形态做对应的服务设置
4、程序
    (1)接口性能
    (2)处理速度
    (3)程序执行效率
5、数据库
4.系统性能优化
文件句柄,Linux一切皆文件,文件句柄可以理解为就是一个索引,文件句柄会随着我们进程的调用频繁增加,系统默认文件句柄是有限制的,不能让一个进程无限的调用,所以我们需要限制每个 进程和每个服务使用多大的文件句柄,文件句柄也是必须要调整的优化参数。

#查看文件句柄数    				ulimit -n
#查看一个服务打开多少文件句柄			lsof -p pid
#查看一共打开多少文件句柄数			lsof -i | awk '{print $2}' |wc -l
1)设置文件句柄数
[root@web01 ~]# vim /etc/security/limits.conf
1.系统全局修改文件句柄
# * 代表所有用户,soft代表提醒,hard直接限制,nofile指定打开最大文件数量
* - nofile 65535
* soft nofile 65535
* hard nofile 65535

2.用户局部修改
root - nofile 65535
root soft nofile 65535
root hard nofile 65535

3.进程指定修改
#针对nginx进程,nginx自带配置,nginx.conf
worker_rlimit_nofile 65535;
2)系统层面优化
#调整内核参数:让time_wait状态端口可以重新使用
[root@web01 ~]# sysctl -a   #查看所有内核参数
[root@web01 ~]# sysctl -p	#查看我们手动配置的内核参数
[root@web01 ~]# vim /etc/sysctl.conf
#重用time_wait状态端口
[root@web01 ~]# sysctl -p
net.ipv4.tcp_tw_reuse = 1
五、代理服务优化
通常nginx作为代理服务,负责转发用户的请求,那么在转发的过程中建议开启HTTP长连接,用于减少握手次数,降低服务器损耗。
1.配置nginx代理开启长连接
upstream tomcat {
    server 127.0.0.1:8080;
    keepalive 16;				#开启长连接
}

server {
    listen 80;
    server_name daili.linux.com;

    location /tomcat/ {
        proxy_pass http://tomcat;
        proxy_http_version	1.1;			#指定http协议为1.1版本
        proxy_set_header Connection ""; 	#清除“connection”头字段
        include proxy_params;				#调用优化配置
        proxy_next_upstream error timeout http_500 http_502 http_503 http_504;	#平滑过渡到另一台机器
    }
}
2.代理到php服务保持长连接
upstream php_conn {
    server 127.0.0.1:9000;
    keepalive 16;
}

server {
    listen 80;
    server_name php.linux.com;

    location /php/ {
        root /code;
        fastcgi_pass php_conn;
        fastcgi_param SCRIPT_FILENAME $document_root$fastcgi_script_name;
        #开启长连接
        fastcgi_keep_conn on;
        #长连接超时时间
        fastcgi_connect_timeout 60s;
        include fastcgi_params;
    }
}

 浙公网安备 33010602011771号