Web Api 2 接口API文档美化
使用用第三方提供的swgger ui 帮助提高 web api 接口列表的阅读性,并且可以在页面中测试服务接口。
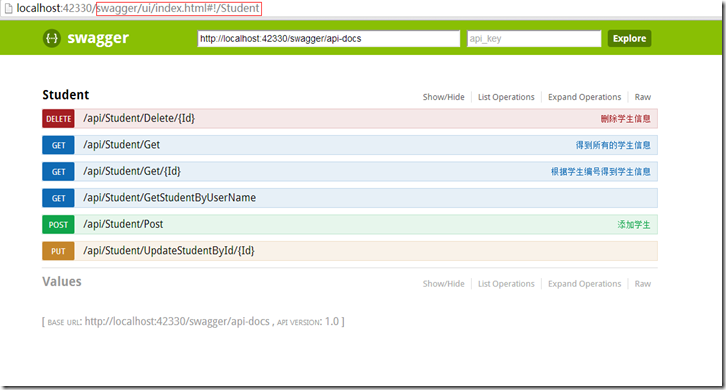
运行程序如下:
注意:在IE中必须输入红色部分。
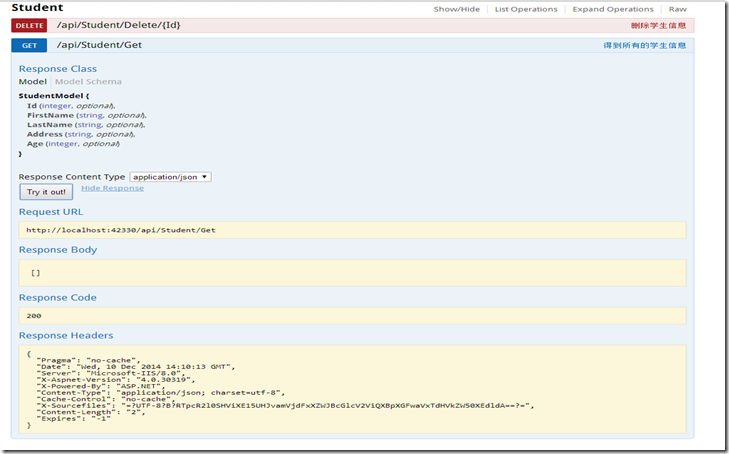
并且可以对方法进行测试。
在开发web api 是可以写清楚注释,并且在文档中可以全部的显示出来。
在工程中处了安装Swashbuckle 以外,还会用到Owin,system.web.http.owin库
在WebApi项目工程中安装:Install-Package Swashbuckle ,安装成功能后,会在项目中的App_Start文件
夹中生成一个文件名为“SwaggerConfig”的文件。并修改如下:
1: using System.Web.Http;
2: using WebApi;
3: using WebActivatorEx;
4: using Swashbuckle.Application;
5:
6: [assembly: PreApplicationStartMethod(typeof(SwaggerConfig), "Register")]
7:
8: namespace WebApi
9: {
10: public class SwaggerConfig
11: {
12: public static void Register()
13: {
14: Swashbuckle.Bootstrapper.Init(GlobalConfiguration.Configuration);
15:
16: // NOTE: If you want to customize the generated swagger or UI, use SwaggerSpecConfig and/or SwaggerUiConfig here ...
17: SwaggerSpecConfig.Customize(c =>
18: {
19: c.IncludeXmlComments(GetXmlCommentsPath());
20: });
21: }
22:
23: private static string GetXmlCommentsPath()
24: {
25: return System.String.Format(@"{0}\bin\WebApi.XML", System.AppDomain.CurrentDomain.BaseDirectory);
26: }
27: }
28: }
在工程中添加一个StartUp的文件,代码如下:
1:
2: using Microsoft.Owin;
3: using Owin;
4: using System;
5: using System.Collections.Generic;
6: using System.Linq;
7: using System.Web;
8: using System.Web.Http;
9:
10: [assembly: OwinStartup(typeof(WebApi.Startup))]
11: namespace WebApi
12: {
13: public class Startup
14: {
15: public void Configuration(IAppBuilder app)
16: {
17: HttpConfiguration config = new HttpConfiguration();
18: WebApiConfig.Register(config);
19: Swashbuckle.Bootstrapper.Init(config);
20: app.UseWebApi(config);
21: }
22: }
23: }
新建一个studentController:
1: namespace WebApi.Controllers
2: {
3: /// <summary>
4: /// 用户接口
5: /// </summary>
6: public class StudentController : ApiController
7: {
8: /// <summary>
9: /// 得到所有的学生信息
10: /// </summary>
11: /// <returns></returns>
12: public IEnumerable<StudentModel> Get()
13: {
14: return new List<StudentModel>();
15: }
16:
17: /// <summary>
18: /// 根据学生编号得到学生信息
19: /// </summary>
20: /// <param name="Id">学生编号</param>
21: /// <returns></returns>
22: public StudentModel Get(int Id)
23: {
24: return new StudentModel { };
25: }
26:
27: /// <summary>
28: /// 添加学生
29: /// </summary>
30: /// <param name="studentModel">学生实体</param>
31: /// <remarks>添加一个新的学生</remarks>
32: /// <response code="400">Bad request </response>
33: /// <response code="500">Internal Server Error</response>
34: public void Post(StudentModel studentModel)
35: {
36: }
37:
38:
39: /// <summary>
40: /// 修改学生信息
41: /// </summary>
42: /// <param name="Id">学生编号</param>
43: /// <param name="studentModel">学生实体</param>
44:
45: [ResponseType(typeof(StudentModel))]
46: [ActionName("UpdateStudentById")]
47: public void Put(int Id, [Form]string studentModel)
48: {
49:
50: }
51:
52: /// <summary>
53: /// 删除学生信息
54: /// </summary>
55: /// <param name="Id">学生编号</param>
56: public void Delete(int Id)
57: {
58: }
59:
60: /// <summary>
61: /// 根据学生姓名得到学生信息
62: /// </summary>
63: /// <param name="name">学生姓名</param>
64: /// <remarks>dfsafdsa</remarks>
65: /// <returns></returns>
66: //[Route(Name = "GetStudentByUserName")]
67: //[ResponseType(typeof(StudentModel))]
68: [HttpGet]
69: [ActionName("GetStudentByUserName")]
70: public IEnumerable<StudentModel> GetStudentByName(string name)
71: {
72: return new List<StudentModel>();
73: }
74: }
75: }
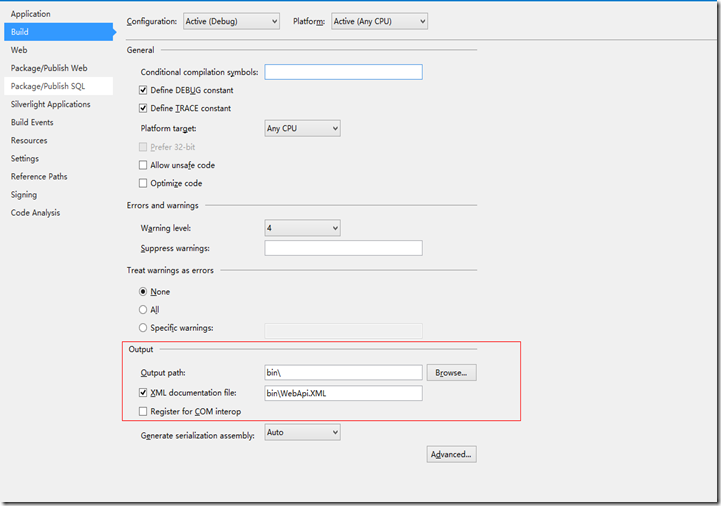
设置工程属性,在属性的构建中设置输出文档:
这里的“bin\WebApi.XML”文件名称和SwaggerConfig文件中的配置保持一样。


 浙公网安备 33010602011771号