Reactive UI -- 反应式编程UI框架入门学习(二)
前文Reactive UI -- 反应式编程UI框架入门学习(一) 介绍了反应式编程的概念和跨平台ReactiveUI框架的简单应用。
本文通过一个简单的小应用更进一步学习ReactiveUI框架的使用和整体布局,并对比与MVVMLight的不同之处。
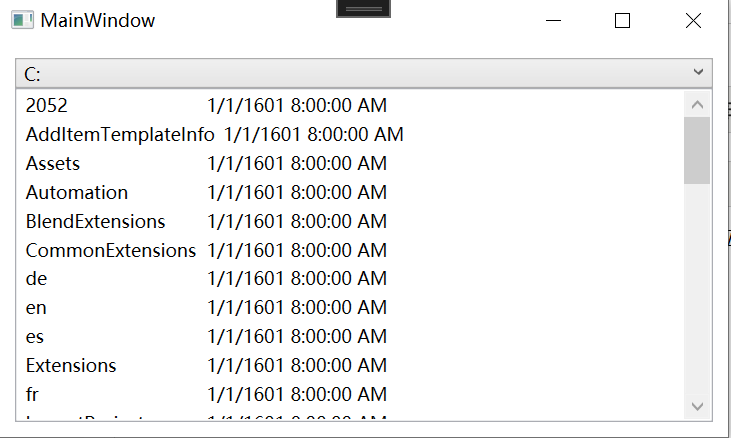
应用的功能很简单,读取本地计算机的所有盘符,并通过选定盘符展示该盘符下的所有文件夹的名称和创建时间。

首先新建一个工程,本文使用的是.Net6.0,并添加两个Nuget包:ReactiveUI.WPF,ReactiveUI.Fody。
ReactiveUI.WPF是框架的核心代码包,而ReactiveUI.Fody是一个扩展包,像[Reactive]这样的标记就是在这个包中定义的。
绑定ViewModel
在MVVMLight框架中,View绑定ViewModel需要通过DataContext来绑定在Locator中定义的ViewModel,而在ReactiveUI框架中,则是通过继承泛型窗口类ReactiveWindow或者泛型用户控件类ReactiveUserControl来自动绑定ViewModel。
<reactiveui:ReactiveWindow  x:TypeArguments="local:MainWindowViewModel"
        x:Class="Calculateor.MainWindow"
        xmlns="http://schemas.microsoft.com/winfx/2006/xaml/presentation"
        xmlns:x="http://schemas.microsoft.com/winfx/2006/xaml"
        xmlns:d="http://schemas.microsoft.com/expression/blend/2008"
        xmlns:mc="http://schemas.openxmlformats.org/markup-compatibility/2006"
        xmlns:local="clr-namespace:Calculateor"
        xmlns:reactiveui="http://reactiveui.net"
        mc:Ignorable="d"
        Title="MainWindow" Height="300" Width="500">
    <Grid Margin="10">
        <Grid.RowDefinitions>
            <RowDefinition Height="20"/>
            <RowDefinition Height="*"/>
        </Grid.RowDefinitions>
        <ComboBox Name="cmbDisks">
            <ComboBox.ItemTemplate>
                <DataTemplate>
                    <TextBlock Text="{Binding }"/>
                </DataTemplate>
            </ComboBox.ItemTemplate>
        </ComboBox>
        <ListBox Grid.Row="1" x:Name="lbFolders"></ListBox>
    </Grid>
</reactiveui:ReactiveWindow>
注意以上Xaml代码中没有出现DataContext。
CS文件中强绑定:
public partial class MainWindow : ReactiveWindow<MainWindowViewModel>
    {
        public MainWindow()
        {
            InitializeComponent();

            ViewModel = new MainWindowViewModel();
            this.WhenActivated(dispos => {

                this.OneWayBind(ViewModel, vm=>vm.Disks, vw=>vw.cmbDisks.ItemsSource)
                .DisposeWith(dispos);

                this.Bind(ViewModel, vm => vm.SelectedDisk, vw => vw.cmbDisks.SelectedItem)
                .DisposeWith(dispos);

                this.OneWayBind(ViewModel,vm=>vm.FolderModels, vw=>vw.lbFolders.ItemsSource)
                .DisposeWith(dispos);
            });


        }
    }
View通过继承指定为MainWindowViewModel类型的ReactiveWindow,便建立了View和ViewModel之间的关联,而不需要额外的指定DataContext去绑定。
界面顶部是一个下拉框,用于显示盘符信息,ItemSource绑定了ReadOnlyObservableCollection<string>类型对象。
    private readonly ReadOnlyObservableCollection<string> _disks;
        public ReadOnlyObservableCollection<string> Disks => _disks;
其选中的盘符则绑定到了一个string类型的属性上。注意Reactive标记
  [Reactive]
  public string SelectedDisk { get; set; }
接着用一个ListBox展示具体的文件夹信息,定义一个FolderModel类型的类来约定需要展示的信息。
public class FolderModel
    {
        public string FolderName { get; set; }
        public DateTime CreateTime { get; set; }

    }
ItemSoruce绑定到一个IEnumerable<FolderModel> FolderModels类型上
        private readonly ObservableAsPropertyHelper<IEnumerable<FolderModel>> _folderModels;
        public IEnumerable<FolderModel> FolderModels => _folderModels.Value;
而 ObservableAsPropertyHelper<IEnumerable<FolderModel>> _folderModels则是用来与SelectedDisk建立观察者模式的联系,每次SelectDisk的值改变时,就会触发方法LoadFolderInfoWithSelectedDiskChanged,并将返回结果赋值到FolderModels对象,最终传导到UI上。
   _folderModels = this.WhenAnyValue(s => s.SelectedDisk)
                .Where(s => !string.IsNullOrWhiteSpace(s))
                .SelectMany(LoadFolderInfoWithSelectedDiskChanged)
                .ObserveOn(RxApp.MainThreadScheduler)//线程调度,后续的代码会在主线程上调用
                .ToProperty(this, nameof(FolderModels));
这里的WhenAnyValue是构建函数声明的核心API,一般都是与ReactiveUI框架扩展的Linq方法搭配使用,前文有过简单的介绍。
在MVVMLight框架中,ViewModel继承的是ViewModelBase/ObservableObject,而在ReactiveUI框架中,ViewModel继承的是ReactiveObject
以下为完整的MainWindowViewModel文件:
public class MainWindowViewModel : ReactiveObject
    {
        public MainWindowViewModel()
        {
            DisksSource = new();
            DisksSource.ToObservableChangeSet()
                .Bind(out _disks)
                .Subscribe();

            _folderModels = this.WhenAnyValue(s => s.SelectedDisk)
                .Where(s => !string.IsNullOrWhiteSpace(s))
                .SelectMany(LoadFolderInfoWithSelectedDiskChanged)
                .ObserveOn(RxApp.MainThreadScheduler)
                .ToProperty(this, nameof(FolderModels));

            Task _ = LoadDisksIqLocal();
        }
        private readonly ReadOnlyObservableCollection<string> _disks;
        public ReadOnlyObservableCollection<string> Disks => _disks;

        public ObservableCollectionExtended<string> DisksSource{get;private set;}

        private readonly ObservableAsPropertyHelper<IEnumerable<FolderModel>> _folderModels;
        public IEnumerable<FolderModel> FolderModels => _folderModels.Value;

        [Reactive]
        public string SelectedDisk { get; set; }

       //通过WMI读取本地计算机的所有磁盘的盘符
        private async Task LoadDisksIqLocal()
        {
            await Task.Run(() => {

                ManagementObjectSearcher query = new("SELECT  *  From  Win32_LogicalDisk");
                var queryCollection = query.Get();

                foreach (var item in queryCollection)
                {
                    var diriveType = (DriveType)int.Parse(item["DriveType"].ToString());
                    if (diriveType == DriveType.Fixed)
                    {
                        var diskID = item["DeviceID"].ToString();
                        DisksSource.Add(diskID);
                    }
                }
            });
        }

        private async Task<IEnumerable<FolderModel>> LoadFolderInfoWithSelectedDiskChanged(string diskName)
        {
            List<FolderModel> folderModels = new List<FolderModel>();
            await Task.Run(() => {
                var files = Directory.GetDirectories(diskName);
                foreach (var fileName in files)
                {
                    FolderModel folderModel = new FolderModel();
                    DirectoryInfo directoryInfo = new DirectoryInfo(fileName);
                    folderModel.FolderName = directoryInfo.Name;
                    folderModel.CreateTime = directoryInfo.CreationTime;
                    folderModels.Add(folderModel);
                }
            });
            return folderModels;
        }
    }
下面需要定义ListBox信息需要以怎样的格式来展示。一般的常规做法是通过Style来定制控件的模板展示定制化的数据格式,而在ReactiveUI框架中,还有其他的选择。
在ReactiveUI中,会根据ListBox ItemSource所绑定的集合类型来自动的搜索这个类型所关联的UserControl来作为ListBox的模板。
简单的说,只需要给上文中的FolderModel指定一个UserControl即可,而不需要额外的指定Style或者Template。
所以View中的ListBox代码很简单:
<ListBox Grid.Row="1" x:Name="lbFolders"></ListBox>
新增一个UserControl的类FolderInfoUC.xaml与FolderModel绑定:
<reactiveui:ReactiveUserControl x:Class="Calculateor.FolderInfoUC"
                                x:TypeArguments="local:FolderModel"
             xmlns="http://schemas.microsoft.com/winfx/2006/xaml/presentation"
             xmlns:x="http://schemas.microsoft.com/winfx/2006/xaml"
             xmlns:mc="http://schemas.openxmlformats.org/markup-compatibility/2006"
             xmlns:d="http://schemas.microsoft.com/expression/blend/2008"
             xmlns:local="clr-namespace:Calculateor"
              xmlns:reactiveui="http://reactiveui.net"
             mc:Ignorable="d"
             d:DesignHeight="450" d:DesignWidth="800">
    <UniformGrid Columns="2">
        <TextBlock Text="{Binding FolderName}" HorizontalAlignment="Left"/>

        <TextBlock Text="{Binding CreateTime}" HorizontalAlignment="Right"/>
    </UniformGrid>
</reactiveui:ReactiveUserControl>
这里的TextBlock控件除了展示数据之外没有其他用途,所以直接使用了Xaml的绑定方式,而View通过ReactiveUserControl来指定他的ViewModel类型为FolderModel,这样就建立了FolderModel和FolderInfoUC之间的联系。
当然,在很多情况下处理复杂的高度自定义的数据展示时,还是需要Style的配合。
需要注意的是,这里的FolderModel数据类型本身比较简单,不需要继承自ReactiveObject。
还有一个情况需要注意,如主界面上的下拉框Combobox。这个控件绑定的是一个简单的string类型的集合 ReadOnlyObservableCollection<string>,不推荐为CLR中的基础类型关联UserControl,所以需要Xaml中指定ItemTemplate,否则无法显示数据。
总结
截至本文,ReactiveUI相比于MVVMLight框架,有以下的不同点:
1.ReactiveUI推荐强绑定,并提供了管理ViewModel和属性的生命周期的方法。
2.易于构建响应式的可观察的函数声明式的数据流处理。
3.简化了ViewModel和View之间绑定的操作方式,并强化了两者之间的联系贯穿在整个应用的生命周期中。
4.扩展了动态数据集合在多线程下的操作,提供线程安全的可绑定动态集合。
本文以一个小应用简单介绍了ReactiveUI整体框架的使用,其中一些核心的API WhenAnyValue、ObservableAsPropertyHelper、ObservableCollectionExtended等没有详细展开,后续会对这些API的高级应用有更深入的学习和了解,学习和阅读ReactiveUI的源码。
git地址:https://github.com/reactiveui/reactiveui
官网地址:https://www.reactiveui.net/


