Swagger2 初始用
1.结合Spring-Boot 引入 pom 依赖
 1 <dependency>
 2             <groupId>io.springfox</groupId>
 3             <artifactId>springfox-swagger2</artifactId>
 4             <version>2.9.2</version>
 5             <exclusions>
 6                 <exclusion>
 7                     <artifactId>guava</artifactId>
 8                     <groupId>com.google.guava</groupId>
 9                 </exclusion>
10             </exclusions>
11         </dependency>
12         <dependency>
13             <groupId>com.google.guava</groupId>
14             <artifactId>guava</artifactId>
15             <version>28.0-jre</version>
16         </dependency>
17         <!--界面支持-->
18         <dependency>
19             <groupId>io.springfox</groupId>
20             <artifactId>springfox-swagger-ui</artifactId>
21             <version>2.9.2</version>
22         </dependency>
2.创建一个 SwaggerConfig 配置类
 1 @Configuration
 2 @EnableSwagger2
 3 public class SwaggerConfig {
 4
 5     @Bean
 6     public Docket createRestApi() {
 7         return new Docket(DocumentationType.SWAGGER_2)
 8                 .select()
 9                 // 方法需要有ApiOperation注解才能生存接口文档
10                 .apis(RequestHandlerSelectors.withMethodAnnotation(ApiOperation.class))
11                 // 路径使用any风格
12                 .paths(PathSelectors.any())
13                 .build()
14                 // 如何保护我们的Api,有三种验证(ApiKey, BasicAuth, OAuth)
15                 .securitySchemes(security())
16                 // 接口文档的基本信息
17                 .apiInfo(apiInfo());
18     }
19
20     /**
21      * 接口文档详细信息
22      *
23      * @return
24      */
25     private ApiInfo apiInfo() {
26         return new ApiInfoBuilder().title("Swagger2 API").description("xd-api文档").termsOfServiceUrl("http://www.localhost:8080").version("1.0.0").build();
27     }
28
29     private List<ApiKey> security() {
30         ArrayList<ApiKey> apiKeys = new ArrayList<>();
31         apiKeys.add(new ApiKey("token", "token", "header"));
32         return apiKeys;
33     }
34
35 }
3.使用 controller 实例

 1 @Api(tags = "登录接口")
 2 @RequestMapping("/api")
 3 @RestController
 4 public class ApiLoginController {
 5
 6     @PostMapping("login")
 7     @ApiOperation(value = "用户登录接口")
 8     @ApiImplicitParams({
 9             @ApiImplicitParam(name = "username", value = "用户名", required = true, dataType = "String"),
10             @ApiImplicitParam(name = "password", value = "登录密码", required = true, dataType = "String")
11     })
12     public String login(String username, String password) {
13         return username + " : " + password;
14
15     }
16
17 }
4.常用注解说明
@Api:修饰整个类,描述Controller的作用 (可选值:value,tags,description...可以自行查看源码)
@ApiOperation:描述一个类的一个方法,或者说一个接口 (用于方法;表示一个http请求的操作 ,value用于方法描述 ,notes用于提示内容)
@ApiParam:单个参数描述 (用于方法,参数,字段说明;表示对参数的添加元数据(说明或是否必填等)
name–参数名
value–参数说明
required–是否必填(默认值为false))
@ApiModel:用对象来接收参数 (用于类 表示对类进行说明,用于参数用实体类接收
value–表示对象名
description–描述
都可省略)
@ApiModelProperty:用对象接收参数时,描述对象的一个字段 (用于方法,字段; 表示对model属性的说明或者数据操作更改
value–字段说明
name–重写属性名字
dataType–重写属性类型
required–是否必填
example–举例说明
hidden–隐藏)

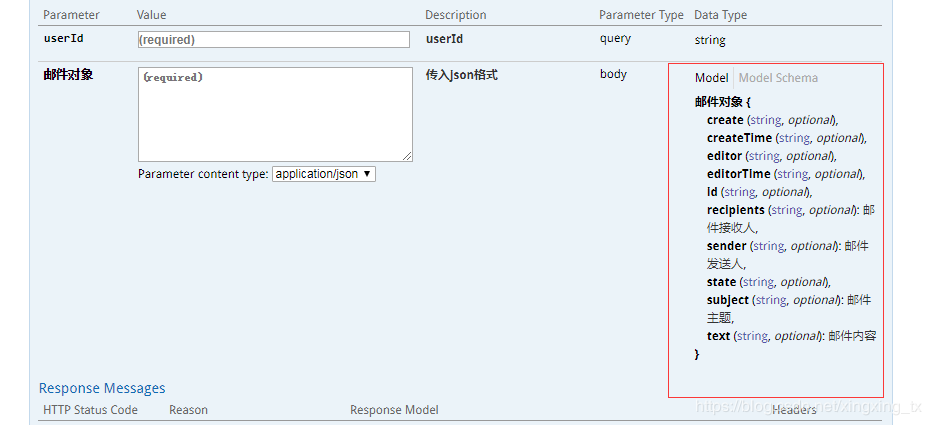
 1 @ApiOperation(value = "用户发送邮件操作", httpMethod = "GET", response = String.class, notes = "用户发送邮件操作,提供用户管理-用户发送邮件操作")
 2 public String sendEmail(@ApiParam ( value = "userId", required = true ) @RequestParam (
 3                         value = "userId" ) String userId,
 4                         @ApiParam(name="邮件对象",value="传入json格式",required=true)
 5                         @RequestBody EmailModel model,
 6             HttpServletRequest request) {
 7
 8
 9 -------------------------------------------------------------------------------------------
10 @ApiModel(value="邮件对象",description="邮件对象实体类")
11 public class EmailModel extends BaseModel {
12     //邮件发送人
13     @ApiModelProperty(value="邮件发送人",name="sender",example="xxxxx@qq.com")
14     private String sender;
15     //邮件接收人
16     @ApiModelProperty(value="邮件接收人",name="recipients",example="xxxxx@qq.com")
17     private String  recipients;
18     //邮件主题
19     @ApiModelProperty(value="邮件主题",name="recipients")
20     private String subject;
21     //邮件内容
22     @ApiModelProperty(value="邮件内容",name="邮件内容")
23     private String text;
24  }
效果图

@ApiIgnore:使用该注解忽略这个API,用于类或者方法上 (用于类或者方法上,可以不被swagger显示在页面上)
@ApiImplicitParam:一个请求参数,用于方法上
name – 参数名称
value – 参数说明
dataType – 数据类型
paramType – 参数类型
example – 举例说明
@ApiImplicitParams:多个请求参数 ,包含多个 @ApiImplicitParam,用于方法上


 浙公网安备 33010602011771号