LVS负载均衡实现双向热备
一、LVS1服务器配置
安装ipvsadm,keepalived
[root@localhost ~]# yum -y install ipvsadm keepalived
配置keepalivedde配置文件
[root@localhost ~]# vim /etc/keepalived/keepalived.conf
! Configuration File for keepalived

global_defs {
   notification_email {
     acassen@firewall.loc
     failover@firewall.loc
     sysadmin@firewall.loc
   }
   notification_email_from Alexandre.Cassen@firewall.loc
   smtp_server 192.168.200.1
   smtp_connect_timeout 30
   router_id LVS_MASTER
   vrrp_skip_check_adv_addr
   vrrp_strict
   vrrp_garp_interval 0
   vrrp_gna_interval 0
}

vrrp_instance VI_1 {
    state MASTER
    interface eno16777728
    virtual_router_id 51
    priority 100
    advert_int 1
    authentication {
        auth_type PASS
        auth_pass 1111
    }
    virtual_ipaddress {
        192.168.200.201
    }
}
virtual_server 192.168.200.201 80 {
    delay_loop 6
    lb_algo rr
    lb_kind DR
    persistence_timeout 50
    protocol TCP

    real_server 192.168.200.113 80 {
        weight 1

    TCP_CHECK{
        connect_timeout 3
            nb_get_retry 3
            delay_before_retry 3
        connect_port 80
    }
    }

    real_server 192.168.200.11 80 {
        weight 1

        TCP_CHECK{
            connect_timeout 3
            nb_get_retry 3
            delay_before_retry 3
            connect_port 80
        }
    }
}
#############################################################
vrrp_instance VI_2 {
    state BACKUP
    interface eno16777728
    virtual_router_id 52
    priority 90
    advert_int 1
    authentication {
        auth_type PASS
        auth_pass 1111
    }
    virtual_ipaddress {
        192.168.200.202
    }
}
virtual_server 192.168.200.202 80 {
    delay_loop 6
    lb_algo rr
    lb_kind DR
    persistence_timeout 50
    protocol TCP

    real_server 192.168.200.113 80 {
        weight 1

        TCP_CHECK{
            connect_timeout 3
            nb_get_retry 3
            delay_before_retry 3
            connect_port 80
        }
    }

    real_server 192.168.200.11 80 {
        weight 1

        TCP_CHECK{
            connect_timeout 3
            nb_get_retry 3
            delay_before_retry 3
            connect_port 80
        }
    }
}
关闭防火墙,安全策略,启动服务并查看
#关闭防火墙,安全策略
[root@localhost ~]# systemctl stop firewalld
[root@localhost ~]# iptables -F
[root@localhost ~]# setenforce 0
#启动keepalived服务
[root@localhost ~]# systemctl start keepalived
#查看VIP
[root@localhost ~]# ip a | grep inet
    inet 127.0.0.1/8 scope host lo
    inet6 ::1/128 scope host
    inet 192.168.200.111/24 brd 192.168.200.255 scope global eno16777728
    inet 192.168.200.201/32 scope global eno16777728
    inet6 fe80::20c:29ff:fef0:4297/64 scope link
#查看策略
[root@localhost ~]# ipvsadm -Ln
IP Virtual Server version 1.2.1 (size=4096)
Prot LocalAddress:Port Scheduler Flags
  -> RemoteAddress:Port           Forward Weight ActiveConn InActConn
TCP  192.168.200.201:80 rr persistent 50    #发现服务器192.168.200.11有问题
  -> 192.168.200.113:80           Route   1      0          0
TCP  192.168.200.202:80 rr persistent 50
  -> 192.168.200.113:80           Route   1      0          0
二、LVS2服务器配置
安装ipvsadm,keepalived
[root@localhost ~]# yum -y install ipvsadm keepalived
配置keepalivedde配置文件
[root@localhost ~]# vim /etc/keepalived/keepalived.conf
! Configuration File for keepalived

global_defs {
   notification_email {
     acassen@firewall.loc
     failover@firewall.loc
     sysadmin@firewall.loc
   }
   notification_email_from Alexandre.Cassen@firewall.loc
   smtp_server 192.168.200.1
   smtp_connect_timeout 30
   router_id LVS_MASTER
   vrrp_skip_check_adv_addr
   vrrp_strict
   vrrp_garp_interval 0
   vrrp_gna_interval 0
}

vrrp_instance VI_1 {
    state BACKUP
    interface eno16777728
    virtual_router_id 51
    priority 80
    advert_int 1
    authentication {
        auth_type PASS
        auth_pass 1111
    }
    virtual_ipaddress {
        192.168.200.201
    }
}
virtual_server 192.168.200.201 80 {
    delay_loop 6
    lb_algo rr
    lb_kind DR
    persistence_timeout 50
    protocol TCP

    real_server 192.168.200.113 80 {
        weight 1

    TCP_CHECK{
        connect_timeout 3
            nb_get_retry 3
            delay_before_retry 3
        connect_port 80
    }
    }

    real_server 192.168.200.11 80 {
        weight 1

        TCP_CHECK{
            connect_timeout 3
            nb_get_retry 3
            delay_before_retry 3
            connect_port 80
        }
    }
}
#############################################################
vrrp_instance VI_2 {
    state MASTER
    interface eno16777728
    virtual_router_id 52
    priority 100
    advert_int 1
    authentication {
        auth_type PASS
        auth_pass 1111
    }
    virtual_ipaddress {
        192.168.200.202
    }
}
virtual_server 192.168.200.202 80 {
    delay_loop 6
    lb_algo rr
    lb_kind DR
    persistence_timeout 50
    protocol TCP

    real_server 192.168.200.113 80 {
        weight 1

        TCP_CHECK{
            connect_timeout 3
            nb_get_retry 3
            delay_before_retry 3
            connect_port 80
        }
    }

    real_server 192.168.200.11 80 {
        weight 1

        TCP_CHECK{
            connect_timeout 3
            nb_get_retry 3
            delay_before_retry 3
            connect_port 80
        }
    }
}
关闭防火墙,安全策略,启动服务并查看
#关闭防火墙,安全策略
[root@localhost ~]# systemctl stop firewalld
[root@localhost ~]# iptables -F
[root@localhost ~]# setenforce 0
#启动keepalived服务
[root@localhost ~]# systemctl start keepalived
#查看VIP
[root@localhost ~]# ip a | grep inet
       inet 127.0.0.1/8 scope host lo
    inet6 ::1/128 scope host
    inet 192.168.200.112/24 brd 192.168.200.255 scope global eno16777728
    inet 192.168.200.202/32 scope global eno16777728
    inet6 fe80::20c:29ff:fe96:8ef5/64 scope link
#查看策略
[root@localhost ~]# ipvsadm -Ln
IP Virtual Server version 1.2.1 (size=4096)
Prot LocalAddress:Port Scheduler Flags
  -> RemoteAddress:Port           Forward Weight ActiveConn InActConn
TCP  192.168.200.201:80 rr persistent 50
  -> 192.168.200.113:80           Route   1      0          0
TCP  192.168.200.202:80 rr persistent 50
  -> 192.168.200.113:80           Route   1      0          0
四、Apache服务器的配置(相同)
[root@localhost ~]# ifconfig lo:0 192.168.200.201 netmask 255.255.255.255
[root@localhost ~]# ifconfig lo:1 192.168.200.202 netmask 255.255.255.255
#查看配置
[root@localhost ~]# ip a
1: lo: <LOOPBACK,UP,LOWER_UP> mtu 65536 qdisc noqueue state UNKNOWN
    link/loopback 00:00:00:00:00:00 brd 00:00:00:00:00:00
    inet 127.0.0.1/8 scope host lo
       valid_lft forever preferred_lft forever
    inet 192.168.200.201/32 scope global lo:0
       valid_lft forever preferred_lft forever
    inet 192.168.200.202/32 scope global lo:1
       valid_lft forever preferred_lft forever
    inet6 ::1/128 scope host
       valid_lft forever preferred_lft forever
2: eno16777728: <BROADCAST,MULTICAST,UP,LOWER_UP> mtu 1500 qdisc pfifo_fast state UP qlen 1000
    link/ether 00:0c:29:fb:c6:2d brd ff:ff:ff:ff:ff:ff
    inet 192.168.200.113/24 brd 192.168.200.255 scope global eno16777728
       valid_lft forever preferred_lft forever
    inet6 fe80::20c:29ff:fefb:c62d/64 scope link
       valid_lft forever preferred_lft forever
路由配置
[root@localhost ~]# route add -host 192.168.200.201 dev lo:0
[root@localhost ~]# route add -host 192.168.200.202 dev lo:1
参数配置
[root@localhost ~]# vim /etc/sysctl.conf
net.ipv4.conf.all.arp_ignore=1
net.ipv4.conf.all.arp_announce = 2
net.ipv4.conf.default.arp_ignore = 1
net.ipv4.conf.default.arp_announce = 2
net.ipv4.conf.lo.arp_ignore = 1
net.ipv4.conf.lo.arp_announce = 2
#启用参数
[root@localhost ~]# sysctl -p
net.ipv4.conf.all.arp_ignore = 1
net.ipv4.conf.all.arp_announce = 2
net.ipv4.conf.default.arp_ignore = 1
net.ipv4.conf.default.arp_announce = 2
net.ipv4.conf.lo.arp_ignore = 1
net.ipv4.conf.lo.arp_announce = 2
安装httpd服务
[root@localhost ~]# yum -y install httpd
#准备测试页
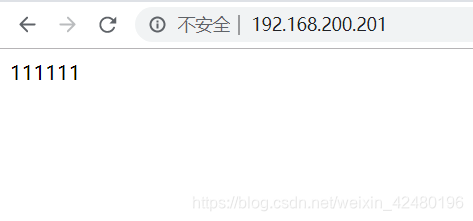
[root@localhost ~]# echo "111111" > /var/www/html/index.html
#启动服务,关闭防火墙
[root@localhost ~]# systemctl restart httpd
[root@localhost ~]# systemctl stop firewalld
[root@localhost ~]# iptables -F
[root@localhost ~]# setenforce 0
五、测试


 浙公网安备 33010602011771号