Quill编辑器介绍及扩展
从这里进入官网. 能找到这个NB的编辑器是因为公司项目需要一个可视化的cms编辑器,类似微信公众号编辑文章。可以插入各种卡片,模块,问题,图片等等。然后插入的内容还需要能删除,拖拽等等。所以采用vue开发,兼容vue并兼容拖拽的文本编辑器并不多,所以在github上一番搜索找到了quill这款文本编辑器神器。
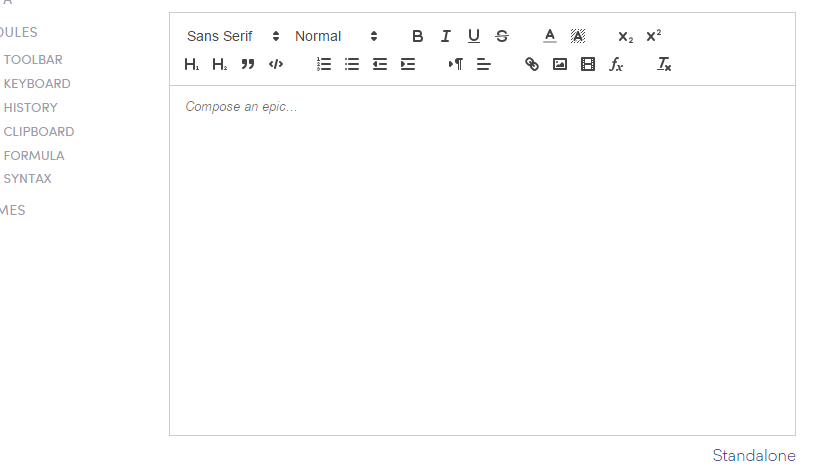
先从官方例子里面扒一个图瞅瞅:
PS:和大多数文本编辑器长得都差不多,如果功能都一样,那也不用介绍了。 他NB,强大的地方就是所有能看到的,不能看到的功能统统都是一个一个独立的模块。全部都是可以替换的。不得不对这段文字进行重点标记。当然其他编辑器的一些几本功能也统统都有且不仅如此。比如文本的样式,多媒体文件的上传,响应键盘事件,操作历史,公式支持等等。点击查看详情. 各种自定义的使用说明
比如上图中的菜单栏可以自定义,对已有的菜单栏定义:继续从官方例子里面扒图:

当然,如果插件自带的功能没有,比如你要做一个动画在菜单栏上加一个图标、选项或者什么的。可以对整个菜单栏进行定义和重写

下面从项目中的扩展点找2个说明一下这个NB的编辑器,当然他的更多可扩展功能也没有用上,所以只有看到的官方文档,才能理解他的可扩展性和灵活性。
修改字体大小选择,使用自定义的列表和单位(rem)
自带的字体大小编辑有2个如下。但是显然不太能支持我们的用法。一开始吧size扩展成了px。但是后来经过测试发现手机端使用的是rem,so。最后改成使用rem。
[{ 'size': ['small', false, 'large', 'huge'] }]
[{ 'header': [1, 2, 3, 4, 5, 6, false] }],
//扩展后的字体选择
[{
    // 'size': ['10px', '12px', '14px', '16px', '18px', '20px']
    //1/75 *2
    //1px =0.026rem
    //1rem=36px
    'size': ['0.26rem', '0.31rem', '0.37rem', '0.41rem', '0.47rem', '0.52rem']
    }]
为了在菜单栏中显示对应的字体大小。加入css。差不多长这样,有多少个选项,就加多少个。
.ql-snow .ql-picker.ql-size .ql-picker-label[data-value="10px"]::before,
.ql-snow .ql-picker.ql-size .ql-picker-item[data-value="10px"]::before {
    content: '10px';
    font-size: 10px;
}
.ql-snow .ql-picker.ql-size .ql-picker-label[data-value="20px"]::before,
.ql-snow .ql-picker.ql-size .ql-picker-item[data-value="20px"]::before {
    content: '20px';
    font-size: 20px;
}
//默认的样式
.ql-snow .ql-picker.ql-size .ql-picker-label::before,
.ql-snow .ql-picker.ql-size .ql-picker-item::before {
    content: '14px';
    font-size: 14px;
}
//rem:需要说明一下,在编辑的时候还是显示px单位,但最终生成的源代码使用rem,因为编辑是在pc上,并且运营人员也只熟悉px这个单位,对rem没有概念。
.ql-snow .ql-picker.ql-size .ql-picker-label[data-value="0.26rem"]::before,
.ql-snow .ql-picker.ql-size .ql-picker-item[data-value="0.26rem"]::before {
    content: '10px';
    font-size: 10px;
}
在然后在初始化quill的地方加上下面的js代码
import Quill from 'quill'
var Size = Quill.import('attributors/style/size');
// Size.whitelist = ['10px', '12px', '14px', '16px', '18px', '20px'];
 Size.whitelist = ['0.26rem', '0.31rem', '0.37rem', '0.41rem', '0.47rem', '0.52rem'];
 Quill.register(Size, true);
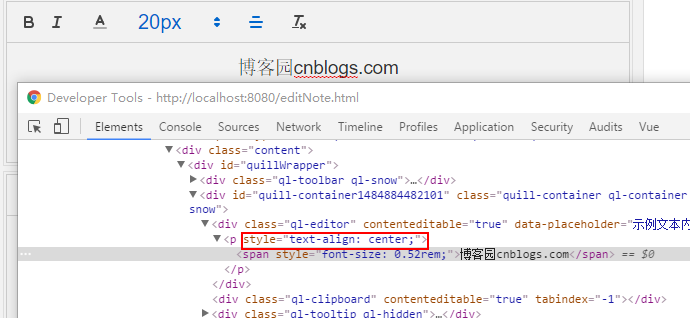
如此之后,对我们字体大小的选择就算扩展完毕了,让我们检验一下成果:

当然为了在pc上rem字体能生效,还必须得加上一行。
html {
    font-size: 36px;
}
扩展居中,靠右使用样式,而不是class方式
值得说明的是,样式的设置等,几本都有多套策略可以选择。举个栗子,官方源代码。
这是官方的字体方向设置的源代码。我们可以看到他就有3种方式设置:通过attribute(algin:'right'),通过class(class='ql-align-right'),通过style(style='text-align:right');是不是很灵活,很强大,任君选择有木有
import Parchment from 'parchment';

let config = {
  scope: Parchment.Scope.BLOCK,
  whitelist: ['right', 'center', 'justify']
};

let AlignAttribute = new Parchment.Attributor.Attribute('align', 'align', config);
let AlignClass = new Parchment.Attributor.Class('align', 'ql-align', config);
let AlignStyle = new Parchment.Attributor.Style('align', 'text-align', config);

export { AlignAttribute, AlignClass, AlignStyle };
那如何指定使用其他的一种呢?像下面的代码一样,如果使用style。则使用 Quill.import('attributors/style/align');替换默认的,如果使用class:则使用 Quill.import('attributors/class/align');
var Align = Quill.import('attributors/style/align');
Align.whitelist = ['right', 'center', 'justify'];
Quill.register(Align, true);
检验一下成果:
然后在来一个高级一点的。设置字体为粗体
quill默认使用的是strong或者b标签方式。其实这也是没有问题的,但是架不住公司的"高级"前端对手机端的所有html标签都reset了。所有的hx标签,em,strong等语义标签全部reset了。所以没办法只能使用style的方式来实现。
import Inline from '../blots/inline';

class Bold extends Inline {
  static create() {
    return super.create();
  }

  static formats() {
    return true;
  }

  optimize() {
    super.optimize();
    if (this.domNode.tagName !== this.statics.tagName[0]) {
      this.replaceWith(this.statics.blotName);
    }
  }
}
Bold.blotName = 'bold';
Bold.tagName = ['STRONG', 'B'];

export default Bold;
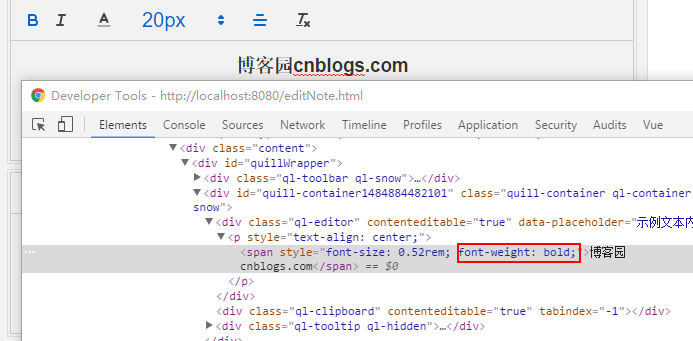
使用style来实现文字的加粗
import Quill from 'quill'
let Parchment = Quill.import('parchment')
class BoldStyleAttributor extends Parchment.Attributor.Style {
    value(domNode) {
        let value = super.value(domNode);
        return value;
    }

    add(node, value) {
        $(node).css('font-weight', 'bold');
        return true;
    }
    remove(node) {
        $(node).css('font-weight', 'normal');
    }
}
let BoldStyle = new BoldStyleAttributor('bold', 'font-weight', {
    scope: Parchment.Scope.INLINE,
    whitelist: [true, false]
});

export default BoldStyle;`
初始化quill的地方加上下面的代码
./NodeEditText/TextBold”或者“./NodeEditText/TextBold.js”就是上面几行代码的js文件路径。
import MyBold from './NodeEditText/TextBold'
Quill.register("formats/bold", MyBold, true);
检验一下成果:
诸如文字的字体啦,斜体啦,都类似写法。就不一一展开了。官方文档虽然是英文的,但是耐着性子看,还是能比较方便看懂的,
写在最后:
能够快速的自定义这个组件的前提是需要懂他的设计思想,我也只是粗浅的了解使用了一下这个组件,就不做什么总结了
回答一下 @48詹泽娟 的问题,集成到vue,大约是这样子.
<template>
    <div id="quillWrapper">

        <div ref="quillContainer" :id="$data.elmId" class="quill-container"></div>

        <button v-if="useSaveButton" class="save-button"
                @click="saveContent">
            {{ buttonText ? buttonText : 'Save Content' }}
        </button>

        <div v-if="showPreview" ref="livePreview" class="ql-editor"></div>

    </div>
</template>

<script>
    import Quill from 'quill'
    import Parchment from 'parchment';
    import MyBold from './NodeEditText/TextBold'
    import MyItalic from './NodeEditText/TextItalic'

    var defaultToolbar = [
        ['bold', 'italic'],
        [{
            'color': []
        }],
        [{
            // 'size': ['10px', '12px', '14px', '16px', '18px', '20px']
            //1/75 *2
            //1px =0.026rem
            //1rem=36px
            'size': ['0.26rem', '0.31rem', '0.37rem', '0.41rem', '0.47rem', '0.52rem']
        }],
        [{
            'align': []
        }],
        ['clean'],
    ];

    export default {
        name: 'VueEditor',
        props: {
            editorContent: String,
            placeholder: String,
            buttonText: String,
            useSaveButton: {
                type: Boolean,
                default () {
                    return true
                }
            },
            showPreview: {
                type: Boolean,
                default () {
                    return false
                }
            }
        },

        data: function() {
            return {
                quill: null,
                editor: null,
                toolbar: defaultToolbar,
                elmId: 'quill-container' + (new Date()).getTime()
            }
        },

        mounted: function() {
            const vm = this
            var Size = Quill.import('attributors/style/size');
            // Size.whitelist = ['10px', '12px', '14px', '16px', '18px', '20px'];
            Size.whitelist = ['0.26rem', '0.31rem', '0.37rem', '0.41rem', '0.47rem', '0.52rem'];
            Quill.register(Size, true);

            var Align = Quill.import('attributors/style/align');
            Align.whitelist = ['right', 'center', 'justify'];
            Quill.register(Align, true);
            // Quill.register(MyBold, true);
            Quill.register("formats/bold", MyBold, true);
            Quill.register("formats/italic", MyItalic, true);

            vm.quill = new Quill(vm.$refs.quillContainer, {
                modules: {
                    toolbar: {
                        'container': this.toolbar,
                    }
                },
                placeholder: this.placeholder ? this.placeholder : '',
                theme: 'snow'
            });
            vm.editor = $(this.$el).find('.ql-editor')[0];

            vm.editor.innerHTML = this.editorContent;
            if (vm.$refs.livePreview !== undefined || false) {

                vm.quill.on('text-change', function() {
                    vm.$refs.livePreview.innerHTML = vm.editor.innerHTML
                    vm.$emit('editor-updated', vm.editor.innerHTML)
                });

            } else {

                vm.quill.on('text-change', function() {
                    vm.$emit('editor-updated', vm.editor.innerHTML)
                });

            }
            var replaceReg = /<(\S*?) [^>]*>.*?<\/\1>|<.*?\/>/gm;
            $(vm.editor).on('paste', function(e) {
                var text = null;

                if (window.clipboardData && clipboardData.setData) {
                    // IE
                    text = window.clipboardData.getData('text');
                } else {
                    text = (e.originalEvent || e).clipboardData.getData('text/plain') || prompt('在这里输入文本');
                }
                console.log(text);
                if (document.body.createTextRange) {
                    if (document.selection) {
                        textRange = document.selection.createRange();
                    } else if (window.getSelection) {
                        sel = window.getSelection();
                        var range = sel.getRangeAt(0);

                        // 创建临时元素,使得TextRange可以移动到正确的位置
                        var tempEl = document.createElement("span");
                        tempEl.innerHTML = "&#FEFF;";
                        range.deleteContents();
                        range.insertNode(tempEl);
                        textRange = document.body.createTextRange();
                        textRange.moveToElementText(tempEl);
                        tempEl.parentNode.removeChild(tempEl);
                    }
                    textRange.text = text;
                    textRange.collapse(false);
                    textRange.select();
                } else {
                    // Chrome之类浏览器
                    document.execCommand("insertText", false, text);
                }
                e.preventDefault();
                console.log('paste:' + text);
            });
            try {
                document.execCommand("AutoUrlDetect", false, false);
            } catch (e) {}
        },
        watch: {
            editorContent: function() {

                if (this.editor.innerHTML != this.editorContent) {
                    console.log('set inner html');
                    this.editor.innerHTML = this.editorContent;
                }
            }
        },

        methods: {
            saveContent: function(value) {
                this.$emit('save-content', this.editor.innerHTML)
            }
        }
    }
</script>

 浙公网安备 33010602011771号