用Keras搭建神经网络 简单模版(三)—— CNN 卷积神经网络(手写数字图片识别)
# -*- coding: utf-8 -*-
import numpy as np
np.random.seed(1337) #for reproducibility再现性
from keras.datasets import mnist
from keras.utils import np_utils
from keras.models import Sequential#按层
from keras.layers import Dense, Activation,Convolution2D, MaxPooling2D, Flatten
import matplotlib.pyplot as plt
from keras.optimizers import RMSprop
from keras.optimizers import Adam
从mnist下载手写数字图片数据集,图片为28*28,将每个像素的颜色(0到255)改为(0倒1),将标签y变为10个长度,若为1,则在1处为1,剩下的都标为0。
#dowmload the mnisst the path '~/.keras/datasets/' if it is the first time to be called
#x shape (60000 28*28),y shape(10000,)
(x_train,y_train),(x_test,y_test) = mnist.load_data()#0-9的图片数据集

#data pre-processing
x_train = x_train.reshape(-1,1,28,28)#-1代表个数不限,1为高度,黑白照片高度为1
x_test = x_test.reshape(-1,1,28,28)
y_train = np_utils.to_categorical(y_train, num_classes=10) #把标签变为10个长度,若为1,则在1处为1,剩下的都标为0
y_test = np_utils.to_categorical(y_test,num_classes=10)
接下来搭建CNN
卷积->池化->卷积->池化
使图片从(1,28,28)->(32,28,28)->(32,14,14)-> (64,14,14) -> (64,7,7)
#Another way to build CNN
model = Sequential()

#Conv layer 1 output shape (32,28,28)
model.add(Convolution2D(
        nb_filter =32,#滤波器装了32个,每个滤波器都会扫过这个图片,会得到另外一整张图片,所以之后得到的告诉是32层
        nb_row=5,
        nb_col=5,
        border_mode='same', #padding method
        input_shape=(1,      #channels  通道数
                     28,28),  #height & width 长和宽
        ))
model.add(Activation('relu'))

#Pooling layer 1 (max pooling) output shape (32,14,14)
model.add(MaxPooling2D(
        pool_size=(2,2), #2*2
        strides=(2,2),  #长和宽都跳两个再pool一次
        border_mode='same', #paddingmethod
        ))

#Conv layers 2 output shape (64,14,14)
model.add(Convolution2D(64,5,5,border_mode='same'))
model.add(Activation('relu'))

#Pooling layers 2 (max pooling) output shape (64,7,7)
model.add(MaxPooling2D(pool_size=(2,2), border_mode='same'))
构建全连接神经网络
#Fully connected layer 1 input shape (64*7*7) = (3136)
#Flatten 把三维抹成一维,全连接
model.add(Flatten())
model.add(Dense(1024))
model.add(Activation('relu'))

#Fully connected layer 2 to shape (10) for 10 classes
model.add(Dense(10)) #输出10个单位
model.add(Activation('softmax')) #softmax用来分类

#Another way to define optimizer
adam = Adam(lr=1e-4)

# We add metrics to get more results you want to see
model.compile( #编译
        optimizer = adam,
        loss = 'categorical_crossentropy',
        metrics=['accuracy'], #在更新时同时计算一下accuracy
        )
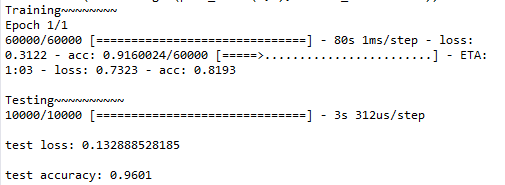
训练和测试
print("Training~~~~~~~~")
#Another way to train the model
model.fit(x_train,y_train, epochs=1, batch_size=32) #训练2大批,每批32个

print("\nTesting~~~~~~~~~~")
#Evalute the model with the  metrics we define earlier
loss,accuracy = model.evaluate(x_test,y_test)

print('\ntest loss:',loss)
print('\ntest accuracy:', accuracy)
全代码:


# -*- coding: utf-8 -*-
import numpy as np
np.random.seed(1337) #for reproducibility再现性
from keras.datasets import mnist
from keras.utils import np_utils
from keras.models import Sequential#按层
from keras.layers import Dense, Activation,Convolution2D, MaxPooling2D, Flatten
import matplotlib.pyplot as plt
from keras.optimizers import RMSprop
from keras.optimizers import Adam

#dowmload the mnisst the path '~/.keras/datasets/' if it is the first time to be called
#x shape (60000 28*28),y shape(10000,)
(x_train,y_train),(x_test,y_test) = mnist.load_data()#0-9的图片数据集

#data pre-processing
x_train = x_train.reshape(-1,1,28,28)#-1代表个数不限,1为高度,黑白照片高度为1
x_test = x_test.reshape(-1,1,28,28)
y_train = np_utils.to_categorical(y_train, num_classes=10) #把标签变为10个长度,若为1,则在1处为1,剩下的都标为0
y_test = np_utils.to_categorical(y_test,num_classes=10)

#Another way to build CNN
model = Sequential()

#Conv layer 1 output shape (32,28,28)
model.add(Convolution2D(
        nb_filter =32,#滤波器装了32个,每个滤波器都会扫过这个图片,会得到另外一整张图片,所以之后得到的告诉是32层
        nb_row=5,
        nb_col=5,
        border_mode='same', #padding method
        input_shape=(1,      #channels  通道数
                     28,28),  #height & width 长和宽
        ))
model.add(Activation('relu'))

#Pooling layer 1 (max pooling) output shape (32,14,14)
model.add(MaxPooling2D(
        pool_size=(2,2), #2*2
        strides=(2,2),  #长和宽都跳两个再pool一次
        border_mode='same', #paddingmethod
        ))

#Conv layers 2 output shape (64,14,14)
model.add(Convolution2D(64,5,5,border_mode='same'))
model.add(Activation('relu'))

#Pooling layers 2 (max pooling) output shape (64,7,7)
model.add(MaxPooling2D(pool_size=(2,2), border_mode='same'))

#Fully connected layer 1 input shape (64*7*7) = (3136)
#Flatten 把三维抹成一维,全连接
model.add(Flatten())
model.add(Dense(1024))
model.add(Activation('relu'))

#Fully connected layer 2 to shape (10) for 10 classes
model.add(Dense(10)) #输出10个单位
model.add(Activation('softmax')) #softmax用来分类

#Another way to define optimizer
adam = Adam(lr=1e-4)

# We add metrics to get more results you want to see
model.compile( #编译
        optimizer = adam,
        loss = 'categorical_crossentropy',
        metrics=['accuracy'], #在更新时同时计算一下accuracy
        )

print("Training~~~~~~~~")
#Another way to train the model
model.fit(x_train,y_train, epochs=1, batch_size=32) #训练2大批,每批32个

print("\nTesting~~~~~~~~~~")
#Evalute the model with the  metrics we define earlier
loss,accuracy = model.evaluate(x_test,y_test)

print('\ntest loss:',loss)
print('\ntest accuracy:', accuracy)
输出: