SpringBoot搭配PageHelper分页插件
一、SpringBoot框架搭建
【1】点击:文件--->模块,选择 Spring Initializr,直接点击下一个
【2】这个页面选项是选择SpringBoot需要的启动依赖,在这里可以有很多选项,这里选择 Web 和 Mysql 然后点击下一步
【3】保存路径,点击完成
二、配置
1、在pom文件中引入Pagehelper分页插件
<!-- 分页插件 -->
<dependency>
    <groupId>com.github.pagehelper</groupId>
    <artifactId>pagehelper-spring-boot-starter</artifactId>
    <version>1.2.12</version>
</dependency>
2、配置分页插件
将application.properties配置文件改成yml后缀,即application.yml,进行如下配置
spring:
  datasource:
    url: jdbc:mysql://127.0.0.1:3306/pagehelperdemodat?useUnicode=true&characterEncoding=UTF-8&serverTimezone=CST
    username: root
    password: 806188
    driver-class-name: com.mysql.cj.jdbc.Driver

  thymeleaf:
    prefix: classpath:/templates/
    check-template-location: true
    suffix: .html
    mode: HTML
    encoding: UTF-8
    cache: false

mybatis:
  mapper-locations: classpath*:mapper/*.xml

pagehelper:
  helper-dialect: mysql
  params: count=countSql
  reasonable: true
  support-methods-arguments: true
3、创建数据库
咱们就以用户数据库为例来进行测试,数据库创建如下:
CREATE DATABASE pagehelperdemodat;

USE pagehelperdemodat;

CREATE TABLE users(
    id INT PRIMARY KEY AUTO_INCREMENT COMMENT 'id主键',
    username VARCHAR(20) NOT NULL COMMENT '用户名',
    PASSWORD  VARCHAR(20) NOT NULL COMMENT'用户密码'
);

INSERT INTO users (username,PASSWORD) VALUES("onestar","123");
INSERT INTO users (username,PASSWORD) VALUES("twostar","456");
插入多条数据方便分页查看
三、代码编写
1、创建用户实体类:User
package com.star.entity;

/**
 * @Description: 用户实体类
 * @Author: ONESTAR
 * @Date: Created in 22:57 2020/3/27
 * @QQ: 316392836
 * @URL: http://122.51.28.187:8080/
 */
public class User {

    private Integer id;
    private String username;
    private String PASSWORD;

    public Integer getId() {
        return id;
    }

    public void setId(Integer id) {
        this.id = id;
    }

    public String getUsername() {
        return username;
    }

    public void setUsername(String username) {
        this.username = username;
    }

    public String getPASSWORD() {
        return PASSWORD;
    }

    public void setPASSWORD(String PASSWORD) {
        this.PASSWORD = PASSWORD;
    }

    @Override
    public String toString() {
        return "User{" +
                "id=" + id +
                ", username='" + username + '\'' +
                ", PASSWORD='" + PASSWORD + '\'' +
                '}';
    }
}
2、创建用户持久层接口:UserDao
package com.star.dao;

import com.star.entity.User;
import org.apache.ibatis.annotations.Select;

import java.util.List;

/**
 * @Description: 用户持久层接口
 * @Author: ONESTAR
 * @Date: Created in 22:59 2020/3/27
 * @QQ: 316392836
 * @URL: http://122.51.28.187:8080/
 */
public interface UserDao {

    //查询所有用户
    @Select("select * from users")
    List<User> getAllUser();

}
3、创建业务层接口和实现类:UserService、UserServiceImpl
package com.star.service;

import com.star.entity.User;

import java.util.List;

/**
 * @Description: 用户业务层接口
 * @Author: ONESTAR
 * @Date: Created in 23:04 2020/3/27
 * @QQ: 316392836
 * @URL: http://122.51.28.187:8080/
 */
public interface UserService {

    //查询所有用户
    List<User> getAllUser();
}
package com.star.service.impl;

import com.star.dao.UserDao;
import com.star.entity.User;
import com.star.service.UserService;
import org.springframework.stereotype.Service;

import javax.annotation.Resource;
import java.util.List;

/**
 * @Description: 用户业务层接口实现类
 * @Author: ONESTAR
 * @Date: Created in 23:06 2020/3/27
 * @QQ: 316392836
 * @URL: http://122.51.28.187:8080/
 */
@Service
public class UserServiceImpl implements UserService {

    @Resource
    UserDao userDao;


    @Override
    public List<User> getAllUser() {
        return userDao.getAllUser();
    }
}
4、创建用户控制层:UserController
package com.star.controller;

import com.github.pagehelper.PageHelper;
import com.github.pagehelper.PageInfo;
import com.star.entity.User;
import com.star.service.UserService;
import org.springframework.beans.factory.annotation.Autowired;
import org.springframework.stereotype.Controller;
import org.springframework.ui.Model;
import org.springframework.web.bind.annotation.GetMapping;
import org.springframework.web.bind.annotation.RequestMapping;
import org.springframework.web.bind.annotation.RequestParam;

import java.util.List;

/**
 * @Description: 用户控制层
 * @Author: ONESTAR
 * @Date: Created in 23:07 2020/3/27
 * @QQ: 316392836
 * @URL: http://122.51.28.187:8080/
 */
@Controller
public class UserController {

    @Autowired
    UserService userService;

    @GetMapping("/findUser")
    public String findUser(Model model,@RequestParam(defaultValue = "1",value = "pageNum") Integer pageNum){
        PageHelper.startPage(pageNum,5);
        List<User> list = userService.getAllUser();
        PageInfo<User> pageInfo = new PageInfo<User>(list);
        model.addAttribute("pageInfo",pageInfo);
        return "index";
    }
}
在这里可以看到,PageHelper.startPage(int PageNum,int PageSize):,这个是用来设置页面的位置和展示的数据条目数的,我们设置每页展示5条数据。PageInfo用来封装页面信息,返回给前台界面,一些PageInfo的参数:
//当前页
 private int pageNum;
 //每页的数量
 private int pageSize;
 //当前页的数量
 private int size;
 //当前页展示的数据的起始行
 private int startRow;
 //当前页展示的数据的结束行
 private int endRow;
 //总记录数--所需要进行分页的数据条数
 private long total;
 //总页数
 private int pages;
 //页面展示的结果集,比如说当前页要展示20条数据,则此list为这20条数据
 private List<T> list;
 //前一页页码
 private int prePage;
 //下一页页码
 private int nextPage;
 //是否为第一页,默认为false,是第一页则设置为true
 private boolean isFirstPage ;
 //是否为最后一页默认为false,是最后一页则设置为true
 private boolean isLastPage ;
 //是否有前一页,默认为false,有前一页则设置为true
 private boolean hasPreviousPage ;
 //是否有下一页,默认为false,有后一页则设置为true
 private boolean hasNextPage ;
 //导航页码数,所谓导航页码数,就是在页面进行展示的那些1.2.3.4...
 //比如一共有分为两页数据的话,则将此值设置为2
 private int navigatePages;
 //所有导航页号,一共有两页的话则为[1,2]
 private int[] navigatepageNums;
 //导航条上的第一页页码值
 private int navigateFirstPage;
 //导航条上的最后一页页码值
 private int navigateLastPage;
5、添加 MapperScan 注解
修改 Application ,在类前添加 MapperScan 注解,修改后如下:
package com.star;

import org.mybatis.spring.annotation.MapperScan;
import org.springframework.boot.SpringApplication;
import org.springframework.boot.autoconfigure.SpringBootApplication;

@SpringBootApplication
@MapperScan({"com.star.dao"})
public class PagehelperdemoApplication {

    public static void main(String[] args) {
        SpringApplication.run(PagehelperdemoApplication.class, args);
    }

}
6、创建index.xml页面
<!DOCTYPE html>
<html lang="en" xmlns:th="http://www.w3.org/1999/xhtml">
<head>
    <meta charset="UTF-8">
    <title>分页测试</title>
</head>
<body>
<H3>查询所有用户</H3>
    <table border="1">
        <tr>
            <th>id</th>
            <th>name</th>
            <th>password</th>
        </tr>
        <tr th:each="user:${pageInfo.list}">
            <td th:text="${user.id}"></td>
            <td th:text="${user.username}"></td>
            <td th:text="${user.PASSWORD}"></td>
        </tr>
    </table>
    <p>当前 <span th:text="${pageInfo.pageNum}"></span> 页,总 <span th:text="${pageInfo.pages}"></span> 页,共 <span th:text="${pageInfo.total}"></span> 条记录</p>
    <a th:href="@{/findUser}">首页</a>
    <a th:href="@{/findUser(pageNum=${pageInfo.hasPreviousPage}?${pageInfo.prePage}:1)}">上一页</a>
    <a th:href="@{/findUser(pageNum=${pageInfo.hasNextPage}?${pageInfo.nextPage}:${pageInfo.pages})}">下一页</a>
    <a th:href="@{/findUser(pageNum=${pageInfo.pages})}">尾页</a>
</body>
</html>
四、运行测试
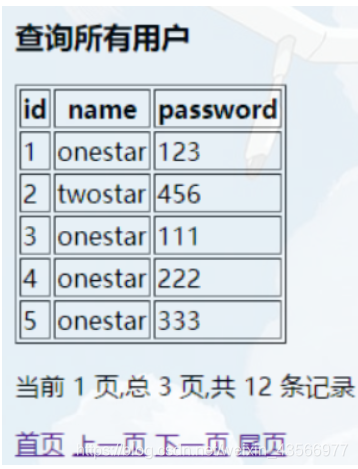
启动 SpringBoot 工程,在浏览器输入:http://localhost:8080/findUser ,可以看到网页显示用户信息表格,点击上一页下一页可以进行页面切换


