RocketMQ系列(三)——原理篇
前言
本篇是RocketMQ系列的第三篇原理(填坑)篇,会从客户端侧(Producer、Consumer)逐一对第一篇中提到的各种特性的实现原理进行解析。文中会出现较多的代码,建议对照源码阅读。
前篇说到RocketMQ是阿里巴巴团队开发并经过长期实践后捐赠给Apache开源基金会的消息中间件,所以就存在阿里和Apache两个版本的源码,本文使用的是Apache的rocket-client 4.4.0.2版,其它版本可能存在细微差别。
一些核心问题
公共机制
长连接与心跳机制
发送环节
消息发送核心流程
事务消息实现原理
延迟消息实现原理
消费环节
消息订阅与消息过滤
消息拉取:push与pull
集群模式与广播模式
集群模式:消息负载均衡
并发消费与顺序消费
一、核心类与数据结构
1.1、DefaultMQProducerImpl
DefaultMQProducer各种功能的具体实现者,它与DefaultMQProducer的主要区别在于:
DefaultMQProducer面向的是应用程序,目的是屏蔽具体的实现细节,为应用程序提供必要而简洁的接口。
DefaultMQProducerImpl除了实现DefaultMQProducer暴露的各种功能之外,还包括与内部其它对象之间的交互接口以及重要的数据结构/对象。
重要数据结构
ConcurrentMap<String/* topic */, TopicPublishInfo> topicPublishInfoTable:topic发布信息映射集,TopicPublishInfo中包含了该topic相关的信息,在【producer启动流程】从NameServer中获取

// topic发布信息
public class TopicPublishInfo {
    // 可写的消息队列集合
    private List<MessageQueue> messageQueueList = new ArrayList<MessageQueue>();
    // 记录接下来往哪个消息队列发消息,用于未指定队列选择策略时循环选择消息队列
    private volatile ThreadLocalIndex sendWhichQueue = new ThreadLocalIndex();
    // topic的路由信息
    private TopicRouteData topicRouteData;
    ……
}

// 消息队列
public class MessageQueue implements Comparable<MessageQueue>, Serializable {
    private String topic;        // 所属topic
    private String brokerName;    // 所在的broker
    private int queueId;        // 队列id,一个broker可以有同一个topic的多个队列,通过id区分
    ……
}

// topic路由信息
public class TopicRouteData extends RemotingSerializable {
    private String orderTopicConf;
    private List<QueueData> queueDatas;
    private List<BrokerData> brokerDatas;
    private HashMap<String/* brokerAddr */, List<String>/* Filter Server */> filterServerTable;
    ……
}

// 消息队列相关数据
public class QueueData implements Comparable<QueueData> {
    private String brokerName;    // 队列所属的节点名
    private int readQueueNums;    // 配置的读队列数量
    private int writeQueueNums;    // 配置的写队列数量
    private int perm;            // 配置的读写等权限,定义见PermName
    private int topicSynFlag;
    ……
}

public class PermName {
    public static final int PERM_PRIORITY = 0x1 << 3;    // 优先级队列
    public static final int PERM_READ = 0x1 << 2;        // 读权限
    public static final int PERM_WRITE = 0x1 << 1;        // 写权限
    public static final int PERM_INHERIT = 0x1 << 0;    // 继承权限
    ……
}

// 节点相关数据
public class BrokerData implements Comparable<BrokerData> {
    private String cluster;        // 集群名
    private String brokerName;    // 节点名,主从节点有相同的节点名
    private HashMap<Long/* brokerId */, String/* broker address */> brokerAddrs; // 节点id与地址映射关系
    ……
}
1.2、DefaultMQPushConsumerImpl
DefaultMQPushConsumer各种功能的具体实现者,与DefaultMQPushConsumer的区别和原因同DefaultMQProducerImpl
重要数据结构
OffsetStore: 消息队列的消费偏移量,定义了加载/更新/移除/持久化偏移量等功能,有本地文件存储(LocalFileOffsetStore)和远程节点存储(RemoteBrokerOffsetStore)两种实现方式,前者用于广播模式,后者用于集群模式。在【consumer启动流程】会从本地文件或远程broker加载消息偏移量。
offsetStore是consumer维度的,内部保存了当前消费者所有消费队列的偏移量,包括不同topic的。队列偏移量在两个场景下会进行全量持久化(persistAll,保存到本地文件或同步到broker):定时任务触发和应用关闭时。
1.3、DefaultMQPullConsumerImpl
DefaultMQPullhConsumer各种功能的具体实现者,与DefaultMQPullConsumer的区别和原因同上
重要的数据结构
OffsetStore:同上
1.4、MQClientInstance
mq客户端实例,主要作用是管理维护生产者实例、消费者实例、topic路由及broker节点等信息。
如:维持producer/consumer与NameServer和broker的心跳,定时更新topic路由,broker列表信息,剔除下线broker,持久化消息偏移量等功能。
注意:MQClientInstance实例是clientId唯一的,clientId=(本地ip+unitName),其中unitName可以在创建producer和consumer时指定。应用场景:如果应用程序要连接多套MQ集群,就需要设置不同的unitName,否则可能会因为共用一套集群信息而导致失败。
重要数据结构
ConcurrentMap<String/* group */, MQProducerInner> producerTable:producer group与producer实例之间的一一映射关系,DefaultMQProducerImpl实现了MQProducerInner接口;producer在启动过程中注册到该table
ConcurrentMap<String/* group */, MQConsumerInner> consumerTable:consumer group与consumer实例之间的一一映射关系,DefaultMQPushConsumerImpl和DefaultMQPullConsumerImpl实现了MQConsumerInner接口;同样的,consumer在启动过程中注册到该table
ConcurrentMap<String/* Topic */, TopicRouteData> topicRouteTable:topic路由信息,前面已有介绍;在producer或consumer启动时从NameServer获取
ConcurrentMap<String/* Broker Name */, HashMap<Long/* brokerId */, String/* address */>> brokerAddrTable:broker的name、id与add之间的映射关系;定时任务MQClientInstance#updateTopicRouteInfoFromNameServer获取和更新
ConcurrentMap<String/* Broker Name */, HashMap<String/* address */, Integer>> brokerVersionTable:broker使用的版本号,主要用于pull消息时的版本校验,在与broker定时心跳过程中获取
MQClientAPIImpl mQClientAPIImpl:与底层remotingClient进行交互的中间层,所有远程交互都是通过mQClientAPIImpl调用remotingClient接口实现的
1.5、RebalanceService
consumer负载均衡服务,producer与consumer启动时会触发各consumer的“以topic为维度的消费负载均衡策略”间隔调度任务,默认间隔20s执行一次。
1.6、RebalanceImpl
consumer消费负载均衡抽象类,消费负载均衡是指消息队列如何在消费者之间进行分配,有RebalancePushImpl和RebalancePullImpl两种实现,上面提到的负载均衡策略就是由RebalanceImpl具体实现。
首先会计算分配的消息队列列表,这些列表意味着当前consumer实例可以进行消费,集群模式下的分配策略由AllocateMessageQueueStrategy确定(见第二篇相关部分),广播模式下则是topic下的所有队列都可以消费。然后根据消息队列列表构造PullRequest请求列表放入PullMessageService的阻塞队列(PushConsumer特有逻辑)。一句话:先分配可以消费的队列,然后对每个队列构造拉取请求放入阻塞队列。
一般来说每个消费者分配到的消息队列是相对固定的,在以下情况会进行重新分配,操作主要是剔除不再分配的消费队列,增加新分配到的消费队列
同一个消费者的实例数有变化
消费队列(ProcessQueue)长时间没有进行拉取操作
重要数据结构
ConcurrentMap<MessageQueue, ProcessQueue> processQueueTable:消息队列与消费队列map,顾名思义消费队列是真正面向消费的数据结构,其内部维护了一个待消费消息的TreeMap
ConcurrentMap<String/* topic */, Set> topicSubscribeInfoTable:topic下的全部消息队列集
ConcurrentMap<String /* topic */, SubscriptionData> subscriptionInner:topic订阅集合
public class ProcessQueue {
    private final ReadWriteLock lockTreeMap = new ReentrantReadWriteLock();                                    // 需要不停读和写数据
    private final TreeMap<Long/* offset */, MessageExt> msgTreeMap = new TreeMap<Long, MessageExt>();        // key是具有唯一属性的消息偏移量,支持按偏移量顺序读取
    private final AtomicLong msgCount = new AtomicLong();
    private final AtomicLong msgSize = new AtomicLong();
    // A subset of msgTreeMap, will only be used when orderly consume
    private final TreeMap<Long, MessageExt> consumingMsgOrderlyTreeMap = new TreeMap<Long, MessageExt>();
    ……
}
1.7、PullMessageService
PushConsumer的消息拉取服务,内部维护了一个PullRequest阻塞队列pullRequestQueue,服务在启动时会不断从该阻塞队列中取出PullRequest对象然后通过PullAPIWrapper#pullKernelImpl向broker拉取消息。pull模式下也是以类似的方式拉取,所以不论是PushConsumer还是PullConsumer实际上内部都是pull模式。
重要数据结构
LinkedBlockingQueue pullRequestQueue:拉取请求阻塞队列,RebalanceService定时往队列里添加请求,PullMessageService则不断取出并触发向broker拉取消息操作。
public class PullRequest {
    private String consumerGroup;
    private MessageQueue messageQueue;    // 通过该消息队列构造向broker拉取消息的请求
    private ProcessQueue processQueue;
    private long nextOffset;            // 消费偏移量
    ……
}
1.8、NettyRemotingAbstract
RocketMQ的RPC通信采用Netty作为底层通信库,NettyRemotingAbstract是client与NameServer和Broker通信的抽象类,有NettyRemotingServer和NettyRemotingClient两个实现类,前者实现Netty服务器端功能,后者实现Netty客户端功能。
NettyRemotingAbstract提供了三种与Server的通信方式:同步(invokeSyncImpl)、异步(invokeAsyncImpl)和单向(invokeOnewayImpl),除此之外它还提供了扫描进行中请求的响应结果(ResponseFuture,见下)的方法scanResponseTable,该方法在对象实例化时会启动定时任务进行调度。
// 同步调用,返回调用结果
public RemotingCommand invokeSync(String addr, final RemotingCommand request, long timeoutMillis)

// 异步调用,需要传递一个回调接口
public void invokeAsync(String addr, RemotingCommand request, long timeoutMillis, InvokeCallback invokeCallback)

// 单向调用,参数与同步调用一样,只是没有回调结果
public void invokeOneway(String addr, RemotingCommand request, long timeoutMillis) throws InterruptedException,

// 扫描进行中的请求,等待超时则执行回调方法,当然异步调用时才有回调接口
public void scanResponseTable()
重要数据结构
ConcurrentMap<Integer /* opaque */, ResponseFuture> responseTable:当前正在进行中的请求集合,ResponseFuture内部注册了一个InvokeCallback,可以用于被调用方应答时进行异步回调,比如异步发送或push模式下的拉取消息(默认),以及pull模式下的异步拉取(需要自定义PullCallback)。
除了被调用方应答时调用之外,InvokeCallback在等待响应超时时也会被强制执行。
1.9、MQClientAPIImpl
一句话,MQClientAPIImpl是producer/consumer与底层remotingClient交互的中间层,进行一些通用逻辑的处理。
1.10、小结
简单总结下上面提到的重要类。
DefaultMQProducerImpl:DefaultMQProducer功能的内部实现类
DefaultMQPushConsumerImpl:DefaultMQPushConsumer功能的内部实现类
DefaultMQPullConsumerImpl:DefaultMQPullConsumer功能的内部实现类
MQClientInstance:MQ客户端实例,内部维持着一个MQ集群下各生产者实例、消费者实例、topic路由、消息队列信息及broker节点等信息,以及这些信息的更新机制和方法实现
RebalanceService:消费者负载均衡服务,一个单独的线程间隔执行消费者负载均衡策略RebalanceImpl,MQClientInstance启动时start该线程
RebalanceImpl:消费者负载均衡策略抽象类,触发重新负载均衡大致有两种情况:消费者数量有变化,消费队列长时间未进行消息拉取操作
PullMessageService:消息拉取服务,从阻塞队列里不断取出PullRequest,然后向broker发起数据拉取请求
NettyRemotingAbstract:客户端(producer、consumer)与服务端(nameServer、broker)进行通信的底层netty实现
MQClientAPIImpl:producer/consumer与底层remotingClient交互的中间层
二、核心流程解析
2.1、Producer启动流程
先看下DefaultMQProducer的启动流程,蓝色框内为producer和consumer启动时的共有流程,在多个生产者&消费者实例启动时只会执行一次。

step1、创建MQClientInstance实例
MQClientInstance是clientId唯一的,clientId由ip+instanceName+unitName组成,同一个clientId只能有一个MQClientInstance实例,所以如果一个服务要同时连接多个MQ集群,需要指定不同的unitName。
public MQClientInstance getAndCreateMQClientInstance(final ClientConfig clientConfig, RPCHook rpcHook) {
    String clientId = clientConfig.buildMQClientId();
    MQClientInstance instance = this.factoryTable.get(clientId);
    if (null == instance) {
        instance = new MQClientInstance(clientConfig.cloneClientConfig(), this.factoryIndexGenerator.getAndIncrement(), clientId, rpcHook);
        MQClientInstance prev = this.factoryTable.putIfAbsent(clientId, instance);
        // 注意这里instance并非绝对唯一,在启动的瞬时可能存在并发情况同时创建了多个实例,这里是通过ConcurrentMap的putIfAbsent来保证最终保存实例的唯一性
        if (prev != null) {
            instance = prev;
        }
        ……
    }

    return instance;
}

public String buildMQClientId() {
    StringBuilder sb = new StringBuilder();
    sb.append(this.getClientIP());

    sb.append("@");
    // producer和consumer的集群模式下,instanceName为线程id,保证了不同JVM实例具有不同的instanceName,也即不同的clientId
    sb.append(this.getInstanceName());
    if (!UtilAll.isBlank(this.unitName)) {
        sb.append("@");
        sb.append(this.unitName);
    }

    return sb.toString();
}
需要注意的是,不要轻易设置instanceName,否则可能导致在同一台物理机上的不同应用实例(JVM)在做消费负载均衡时出现问题,因为consumer会根据clientId来进行消息队列的分配,如果两个不同实例的clientId相同,很有可能会分配到同一批消息队列,具体原理参考默认消费负载均衡策略AllocateMessageQueueAveragely的实现。
step2、NettyRemotingClient中启动netty客户端,为后续与各Broker建立长连接做准备
长连接与短链接
短连接:每次连接需要三次握手,数据发送完之后断开连接;缺点:连接过多时消耗CPU内存资源
长连接:保持连接,有数据直接发送,没有数据传输时通过心跳维持连接;缺点:可能无法及时感知客户端断开连接,不能及时回收资源
public void start() {
    ……
    Bootstrap handler = this.bootstrap.group(this.eventLoopGroupWorker).channel(NioSocketChannel.class)
        // 禁止使用Nagle算法,有数据立即发送
        .option(ChannelOption.TCP_NODELAY, true)
        // 开启情况下,当2个小时没有发生数据交换时,TCP会发送一个探针给对方,如果收到的是ACK标记的应答,则连接保持,否则关闭连接
        .option(ChannelOption.SO_KEEPALIVE, false)
        .option(ChannelOption.CONNECT_TIMEOUT_MILLIresponseTable的定时任务S, nettyClientConfig.getConnectTimeoutMillis())
        .option(ChannelOption.SO_SNDBUF, nettyClientConfig.getClientSocketSndBufSize())
        .option(ChannelOption.SO_RCVBUF, nettyClientConfig.getClientSocketRcvBufSize())
        .handler(new ChannelInitializer<SocketChannel>() {
            @Override
            public void initChannel(SocketChannel ch) throws Exception {
                ChannelPipeline pipeline = ch.pipeline();
                if (nettyClientConfig.isUseTLS()) {
                    if (null != sslContext) {
                        pipeline.addFirst(defaultEventExecutorGroup, "sslHandler", sslContext.newHandler(ch.alloc()));
                        log.info("Prepend SSL handler");
                    } else {
                        log.warn("Connections are insecure as SSLContext is null!");
                    }
                }
                pipeline.addLast(
                    defaultEventExecutorGroup,
                    new NettyEncoder(),
                    new NettyDecoder(),
                    // 心跳检测实例,默认超过120s没有读写就发送心跳
                    new IdleStateHandler(0, 0, nettyClientConfig.getClientChannelMaxIdleTimeSeconds()),
                    new NettyConnectManageHandler(),
                    // 该handler用于客户端处理服务端回调,见【消息发送核心流程】step 4
                    new NettyClientHandler());
            }
        });

        ……
}
netty实现长连接的两种方式:1、设置ChannelOption.SO_KEEPALIVE为true,默认2小时进行一次心跳检测;2、通过IdleStateHandler自定义心跳保持和消息发送机制,可以有效及时发现客户端断开问题。RocketMQ采用的是第二种方式。
IdleStateHandler构造函数需要传递三个参数,分别是多长时间没有读数据、写数据和没有读写数据时,进行心跳检测,实现原理为启动时分别创建定时任务对这三种事件进行检测并发送心跳。
    private void initialize(ChannelHandlerContext ctx) {
        switch(this.state) {
        case 1:
        case 2:
            return;
        default:
            this.state = 1;
            this.initOutputChanged(ctx);
            this.lastReadTime = this.lastWriteTime = this.ticksInNanos();
            if (this.readerIdleTimeNanos > 0L) {
                this.readerIdleTimeout = this.schedule(ctx, new IdleStateHandler.ReaderIdleTimeoutTask(ctx), this.readerIdleTimeNanos, TimeUnit.NANOSECONDS);
            }

            if (this.writerIdleTimeNanos > 0L) {
                this.writerIdleTimeout = this.schedule(ctx, new IdleStateHandler.WriterIdleTimeoutTask(ctx), this.writerIdleTimeNanos, TimeUnit.NANOSECONDS);
            }

            if (this.allIdleTimeNanos > 0L) {
                this.allIdleTimeout = this.schedule(ctx, new IdleStateHandler.AllIdleTimeoutTask(ctx), this.allIdleTimeNanos, TimeUnit.NANOSECONDS);
            }
        }
    }
step3、启动扫描responseTable的定时任务
    public void start() {
        ……

        this.timer.scheduleAtFixedRate(new TimerTask() {
            @Override
            public void run() {
                try {
                    NettyRemotingClient.this.scanResponseTable();
                } catch (Throwable e) {
                    log.error("scanResponseTable exception", e);
                }
            }
        }, 1000 * 3, 1000);

        ……
    }
第一部分的NettyRemotingAbstract简介中提到的responseTable表保存着进行中的请求集合,如果检测到请求超时,会立即执行注入的回调方法,比如消息的异步发送或pull拉取回调。
每个消费者、生产者启动都会进入org.apache.rocketmq.client.impl.factory.MQClientInstance#start该方法,如下图:
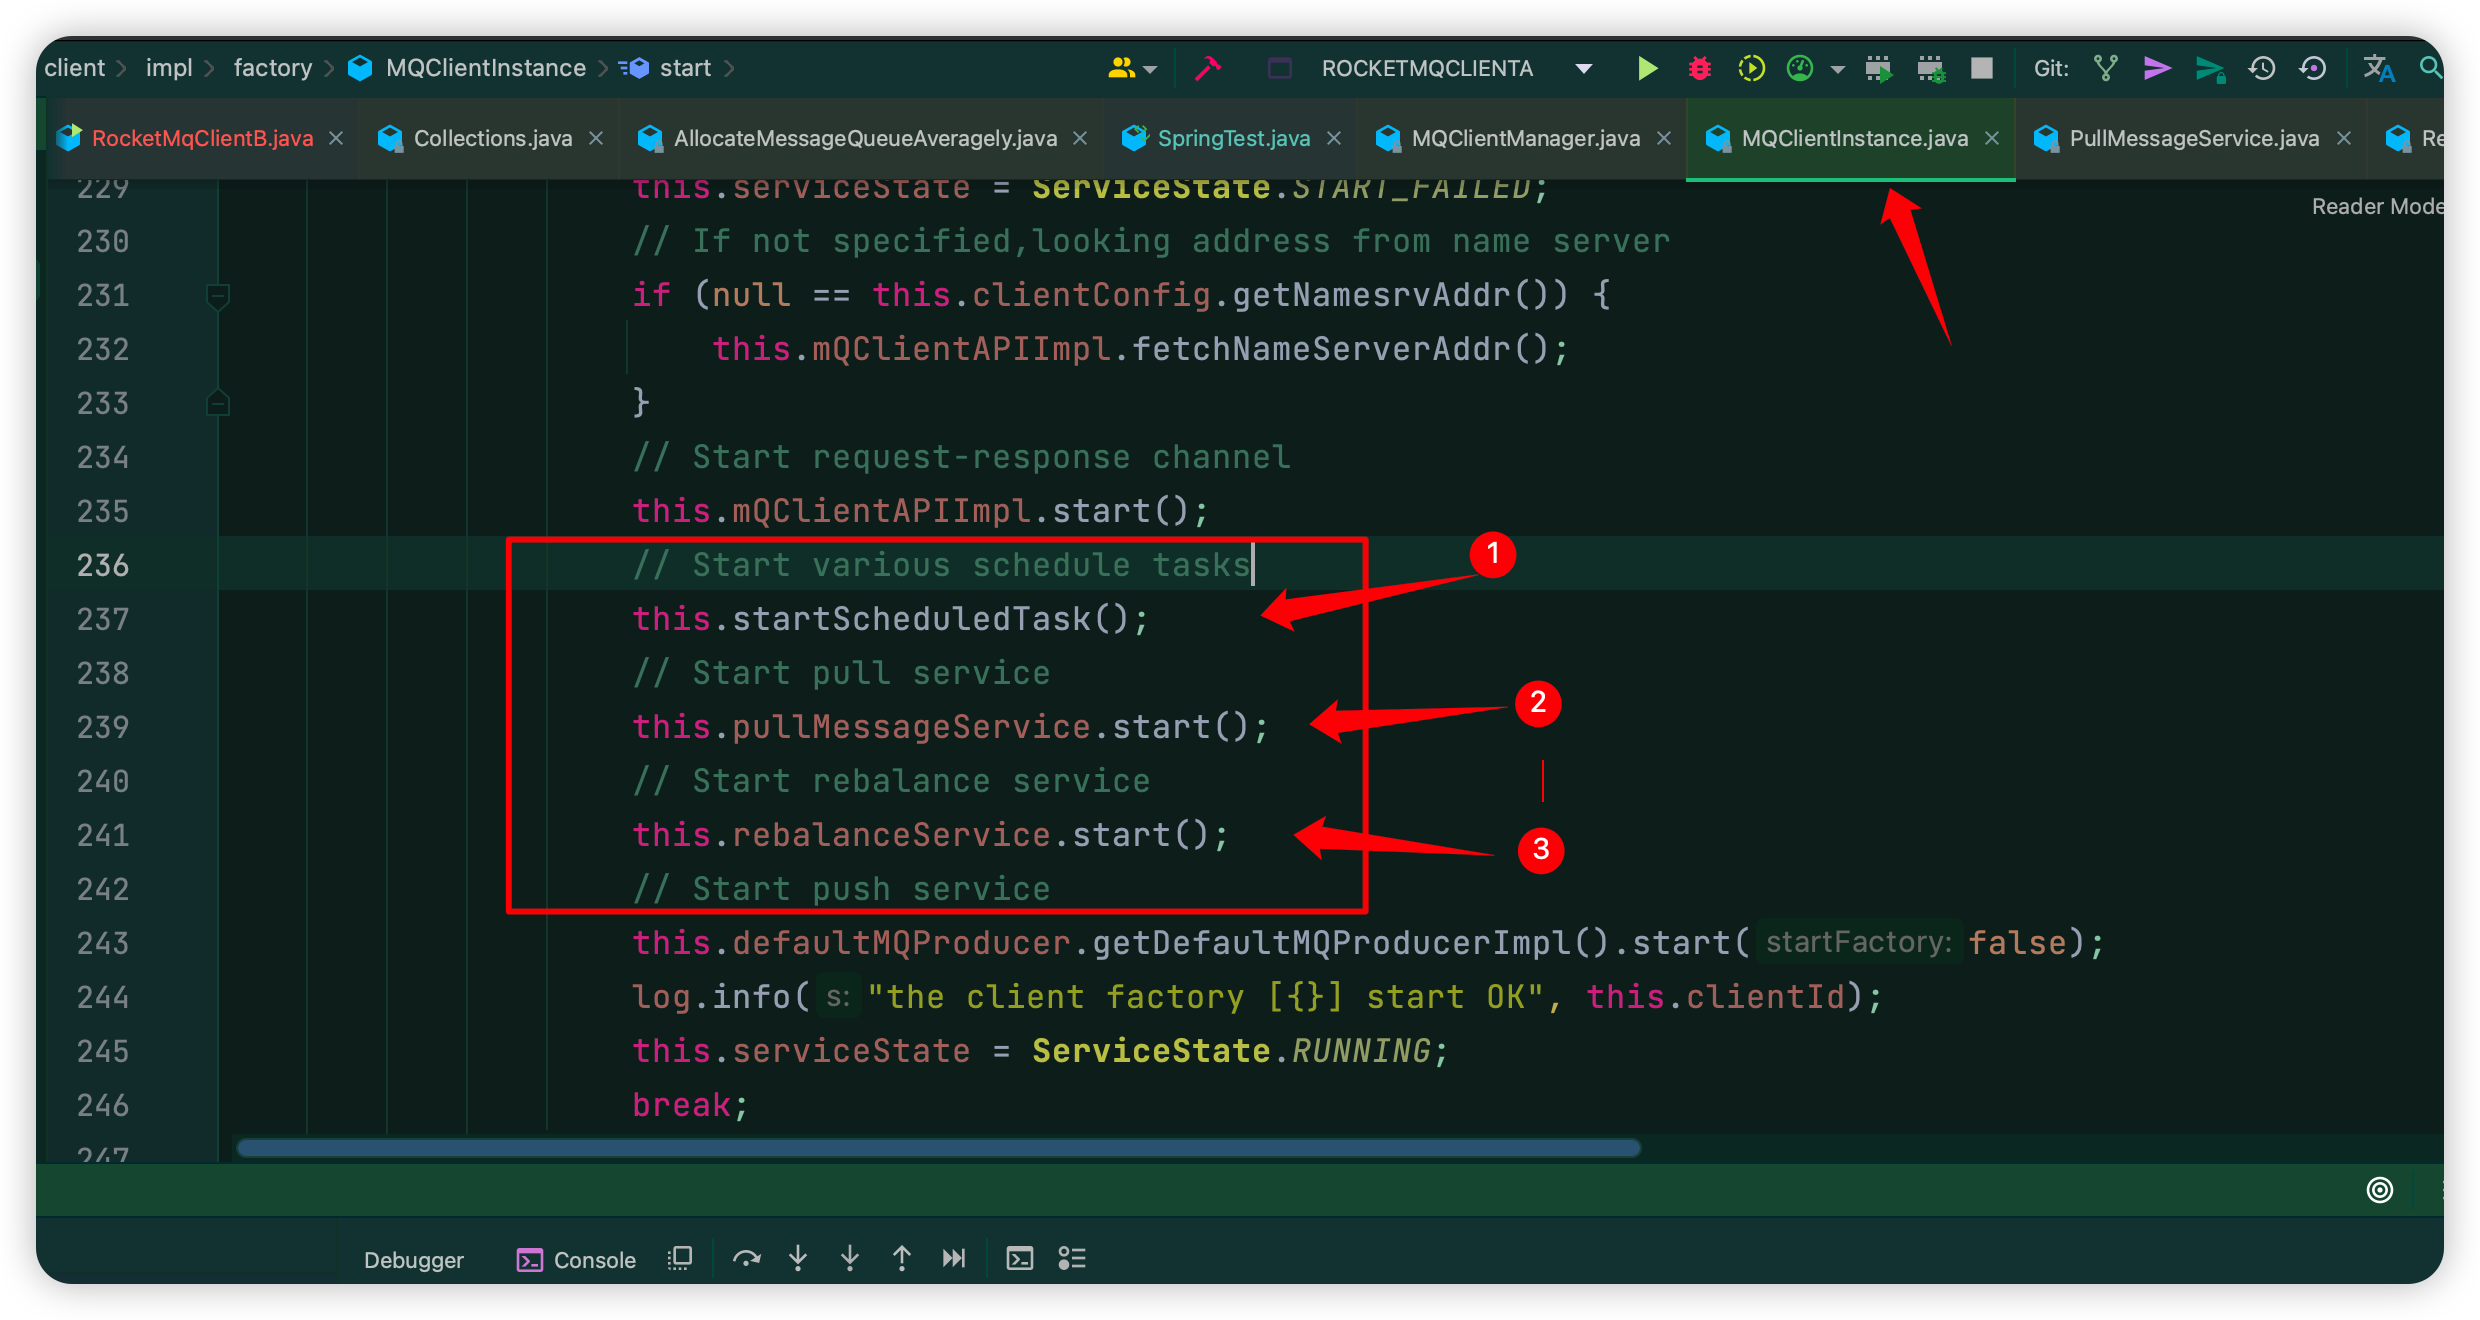
注意:图中①对应下面step4的代码入口,图中②对应step5的代码入口,图中③对应 step6的代码入口;
step4、startScheduledTask注册多个定时任务
其中比较重要的任务有:
1、从NameServer同步topic的路由信息
2、更新broker信息,排除下线的broker
3、向所有broker发送心跳
发送包含了生产者和消费者订阅信息在内的心跳包
在push模式下,向broker上传MessageFilter消息过滤实现
4、持久化消息偏移量到broker(集群模式下)或本地文件(广播模式下)
private void startScheduledTask() {
    if (null == this.clientConfig.getNamesrvAddr()) {
        this.scheduledExecutorService.scheduleAtFixedRate(new Runnable() {
            @Override
            public void run() {
                try {
                    MQClientInstance.this.mQClientAPIImpl.fetchNameServerAddr();
                } catch (Exception e) {
                    log.error("ScheduledTask fetchNameServerAddr exception", e);
                }
            }
        }, 1000 * 10, 1000 * 60 * 2, TimeUnit.MILLISECONDS);
    }

    this.scheduledExecutorService.scheduleAtFixedRate(new Runnable() {
        @Override
        public void run() {
            try {
                // 从NameServer同步topic的路由信息
                MQClientInstance.this.updateTopicRouteInfoFromNameServer();
            } catch (Exception e) {
                log.error("ScheduledTask updateTopicRouteInfoFromNameServer exception", e);
            }
        }
    }, 10, this.clientConfig.getPollNameServerInterval(), TimeUnit.MILLISECONDS);

    this.scheduledExecutorService.scheduleAtFixedRate(new Runnable() {
        @Override
        public void run() {
            try {
                // 更新本地broker信息,剔除下线的broker
                MQClientInstance.this.cleanOfflineBroker();
                // 向所有broker发送心跳
                MQClientInstance.this.sendHeartbeatToAllBrokerWithLock();
            } catch (Exception e) {
                log.error("ScheduledTask sendHeartbeatToAllBroker exception", e);
            }
        }
    }, 1000, this.clientConfig.getHeartbeatBrokerInterval(), TimeUnit.MILLISECONDS);

    this.scheduledExecutorService.scheduleAtFixedRate(new Runnable() {
        @Override
        public void run() {
            try {
                // 持久化消息偏移量到本地文件或远程broker
                MQClientInstance.this.persistAllConsumerOffset();
            } catch (Exception e) {
                log.error("ScheduledTask persistAllConsumerOffset exception", e);
            }
        }
    }, 1000 * 10, this.clientConfig.getPersistConsumerOffsetInterval(), TimeUnit.MILLISECONDS);

    this.scheduledExecutorService.scheduleAtFixedRate(new Runnable() {
        @Override
        public void run() {
            try {
                // push模式下,调整消费线程数量,调整实现目前为空
                MQClientInstance.this.adjustThreadPool();
            } catch (Exception e) {
                log.error("ScheduledTask adjustThreadPool exception", e);
            }
        }
    }, 1, 1, TimeUnit.MINUTES);
}
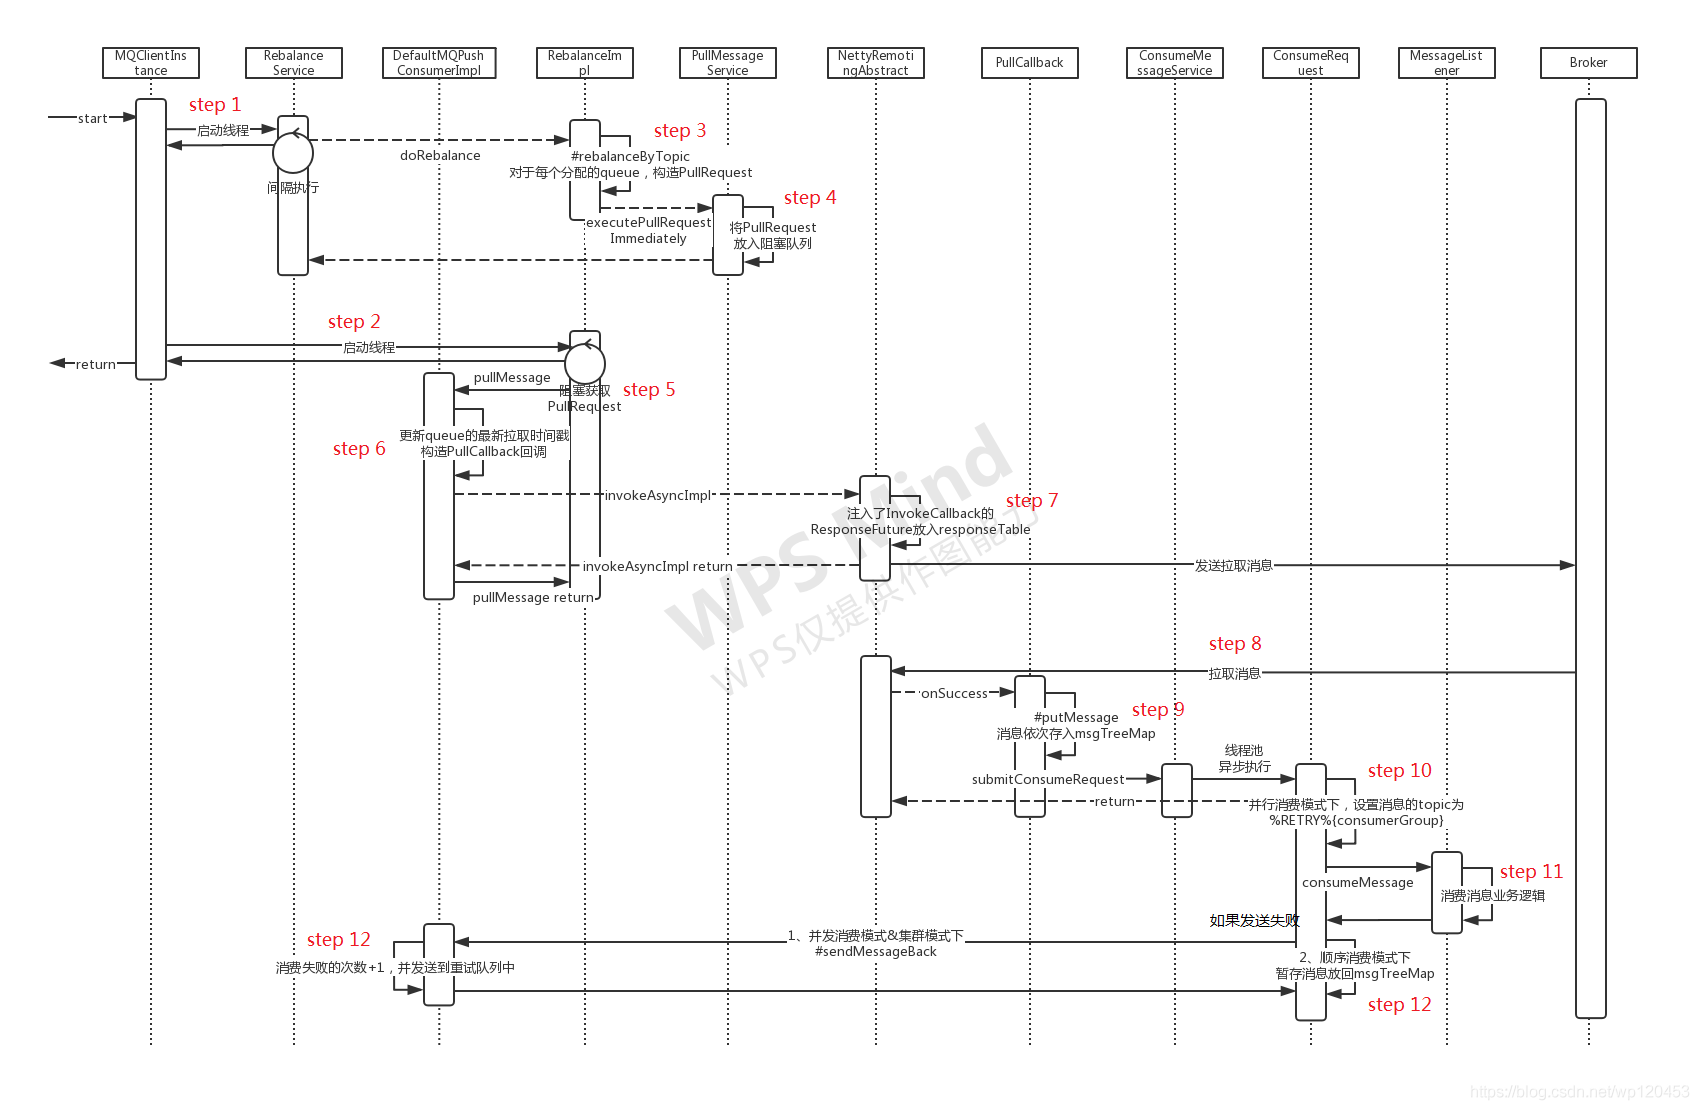
step5、启动PullMessageService线程拉取消息
线程循环从LinkedBlockingQueue中阻塞获取PullRequest,然后构造请求从Broker中异步拉取消息,同时注册一个拉取回调接口PullCallback,PullCallback中定义了消息拉取后的处理方式,比如消费消息和再次拉取消息等。
@Override
public void run() {
    log.info(this.getServiceName() + " service started");

    while (!this.isStopped()) {
        try {
            // 从LinkedBlockingQueue中获取pullRequest
            PullRequest pullRequest = this.pullRequestQueue.take();
            this.pullMessage(pullRequest);
        } catch (InterruptedException ignored) {
        } catch (Exception e) {
            log.error("Pull Message Service Run Method exception", e);
        }
    }

    log.info(this.getServiceName() + " service end");
}

private void pullMessage(final PullRequest pullRequest) {
    final MQConsumerInner consumer = this.mQClientFactory.selectConsumer(pullRequest.getConsumerGroup());
    if (consumer != null) {
        DefaultMQPushConsumerImpl impl = (DefaultMQPushConsumerImpl) consumer;
        // 从broker中拉取消息
        impl.pullMessage(pullRequest);
    } else {
        log.warn("No matched consumer for the PullRequest {}, drop it", pullRequest);
    }
}
至于DefaultMQPushConsumerImpl拉取消息的具体实现在下面的消息拉取核心流程中会详细介绍。
下面看下DefaultMQPushConsumerImpl拉取消息的实现
public void pullMessage(final PullRequest pullRequest) {
    ……

    // 构造消息拉取回调,显然拉取消息是一个异步操作
    PullCallback pullCallback = new PullCallback() {
        @Override
        public void onSuccess(PullResult pullResult) {
                ……
                switch (pullResult.getPullStatus()) {
                    case FOUND:    // 如果拉取到消息
                    ……
                        // 先将消息放入消费队列中
                        boolean dispatchToConsume = processQueue.putMessage(pullResult.getMsgFoundList());
                        // 调用consumeMessageService#submitConsumeRequest进行消费
                        DefaultMQPushConsumerImpl.this.consumeMessageService.submitConsumeRequest(pullResult.getMsgFoundList(),
                            processQueue,
                            pullRequest.getMessageQueue(),
                            dispatchToConsume);
                    ……
                }
        }
    }

    try {
        this.pullAPIWrapper.pullKernelImpl(
            pullRequest.getMessageQueue(),
            subExpression,
            subscriptionData.getExpressionType(),
            subscriptionData.getSubVersion(),
            pullRequest.getNextOffset(),
            this.defaultMQPushConsumer.getPullBatchSize(),
            sysFlag,
            commitOffsetValue,
            BROKER_SUSPEND_MAX_TIME_MILLIS,
            CONSUMER_TIMEOUT_MILLIS_WHEN_SUSPEND,
            CommunicationMode.ASYNC,
            pullCallback        // 回调实现传入通信层,最终会包装成一个ResponseFuture放入responseTable,等待broker消息的异步返回
        );
    } catch (Exception e) {
        log.error("pullKernelImpl exception", e);
        this.executePullRequestLater(pullRequest, PULL_TIME_DELAY_MILLS_WHEN_EXCEPTION);
    }
step6、启动RebalanceService线程进行consumer的消费负载均衡
所谓消费负载均衡,就是如何分配多个消息队列给所有consumer实例消费,不论是push还是pull模式,负责均衡策略最终都是调用RebalanceImpl#rebalanceByTopic方法。
private void rebalanceByTopic(final String topic, final boolean isOrder) {
    switch (messageModel) {
        case BROADCASTING: {
            // 获取本地缓存的该topic的所有消息队列
            Set<MessageQueue> mqSet = this.topicSubscribeInfoTable.get(topic);
            if (mqSet != null) {
                // 更新本地的消费队列并返回是否有更新(分配的消费队列是否有变化)
                boolean changed = this.updateProcessQueueTableInRebalance(topic, mqSet, isOrder);
                if (changed) {
                    // 如果有,需要更新订阅信息,并向broker发送心跳,即step7
                    this.messageQueueChanged(topic, mqSet, mqSet);
                }
            }
            break;
        }
        case CLUSTERING: {
             // 获取本地缓存的该topic的所有消息队列
            Set<MessageQueue> mqSet = this.topicSubscribeInfoTable.get(topic);
            // 根据topic、group获取在线的消费者终端列表(即在线的clientId)
            List<String> cidAll = this.mQClientFactory.findConsumerIdList(topic, consumerGroup);

            if (mqSet != null && cidAll != null) {
                List<MessageQueue> mqAll = new ArrayList<MessageQueue>();
                mqAll.addAll(mqSet);

                Collections.sort(mqAll);
                Collections.sort(cidAll);

                AllocateMessageQueueStrategy strategy = this.allocateMessageQueueStrategy;
                List<MessageQueue> allocateResult = null;
                try {
                    // 按照一定的分配策略,对所有消息队列在所有消费者之间进行分配,返回当前消费者分配到的队列
                    allocateResult = strategy.allocate(
                        this.consumerGroup,
                        this.mQClientFactory.getClientId(),
                        mqAll,
                        cidAll);
                } catch (Throwable e) {
                    log.error("AllocateMessageQueueStrategy.allocate Exception. allocateMessageQueueStrategyName={}", strategy.getName(), e);
                    return;
                }

                Set<MessageQueue> allocateResultSet = new HashSet<MessageQueue>();
                if (allocateResult != null) {
                    allocateResultSet.addAll(allocateResult);
                }

                // 将负载均衡的消息队列结果更新到消费队列中
                boolean changed = this.updateProcessQueueTableInRebalance(topic, allocateResultSet, isOrder);
                // 如果消费队列有改变
                if (changed) {
                    this.messageQueueChanged(topic, mqSet, allocateResultSet); // 这里最后会向发送心跳,即step7
                }
            }
            break;
        }
        default:
            break;
    }
}
step7、向broker发送心跳(这一步也就是负载均衡红色代码部分)
这一步在step4的定时任务中也出现过,这一阶段包含了两部分操作:
1、依次向所有相关的broker发送包含了当前应用节点所有生产者和消费者及订阅信息的心跳包,同步返回broker的版本号信息
2、如果是push模式且过滤方式为类过滤模式,则上传MessageFilter的实现到所有相关Broker。
public void sendHeartbeatToAllBrokerWithLock() {
    if (this.lockHeartbeat.tryLock()) {
        try {
            this.sendHeartbeatToAllBroker();
            this.uploadFilterClassSource();
        } catch (final Exception e) {
            log.error("sendHeartbeatToAllBroker exception", e);
        } finally {
            this.lockHeartbeat.unlock();
        }
    } else {
        log.warn("lock heartBeat, but failed.");
    }
}

private void sendHeartbeatToAllBroker() {
    // 构造心跳包
    final HeartbeatData heartbeatData = this.prepareHeartbeatData();
    ……
        // 发送心跳并同步返回broker版本号
       int version = this.mQClientAPIImpl.sendHearbeat(addr, heartbeatData, 3000);
       if (!this.brokerVersionTable.containsKey(brokerName)) {
           this.brokerVersionTable.put(brokerName, new HashMap<String, Integer>(4));
       }
}

private HeartbeatData prepareHeartbeatData() {
    HeartbeatData heartbeatData = new HeartbeatData();
    ……

    // Consumer
    for (Map.Entry<String, MQConsumerInner> entry : this.consumerTable.entrySet()) {
        MQConsumerInner impl = entry.getValue();
        if (impl != null) {
            ConsumerData consumerData = new ConsumerData();
            ……
            // 设置订阅消息SubscriptionData,订阅消息构造方式见PushConsumer启动流程step 1
            consumerData.getSubscriptionDataSet().addAll(impl.subscriptions());
            consumerData.setUnitMode(impl.isUnitMode());
            heartbeatData.getConsumerDataSet().add(consumerData);
        }
    }

    // Producer
    ……

    return heartbeatData;
}

private void uploadFilterClassSource() {
    Iterator<Entry<String, MQConsumerInner>> it = this.consumerTable.entrySet().iterator();
    while (it.hasNext()) {
        Entry<String, MQConsumerInner> next = it.next();
        MQConsumerInner consumer = next.getValue();
        // push模式下
        if (ConsumeType.CONSUME_PASSIVELY == consumer.consumeType()) {
            Set<SubscriptionData> subscriptions = consumer.subscriptions();
            for (SubscriptionData sub : subscriptions) {
                // 类过滤模式下
                if (sub.isClassFilterMode() && sub.getFilterClassSource() != null) {
                    final String consumerGroup = consumer.groupName();
                    final String className = sub.getSubString();
                    final String topic = sub.getTopic();
                    // filterClassSource为通过MixAll#file2String转换为String类型的MessageFilterImpl.java文件
                    final String filterClassSource = sub.getFilterClassSource();
                    try {
                        // 上传文件到broker
                        this.uploadFilterClassToAllFilterServer(consumerGroup, className, topic, filterClassSource);
                    } catch (Exception e) {
                        log.error("uploadFilterClassToAllFilterServer Exception", e);
                    }
                }
            }
        }
    }
}
2.2、PushConsumer启动流程
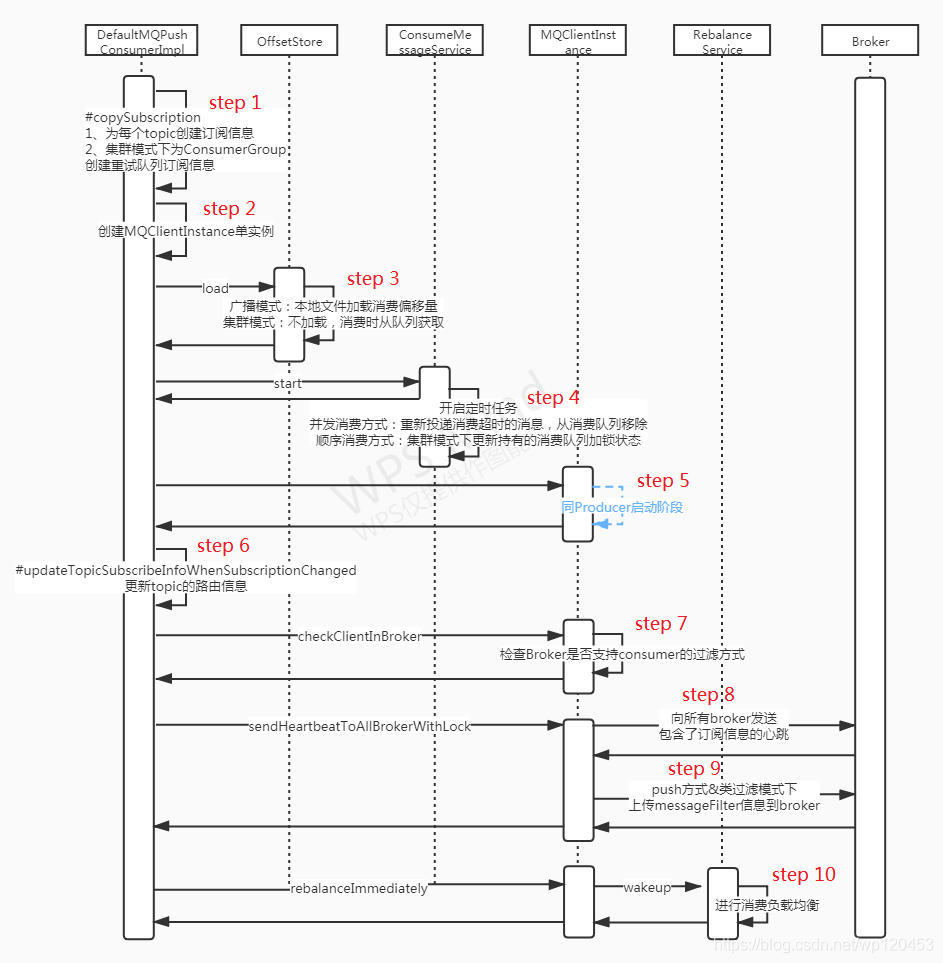
step1、构建订阅消息
根据用户的订阅规则,按topic维度构造订阅消息SubscriptionData,并放入ConcurrentMap<String /* topic */, SubscriptionData> subscriptionInner,订阅消息列表会用于构造心跳包(HeartbeatData)以便向各Broker发送心跳,见【producer启动流程】的step 4.3。
如果为集群模式,则还需要为当前消费者组创建一个重试队列。
private void copySubscription() throws MQClientException {
    try {
        Map<String, String> sub = this.defaultMQPushConsumer.getSubscription();
        if (sub != null) {
            for (final Map.Entry<String, String> entry : sub.entrySet()) {
                final String topic = entry.getKey();
                final String subString = entry.getValue();
                // 构造订阅消息,如果tag为空(""或Null)则统一替换为"*",如果设置了多个tags则按"||"分割后分别放入subscriptionData的Set<String> tagsSet中
                SubscriptionData subscriptionData = FilterAPI.buildSubscriptionData(this.defaultMQPushConsumer.getConsumerGroup(), topic, subString);
                this.rebalanceImpl.getSubscriptionInner().put(topic, subscriptionData);
            }
        }

        switch (this.defaultMQPushConsumer.getMessageModel()) {
            case BROADCASTING:
                break;
            case CLUSTERING:    // 集群模式下需要订阅重试topic下的所有消息
                // retryTopic = ${RETRY_GROUP_TOPIC_PREFIX} + ${consumerGroup},RETRY_GROUP_TOPIC_PREFIX值为%RETRY%
                final String retryTopic = MixAll.getRetryTopic(this.defaultMQPushConsumer.getConsumerGroup());
                SubscriptionData subscriptionData = FilterAPI.buildSubscriptionData(this.defaultMQPushConsumer.getConsumerGroup(), retryTopic, SubscriptionData.SUB_ALL);
                this.rebalanceImpl.getSubscriptionInner().put(retryTopic, subscriptionData);
                break;
            default:
                break;
        }
    } catch (Exception e) {
        throw new MQClientException("subscription exception", e);
    }
}
step2、创建MQClientInstance实例
逻辑同【Producer启动流程】的step 1
step3、创建偏移量存储对象并加载消费偏移量
广播模式下为本地文件偏移量存储对象(LocalFileOffsetStore),集群模式下为远程偏移量存储对象(RemoteBrokerOffsetStore),主要区别是前者会将每个消息队列的偏移量以文件的形式保存在本地,后者会定时将偏移量同步至各broker,见【producer启动阶流程】的step 4.4。
step4、启动消费服务定时任务
消息消费服务(ConsumeMessageService)分并发消费(ConsumeMessageConcurrentlyService)和顺序消费(ConsumeMessageOrderlyService)两种实现,在创建consumer时进行注册。
并发消费模式下,任务cleanExpiredMsg会依次遍历msgTreeMap中至多前16个消息,如果该消息的消费时长超过消费者设置的消费超时时间,就会被重新投递到重试队列中。消费时长=(当前系统时间 - msg中的CONSUME_START_TIME属性值),CONSUME_START_TIME值在消息即将被listener消费前会统一设置(见【消息拉取核心流程】的step 7)
public void cleanExpiredMsg(DefaultMQPushConsumer pushConsumer) {
    // 并发消费模式下才需要清除消费超时消息
    // 顺序消费模式下没有超时概念,消费失败后会重新放入msgTreeMap反复重试,直到超过最大重试次数后重新投递
    if (pushConsumer.getDefaultMQPushConsumerImpl().isConsumeOrderly()) {
        return;
    }

    // 最多判断前16条消息是否超时
    int loop = msgTreeMap.size() < 16 ? msgTreeMap.size() : 16;
    for (int i = 0; i < loop; i++) {
        MessageExt msg = null;
        try {
            // 队列加锁
            this.lockTreeMap.readLock().lockInterruptibly();
            try {
                // 消费超时判断:当前时间戳 - 消息的开始消费时间 > 设置的消费超时时间
                if (!msgTreeMap.isEmpty() && System.currentTimeMillis() - Long.parseLong(MessageAccessor.getConsumeStartTimeStamp(msgTreeMap.firstEntry().getValue())) > pushConsumer.getConsumeTimeout() * 60 * 1000) {
                    msg = msgTreeMap.firstEntry().getValue();
                } else {
                    break;
                }
            } finally {
                this.lockTreeMap.readLock().unlock();
            }
        } catch (InterruptedException e) {
            log.error("getExpiredMsg exception", e);
        }

        try {
            // 如果消费超时,直接放到delayLevel=3的延迟队列
            pushConsumer.sendMessageBack(msg, 3);
            log.info("send expire msg back. topic={}, msgId={}, storeHost={}, queueId={}, queueOffset={}", msg.getTopic(), msg.getMsgId(), msg.getStoreHost(), msg.getQueueId(), msg.getQueueOffset());
            try {
                this.lockTreeMap.writeLock().lockInterruptibly();
                try {
                    if (!msgTreeMap.isEmpty() && msg.getQueueOffset() == msgTreeMap.firstKey()) {
                        try {
                            // 从msgTreeMap中移除超时的消息
                            removeMessage(Collections.singletonList(msg));
                        } catch (Exception e) {
                            log.error("send expired msg exception", e);
                        }
                    }
                } finally {
                    this.lockTreeMap.writeLock().unlock();
                }
            ……
    }
}
顺序消费模式下,会向Master Broker发起锁定当前节点所有消费队列(注意不是消息队列)请求,加锁成功则重新设置获得锁时间,加锁失败则更新本地锁状态,该锁状态会影响到后续的消费行为。
public void lockAll() {
    // 获取当前节点所有消费队列
    HashMap<String, Set<MessageQueue>> brokerMqs = this.buildProcessQueueTableByBrokerName();

    Iterator<Entry<String, Set<MessageQueue>>> it = brokerMqs.entrySet().iterator();
    while (it.hasNext()) {
        Entry<String, Set<MessageQueue>> entry = it.next();
        final String brokerName = entry.getKey();
        final Set<MessageQueue> mqs = entry.getValue();

        if (mqs.isEmpty())
            continue;

        // 获取mater broker节点
        FindBrokerResult findBrokerResult = this.mQClientFactory.findBrokerAddressInSubscribe(brokerName, MixAll.MASTER_ID, true);
        if (findBrokerResult != null) {
            LockBatchRequestBody requestBody = new LockBatchRequestBody();
            requestBody.setConsumerGroup(this.consumerGroup);
            requestBody.setClientId(this.mQClientFactory.getClientId());
            requestBody.setMqSet(mqs);

            try {
                // 返回加锁成功的队列
                Set<MessageQueue> lockOKMQSet = this.mQClientFactory.getMQClientAPIImpl().lockBatchMQ(findBrokerResult.getBrokerAddr(), requestBody, 1000);

                for (MessageQueue mq : lockOKMQSet) {
                    ProcessQueue processQueue = this.processQueueTable.get(mq);
                    if (processQueue != null) {
                        if (!processQueue.isLocked()) {
                            log.info("the message queue locked OK, Group: {} {}", this.consumerGroup, mq);
                        }

                        // 不论之前有没有加锁都统一加锁
                        processQueue.setLocked(true);
                        // 设置最新加锁时间,持有锁有过期时间
                        processQueue.setLastLockTimestamp(System.currentTimeMillis());
                    }
                }
                for (MessageQueue mq : mqs) {
                    if (!lockOKMQSet.contains(mq)) {
                        ProcessQueue processQueue = this.processQueueTable.get(mq);
                        if (processQueue != null) {
                            // 释放没有加锁成功的队列
                            processQueue.setLocked(false);
                            log.warn("the message queue locked Failed, Group: {} {}", this.consumerGroup, mq);
                        }
                    }
                }
            } catch (Exception e) {
                log.error("lockBatchMQ exception, " + mqs, e);
            }
        }
    }
}
step5、MQClientInstance的start阶段
同【Producer启动流程】的step 2 ~ step 7
step6、更新topic的路由信息
同【Producer启动流程】的step 4.1
step7、检查Broker是否支持consumer的过滤方式
如果未指定或过滤方式为TAG则跳过,否则构造校验订阅请求,如果服务端不支持当前过滤方式就会返回异常。
step8、向Broker发送心跳
同【Producer启动流程】的step 7.1
step9、上传MessageFilter信息到Broker
private void uploadFilterClassSource() {
    Iterator<Entry<String, MQConsumerInner>> it = this.consumerTable.entrySet().iterator();
    while (it.hasNext()) {
        Entry<String, MQConsumerInner> next = it.next();
        MQConsumerInner consumer = next.getValue();

        // CONSUME_PASSIVELY表示push方式,pull方式由于是客户端每次主动拉取,所以不需要上传过滤方式
        if (ConsumeType.CONSUME_PASSIVELY == consumer.consumeType()) {
            Set<SubscriptionData> subscriptions = consumer.subscriptions();
            for (SubscriptionData sub : subscriptions) {
                // classFilterMode = true表示MessageFilter过滤方式
                if (sub.isClassFilterMode() && sub.getFilterClassSource() != null) {
                    ……
                    // filterClassSource为本地filter文件,由于会上传到服务端执行,所以实现不应该引用外部包?
                    final String filterClassSource = sub.getFilterClassSource();
                    try {
                        this.uploadFilterClassToAllFilterServer(consumerGroup, className, topic, filterClassSource);
                    } catch (Exception e) {
                        log.error("uploadFilterClassToAllFilterServer Exception", e);
                    }
                }
            }
        }
    }
}
step10、立即进行消费负载均衡
见【消息拉取核心流程】相关步骤
2.3、PullConsumer启动流程
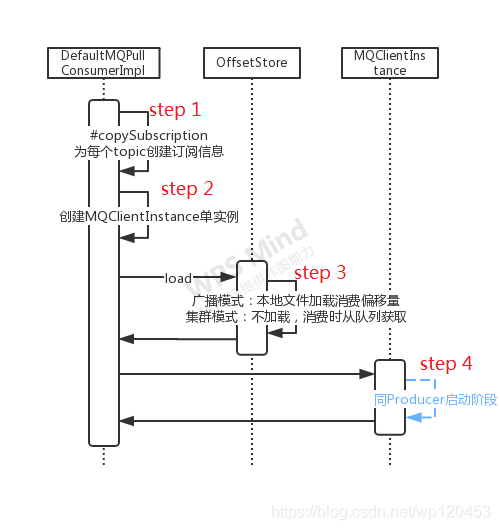
因为是业务代码控制消息的拉取和消费,没有向服务端进行订阅的环节,所以PullConsumer的启动流程相对较为简单。
step1、构建订阅消息
同【PushConsumer启动流程】step 1
step2、创建MQClientInstance实例
同【PushConsumer启动流程】step 2
step3、创建并加载消费偏移量
同【PushConsumer启动流程】step 3
step4、MQClientInstance的start阶段
2.4、消息发送核心流程
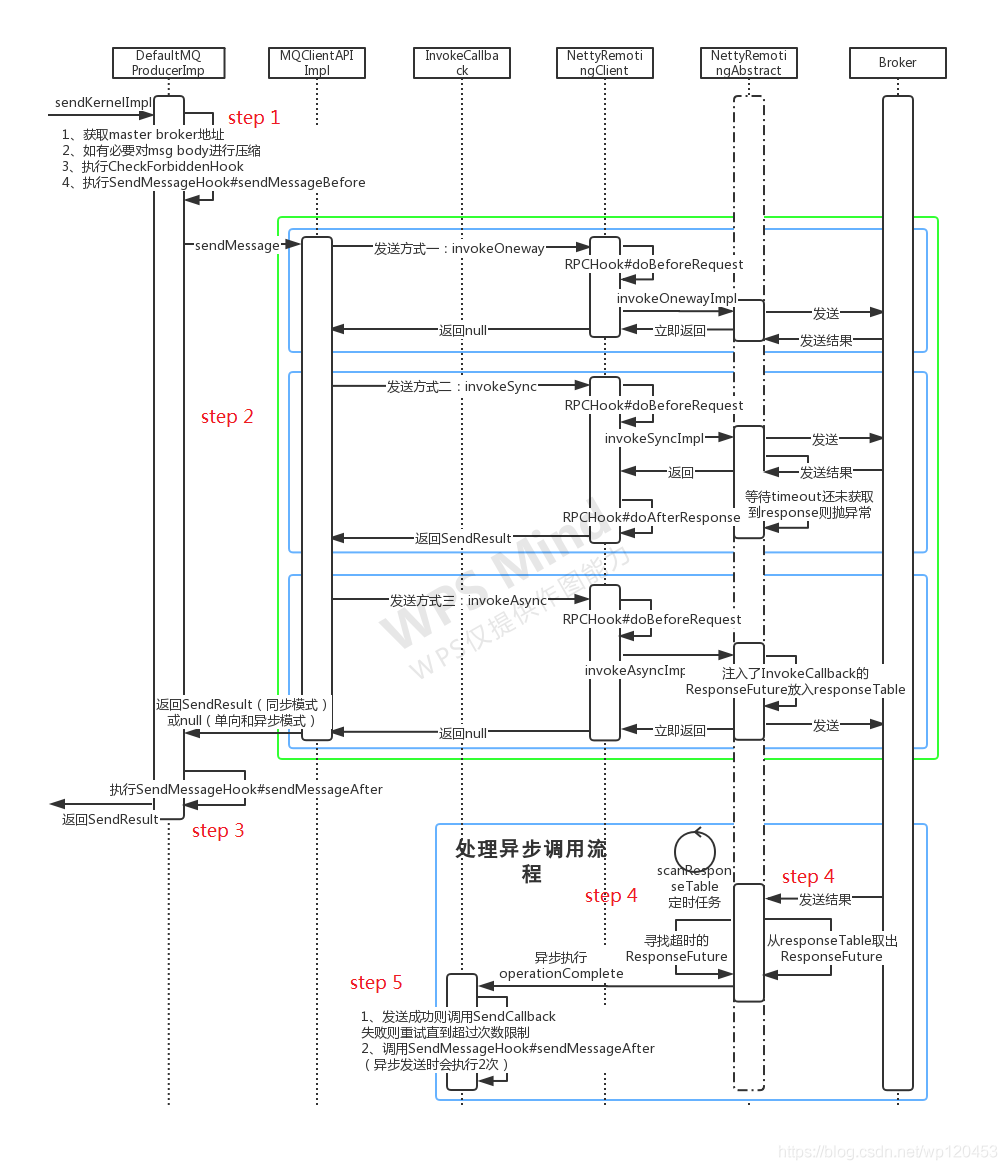
消息发送形式主要有默认发送、指定消息队列发送、指定消息选择器发送、单向发送、异步发送以及这几种基本发送方式的组合,所有这些发送方式最终都会调用DefaultMQProducerImpl#sendKernelImpl这个接口,下面主要从该接口入手进行分析。
step1、准备阶段
1、先从消息队列对象中获取到该队列所在的master broker地址addr
2、如果消息体字节数超过一定长度(默认1024*4)则进行压缩同时设置sysFlag字段对应的标识位
3、如果设置了CheckForbiddenHook,则依次执行CheckForbiddenHook#checkForbidden方法,该接口没有注释没有实现,从命名推测可能是用于某些需要禁止执行发送操作的场景
4、如果设置了SendMessageHook,则依次执行SendMessageHook#sendMessageBefore方法,该接口可以用于消息发送前后的一些业务增强操作,比如打印日志、设置一些消息属性等
step2、发送阶段
根据发送方式的不同,发送阶段分为单向发送(ONEWAY)、同步发送(SYNC)和异步发送(ASYNC)
public SendResult sendMessage(
    final String addr,
    final String brokerName,
    final Message msg,
    final SendMessageRequestHeader requestHeader,
    final long timeoutMillis,
    final CommunicationMode communicationMode,
    final SendCallback sendCallback,
    final TopicPublishInfo topicPublishInfo,
    final MQClientInstance instance,
    final int retryTimesWhenSendFailed,
    final SendMessageContext context,
    final DefaultMQProducerImpl producer
) throws RemotingException, MQBrokerException, InterruptedException {
    long beginStartTime = System.currentTimeMillis();

    // 构造RemotingCommand 用于向broker发送请求
    RemotingCommand request = null;
    if (sendSmartMsg || msg instanceof MessageBatch) {
        SendMessageRequestHeaderV2 requestHeaderV2 = SendMessageRequestHeaderV2.createSendMessageRequestHeaderV2(requestHeader);
        request = RemotingCommand.createRequestCommand(msg instanceof MessageBatch ? RequestCode.SEND_BATCH_MESSAGE : RequestCode.SEND_MESSAGE_V2, requestHeaderV2);
    } else {
        request = RemotingCommand.createRequestCommand(RequestCode.SEND_MESSAGE, requestHeader);
    }

    request.setBody(msg.getBody());

    switch (communicationMode) {
        case ONEWAY:     // 单向发送,只需要设置超时时间
            this.remotingClient.invokeOneway(addr, request, timeoutMillis);
            return null;
        case ASYNC:        // 异步发送,需要设置发送回调接口、超时重试次数等
            ……
            this.sendMessageAsync(addr, brokerName, msg, timeoutMillis - costTimeAsync, request, sendCallback, topicPublishInfo, instance, retryTimesWhenSendFailed, times, context, producer);
            return null;
        case SYNC:        // 同步发送,需要设置超时时间并返回发送结果
            ……
            return this.sendMessageSync(addr, brokerName, msg, timeoutMillis - costTimeSync, request);
        default:
            assert false;
            break;
    }

    return null;
}
单向发送:发送流程相对比较简单,因为不需要等待返回结果,调用底层的NettyRemotingClient#invokeOneway方法后直接返回
public void invokeOneway(String addr, RemotingCommand request, long timeoutMillis) throws InterruptedException,
    RemotingConnectException, RemotingTooMuchRequestException, RemotingTimeoutException, RemotingSendRequestException {
    // 获取发送通道
    final Channel channel = this.getAndCreateChannel(addr);
    if (channel != null && channel.isActive()) {
        try {
            if (this.rpcHook != null) {
                // 在rpc前执行应用程序注册的hook#doBeforeRequest
                this.rpcHook.doBeforeRequest(addr, request);
            }

            this.invokeOnewayImpl(channel, request, timeoutMillis);
        } catch (RemotingSendRequestException e) {
            ……
        }
    } else {
        this.closeChannel(addr, channel);
        throw new RemotingConnectException(addr);
    }
}

public void invokeOnewayImpl(final Channel channel, final RemotingCommand request, final long timeoutMillis)
    throws InterruptedException, RemotingTooMuchRequestException, RemotingTimeoutException, RemotingSendRequestException {
    // 标识request为单向发送方式
    request.markOnewayRPC();

    // 信号量控制单向发送并发量,默认并发数为65535
    boolean acquired = this.semaphoreOneway.tryAcquire(timeoutMillis, TimeUnit.MILLISECONDS);
    if (acquired) {
        final SemaphoreReleaseOnlyOnce once = new SemaphoreReleaseOnlyOnce(this.semaphoreOneway);
        try {
            // 通过通道发送请求
            channel.writeAndFlush(request).addListener(new ChannelFutureListener() {
                // 发送完成后释放持有的信号量,如果发送失败只是简单的打印日志
                @Override
                public void operationComplete(ChannelFuture f) throws Exception {
                    once.release();
                }
            });
        } catch (Exception e) {
            once.release();        // 发生异常时也要记得释放
            throw new RemotingSendRequestException(RemotingHelper.parseChannelRemoteAddr(channel), e);
        }
    // 获取信号量失败抛异常
    } else {
        throw new RemotingTooMuchRequestException("invokeOnewayImpl invoke too fast");
    }
}
通道创建/获取方式,addr不为空则创建面向指定addr的连接通道;如果为空则选择一个NameServer并与之创建通道
private Channel getAndCreateChannel(final String addr) throws InterruptedException {
    // 一般只有在需要请求NameServer时才可能为空,比如查询topic路由信息等场景
    if (null == addr) {
        // 获取/创建面向NameServer的通道
        return getAndCreateNameserverChannel();
    }

    // 先尝试从map中获取;ChannelWrapper为ChannelFuture的简单封装
    ChannelWrapper cw = this.channelTables.get(addr);
    if (cw != null && cw.isOK()) {
        return cw.getChannel();
    }

    // 本地缓存没有则直接创建
    return this.createChannel(addr);
}

// 获取/创建面向NameServer的通道
private Channel getAndCreateNameserverChannel() throws InterruptedException {
    // AtomicReference<String> namesrvAddrChoosed为与当前节点保持连接的NameServer地址
    String addr = this.namesrvAddrChoosed.get();
    if (addr != null) {
        // 同样是先从map缓存中获取
        ChannelWrapper cw = this.channelTables.get(addr);
        if (cw != null && cw.isOK()) {
            return cw.getChannel();
        }
    }

    // NameServer addr列表
    // 这里采用了类似于单例模式的实现方式:先直接获取对象,获取失败后再加锁,同步代码块中在创建前再尝试直接获取
    final List<String> addrList = this.namesrvAddrList.get();
    if (this.lockNamesrvChannel.tryLock(LOCK_TIMEOUT_MILLIS, TimeUnit.MILLISECONDS)) {
        try {
            addr = this.namesrvAddrChoosed.get();
            if (addr != null) {
                ChannelWrapper cw = this.channelTables.get(addr);
                if (cw != null && cw.isOK()) {
                    return cw.getChannel();
                }
            }

            if (addrList != null && !addrList.isEmpty()) {
                // 如果选择的NameServer创建通道失败,则循环尝试其它NameServer节点,并记录下创建成功的节点地址(namesrvAddrChoosed)
                for (int i = 0; i < addrList.size(); i++) {
                    // namesrvIndex保留了上次保持连接的NameServer下标
                    int index = this.namesrvIndex.incrementAndGet();
                    index = Math.abs(index);
                    index = index % addrList.size();
                    String newAddr = addrList.get(index);

                    this.namesrvAddrChoosed.set(newAddr);
                    Channel channelNew = this.createChannel(newAddr);
                    if (channelNew != null) {
                        return channelNew;
                    }
                }
            }
        } finally {
            this.lockNamesrvChannel.unlock();
        }
    } else {
        log.warn("getAndCreateNameserverChannel: try to lock name server, but timeout, {}ms", LOCK_TIMEOUT_MILLIS);
    }

    return null;
}

// 创建面向指定地址的通道
private Channel createChannel(final String addr) throws InterruptedException {
    ChannelWrapper cw = this.channelTables.get(addr);
    // 关闭不活跃的通道从本地移除
    if (cw != null && cw.isOK()) {
        cw.getChannel().close();
        channelTables.remove(addr);
    }

    if (this.lockChannelTables.tryLock(LOCK_TIMEOUT_MILLIS, TimeUnit.MILLISECONDS)) {
        try {
            boolean createNewConnection;
            cw = this.channelTables.get(addr);
            if (cw != null) {
                if (cw.isOK()) {
                    cw.getChannel().close();
                    this.channelTables.remove(addr);
                    createNewConnection = true;
                // 如果通道当前的任务还在执行,则不重新创建
                } else if (!cw.getChannelFuture().isDone()) {
                    createNewConnection = false;
                } else {
                    this.channelTables.remove(addr);
                    createNewConnection = true;
                }
            } else {
                createNewConnection = true;
            }

            // 从【Producer启动流程】step 2启动的netty客户端基础上创建面向addr的通道并放入本地缓存
            if (createNewConnection) {
                ChannelFuture channelFuture = this.bootstrap.connect(RemotingHelper.string2SocketAddress(addr));
                cw = new ChannelWrapper(channelFuture);
                this.channelTables.put(addr, cw);
            }
        } finally {
            this.lockChannelTables.unlock();
        }
    } else {
        log.warn("createChannel: try to lock channel table, but timeout, {}ms", LOCK_TIMEOUT_MILLIS);
    }

    if (cw != null) {
        ChannelFuture channelFuture = cw.getChannelFuture();
        // 等待connectTimeoutMillis=3000ms后尝试返回
        if (channelFuture.awaitUninterruptibly(this.nettyClientConfig.getConnectTimeoutMillis())) {
            if (cw.isOK()) {
                return cw.getChannel();
            }
        }
    }

    return null;
}
同步发送:需要返回发送结果,发送失败或超时未获取到则抛异常,这里区分下面两个概念:
发送操作成功:指客户端将消息成功发送出去,它并不意味着消息被成功接收,服务端在主从同步或刷盘等环节有可能发生异常
发送消息成功:指客户端发送的消息被服务端成功接收并保存,可以被消费者消费
public RemotingCommand invokeSync(String addr, final RemotingCommand request, long timeoutMillis)
    throws InterruptedException, RemotingConnectException, RemotingSendRequestException, RemotingTimeoutException {
    long beginStartTime = System.currentTimeMillis();
    // 创建通道同单向发送
    final Channel channel = this.getAndCreateChannel(addr);
    if (channel != null && channel.isActive()) {
        try {
            if (this.rpcHook != null) {
                // 在rpc前执行应用程序注册的hook#doBeforeRequest
                this.rpcHook.doBeforeRequest(addr, request);
            }
            long costTime = System.currentTimeMillis() - beginStartTime;

            RemotingCommand response = this.invokeSyncImpl(channel, request, timeoutMillis - costTime);
            if (this.rpcHook != null) {
                // 在rpc后执行应用程序注册的hook#doAfterResponse
                this.rpcHook.doAfterResponse(RemotingHelper.parseChannelRemoteAddr(channel), request, response);
            }
            return response;
        } catch (Exception e) {
            ……
            throw e;
        }
    } else {
        this.closeChannel(addr, channel);
        throw new RemotingConnectException(addr);
    }
}

public RemotingCommand invokeSyncImpl(final Channel channel, final RemotingCommand request,
    final long timeoutMillis)
    throws InterruptedException, RemotingSendRequestException, RemotingTimeoutException {
    // opaque为自增int保证每个请求唯一
    final int opaque = request.getOpaque();

    try {
        final ResponseFuture responseFuture = new ResponseFuture(channel, opaque, timeoutMillis, null, null);
        // responseFuture放入responseTable,以便超时时能取出处理
        this.responseTable.put(opaque, responseFuture);
        final SocketAddress addr = channel.remoteAddress();
        channel.writeAndFlush(request).addListener(new ChannelFutureListener() {
            @Override
            public void operationComplete(ChannelFuture f) throws Exception {
                if (f.isSuccess()) {
                    responseFuture.setSendRequestOK(true);
                    return;
                } else {
                    responseFuture.setSendRequestOK(false);
                }
                // 发送失败则从table移除
                responseTable.remove(opaque);
                responseFuture.setCause(f.cause());
                responseFuture.putResponse(null);
            }
        });

        // 超时获取responseCommand返回
        RemotingCommand responseCommand = responseFuture.waitResponse(timeoutMillis);
        if (null == responseCommand) {
            if (responseFuture.isSendRequestOK()) {
                throw new RemotingTimeoutException(RemotingHelper.parseSocketAddressAddr(addr), timeoutMillis, responseFuture.getCause());
            } else {
                throw new RemotingSendRequestException(RemotingHelper.parseSocketAddressAddr(addr), responseFuture.getCause());
            }
        }

        return responseCommand;
    } finally {
        this.responseTable.remove(opaque);
    }
}
异步发送:将回调实现invokeCallback注入到responseFuture中,responseFuture注册到responseTable以便服务端返回发送结果时执行回调。
public void invokeAsyncImpl(final Channel channel, final RemotingCommand request, final long timeoutMillis, final InvokeCallback invokeCallback)
    throws InterruptedException, RemotingTooMuchRequestException, RemotingTimeoutException, RemotingSendRequestException {
    // opaque为自增int保证每个请求唯一
    final int opaque = request.getOpaque();
    // 与单向发送类似,异步发送也需要控制并发量
    boolean acquired = this.semaphoreAsync.tryAcquire(timeoutMillis, TimeUnit.MILLISECONDS);

    if (acquired) {
        final SemaphoreReleaseOnlyOnce once = new SemaphoreReleaseOnlyOnce(this.semaphoreAsync);
        long costTime = System.currentTimeMillis() - beginStartTime;

        final ResponseFuture responseFuture = new ResponseFuture(channel, opaque, timeoutMillis - costTime, invokeCallback, once);
        // responseFuture放入responseTable,以便broker响应发送请求或超时时能取出触发回调接口invokeCallback,详见step 4/5
        this.responseTable.put(opaque, responseFuture);
        try {
            channel.writeAndFlush(request).addListener(new ChannelFutureListener() {
                @Override
                public void operationComplete(ChannelFuture f) throws Exception {
                    if (f.isSuccess()) {
                        responseFuture.setSendRequestOK(true);
                        return;
                    }
                    requestFail(opaque);
                }
            });
            ……
        }
        ……
    }
}
step3、发送后处理
不论成功与否,都需要执行SendMessageHook列表的sendMessageAfter方法。
step4、发送回调或定时任务
在step 2中如果为同步发送或异步发送,都会将responseFuture对象放入responseTable中,其作用是当服务端返回发送结果或等待超时时,可以取出执行内部注入的invokeCallback。
方式一、服务端回调
在【Producer启动流程】step 2的netty启动客户端环节注册了一个NettyClientHandler,下面是实现的主要逻辑
public void processMessageReceived(ChannelHandlerContext ctx, RemotingCommand msg) throws Exception {
    final RemotingCommand cmd = msg;
    if (cmd != null) {
        switch (cmd.getType()) {
            // 处理服务端的主动请求,比如服务端定时回查本地事务状态(CHECK_TRANSACTION_STATE),服务端通知消费者ids有变更(NOTIFY_CONSUMER_IDS_CHANGED)等
            case REQUEST_COMMAND:
                processRequestCommand(ctx, cmd);
                break;
            // 处理服务端的响应请求,比如通知同步/异步发送结果等
            case RESPONSE_COMMAND:
                processResponseCommand(ctx, cmd);
                break;
            default:
                break;
        }
    }
}

public void processResponseCommand(ChannelHandlerContext ctx, RemotingCommand cmd) {
    final int opaque = cmd.getOpaque();
    // 从responseTable中取出future
    final ResponseFuture responseFuture = responseTable.get(opaque);
    if (responseFuture != null) {
        responseFuture.setResponseCommand(cmd);
        responseTable.remove(opaque);

        // 如果future注入了invokeCallBack则放入线程池中异步执行
        if (responseFuture.getInvokeCallback() != null) {
            executeInvokeCallback(responseFuture);
        } else {
            responseFuture.putResponse(cmd);
            responseFuture.release();
        }
    }
}
方式二、超时检查
在【Producer启动流程】的step 3中启动了扫描responseTable的定时任务
public void scanResponseTable() {
    final List<ResponseFuture> rfList = new LinkedList<ResponseFuture>();
    Iterator<Entry<Integer, ResponseFuture>> it = this.responseTable.entrySet().iterator();
    while (it.hasNext()) {
        Entry<Integer, ResponseFuture> next = it.next();
        ResponseFuture rep = next.getValue();

        // 记录超时的future
        if ((rep.getBeginTimestamp() + rep.getTimeoutMillis() + 1000) <= System.currentTimeMillis()) {
            rep.release();
            it.remove();
            rfList.add(rep);
        }
    }

    for (ResponseFuture rf : rfList) {
        try {
            // 放入线程池执行回调
            executeInvokeCallback(rf);
        } catch (Throwable e) {
            log.warn("scanResponseTable, operationComplete Exception", e);
        }
    }
}
step5、执行回调接口或重新发送
服务端返回的发送结果(ResponseCode)可能是发送成功,也可能是刷盘超时、同步slave超时等异常情况,下面是InvokeCallback的主要实现逻辑。
class InvokeCallback {
    @Override
    public void operationComplete(ResponseFuture responseFuture) {
        RemotingCommand response = responseFuture.getResponseCommand();
        // 没有sendCallback情况,同步发送方式
        if (null == sendCallback && response != null) {
            try {
                // 根据返回结果构造sendResult对象
                SendResult sendResult = MQClientAPIImpl.this.processSendResponse(brokerName, msg, response);
                if (context != null && sendResult != null) {
                    context.setSendResult(sendResult);
                    // 再次执行SendMessageHook#sendMessageAfter
                    context.getProducer().executeSendMessageHookAfter(context);
                }
            } catch (Throwable e) {
            }
            return;
        }

        if (response != null) {
            try {
                // 根据返回结果构造sendResult对象
                SendResult sendResult = MQClientAPIImpl.this.processSendResponse(brokerName, msg, response);
                assert sendResult != null;
                if (context != null) {
                    context.setSendResult(sendResult);
                    context.getProducer().executeSendMessageHookAfter(context);
                }

                // 执行应用程序实现的回调
                sendCallback.onSuccess(sendResult);
            } catch (Exception e) {
                // 异常处理:在异步发送方式下,retryTimesWhenSendFailed为retryTimesWhenSendAsyncFailed=2,同步模式下为0
                // 注意:不是所有异常情况下都需要重新发送,比如这里的应用程序处理异常
                onExceptionImpl(brokerName, msg, 0L, request, sendCallback, topicPublishInfo, instance, retryTimesWhenSendFailed, times, e, context, false, producer);
            }
        } else {
            MQClientException ex = new MQClientException("unknow reseaon", responseFuture.getCause());
            onExceptionImpl(brokerName, msg, 0L, request, sendCallback, topicPublishInfo, instance, retryTimesWhenSendFailed, times, ex, context, true, producer);
        }
    }
}

private void onExceptionImpl(final String brokerName,
    final Message msg,
    final long timeoutMillis,
    final RemotingCommand request,
    final SendCallback sendCallback,
    final TopicPublishInfo topicPublishInfo,
    final MQClientInstance instance,
    final int timesTotal,
    final AtomicInteger curTimes,
    final Exception e,
    final SendMessageContext context,
    final boolean needRetry,
    final DefaultMQProducerImpl producer
) {
    int tmp = curTimes.incrementAndGet();
    // 需要重试且未达最大重试次数,只有异步发送存在该情况
    if (needRetry && tmp <= timesTotal) {
        String retryBrokerName = brokerName;//by default, it will send to the same broker
        if (topicPublishInfo != null) { //select one message queue accordingly, in order to determine which broker to send
            // 选取发送队列
            MessageQueue mqChosen = producer.selectOneMessageQueue(topicPublishInfo, brokerName);
            retryBrokerName = mqChosen.getBrokerName();
        }
        String addr = instance.findBrokerAddressInPublish(retryBrokerName);
        try {
            request.setOpaque(RemotingCommand.createNewRequestId());
            // 继续尝试异步发送
            sendMessageAsync(addr, retryBrokerName, msg, timeoutMillis, request, sendCallback, topicPublishInfo, instance, timesTotal, curTimes, context, producer);
        } catch (Exception e1) {
            ……
            // 嵌套执行异常处理
            onExceptionImpl(retryBrokerName, msg, timeoutMillis, request, sendCallback, topicPublishInfo, instance, timesTotal, curTimes, e1, context, true, producer);
        }
    } else {
        if (context != null) {
            context.setException(e);
            context.getProducer().executeSendMessageHookAfter(context);
        }
    }
}
注意到上面的描述,重新发送都是针对异步发送失败场景,那同步发送是如何重试的呢?答案是同步发送的重试是在发送操作阶段而不是发送回调阶段进行的,当发送操作失败或超时后,客户端就会按照一定的策略重新选取消息队列进行发送。
这里存在一个问题,那就是客户端认为的发送失败并不代表真正的失败,有可能只是服务端响应超时,所以客户端是无法保证只发送一次的。
2.5、事务消息核心流程
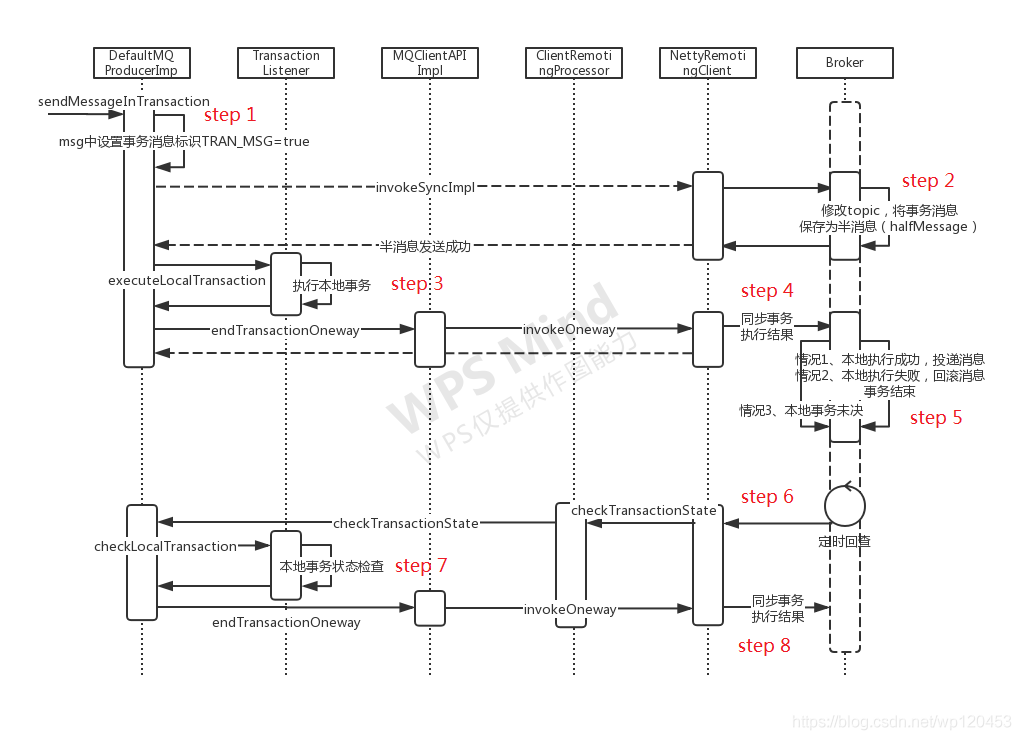
实现思想:两阶段提交(2PC)
step1、标记消息为事务消息
step2、Broker修改topic并保存为半消息
同普通同步消息发送流程,将消息发送到master broker,broker根据properties中的TRAN_MSG属性识别到为事务消息。
step3、执行本地事务
step4、同步事务执行结果
step5、Broker根据本地事务执行结果进行投递或回滚
根据本地事务执行状态,broker可以有如下操作
COMMIT_MESSAGE:进行消息投递,事务结束
ROLLBACK_MESSAGE:进行消息回滚,事务结束
UNKNOW:状态未知,定时回查
step6、如果事务未决,定时回查
如果本地事务执行状态一直是未知,broker会一直回查,直到重试超过一定次数
step7、检查本地事务状态
返回状态同本地事务执行结果
step8、同步事务执行结果
同step 4
2.6、消息拉取核心流程
step1、启动消费负载均衡线程
同【Producer启动流程】step 6
step2、启动拉取消息线程
同【Producer启动流程】step 5
step3、消息队列负载均衡
consumer内部维护了所有topic与对应的消息队列集合ConcurrentMap<String/* topic */, Set> topicSubscribeInfoTable,以及消息队列与消费队列映射ConcurrentMap<MessageQueue, ProcessQueue> processQueueTable。
topicSubscribeInfoTable在【PushConsumer启动流程】的step 6中进行初始化,主要逻辑是从topic的路由信息TopicRouteData中构建MessageQueue列表。
下面看下主要逻辑实现
private void rebalanceByTopic(final String topic, final boolean isOrder) {
    switch (messageModel) {
        case BROADCASTING: {
            Set<MessageQueue> mqSet = this.topicSubscribeInfoTable.get(topic);
            if (mqSet != null) {
                // 广播模式会为topic下的所有消息队列创建PullRequest
                boolean changed = this.updateProcessQueueTableInRebalance(topic, mqSet, isOrder);
                if (changed) {
                    // 如果消息队列有更新,可能会进行一些处理,比如更新订阅信息时间戳,调整批处理size大小等
                    this.messageQueueChanged(topic, mqSet, mqSet);
                }
            }
            break;
        }
        case CLUSTERING: {
            Set<MessageQueue> mqSet = this.topicSubscribeInfoTable.get(topic);
            // 先获取group下的所有consumer ids,
            List<String> cidAll = this.mQClientFactory.findConsumerIdList(topic, consumerGroup);
            ……

            if (mqSet != null && cidAll != null) {
                List<MessageQueue> mqAll = new ArrayList<MessageQueue>();
                mqAll.addAll(mqSet);
                Collections.sort(mqAll);
                Collections.sort(cidAll);

                AllocateMessageQueueStrategy strategy = this.allocateMessageQueueStrategy;
                List<MessageQueue> allocateResult = null;
                try {
                    // 根据一定的策略进行消息队列的分配,即消费负载均衡,返回的MessageQueue list就代表当前节点需要消费的队列,PullRequest也是根据这个集合进行构建
                    allocateResult = strategy.allocate(this.consumerGroup, this.mQClientFactory.getClientId(), mqAll, cidAll);
                } catch (Throwable e) {
                    return;
                }

                Set<MessageQueue> allocateResultSet = new HashSet<MessageQueue>();
                if (allocateResult != null) {
                    allocateResultSet.addAll(allocateResult);
                }

                // 方法内部会根据分配到的消息队列allocateResultSet构建PullRequest
                boolean changed = this.updateProcessQueueTableInRebalance(topic, allocateResultSet, isOrder);
                if (changed) {
                    // 如果消息队列有更新,可能会进行一些处理,比如更新订阅信息时间戳,调整批处理size大小等
                    this.messageQueueChanged(topic, mqSet, allocateResultSet);
                }
            }
            break;
        }
    }
}

// 根据分配到的消息队列,更新消费队列映射,构建PullRequest并放入阻塞队列
// 主要分三步:1、从processQueueTable中移除不在最新分配队列里的,以及消费超时的;2、将新分配的队列添加导processQueueTable中;3、pullRequest列表放入阻塞请求队列
private boolean updateProcessQueueTableInRebalance(final String topic, final Set<MessageQueue> mqSet, final boolean isOrder) {
    boolean changed = false;

    // 第一步、processQueueTable维护了当前节点的消息队列与消费队列的映射,只有被分配到的消息队列才会有消费队列
    Iterator<Entry<MessageQueue, ProcessQueue>> it = this.processQueueTable.entrySet().iterator();
    while (it.hasNext()) {
        Entry<MessageQueue, ProcessQueue> next = it.next();
        MessageQueue mq = next.getKey();
        ProcessQueue pq = next.getValue();

        if (mq.getTopic().equals(topic)) {
            // 如果之前的消费队列已经不在最新的集合里,需要移除
            if (!mqSet.contains(mq)) {
                pq.setDropped(true);
                if (this.removeUnnecessaryMessageQueue(mq, pq)) {
                    it.remove();
                    changed = true;
                }
            // 同时还要移除长时间没有消费行为的,在拉取之前会设置拉取时间戳,见下step 6
            } else if (pq.isPullExpired()) {
                switch (this.consumeType()) {
                    // pull方式不需要移除
                    case CONSUME_ACTIVELY:
                        break;
                    case CONSUME_PASSIVELY:
                        pq.setDropped(true);
                        if (this.removeUnnecessaryMessageQueue(mq, pq)) {
                            it.remove();
                            changed = true;
                            log.error("[BUG]doRebalance, {}, remove unnecessary mq, {}, because pull is pause, so try to fixed it",
                                consumerGroup, mq);
                        }
                        break;
                    default:
                        break;
                }
            }
        }
    }

    // 第二步、新分配的队列加入到processQueueTable,并构建pullRequest列表
    List<PullRequest> pullRequestList = new ArrayList<PullRequest>();
    for (MessageQueue mq : mqSet) {
        if (!this.processQueueTable.containsKey(mq)) {
            if (isOrder && !this.lock(mq)) {
                log.warn("doRebalance, {}, add a new mq failed, {}, because lock failed", consumerGroup, mq);
                continue;
            }

            this.removeDirtyOffset(mq);
            ProcessQueue pq = new ProcessQueue();
            // 计算需要拉取队列的消费偏移量,并发消费下由于消费是乱序的(后来的可能先消费),偏移量只代表之前的一定被消费了,偏移量之后的消费也可能已经被消费,所以存在重复拉取的问题
            long nextOffset = this.computePullFromWhere(mq);
            if (nextOffset >= 0) {
                ProcessQueue pre = this.processQueueTable.putIfAbsent(mq, pq);
                if (pre == null) {
                    // 构建pullRequest
                    PullRequest pullRequest = new PullRequest();
                    pullRequest.setConsumerGroup(consumerGroup);
                    pullRequest.setNextOffset(nextOffset);
                    pullRequest.setMessageQueue(mq);
                    pullRequest.setProcessQueue(pq);
                    pullRequestList.add(pullRequest);
                    changed = true;
                }
            }
        }
    }

    // 第三步、pullRequest列表放入阻塞队列
    this.dispatchPullRequest(pullRequestList);

    return changed;
}
step4、将PullRequest列表放入阻塞队列
该步骤仅针对push模式,因为pull模式下是用户主动拉取,不需要组件为其定时拉取消息。
step5、线程从阻塞队列拉取请求
同样的,这一步也只针对push模式。
step6、更新PullRequest的最新时间戳
该时间戳用于系统判定拉取超时时,是否需要将该队列释放以便重新分配给其它consumer节点。
step7、TODO
拉取到的PullRequest先更新最新拉取时间戳(对应上一步的过期移除),然后构造拉取回调接口实现PullCallback,最后调用底层拉取接口进行异步拉取,拉取消息回调过程参考【消息发送核心流程】step 4。
下面主要看一下消费过程。
前面提到消费队列processQueue中维护了一个存放未消费消息的TreeMap<Long, MessageExt> msgTreeMap,客户端接收到消息后首先会按接收顺序存入这个TreeMap,之后根据并发与顺序消费的不同,其处理逻辑也有所不同。
并发消费
并发消费模式下,刚接收到的批量消息能够立即进入消费环节,如果数量大于了批处理最大限制,则会切分后分批顺序消费
public void run() {
    // 在负载均衡时如果不再被分配或消费超时会被移除
    if (this.processQueue.isDropped()) {
        return;
    }

    MessageListenerConcurrently listener = ConsumeMessageConcurrentlyService.this.messageListener;
    ConsumeConcurrentlyContext context = new ConsumeConcurrentlyContext(messageQueue);
    ConsumeReturnType returnType = ConsumeReturnType.SUCCESS;
    try {
        // 真正消费前先设置重试队列的topic,方便后续消费失败后直接投递到重试队列
        ConsumeMessageConcurrentlyService.this.resetRetryTopic(msgs);
        if (msgs != null && !msgs.isEmpty()) {
            for (MessageExt msg : msgs) {
                // 设置消息的消费开始时间戳,以便对消费超时的消息进行清理,见【PushConsumer启动流程】step 4
                MessageAccessor.setConsumeStartTimeStamp(msg, String.valueOf(System.currentTimeMillis()));
            }
        }
        // 这里是真正业务消费消息的地方,返回消费成功或稍后重试
        status = listener.consumeMessage(Collections.unmodifiableList(msgs), context);
    } catch (Throwable e) {
    }

    ……
    if (!processQueue.isDropped()) {
        // 消费后续处理
        ConsumeMessageConcurrentlyService.this.processConsumeResult(status, context, this);
    }
}

public void processConsumeResult(
    final ConsumeConcurrentlyStatus status,
    final ConsumeConcurrentlyContext context,
    final ConsumeRequest consumeRequest
) {
    int ackIndex = context.getAckIndex();
    switch (status) {
        case CONSUME_SUCCESS:
            if (ackIndex >= consumeRequest.getMsgs().size()) {
                ackIndex = consumeRequest.getMsgs().size() - 1;
            }
            break;
        case RECONSUME_LATER:
            ackIndex = -1;
            break;
        default:
            break;
    }

    ……
    switch (this.defaultMQPushConsumer.getMessageModel()) {
        // 广播模式下,只简单的打印出消费失败的消息,不需要重新投递和消费
        case BROADCASTING:
            for (int i = ackIndex + 1; i < consumeRequest.getMsgs().size(); i++) {
                MessageExt msg = consumeRequest.getMsgs().get(i);
            }
            break;

        // 集群模式下,重新投递消费失败的消息
        case CLUSTERING:
            List<MessageExt> msgBackFailed = new ArrayList<MessageExt>(consumeRequest.getMsgs().size());
            // 只有在消费失败时才会进入到for内部逻辑,此时会将所有当前消费的msgs都重新投递
            for (int i = ackIndex + 1; i < consumeRequest.getMsgs().size(); i++) {
                MessageExt msg = consumeRequest.getMsgs().get(i);
                // 重新投递消费失败的消息,前面已经设置了retryTopic
                boolean result = this.sendMessageBack(msg, context);
                if (!result) {
                    msg.setReconsumeTimes(msg.getReconsumeTimes() + 1);
                    msgBackFailed.add(msg);
                }
            }

            break;
    }

    // 不论消费成功与否,都需要从msgTreeMap中移除这批数据,然后返回msgTreeMap中剩下的第一条消息的偏移量
    // 注意:顺序消费模式下可能重复拉取和消费某些消息,所以业务代码需要尽量保证消息的幂等性
    long offset = consumeRequest.getProcessQueue().removeMessage(consumeRequest.getMsgs());
    if (offset >= 0 && !consumeRequest.getProcessQueue().isDropped()) {
        // 更新本地偏移量,注意不是持久化,持久化是通过定时任务实现的,见【Producer启动流程】的step 4.4
        this.defaultMQPushConsumerImpl.getOffsetStore().updateOffset(consumeRequest.getMessageQueue(), offset, true);
    }
}
顺序消费
首先需要明确一点,顺序消费并不是说每次只能一条一条进行消费,而是被消费的这批数据(MessageListenerOrderly#consumeMessage的入参List msgs)是所有待消费数据里最靠前的,并且内部本身也是按顺序组织的。
顺序消费与并发消费实现上最大的区别在于,每次在进行消费时,顺序消费都会从msgTreeMap中获取最靠前的一批消息,并且是单线程进行消费;而并发消费则会直接消费刚从broker拉取到的消息,并且是放入线程池进行并发消费。
public void run() {
    // 在负载均衡时如果不再被分配或消费超时会被移除
    if (this.processQueue.isDropped()) {
        return;
    }

    // 对消息队列进行加锁以保证任何时候都只会有一个线程在消费同一个队列,但多个队列可以并行消费
    final Object objLock = messageQueueLock.fetchLockObject(this.messageQueue);
    synchronized (objLock) {
        // 集群模式下需要对消息队列进行加锁和锁过期判断,广播模式下不需要加锁,也没有过期概念
        if (MessageModel.BROADCASTING.equals(ConsumeMessageOrderlyService.this.defaultMQPushConsumerImpl.messageModel())
            || (this.processQueue.isLocked() && !this.processQueue.isLockExpired())) {
            final long beginTime = System.currentTimeMillis();
            for (boolean continueConsume = true; continueConsume; ) {
                ……
                final int consumeBatchSize = ConsumeMessageOrderlyService.this.defaultMQPushConsumer.getConsumeMessageBatchMaxSize();

                // 从消费队列中取出前batchSize个消息,同时放入顺序消费临时treeMap中,如果消费失败需要重新放回msgTreeMap
                List<MessageExt> msgs = this.processQueue.takeMessags(consumeBatchSize);
                if (!msgs.isEmpty()) {
                    final ConsumeOrderlyContext context = new ConsumeOrderlyContext(this.messageQueue);

                    ConsumeOrderlyStatus status = null;
                    long beginTimestamp = System.currentTimeMillis();
                    ConsumeReturnType returnType = ConsumeReturnType.SUCCESS;
                    boolean hasException = false;
                    try {
                        // 这里是真正业务消费消息的地方,返回消费成功或稍后重试
                        status = messageListener.consumeMessage(Collections.unmodifiableList(msgs), context);
                    } catch (Throwable e) {
                        hasException = true;
                    } finally {
                        this.processQueue.getLockConsume().unlock();
                    }

                    ……
                    // 消费后续处理
                    continueConsume = ConsumeMessageOrderlyService.this.processConsumeResult(msgs, status, context, this);
                } else {
                    continueConsume = false;
                }
            }
        } else {
            if (this.processQueue.isDropped()) {
                return;
            }
            // 稍后再尝试拉取消息
            ConsumeMessageOrderlyService.this.tryLockLaterAndReconsume(this.messageQueue, this.processQueue, 100);
        }
    }
}

public boolean processConsumeResult(
    final List<MessageExt> msgs,
    final ConsumeOrderlyStatus status,
    final ConsumeOrderlyContext context,
    final ConsumeRequest consumeRequest
) {
    boolean continueConsume = true;
    long commitOffset = -1L;
    if (context.isAutoCommit()) {
        switch (status) {
            case COMMIT:
            case ROLLBACK:
            case SUCCESS:
                // 更新本地数据并返回已消费最大消息id+1,也即剩余未消费消息的最小id
                commitOffset = consumeRequest.getProcessQueue().commit();
                this.getConsumerStatsManager().incConsumeOKTPS(consumerGroup, consumeRequest.getMessageQueue().getTopic(), msgs.size());
                break;
            case SUSPEND_CURRENT_QUEUE_A_MOMENT:
                this.getConsumerStatsManager().incConsumeFailedTPS(consumerGroup, consumeRequest.getMessageQueue().getTopic(), msgs.size());
                // 更新消息被消费次数,如果消费次数超限则发送到重试队列中
                if (checkReconsumeTimes(msgs)) {
                    consumeRequest.getProcessQueue().makeMessageToCosumeAgain(msgs);
                    continueConsume = false;
                } else {
                    commitOffset = consumeRequest.getProcessQueue().commit();
                }
                break;
            default:
                break;
        }
    } else {
        switch (status) {
            case SUCCESS:
                this.getConsumerStatsManager().incConsumeOKTPS(consumerGroup, consumeRequest.getMessageQueue().getTopic(), msgs.size());
                break;
            case COMMIT:
                commitOffset = consumeRequest.getProcessQueue().commit();
                break;
            case ROLLBACK:
                // 将本次消费失败的消息放回到msgTreeMap中
                consumeRequest.getProcessQueue().rollback();
                continueConsume = false;
                break;
            case SUSPEND_CURRENT_QUEUE_A_MOMENT:
                this.getConsumerStatsManager().incConsumeFailedTPS(consumerGroup, consumeRequest.getMessageQueue().getTopic(), msgs.size());
                // 更新消息被消费次数,如果消费次数超限则发送到重试队列中
                if (checkReconsumeTimes(msgs)) {
                    consumeRequest.getProcessQueue().makeMessageToCosumeAgain(msgs);
                    continueConsume = false;
                }
                break;
            default:
                break;
        }
    }

    if (commitOffset >= 0 && !consumeRequest.getProcessQueue().isDropped()) {
        // 更新本地偏移量,注意不是持久化,持久化是通过定时任务实现的,见【Producer启动流程】的step 4.4
        this.defaultMQPushConsumerImpl.getOffsetStore().updateOffset(consumeRequest.getMessageQueue(), commitOffset, false);
    }

    return continueConsume;
}
2.7、延迟消息
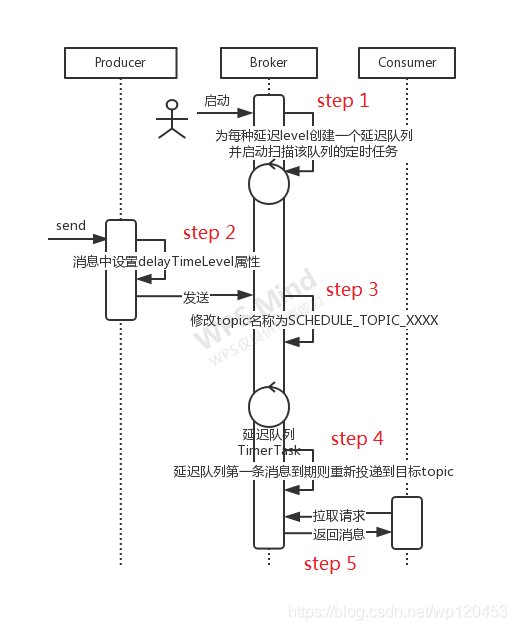
思想:将延迟消息通过一个临时存储进行暂存,到期后才投递到目标Topic中
step1、Broker创建延迟队列
broker在启动时会创建一个名为SCHEDULE_TOPIC_XXXX的内部topic,同时为设置的每一个延迟级别对应创建一个queue,QueueId = DelayLevel - 1
为每一个queue启动定时任务进行扫描
step2、消息中设置延迟级别
延迟Level会以DELAY=${delayLevel}形式保存在message的properties中
step3、Broker修改topic
broker接收到消息后发现properties中带有DELAY属性,修改topic名称和队列信息,使其投递到SCHEDULE_TOPIC_XXXX的对应队列中
step4、定时扫描延迟队列
step1中创建的定时任务扫描队列头部消息,如果达到设定的延迟时间则重新投递到原来的topic中
step5、正常拉取和消费消息
被consumer正常拉取和消费
三、设计思想总结
3.1、分层设计思想
大体上分为应用层、核心实现层和通信层
应用层部分主要类:DefaultMQProducer、TransactionMQProducer、SendCallBack、RPCHook、MessageQueueSelector、TransactionListener、DefaultMQPushConsumer、DefaultMQPullConsumer、MessageFilter、
AllocateMessageQueueStrategy、MessageListener、MessageListenerConcurrently、MessageListenerOrderly
核心实现层主要类:DefaultMQProducerImpl、DefaultMQPushConsumerImpl、DefaultMQPullConsumerImpl、MQClientInstance、RebalanceService、RebalanceImpl、PullMessageService、MQClientAPIImpl、ConsumeMessageConcurrentlyService、ConsumeMessageOrderlyService
通信层主要类:NettyRemotingAbstract、NettyRemotingServer、NettyRemotingClient、NettyClientConfig、ResponseFuture
3.2、充分的扩展性
RocketMQ在多个环节提供了增强接口,用户可根据需要进行扩展实现
CheckForbiddenHook:没有相应的注解和实现,推测可以用于某些需要禁止使用的场景
SendMessageHook:发送前后对消息进行处理
ConsumeMessageHook:消费前后对消息进行处理
FilterMessageHook:拉取后消费前对tag匹配的消息进行处理
FilterCheckHook:暂无应用
RPCHook:在发起通信前后对远程命令(RemotingCommand)进行处理
3.3、提供多种实现
MessageQueueSelector:发送时的消息队列选择器,主要提供了SelectMessageQueueByRandom和SelectMessageQueueByHash两种实现,用户也可自己实现
AllocateMessageQueueStrategy:消费负载均衡策略,提供了6中默认实现
3.4、长连接解决性能问题
四、容易踩的坑
4.1、连接不同集群需要不同unitName
4.2、同一group不同consumer订阅不同topic或不同tag,可能导致消息积压
原因:consumer在做消费负载均衡时是以consumer group为单位的,会默认该组内所有consumer都具有完全一致的订阅和消费行为。
分析:假设同一消费者组中的consumerA订阅了topicA,consumerB订阅了topicA和topicB,那么consumerB在进行负载均衡时,会默认为consumerA也订阅了topicB的,所以consumerB只会消费topicB中的一部分消息队列。
那么consumerA对topicB会有怎样的消费行为呢?
答案是不会有任何行为,因为consumerA实例并没有订阅topicB,所以就不会有topicB相关的消息队列和消费队列,也就不会主动从broker中拉取topicB中的消息,啥事都不会发生。而在broker端由于没有消费者消费另外部分的消息队列,就会导致消息积压。
那为什么说是可能导致消费积压呢?因为这取决于具体的消费策略,这个用户可以自定义,如果自定义的负载均衡策略刚好把topicB的所有消息都分配给了consumerB,也就不会有积压了。
订阅不同TAG的情况与topic类似。
4.3、自定义instanceName可能导致消息积压和重复消费情况
原理与上一个问题类似,如果在同一个物理机的不同消费者实例具有了相同的clientId,那么这两个消费者都会从broker拉取相同队列的消息进行消费,所以存在重复消费问题。
4.4、事务消息发送接口在DefaultProducerImpl中定义,但是只有它的扩展TransactionMQProducer中有实现
4.5、广播消费模式下,消费失败没有补偿机制
4.6、偏移量实现机制存在重复拉取情况
转载:https://blog.csdn.net/wp120453/article/details/111682366


【推荐】国内首个AI IDE,深度理解中文开发场景,立即下载体验Trae
【推荐】编程新体验,更懂你的AI,立即体验豆包MarsCode编程助手
【推荐】抖音旗下AI助手豆包,你的智能百科全书,全免费不限次数
【推荐】轻量又高性能的 SSH 工具 IShell:AI 加持,快人一步
· 阿里最新开源QwQ-32B,效果媲美deepseek-r1满血版,部署成本又又又降低了!
· 开源Multi-agent AI智能体框架aevatar.ai,欢迎大家贡献代码
· Manus重磅发布:全球首款通用AI代理技术深度解析与实战指南
· 被坑几百块钱后,我竟然真的恢复了删除的微信聊天记录!
· 没有Manus邀请码?试试免邀请码的MGX或者开源的OpenManus吧