

ag 4.0 [记录]
页面绑定数据
    [disabled]="gCtrlIsCheck"
    [attr.data-h]='el.id'
    [src]='el.url'
    [class]=''
    [class.c]=''
    [style.color]=''
    [style.background-image]="'url('+showListPics[0]+')'"
angular+layui


.angular-cli.json
  styles  -   "./assets/layui/css/layui.css"
  scripts -   "./assets/layui/layui.js"
layui.js
  n.dir + fp="assets/layui/"
...

---------------------------------------

index.html
  <link rel="stylesheet" href="//res.layui.com/layui/dist/css/layui.css?t=1527693307626" media="all">
  <script src="//res.layui.com/layui/dist/layui.js?t=1527693307626"></script>


方案一:
webpack.config.js
     module.exports  externals: { 'layui': 'layui' }
XXX.component.ts
    declare let layui:any; layui.use('layer', function(){......})

方案二:
XXX.component.ts
    var layui=window['layui']; layui.use('layer', function(){ ...... })
表单验证
  <form [formGroup]="formModel" (ngSubmit)="submitFn()">

  <input type="text" placeholder="请输入用户名" formControlName="username"/>
  <div formGroupName="password">
      <input type="password" placeholder="请输入密码" formControlName="psw1"/>
      <input type="password" placeholder="请再次输入密码" formControlName="psw2"/>
  </div>

  <input type="submit" value="提交" class="btn btn-warning" [disabled]="!formModel.valid"/>

  --------------------------
  formModel: FormGroup = new FormGroup({
    username: new FormControl('aaa'),
    password: new FormGroup({
      psw1: new FormControl(),
      psw2: new FormControl(),
    })
  });

  submitFn  --  console.log(this.formModel.value);
  -------------------------

  注意:  ReactiveFormsModule   +  FormsModule
路由传递数据
查询参数传递参数
/product?id=1&name=2    =>   ActiveRoute.queryParams[id]
  -- <a [routerLink] = "['/product']" [queryParams]="{id : 1}" > 主页 </a>
    (queryParams指到一个对象上 传递参数过去)
    接收:在构造函数中注入  constructor( private routeInfo: ActivatedRoute){}
        获取:定义private id:number;
          ngOnInit(){this.id=this.routeInfo.snapshot.queryParams["id"];}
路由路径url传递参数
{path:/product/:id} => /product/1 => ActivatedRoute.params[id]
(三步:01 修改路由参数中的path属性使其可携带参数
02 修改路由链接的参数来传递数据
03 prams 替换queryParams)
-- {path:product/:id”,component:ProductComponent },
HTML <a [routerLink] = "['/product',1]" > 主页 </a> (和this.router.navigate(['/product',1])一样的)
接收:prams 替换queryParams
-- 参数快照 vs 参数订阅
原因:组件只创建一次,创建时constructor,ngOnInit被调用
比如:home -> 商品详情 constructor,ngOnInit调用
商品详情 -> 商品详情 已经被创建的不会再次被创建 那么init就不会被再次调用,id不会发生改变
-- 参数订阅
this.routeInfo.params.subscribe(params:Params => this.productId=params["id"])
subscribe(这里面 申明一个匿名函数处理进来的参数 给本地定义参数)
获取路由参数时注意:一个组件一定不会从自身到自身 快照 否则 订阅
!路由配置传递参数!!!
{path:/product,component: ProductComponent,data:[{isProd:yrue}]}
=>  ActivatedRoute.ata[0][isProd]
  (data为静态数据 data参数本身就是一个数组 可定义多个对象)
  --
路由
app-routing.modul.ts路由配置,不用/开头 const routes : Routes = [ {path:'',component:IndexComponent }, ...... ] 第一种: 路由使用,使用数组是要解决增加传参的问题,字符串不方便 <a [routerLink] = "['/']" > 主页 </a>
(参数为一个数组 这里需要/开头 导航到一个根路由 但是path里面不用/开头) 第二种: 事件绑定 控制器中定义 <input type="button" value="主页" (click)= "toIndex()" export class AppComponent { constructor(private router: Router){}
fn里面的router从构造函数中来 toIndex(){ this.router.navigate(['/']); } } 404组件,通配符定义 **解决输入未定义路径报错的情况** {path:'**',component:404Component }, 404组件页要放在最后,因为Ag路由使用先配置,先匹配的原则。
----------------------------------------------
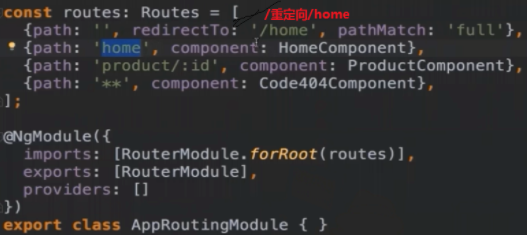
重定向路由
www.aaa.com => www.aaa.com/products
www.aaa.com/x => www.aaa.com/y
{path: '',redirectTo: 'home',pathMatch: 'full'}, 进行重定向 redirectTo
{path: 'home',component: HomeComponent},
--------------------------------------------
子路由 (展示main03时,拿main03模板并且模板里的router-outlet里会显示children组件模板)
{
path: 'main03',
component: Main03Component,
children: [
{path: '', component: MainS01Component},
{path: 'mainS02', component: MainS02Component}
]
},
-- main03 HTML
  <a [routerLink]="['./']">切换1</a>   (当前路由的下面 ./ 而不是/  /为根)
  <a [routerLink]="['./mainS02']">切换2</a>
  <router-outlet></router-outlet>


------------------------------------------

辅助路由
  3步:01 在组件的模板上面 除了主的插座还需要申明一个带name的插座
       <router-outlet></router-outlet>
       <router-outlet name="aux"></router-outlet>
     02 当前的路由要显示在哪个插座上
       {path: 'xxx', component:XxxComponent,outlet:"aux"}
       {path: 'yyy', component: YyyComponent,outlet:"aux"}
     03 导航时
      <a [routerLink]="['/home',{outlets:{aux:"xxx"}}]">xxx</a>
      <a [routerLink]="['/product',{outlets:{aux:"yyy"}}]">yyy</a>
  在点击xxx链接的时候,主插座导航到"/home"组件,辅助的插座上aux上显示xxx组件
  在一个组件的模板上只有一个插座而辅助路由允许你定义多个插件并同时控制每一个插座上显示的内容
  案例:
    页面左右分布  左边 商品 1 2  右边 聊天 1 2
    插座 + 插座   (单独开发一个聊天组件只显示在新定义的插座上  -  路由参数是否显示聊天面板)
    是否显示聊天面板:
      开始 <a [routerLink]="[{outlets:{aux:"chat"}}]">chat</a>
      关闭 <a [routerLink]="[{outlets:{aux:"null"}}]">null</a>
    如果想制定主路由路径(展示chat组件的时候主路由路由到别的页面)
      <a [routerLink]="[{outlets:{primary:"home",aux:"chat"}}]">chat</a>
      primary!!!
@NgModule

declarations:只能声明组件,指令,管道
imports 依赖模块
  Browser浏览器模块
  Form表单模块
  Http模块
    provides 模块提供了什么服务
    bootstrap 模块主组件
环境 + 指令

  生成组件 terminal -> ng g component 组件名


  全局安装脚手架  npm install -g @angular/cli
  查看版本  ng version
  新建项目 ng new 项目名字
     ng new 项目名字 –skip-install   +    cnpm install
  启动服务  np serve
  生成一个路由模块  ng new project routing

  修改端口号:
    01 /lib/config/schema.json
    02 ng server --port 4201
  重装 npm uninstall -g angular-cli npm cache clean

  常用命令:
    ng serve --host 你的ip地址192.168.1.111 --port 你要的端口号4444
    ng build --prod   build项目生成dist文件
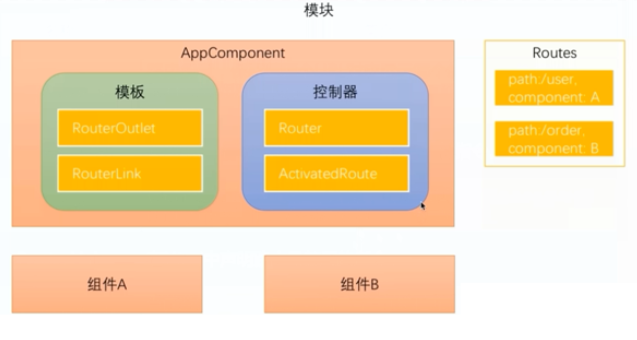
SPA:单页面应用

  主页面只加载一页,不再刷新,只是改变页面上部分内容的应用
  routes为A时  组件A会显示于模块
  模块:router-outlet  + routerLink
  控制器: router + ActivitedRoute
文案来源:https://blog.csdn.net/qq_33936481/article/details/73622207
自定义匿名函数
class Peo {
  constructor(public id: number, public name: string) {}
}
https://stackblitz.com/angular/brlmajkxenxn?file=src%2Fpolyfills.ts
HTML

  <div class="box">
    <h2>单向数据绑定</h2>
    <span>{{title}}</span>
    <h2>My favorite hero is: {{myHero.name}}</h2>
  </div>

  <div class="box">
    <h3>数据循环*ngFor="let el of heroes":</h3>
    <ul>
      <li *ngFor="let el of heroes">
        {{ el.name }}
        </li>
    </ul>
    <p *ngIf="heroes.length > 3">There are many heroes!</p>
  </div>

  <div class="box">
    <h3>绑定事件(click)="onClickMe()"</h3>
    <button (click)="onClickMe()">点击触发</button>
    {{clickMessage}}
  </div>

  <div class="box">
    <h3>通过 $event 对象取得用户输入(keyup)="onKey($event)"</h3>
    <input (keyup)="onKey($event)">
    <p>{{values}}</p>
  </div>

  <div class="box">
    <h3>从一个模板引用变量中获得用户输入</h3>
    <p>传入 $event 是靠不住的做法</p>
    <input #box (keyup)="0">
    <p>{{box.value}}</p>
    <p>从模板变量获得输入框比通过 $event 对象更加简单。 下面的代码重写了之前 keyup 示例,它使用变量来获得用户输入</p>
    <input #boxx (keyup)="onKey(boxx.value)">
    <p>{{valuess}}</p>
  </div>
TS

import { Component } from '@angular/core';

import { Hero } from './hero';

@Component({
  selector: 'app-zjName',
  template: `自定义模板`,
  templateUrl: './app.component.html',
})
export class AppComponent {
  title = '自定义字段名称 并且绑定';
  heroes = [
    new Hero(1, '数据1 数据'),
    new Hero(13, 'Bombasto'),
    new Hero(15, 'Magneta'),
    new Hero(20, 'Tornado')
  ];
  myHero = this.heroes[0];

  clickMessage = '';
  onClickMe() {
    this.clickMessage = '绑定事件 click';
  }

  values = '';
  // onKey(event: any) {
  //   this.values += event.target.value + ' | ';
  // }
  // onKey(event: KeyboardEvent) { // with type info
  //   this.values += (<HTMLInputElement>event.target).value + ' | ';
  // }
  valuess = '';
  onKey(value: string) {
    this.valuess += value + ' | ';
  }

}
