【Shiro学习之四】shiro拦截器
apahce shiro:1.6.0,依赖shiro-web部分
一、shiro与web集成
1、Shiro1.1 及以前版本配置方式
使用org.apache.shiro.web.servlet.IniShiroFilter作为Shiro安全控制的入口点。
web.xml:

<?xml version="1.0" encoding="UTF-8"?>
<web-app
        xmlns="http://java.sun.com/xml/ns/javaee"
        xmlns:xsi="http://www.w3.org/2001/XMLSchema-instance"
        xsi:schemaLocation="http://java.sun.com/xml/ns/javaee http://java.sun.com/xml/ns/javaee/web-app_3_0.xsd"
        version="3.0"
        metadata-complete="false">
    <!--- shiro 1.1 -->
    <filter>
        <filter-name>iniShiroFilter</filter-name>
        <filter-class>org.apache.shiro.web.servlet.IniShiroFilter</filter-class>
        <init-param>
            <param-name>configPath</param-name>
            <param-value>classpath:shiro.ini</param-value> <!--默认先从/WEB-INF/shiro.ini,如果没有找classpath:shiro.ini-->
        </init-param>
        <init-param>
            <param-name>config</param-name>
            <param-value>
                [main]
                authc.loginUrl=/login

                [users]
                zhang=123,admin

                [roles]
                admin=user:*,menu:*

                [urls]
                /login=anon
                /static/**=anon
                /authenticated=authc
                /role=authc,roles[admin]
                /permission=authc,perms["user:create"]
            </param-value>
        </init-param>
    </filter>
    <filter-mapping>
        <filter-name>iniShiroFilter</filter-name>
        <url-pattern>/*</url-pattern>
    </filter-mapping>
    <error-page>
        <error-code>401</error-code>
        <location>/WEB-INF/jsp/unauthorized.jsp</location>
    </error-page>

</web-app>
2、Shiro 1.2 及以后版本的配置方式
使用org.apache.shiro.web.env.EnvironmentLoaderListener来创建相应的WebEnvironment,并自动绑定到ServletContext,默认使用org.apache.shiro.web.env.IniWebEnvironment实现。
web.xml:

<?xml version="1.0" encoding="UTF-8"?>
<web-app
        xmlns="http://java.sun.com/xml/ns/javaee"
        xmlns:xsi="http://www.w3.org/2001/XMLSchema-instance"
        xsi:schemaLocation="http://java.sun.com/xml/ns/javaee http://java.sun.com/xml/ns/javaee/web-app_3_0.xsd"
        version="3.0"
        metadata-complete="false">
    <!--- shiro 1.2 -->
    <listener>
        <listener-class>org.apache.shiro.web.env.EnvironmentLoaderListener</listener-class>
    </listener>
    <context-param>
        <param-name>shiroEnvironmentClass</param-name>
        <param-value>org.apache.shiro.web.env.IniWebEnvironment</param-value><!-- 默认先从/WEB-INF/shiro.ini,如果没有找classpath:shiro.ini -->
    </context-param>
    <context-param>
        <param-name>shiroConfigLocations</param-name>
        <param-value>classpath:shiro.ini</param-value>
    </context-param>
    <filter>
        <filter-name>shiroFilter</filter-name>
        <filter-class>org.apache.shiro.web.servlet.ShiroFilter</filter-class>
    </filter>
    <filter-mapping>
        <filter-name>shiroFilter</filter-name>
        <url-pattern>/*</url-pattern>
    </filter-mapping>

</web-app>
3、与Spring集成
使用org.springframework.web.filter.DelegatingFilterProxy作为入口,DelegatingFilterProxy自动到spring容器查找名字为 shiroFilter的bean并把所有 Filter 的操作委托给它。然后将ShiroFilter配置到spring容器即可
目前基本上都是用于spring集成的方式。
web.xml:

<?xml version="1.0" encoding="UTF-8"?>
<web-app
        xmlns="http://java.sun.com/xml/ns/javaee"
        xmlns:xsi="http://www.w3.org/2001/XMLSchema-instance"
        xsi:schemaLocation="http://java.sun.com/xml/ns/javaee http://java.sun.com/xml/ns/javaee/web-app_3_0.xsd"
        version="3.0"
        metadata-complete="false">

    <!-- Spring配置文件开始  -->
    <context-param>
        <param-name>contextConfigLocation</param-name>
        <param-value>
            classpath:spring-beans.xml,
            classpath:spring-shiro-web.xml
        </param-value>
    </context-param>
    <listener>
        <listener-class>org.springframework.web.context.ContextLoaderListener</listener-class>
    </listener>
    <!-- Spring配置文件结束 -->

    <!-- shiro 安全过滤器 -->
    <!-- The filter-name matches name of a 'shiroFilter' bean inside applicationContext.xml -->
    <filter>
        <filter-name>shiroFilter</filter-name>
        <filter-class>org.springframework.web.filter.DelegatingFilterProxy</filter-class>
        <async-supported>true</async-supported>
        <init-param>
            <param-name>targetFilterLifecycle</param-name>
            <param-value>true</param-value>
        </init-param>
    </filter>

    <!-- Make sure any request you want accessible to Shiro is filtered. /* catches all -->
    <!-- requests.  Usually this filter mapping is defined first (before all others) to -->
    <!-- ensure that Shiro works in subsequent filters in the filter chain:             -->
    <filter-mapping>
        <filter-name>shiroFilter</filter-name>
        <url-pattern>/*</url-pattern>
    </filter-mapping>

    <servlet>
        <servlet-name>spring</servlet-name>
        <servlet-class>org.springframework.web.servlet.DispatcherServlet</servlet-class>
        <init-param>
            <param-name>contextConfigLocation</param-name>
            <param-value>classpath:spring-mvc.xml</param-value>
        </init-param>
        <load-on-startup>1</load-on-startup>
        <async-supported>true</async-supported>
    </servlet>
    <servlet-mapping>
        <servlet-name>spring</servlet-name>
        <url-pattern>/</url-pattern>
    </servlet-mapping>


</web-app>
spring-shiro-web.xml:

<?xml version="1.0" encoding="UTF-8"?>
<beans xmlns="http://www.springframework.org/schema/beans"
       xmlns:util="http://www.springframework.org/schema/util"
       xmlns:xsi="http://www.w3.org/2001/XMLSchema-instance"
       xsi:schemaLocation="
       http://www.springframework.org/schema/beans http://www.springframework.org/schema/beans/spring-beans.xsd
       http://www.springframework.org/schema/util http://www.springframework.org/schema/util/spring-util.xsd">

    <!-- 缓存管理器 使用Ehcache实现 -->
    <bean id="cacheManager" class="org.apache.shiro.cache.ehcache.EhCacheManager">
        <property name="cacheManagerConfigFile" value="classpath:ehcache.xml"/>
    </bean>

    <!-- 凭证匹配器 -->
    <bean id="credentialsMatcher" class="com.github.zhangkaitao.shiro.chapter12.credentials.RetryLimitHashedCredentialsMatcher">
        <constructor-arg ref="cacheManager"/>
        <property name="hashAlgorithmName" value="md5"/>
        <property name="hashIterations" value="2"/>
        <property name="storedCredentialsHexEncoded" value="true"/>
    </bean>

    <!-- Realm实现 -->
    <bean id="userRealm" class="com.github.zhangkaitao.shiro.chapter12.realm.UserRealm">
        <property name="userService" ref="userService"/>
        <property name="credentialsMatcher" ref="credentialsMatcher"/>
        <property name="cachingEnabled" value="true"/>
        <property name="authenticationCachingEnabled" value="true"/>
        <property name="authenticationCacheName" value="authenticationCache"/>
        <property name="authorizationCachingEnabled" value="true"/>
        <property name="authorizationCacheName" value="authorizationCache"/>
    </bean>

    <!-- 会话ID生成器 -->
    <bean id="sessionIdGenerator" class="org.apache.shiro.session.mgt.eis.JavaUuidSessionIdGenerator"/>

    <!-- 会话Cookie模板 -->
    <bean id="sessionIdCookie" class="org.apache.shiro.web.servlet.SimpleCookie">
        <constructor-arg value="sid"/>
        <property name="httpOnly" value="true"/>
        <property name="maxAge" value="180000"/>
    </bean>

    <!-- 会话DAO -->
    <bean id="sessionDAO" class="org.apache.shiro.session.mgt.eis.EnterpriseCacheSessionDAO">
        <property name="activeSessionsCacheName" value="shiro-activeSessionCache"/>
        <property name="sessionIdGenerator" ref="sessionIdGenerator"/>
    </bean>

    <!-- 会话验证调度器 -->
    <bean id="sessionValidationScheduler" class="org.apache.shiro.session.mgt.quartz.QuartzSessionValidationScheduler">
        <property name="sessionValidationInterval" value="1800000"/>
        <property name="sessionManager" ref="sessionManager"/>
    </bean>

    <!-- 会话管理器 -->
    <bean id="sessionManager" class="org.apache.shiro.web.session.mgt.DefaultWebSessionManager">
        <property name="globalSessionTimeout" value="1800000"/>
        <property name="deleteInvalidSessions" value="true"/>
        <property name="sessionValidationSchedulerEnabled" value="true"/>
        <property name="sessionValidationScheduler" ref="sessionValidationScheduler"/>
        <property name="sessionDAO" ref="sessionDAO"/>
        <property name="sessionIdCookieEnabled" value="true"/>
        <property name="sessionIdCookie" ref="sessionIdCookie"/>
    </bean>

    <!-- 安全管理器 -->
    <bean id="securityManager" class="org.apache.shiro.web.mgt.DefaultWebSecurityManager">
        <property name="realm" ref="userRealm"/>
        <property name="sessionManager" ref="sessionManager"/>
        <property name="cacheManager" ref="cacheManager"/>
    </bean>

    <!-- 相当于调用SecurityUtils.setSecurityManager(securityManager) -->
    <bean class="org.springframework.beans.factory.config.MethodInvokingFactoryBean">
        <property name="staticMethod" value="org.apache.shiro.SecurityUtils.setSecurityManager"/>
        <property name="arguments" ref="securityManager"/>
    </bean>

    <!-- 基于Form表单的身份验证过滤器 -->
    <bean id="formAuthenticationFilter" class="org.apache.shiro.web.filter.authc.FormAuthenticationFilter">
        <property name="usernameParam" value="username"/>
        <property name="passwordParam" value="password"/>
        <property name="loginUrl" value="/login.jsp"/>
    </bean>

    <!-- Shiro的Web过滤器 -->
    <bean id="shiroFilter" class="org.apache.shiro.spring.web.ShiroFilterFactoryBean">
        <property name="securityManager" ref="securityManager"/>
        <property name="loginUrl" value="/login.jsp"/>
        <property name="unauthorizedUrl" value="/unauthorized.jsp"/>
        <property name="filters">
            <util:map>
                <entry key="authc" value-ref="formAuthenticationFilter"/>
            </util:map>
        </property>
        <property name="filterChainDefinitions">
            <value>
                /index.jsp = anon
                /unauthorized.jsp = anon
                /login.jsp = authc
                /logout = logout
                /** = user
            </value>
        </property>
    </bean>

    <!-- Shiro生命周期处理器-->
    <bean id="lifecycleBeanPostProcessor" class="org.apache.shiro.spring.LifecycleBeanPostProcessor"/>

</beans>
二、常用shiro内置拦截器

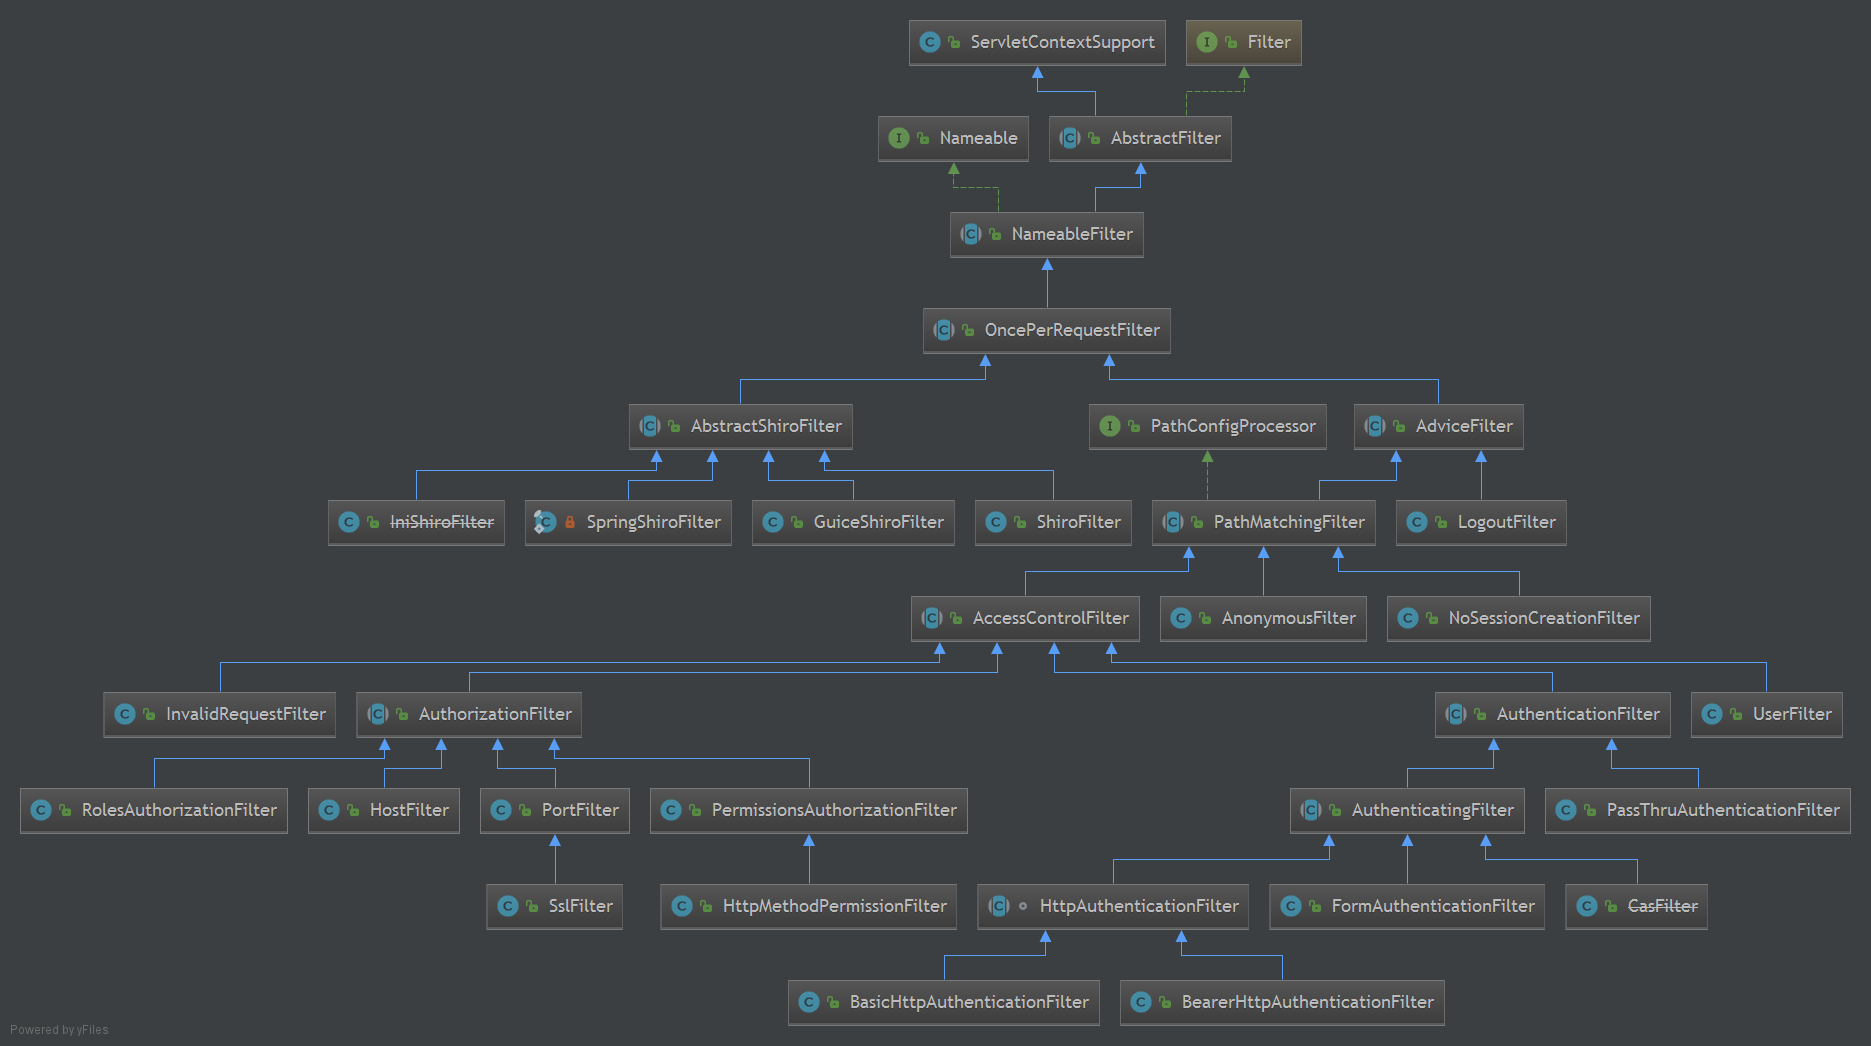
1、NameableFilter
NameableFilter给Filter起个名字,如果没有设置默认就是FilterName;当我们组装拦截器链时会根据这个名字找到相应的拦截器实例;
2、OncePerRequestFilter
OncePerRequestFilter用于防止多次执行Filter;也就是说一次请求只会走一次拦截器链;另外提供enabled属性,表示是否开启该拦截器实例,默认enabled=true表示开启,如果不想让某个拦截器工作,可以设置为false即可。
3、ShiroFilter
ShiroFilter是整个Shiro的入口点,用于拦截需要安全控制的请求进行处理。
4、AdviceFilter
AdviceFilter提供了AOP风格的支持,类似于SpringMVC中的Interceptor.
5、PathMatchingFilter
PathMatchingFilter 提供了基于Ant风格的请求路径匹配功能及拦截器参数解析的功能,如"roles[admin,user]"自动根据","分割解析到一个路径参数配置并绑定到相应的路径:
6、AccessControlFilter
AccessControlFilter提供了访问控制的基础功能;比如是否允许访问/当访问拒绝时如何处理等
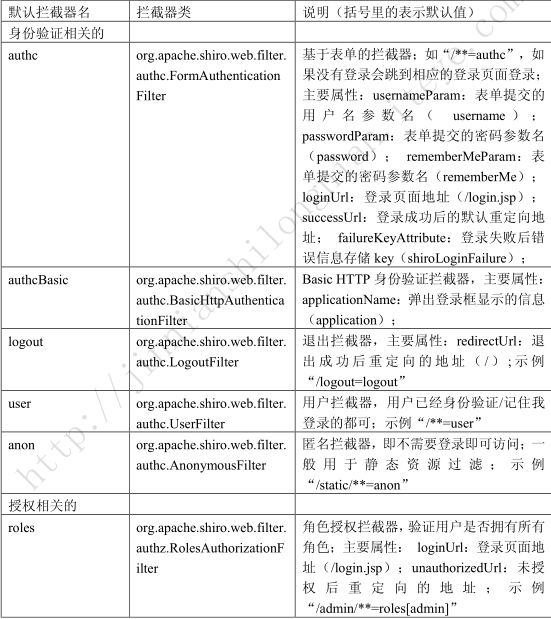
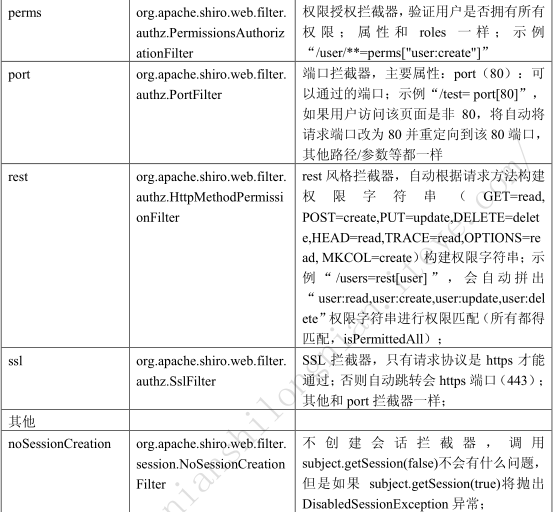
7、默认拦截器
org.apache.shiro.web.filter.mgt.DefaultFilter 中的枚举拦截器
public enum DefaultFilter {
    anon(AnonymousFilter.class),
    authc(FormAuthenticationFilter.class),
    authcBasic(BasicHttpAuthenticationFilter.class),
    authcBearer(BearerHttpAuthenticationFilter.class),
    logout(LogoutFilter.class),
    noSessionCreation(NoSessionCreationFilter.class),
    perms(PermissionsAuthorizationFilter.class),
    port(PortFilter.class),
    rest(HttpMethodPermissionFilter.class),
    roles(RolesAuthorizationFilter.class),
    ssl(SslFilter.class),
    user(UserFilter.class),
    invalidRequest(InvalidRequestFilter.class);
}


8、自定义拦截器
通过自定义自己的拦截器可以扩展一些功能,诸如动态 url-角色/权限访问控制的实现、根据 Subject 身份信息获取用户信息绑定到 Request(即设置通用数据)、验证码验证、在线用户信息的保存等等,因为其本质就是一个 Filter;所以 Filter 能做的它就能做.
(1)默认拦截器接口定义有三个方法
public interface Filter {
    //初始化
    void init(FilterConfig var1) throws ServletException;
    //执行拦截逻辑
    void doFilter(ServletRequest var1, ServletResponse var2, FilterChain var3) throws IOException, ServletException;
    //拦截器销毁回调方法
    void destroy();
}
(2)根据需要继承相应的父类 重写相应方法即可
如果我们想进行访问控制就可以继承AccessControlFilter;
如果我们要添加一些通用数据我们可以直接继承PathMatchingFilter;
三、拦截器链
Shiro对Servlet容器的FilterChain进行了代理,即ShiroFilter在继续 Servlet 容器的 Filter链的执行之前,通过 ProxiedFilterChain 对 Servlet 容器的 FilterChain 进行了代理;即先走
Shiro 自己的 Filter 体系,然后才会委托给 Servlet 容器的 FilterChain 进行 Servlet 容器级别的 Filter 链执行; Shiro 的 ProxiedFilterChain 执行流程: 1、 先执行 Shiro 自己的 Filter 链; 2、再执行 Servlet 容器的 Filter 链(即原始的 Filter)。
1、拦截器链管理器
接口FilterChainManager,用于注册 Filter;注册 URL-Filter 的映射关系。

public interface FilterChainManager {
    //返回注册当当前FilterChainManager过滤器
    Map<String, Filter> getFilters();

    //根据过滤器链名称返回过滤器链
    NamedFilterList getChain(String chainName);

    //校验是否有可用的过滤器链
    boolean hasChains();

    //返回所有过滤器链的名称
    Set<String> getChainNames();

    //输入一个源过滤器链返回一个名字为chainName的代理过滤器链
    //交给SimpleNamedFilterList代理最终包装成一个ProxiedFilterChain返回
    FilterChain proxy(FilterChain original, String chainName);

    //注册过滤器
    void addFilter(String name, Filter filter);

    //注册过滤器 添加之前是否要初始化
    void addFilter(String name, Filter filter, boolean init);

    //根据给定的名字和格式字符串定义创建过滤器链
    void createChain(String chainName, String chainDefinition);

    //对于没有匹配到的请求路径 通常是/** 创建一个默认过滤器链
    void createDefaultChain(String chainName);

    //注册 URL-Filter 的映射关系
    void addToChain(String chainName, String filterName);
    void addToChain(String chainName, String filterName, String chainSpecificFilterConfig) throws ConfigurationException;

    //配置一个全局的过滤器集合用于所有请求路径 这个集合将先于创建和设置过滤器链之前匹配
    void setGlobalFilters(List<String> globalFilterNames) throws ConfigurationException;
}
实现类DefaultFilterChainManager在构造器中会默认添加org.apache.shiro.web.filter.mgt.DefaultFilter中声明的拦截器。
(1)shiro1.2注册拦截器的流程?
应用启动时:
监听器org.apache.shiro.web.env.EnvironmentLoaderListener
-->org.apache.shiro.web.env.EnvironmentLoader
-->org.apache.shiro.web.env.IniWebEnvironment(默认是IniWebEnvironment,可以配置成自定义的类)
-->默认加载classpath:shiro.ini文件进行解析
-->创建web安全管理器WebSecurityManager
-->IniFilterChainResolverFactory::createInstance通过IniFilterChainResolverFactory工厂创建拦截器链处理器,默认是PathMatchingFilterChainResolver
-->PathMatchingFilterChainResolver::getFilterChainManager获取拦截器链管理器DefaultFilterChainManager
-->IniFilterChainResolverFactory::buildChains创建过滤器链
-->IniFilterChainResolverFactory::registerFilters-->DefaultFilterChainManager::addFilter注册过滤器存放到LinkedHashMap<String, Filter>结构
-->IniFilterChainResolverFactory::createChains-->DefaultFilterChainManager::createChain创建过滤器链 url部分是chainname存放到LinkedHashMap<String, NamedFilterList>结构
如果要自定义FilterChainResolver,可以自定义MyIniWebEnvironment.java继承IniWebEnvironment来重写上面逻辑
MyIniWebEnvironment.java:

package com.github.zhangkaitao.shiro.chapter8.web.env;

import org.apache.shiro.util.ClassUtils;
import org.apache.shiro.web.env.IniWebEnvironment;
import org.apache.shiro.web.filter.authc.FormAuthenticationFilter;
import org.apache.shiro.web.filter.authz.RolesAuthorizationFilter;
import org.apache.shiro.web.filter.mgt.DefaultFilter;
import org.apache.shiro.web.filter.mgt.DefaultFilterChainManager;
import org.apache.shiro.web.filter.mgt.FilterChainResolver;
import org.apache.shiro.web.filter.mgt.PathMatchingFilterChainResolver;

import javax.servlet.Filter;

public class MyIniWebEnvironment extends IniWebEnvironment {
    @Override
    protected FilterChainResolver createFilterChainResolver() {
        //在此处扩展自己的FilterChainResolver
        //1、创建FilterChainResolver
        PathMatchingFilterChainResolver filterChainResolver =
                new PathMatchingFilterChainResolver();
        //2、创建FilterChainManager
        DefaultFilterChainManager filterChainManager = new DefaultFilterChainManager();
        //3、注册Filter
        for(DefaultFilter filter : DefaultFilter.values()) {
            filterChainManager.addFilter(filter.name(), (Filter) ClassUtils.newInstance(filter.getFilterClass()));
        }
        //4、注册URL-Filter的映射关系
        filterChainManager.addToChain("/login.jsp", "authc");
        filterChainManager.addToChain("/unauthorized.jsp", "anon");
        filterChainManager.addToChain("/**", "authc");
        filterChainManager.addToChain("/**", "roles", "admin");

        //5、设置Filter的属性
        FormAuthenticationFilter authcFilter =
                (FormAuthenticationFilter)filterChainManager.getFilter("authc");
        authcFilter.setLoginUrl("/login.jsp");
        RolesAuthorizationFilter rolesFilter = (RolesAuthorizationFilter)filterChainManager.getFilter("roles");
        rolesFilter.setUnauthorizedUrl("/unauthorized.jsp");

        filterChainResolver.setFilterChainManager(filterChainManager);
        return filterChainResolver;
    }
}
web.xml:

<?xml version="1.0" encoding="UTF-8"?>
<web-app
        xmlns="http://java.sun.com/xml/ns/javaee"
        xmlns:xsi="http://www.w3.org/2001/XMLSchema-instance"
        xsi:schemaLocation="http://java.sun.com/xml/ns/javaee http://java.sun.com/xml/ns/javaee/web-app_3_0.xsd"
        version="3.0"
        metadata-complete="false">
    <!--- shiro 1.2 -->
    <listener>
        <listener-class>org.apache.shiro.web.env.EnvironmentLoaderListener</listener-class>
    </listener>
    <context-param>
        <param-name>shiroEnvironmentClass</param-name>
        <param-value>com.github.zhangkaitao.shiro.chapter8.web.env.MyIniWebEnvironment</param-value>
    </context-param>
    <context-param>
        <param-name>shiroConfigLocations</param-name>
        <param-value>classpath:shiro.ini</param-value>
    </context-param>
    <filter>
        <filter-name>shiroFilter</filter-name>
        <filter-class>org.apache.shiro.web.servlet.ShiroFilter</filter-class>
    </filter>
    <filter-mapping>
        <filter-name>shiroFilter</filter-name>
        <url-pattern>/*</url-pattern>
    </filter-mapping>
</web-app>
(2)shiro与spring整合注册拦截器的流程?
结合一个整合Spring的web.xml配置来回顾一下web.xml各组件的启动顺序以及访问时的执行顺序:

<?xml version="1.0" encoding="UTF-8"?>
<web-app
        xmlns="http://java.sun.com/xml/ns/javaee"
        xmlns:xsi="http://www.w3.org/2001/XMLSchema-instance"
        xsi:schemaLocation="http://java.sun.com/xml/ns/javaee http://java.sun.com/xml/ns/javaee/web-app_3_0.xsd"
        version="3.0"
        metadata-complete="false">

    <!-- Spring配置文件开始  -->
    <context-param>
        <param-name>contextConfigLocation</param-name>
        <param-value>
            classpath:spring-beans.xml,
            classpath:spring-shiro-web.xml
        </param-value>
    </context-param>
    <listener>
        <listener-class>org.springframework.web.context.ContextLoaderListener</listener-class>
    </listener>
    <!-- Spring配置文件结束 -->

    <!-- shiro 安全过滤器 -->
    <!-- The filter-name matches name of a 'shiroFilter' bean inside applicationContext.xml -->
    <filter>
        <filter-name>shiroFilter</filter-name>
        <filter-class>org.springframework.web.filter.DelegatingFilterProxy</filter-class>
        <async-supported>true</async-supported>
        <init-param>
            <param-name>targetFilterLifecycle</param-name>
            <param-value>true</param-value>
        </init-param>
    </filter>

    <!-- Make sure any request you want accessible to Shiro is filtered. /* catches all -->
    <!-- requests.  Usually this filter mapping is defined first (before all others) to -->
    <!-- ensure that Shiro works in subsequent filters in the filter chain:             -->
    <filter-mapping>
        <filter-name>shiroFilter</filter-name>
        <url-pattern>/*</url-pattern>
    </filter-mapping>

    <servlet>
        <servlet-name>spring</servlet-name>
        <servlet-class>org.springframework.web.servlet.DispatcherServlet</servlet-class>
        <init-param>
            <param-name>contextConfigLocation</param-name>
            <param-value>classpath:spring-mvc.xml</param-value>
        </init-param>
        <load-on-startup>1</load-on-startup>
        <async-supported>true</async-supported>
    </servlet>
    <servlet-mapping>
        <servlet-name>spring</servlet-name>
        <url-pattern>/</url-pattern>
    </servlet-mapping>


</web-app>
启动顺序:先执行监听器public void contextInitialized(ServletContextEvent event)方法,然后执行拦截器Filter的public void init()方法
用户访问执行顺序:先执行拦截器filter的doFilter方法,在执行Servlet的doGet/doPost/service方法;
流程:
Spring监听器org.springframework.web.context.ContextLoaderListener::contextInitialized
-->org.springframework.web.context.ContextLoader::initWebApplicationContext加载spring-beans.xml、spring-shiro-web.xml注册bean到Spring容器上下文
-->spring-shiro-web.xml初始化和shiro相关的各个类,这里看一下Shiro的Web过滤器shiroFilter,实现类是org.apache.shiro.spring.web.ShiroFilterFactoryBean
-->org.apache.shiro.spring.web.ShiroFilterFactoryBean::createInstance创建SecurityManager、FilterChainManager、PathMatchingFilterChainResolver,返回SpringShiroFilter实例,和原生ShiroFilter一样要继承AbstractShiroFilter
-->org.apache.shiro.spring.web.ShiroFilterFactoryBean::createFilterChainManager在创建过滤器链管理器时将过滤器、过滤器链注册到过滤器链管理器

拦截器:org.springframework.web.filter.DelegatingFilterProxy::init没有重写init 则执行父类的init方法
-->org.springframework.web.filter.GenericFilterBean::init
-->org.springframework.web.filter.DelegatingFilterProxy::initFilterBean这一步是获取web.xml中配置的<filter-name>内容 也就是shiroFilter 赋值给targetBeanName
-->org.springframework.web.filter.DelegatingFilterProxy::initDelegate这一步很重要就是根据targetBeanName将之前注册好的ShiroFilter赋值给DelegatingFilterProxy里的delegate
2、拦截器链处理器
接口FilterChainResolver:解析请求url,然后将URL和拦截器链管理器存放的拦截器链模式匹配,根据传入原始的chain得到一个代理的chain,默认包装成ProxiedFilterChain
public interface FilterChainResolver {
    FilterChain getChain(ServletRequest request, ServletResponse response, FilterChain originalChain);
}
默认实现类:PathMatchingFilterChainResolver:按照Ant风格路径匹配的处理器
(1)shiro1.2执行拦截器链的流程?
web.xml配置的入口filter是org.apache.shiro.web.servlet.ShiroFilter,会执行doFilter方法,ShiroFilter本身没有实现doFilter方法,则向上执行父类的doFilter方法:
请求url-->org.apache.shiro.web.servlet.ShiroFilter::doFilter方法
-->org.apache.shiro.web.servlet.OncePerRequestFilter::doFilter方法
-->org.apache.shiro.web.servlet.AbstractShiroFilter::doFilterInternal组装Subject
-->org.apache.shiro.subject.subject::execute
-->org.apache.shiro.web.servlet.AbstractShiroFilter::executeChain
-->org.apache.shiro.web.servlet.AbstractShiroFilter::getExecutionChain
-->PathMatchingFilterChainResolver::getChain在这里根据请求地址获取对应代理拦截器链
-->ProxiedFilterChain::doFilter依次执行拦截器链上的拦截器
(2)shiro与Spring整合执行拦截器链的流程?
拦截器:org.springframework.web.filter.DelegatingFilterProxy::doFilter
-->org.springframework.web.filter.DelegatingFilterProxy::invokeDelegate 这里delegate就是注入的ShiroFilter
-->org.apache.shiro.spring.web.ShiroFilterFactoryBean.SpringShiroFilter::doFilter没有重写 调用父类doFilter方法
-->org.apache.shiro.web.servlet.OncePerRequestFilter::doFilter方法
-->org.apache.shiro.web.servlet.AbstractShiroFilter::doFilterInternal组装Subject
-->org.apache.shiro.subject.subject::execute
-->org.apache.shiro.web.servlet.AbstractShiroFilter::executeChain
-->org.apache.shiro.web.servlet.AbstractShiroFilter::getExecutionChain
-->PathMatchingFilterChainResolver::getChain在这里根据请求地址获取对应代理拦截器链
-->ProxiedFilterChain::doFilter依次执行拦截器链上的拦截器
3、拦截器链
javax.servlet.FilterChain:拦截器链接口,里面就一个方法执行拦截器
public interface FilterChain {
    void doFilter(ServletRequest var1, ServletResponse var2) throws IOException, ServletException;
}
shiro里的实现:ProxiedFilterChain.java
public class ProxiedFilterChain implements FilterChain {
    private static final Logger log = LoggerFactory.getLogger(ProxiedFilterChain.class);
    private FilterChain orig;
    private List<Filter> filters;
    private int index = 0;

    //构造拦截器链
    public ProxiedFilterChain(FilterChain orig, List<Filter> filters) {
        if (orig == null) {
            throw new NullPointerException("original FilterChain cannot be null.");
        }
        this.orig = orig;
        this.filters = filters;
        this.index = 0;
    }
    //依次执行list中拦截器
    public void doFilter(ServletRequest request, ServletResponse response) throws IOException, ServletException {
        if (this.filters == null || this.filters.size() == this.index) {
            //当执行完拦截器链中所有拦截器后 然后执行元拦截器链中拦截器
            this.orig.doFilter(request, response);
        } else {
            //顺序执行拦截器链中的拦截器
            this.filters.get(this.index++).doFilter(request, response, this);
        }
    }
}
代码及内容参考:张开涛-跟我学shiro


