spring cloud --- config 配置中心 [本地、git获取配置文件]
spring boot 1.5.9.RELEASE
spring cloud Dalston.SR1
1.前言
spring cloud config 配置中心是什么?
为了统一管理配置信息,比如数据库的账户密码等信息 ,将一个服务器注册为配置中心,其他服务可以从配置中心获取配置文件信息 。
2.新建 配置中心端
(1)新建一个端口为100的 maven子工程, 作为 配置中心
引入依赖

完整pom.xml

<?xml version="1.0" encoding="UTF-8"?> <project xmlns="http://maven.apache.org/POM/4.0.0" xmlns:xsi="http://www.w3.org/2001/XMLSchema-instance" xsi:schemaLocation="http://maven.apache.org/POM/4.0.0 https://maven.apache.org/xsd/maven-4.0.0.xsd"> <modelVersion>4.0.0</modelVersion> <parent> <groupId>com.atguigu.springcloud</groupId> <!-- 父级maven模块的工程名字--> <artifactId>microservicecloud</artifactId> <version>0.0.1-SNAPSHOT</version> </parent> <groupId>com.example</groupId> <artifactId>demo-my-cen-myconfig</artifactId> <version>0.0.1-SNAPSHOT</version> <name>demo-my-cen-myconfig</name> <description>Demo project for Spring Boot</description> <properties> <java.version>1.8</java.version> </properties> <dependencies> <dependency> <groupId>org.springframework.boot</groupId> <artifactId>spring-boot-starter-thymeleaf</artifactId> </dependency> <dependency> <groupId>org.springframework.boot</groupId> <artifactId>spring-boot-starter-web</artifactId> </dependency> <dependency> <groupId>org.springframework.boot</groupId> <artifactId>spring-boot-starter-test</artifactId> <scope>test</scope> <exclusions> <exclusion> <groupId>org.junit.vintage</groupId> <artifactId>junit-vintage-engine</artifactId> </exclusion> </exclusions> </dependency> <dependency> <groupId>org.springframework.cloud</groupId> <artifactId>spring-cloud-starter-eureka</artifactId> </dependency> <dependency> <groupId>org.springframework.cloud</groupId> <artifactId>spring-cloud-starter-hystrix</artifactId> </dependency> <dependency> <groupId>org.springframework.cloud</groupId> <artifactId>spring-cloud-starter-config</artifactId> </dependency> <!-- actuator监控 --> <dependency> <groupId>org.springframework.boot</groupId> <artifactId>spring-boot-starter-actuator</artifactId> </dependency> <!-- <!– zuul路由网关 –>--> <!-- <dependency>--> <!-- <groupId>org.springframework.cloud</groupId>--> <!-- <artifactId>spring-cloud-starter-zuul</artifactId>--> <!-- </dependency>--> <!-- springCloud Config --> <dependency> <groupId>org.springframework.cloud</groupId> <artifactId>spring-cloud-config-server</artifactId> </dependency> <!-- 热部署插件 --> <dependency> <groupId>org.springframework</groupId> <artifactId>springloaded</artifactId> </dependency> <dependency> <groupId>org.springframework.boot</groupId> <artifactId>spring-boot-devtools</artifactId> </dependency> </dependencies> <build> <plugins> <plugin> <groupId>org.springframework.boot</groupId> <artifactId>spring-boot-maven-plugin</artifactId> </plugin> </plugins> </build> </project>
(2)看一下目录结构

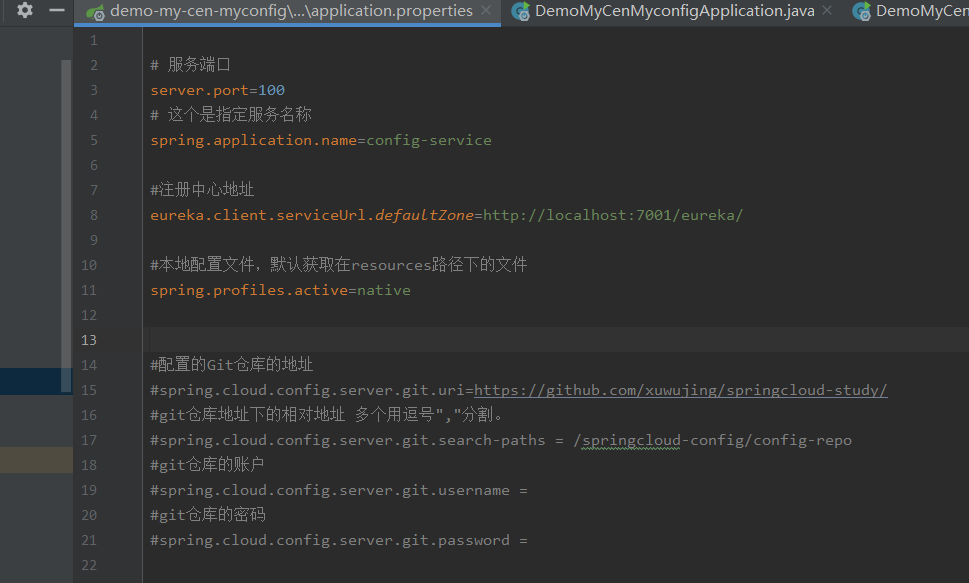
(3)application.properties配置信息,名称设为 config-service ,名字随意

当前演示获取本地文件,在resources 文件夹新建一个 properties 文件 ,我这设为 configText.properties ,随便加一些信息用于测试
完整源码

# 服务端口
server.port=100
# 这个是指定服务名称
spring.application.name=config-service

#注册中心地址
eureka.client.serviceUrl.defaultZone=http://localhost:7001/eureka/

#本地配置文件,默认获取在resources路径下的文件
spring.profiles.active=native


#配置的Git仓库的地址
#spring.cloud.config.server.git.uri=https://github.com/xuwujing/springcloud-study/
#git仓库地址下的相对地址 多个用逗号","分割。
#spring.cloud.config.server.git.search-paths = /springcloud-config/config-repo
#git仓库的账户
#spring.cloud.config.server.git.username =
#git仓库的密码
#spring.cloud.config.server.git.password =

如果需要获取git仓库的文件,则需要把
spring.profiles.active=native
注释掉 ,换成被注释的git配置内容 ,
完整源码
//todo
(4)启动类配置 ,任何启动

(5)测试 , 浏览器输入 http://localhost:100/configText-1.properties ,可以看到可以访问配置信息

注:配置文件的名称是configText.properties,但是如果直接该名称的话是获取不到的,因为在配置文件名需要通过-来进行获取,如果配置文件名称没有-,那么添加了-之后,会自动进行匹配搜索。
下面的url会映射{application}-{profile}.properties对应的配置文件,{label}对应git上不同的分支,默认为master。

3.新建 服务消费者端
(1)新建一个端口为200的 maven子工程, 作为 服务消费者端 ,用于获取配置中心文件
也需要引入配置中心依赖才可以

完整pom.xml

<?xml version="1.0" encoding="UTF-8"?>
<project xmlns="http://maven.apache.org/POM/4.0.0" xmlns:xsi="http://www.w3.org/2001/XMLSchema-instance"
         xsi:schemaLocation="http://maven.apache.org/POM/4.0.0 https://maven.apache.org/xsd/maven-4.0.0.xsd">
    <modelVersion>4.0.0</modelVersion>
    <parent>
        <groupId>com.atguigu.springcloud</groupId>
        <!--    父级maven模块的工程名字-->
        <artifactId>microservicecloud</artifactId>
        <version>0.0.1-SNAPSHOT</version>
    </parent>
    <groupId>com.example</groupId>
    <artifactId>demo-my-cen-myconfig-client</artifactId>
    <version>0.0.1-SNAPSHOT</version>
    <name>demo-my-cen-myconfig-client</name>
    <description>Demo project for Spring Boot</description>

    <properties>
        <java.version>1.8</java.version>
    </properties>

    <dependencies>
        <dependency>
            <groupId>org.springframework.boot</groupId>
            <artifactId>spring-boot-starter-web</artifactId>
        </dependency>

        <dependency>
            <groupId>org.springframework.boot</groupId>
            <artifactId>spring-boot-starter-test</artifactId>
            <scope>test</scope>
            <exclusions>
                <exclusion>
                    <groupId>org.junit.vintage</groupId>
                    <artifactId>junit-vintage-engine</artifactId>
                </exclusion>
            </exclusions>
        </dependency>

        <dependency>
            <groupId>org.springframework.cloud</groupId>
            <artifactId>spring-cloud-starter-eureka</artifactId>
        </dependency>

<!--        配置中心依赖包-->
        <dependency>
            <groupId>org.springframework.cloud</groupId>
            <artifactId>spring-cloud-starter-config</artifactId>
        </dependency>


    </dependencies>

    <build>
        <plugins>
            <plugin>
                <groupId>org.springframework.boot</groupId>
                <artifactId>spring-boot-maven-plugin</artifactId>
            </plugin>
        </plugins>
    </build>

</project>
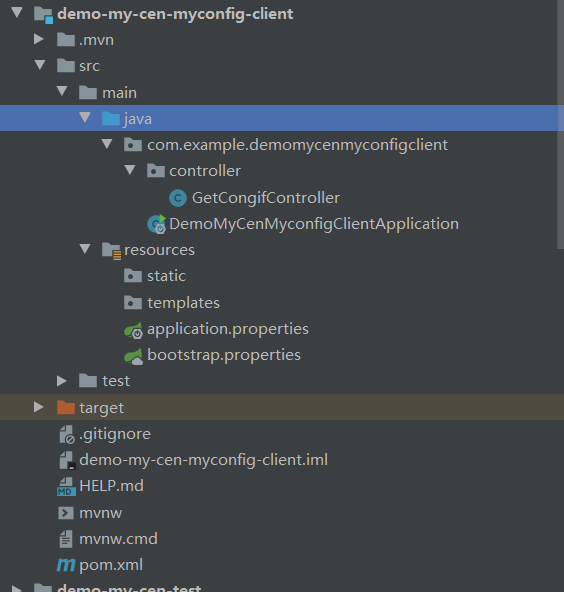
(2)目录结构

(3)配置 application.properties

(4)新建一个 bootstrap.properties 文件 ,spring boot启动 bootstrap.properties 文件 优先于 application.properties 文件读取配置,因此注册信息需要在bootstrap文件设置

完整信息

#获取配置文件到名称
spring.cloud.config.name=configText
#获取配置的策略
spring.cloud.config.profile=pro
#获取配置文件的分支,默认是master。如果是是本地获取的话,则无用,
spring.cloud.config.label=master
#开启配置信息发现
spring.cloud.config.discovery.enabled=true
#指定配置中心的service-id,便于扩展为高可用配置集群,不区分大小写
spring.cloud.config.discovery.serviceId=config-service
#这个是设置与Eureka Server交互的地址,客户端的查询服务和注册服务都需要依赖这个地址。
eureka.client.serviceUrl.defaultZone=http://localhost:7001/eureka/
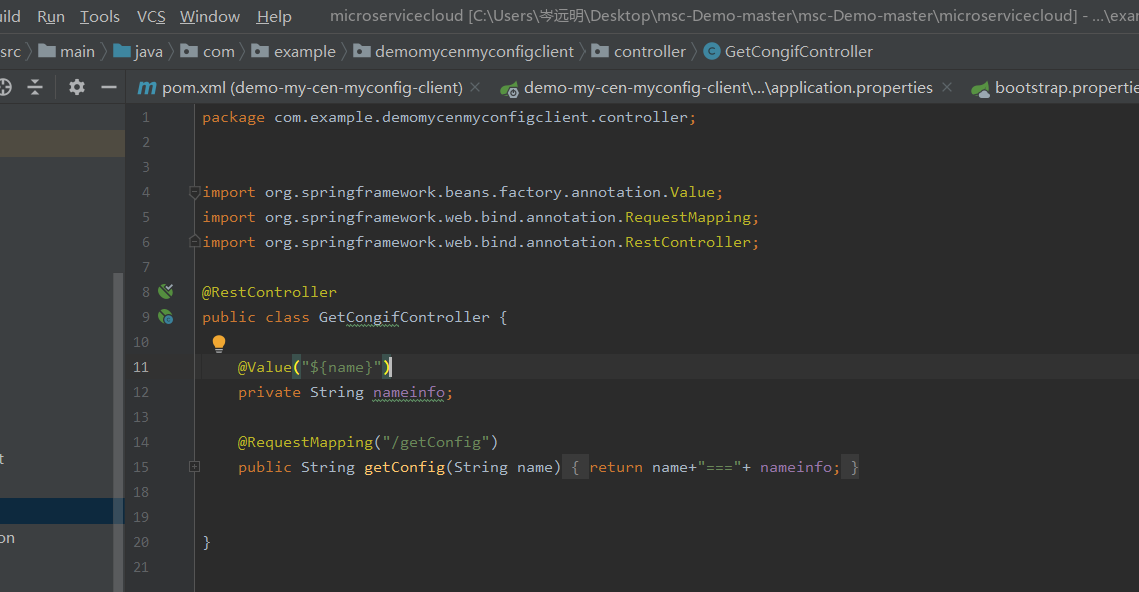
(5)配置 controller 接口, 用于验证 能否读取配置中心的文件 ,name 就是配置中文本地文件 configText.properties 的参数 ,直接调用即可

(6)启动类配置 ,使用发现服务注解即可

4.测试
还需要提前 准备 一个端口为7001的服务注册中心,【这里就不展示了,可以看我的其他随笔有详细操作解说】
然后由消费者端 200 访问 接口,调用端口为100的配置中心 ,

浏览器 输入 http://localhost:200/getConfig?name=爱你哟 ,

获取成功 ,撒花
--------------------------

参考博文原址  :  https://blog.csdn.net/qazwsxpcm/article/details/88578076
本文来自博客园,作者:岑惜,转载请注明原文链接:https://www.cnblogs.com/c2g5201314/p/12897753.html
响应开源精神相互学习,内容良币驱除劣币


