ES的使用
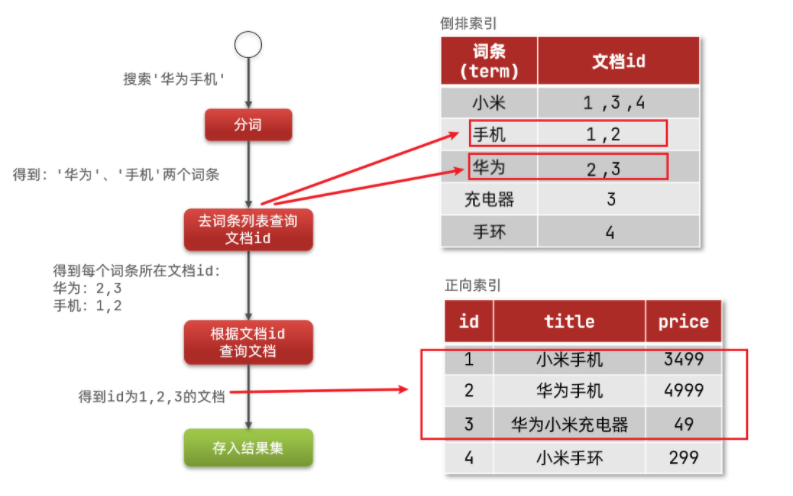
1. 基本理念
1.1 使用分词器把一段话给分成词条
1.2 倒排索引,就是按照词条查询对应的结果

1.3 和数据库的对应

2. ES的安装
2.1 创建网络。因为我们还需要部署kibana容器,因此需要让es和kibana容器互联。
docker network create es-net
2.1 安装 ES 和 kibana 可视化界面,这两个版本需要一致,或者从本地加载(docker load -i 文件名),下载地址:点击这里
docker pull elasticsearch:7.12.1

docker pull kibana:7.12.1
2.2 运行 ES 和 kibana
# 如果启动不起来,查看 docker logs mes 日志找出错误。
docker run -p 9200:9200 -p 9300:9300 --name mes \
-e "ES_JAVA_OPTS=-Xms512m -Xmx512m" \
-e "discovery.type=single-node" \
-e LANG="C.UTF-8" \
-v es-7p16p3-data:/usr/share/elasticsearch/data \
-v es-7p16p3-plugins:/usr/share/elasticsearch/plugins \
--privileged \
--network es-net \
-d elasticsearch:7.12.1
docker run -p 5601:5601 --name mesk \
-e ELASTICSEARCH_HOSTS=http://mes:9200 \
--network=es-net \
-d kibana:7.12.1
2.3 IK 分词器
2.3.1 安装
2.3.1.1 方案一(缺少config文件夹)
# 进入容器内部
docker exec -it mes /bin/bash

# 在线下载并安装, 版本要和es一致
./bin/elasticsearch-plugin  install https://github.com/medcl/elasticsearch-analysis-ik/releases/download/v7.12.1/elasticsearch-analysis-ik-7.12.1.zip

#退出
exit
#重启容器
docker restart mes
2.3.1.2 方案二
# 查看数据挂载
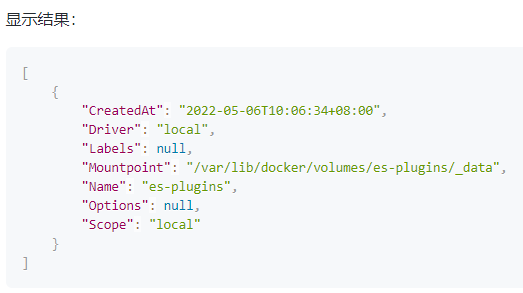
docker volume inspect es-7p16p3-plugins

- 点这里下载文件
- 将ik文件放入到 /var/lib/docker/volumes/es-plugins/_data 下
- 重启容器
2.3.2 分词器的两种模式
# :最少切分
ik_smart

# :最细切分
ik_max_word

2.3.3 添加/禁用词条
有的词条分不出来(比如奥里给),需要我们自定义
进入 ik 文件夹下 的 config 文件夹 , 修改 IKAnalyzer.cfg.xml 文件
<?xml version="1.0" encoding="UTF-8"?>
<!DOCTYPE properties SYSTEM "http://java.sun.com/dtd/properties.dtd">
<properties>
        <comment>IK Analyzer 扩展配置</comment>
        <!--用户可以在这里配置自己的扩展字典 *** 添加扩展词典,多个字典用 ; 分开-->
        <entry key="ext_dict">ext.dic</entry>

        <!--用户可以在这里配置自己的扩展停止词字典  *** 添加停用词词典,多个字典用 ; 分开-->
        <entry key="ext_stopwords">stopword.dic</entry>
</properties>
新建ext.dic文件并输入想添加的分词
修改stopword.dic文件添加想禁用的分词,(例如:添加 大西瓜 , 那个大西瓜这个词不会被搜索出来,但是 大/西/瓜...会被搜索出来)
3. ES的索引库操作
3.1 mapping 映射属性
- type:字段数据类型,常见的简单类型有:
- 字符串:text(可分词的文本)、keyword(精确值,例如:品牌、国家、ip地址,不会被分词)
- 数值:long、integer、short、byte、double、float、
- 布尔:boolean
- 日期:date
- 对象:object
- index:是否创建索引,默认为true
- analyzer:使用哪种分词器
- properties:该字段的子字段
例子:
{
    "age": 21,
    "weight": 52.1,
    "isMarried": false,
    "info": "黑马程序员Java讲师",
    "email": "zy@itcast.cn",
    "score": [99.1, 99.5, 98.9],
    "name": {
        "firstName": "云",
        "lastName": "赵"
    }
}
------------------------------
age:类型为 integer;参与搜索,因此需要index为true;无需分词器
weight:类型为float;参与搜索,因此需要index为true;无需分词器
isMarried:类型为boolean;参与搜索,因此需要index为true;无需分词器
info:类型为字符串,需要分词,因此是text;参与搜索,因此需要index为true;分词器可以用ik_smart
email:类型为字符串,但是不需要分词,因此是keyword;不参与搜索,因此需要index为false;无需分词器
score:虽然是数组,但是我们只看元素的类型,类型为float;参与搜索,因此需要index为true;无需分词器
name:类型为object,需要定义多个子属性
    name.firstName;类型为字符串,但是不需要分词,因此是keyword;参与搜索,因此需要index为true;无需分词器
    name.lastName;类型为字符串,但是不需要分词,因此是keyword;参与搜索,因此需要index为true;无需分词器
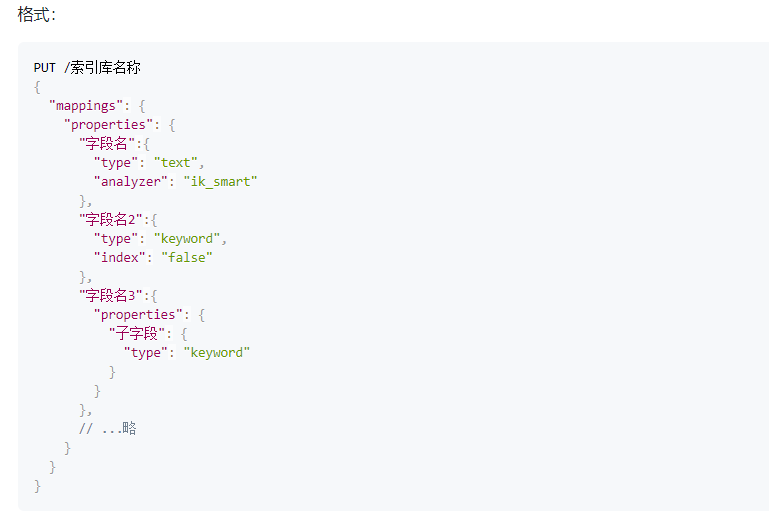
3.2 创建索引库和映射
基本语法:
请求方式:PUT
请求路径:/索引库名,可以自定义
请求参数:mapping映射

3.3 使用Java操作ES
3.1 配置环境
<!--修改版本,要和es一样-->
<properties>
    <java.version>1.8</java.version>
    <elasticsearch.version>7.12.1</elasticsearch.version>
</properties>
<!--引入依赖-->
<dependency>
    <groupId>org.elasticsearch.client</groupId>
    <artifactId>elasticsearch-rest-high-level-client</artifactId>
</dependency>
3.2 注入IOC容器
    @Bean
    public RestHighLevelClient restHighLevelClient(){
        return new RestHighLevelClient(RestClient.builder(
                HttpHost.create("http://192.168.175.129:9200")
        ));
    }
3.3 使用
3.3.1 操作索引库
3.3.1.1 创建索引库
CreateIndexRequest indexRequest = new CreateIndexRequest("索引库的名字");
indexRequest.source("mappings开始的建表语句",XContentType.JSON);
restHighLevelClient.indices().create(indexRequest, RequestOptions.DEFAULT);
3.3.1.2 删除索引库
DeleteIndexRequest indexRequest = new DeleteIndexRequest("索引库的名字");
restHighLevelClient.indices().delete(indexRequest, RequestOptions.DEFAULT);
3.3.1.3 判断索引库是否存在
GetIndexRequest request = new GetIndexRequest("hotel");
boolean exists = restHighLevelClient.indices().exists(request, RequestOptions.DEFAULT);
3.3.2 操作文档
3.3.2.1 添加
// 0.准备实体对象
hotelDoc = ...
// 1.准备Request对象,id只能时String
IndexRequest request = new IndexRequest("索引库的名字").id(hotelDoc.getId().toString());
// 2.准备Json文档
request.source(json, XContentType.JSON);
// 3.发送请求
restHighLevelClient.index(request, RequestOptions.DEFAULT);
3.3.2.2 获取
// 1.准备Request
GetRequest request = new GetRequest("索引库的名字", "要查找的id");
// 2.发送请求,得到响应
GetResponse response = restHighLevelClient.get(request, RequestOptions.DEFAULT);
// 3.解析响应结果
String json = response.getSourceAsString();
3.3.2.3 删除
// 1.准备Request
DeleteRequest request = new DeleteRequest("索引库的名字", "要删除的id");
// 2.发送请求
restHighLevelClient.delete(request, RequestOptions.DEFAULT);
3.3.2.4 修改
// 1.准备Request
UpdateRequest request = new UpdateRequest("索引库的名字", "要修改的id");
// 2.准备修改的内容
request.doc(
    "price", "952",
    "starName", "四钻"
);
// 3.发送请求
restHighLevelClient.update(request, RequestOptions.DEFAULT);
3.3.2.5 批量导入
// 批量查询酒店数据
List<对象> objs = ...

// 1.创建Request
BulkRequest request = new BulkRequest();
// 2.准备参数,添加多个新增的Request
for (Object obj: objs) {
    // 2.1 创建新增文档的Request对象
    request.add(new IndexRequest("索引库的名字")
                .id(obj.getId().toString())
                .source(JSON.toJSONString(obj), XContentType.JSON));
}
// 3.发送请求
restHighLevelClient.bulk(request, RequestOptions.DEFAULT);


