SpringCloud配置中心+Feign+Gateway网关
1. 配置中心
1.1 配置中心的设置
SpringCloud配置中心也可以使用nacos来完成
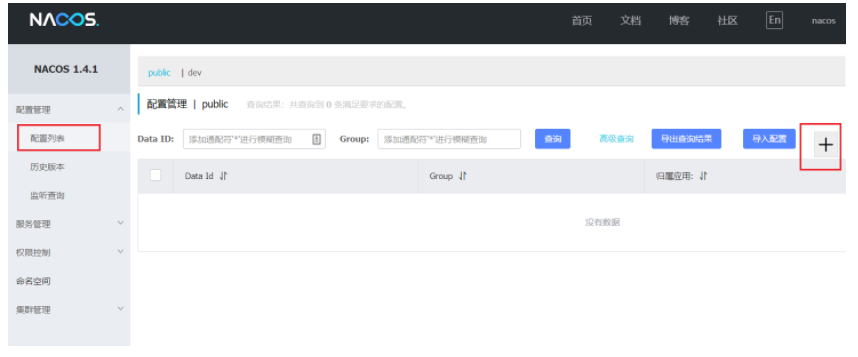

nacos配置中心的配置通过 [服务名]-[类型].[后缀名] 来定位到需要读取这个配置文件的服务
1.2 配置中心的读取
- 给需要使用配置中心的服务 添加依赖
<!--nacos配置管理依赖-->
<dependency>
    <groupId>com.alibaba.cloud</groupId>
    <artifactId>spring-cloud-starter-alibaba-nacos-config</artifactId>
</dependency>
- 给需要使用配置中心的服务 添加 bootstrap.yml 配置文件并输入配置
# 通过 [服务名称]-[开发环境].[文件类型] 可以定位到 Nacos 的配置中心的具体配置
spring:
  application:
    name: userservice # 服务名称
  profiles:
    active: dev #开发环境,这里是dev
  cloud:
    nacos:
      server-addr: localhost:8848 # Nacos地址
      config:
        file-extension: yaml # 文件后缀名
- 部署热更新
每次修改配置中心的文件,服务不需要再重启就能读取到最新配置
方法1. 想要热更新的Field所在class上添加 @RefreshScope 注解,这样配置中心的xx.yyy属性更新后,str的属性也会更新
@Component
@RefreshScope
class Test{

    @Value("xx.yyy")
    private String str;
}
方法2. 使用 @ConfigurationProperties 注解获取配置中心的配置,然后添加到IOC容器中。这样配置中心的xx.yyy属性更新后,yyy的属性也会更新
@Component
@ConfigurationProperties(prefix = "xx")
class Test{
    private String yyy;
}

@Component
class Org{

    @Autowired
    private Test test;
}
1.3 配置中心的共享
直接使用 [服务名称].[文件类型] 为Data ID来创建配置
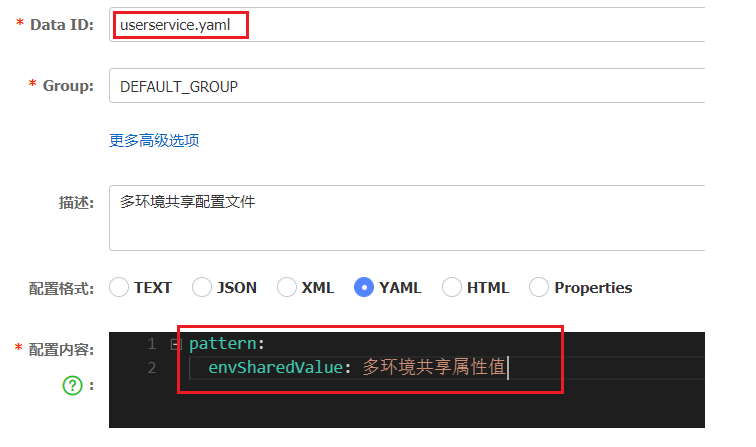
这样该服务的所有类型的开发环境下都能读取到该配置
配置的优先级:[服务名称]-[开发环境].[文件类型] > [服务名称].[文件类型] > 本地配置文件(applicaiton.yml)
2. Feign远程调用
Feign提供了一种优雅的方式调用远程接口,不需要再使用 RestTemplate 了
2.1 使用步骤
- 给需要使用远程调用功能的服务 添加依赖
<dependency>
    <groupId>org.springframework.cloud</groupId>
    <artifactId>spring-cloud-starter-openfeign</artifactId>
</dependency>

<!--servlet API-->
<dependency>
    <groupId>javax.servlet</groupId>
    <artifactId>servlet-api</artifactId>
    <version>2.5</version>
    <scope>provided</scope>
</dependency>
- 给需要使用远程调用功能的服务的启动类添加 @EnableFeignClients 注解
- 编写Feign客户端(接口)
@FeignClient("userservice") //服务名
public interface UserFeign {

    // 请求方式、请求路径、方法参数、返回值要和 被请求的服务 的接口相同
    @GetMapping("/user/{id}")
    User findByID(@PathVariable("id")Long id);
}
- 使用
@Component
class Test{

    @Autowired
    private UserFeign userFeign;

    public void test(){
        User user = userFeign.findByID(1L);
    }
}
2.2 自定义配置
- 主要属性

- 配置文件方式
基于配置文件修改feign的日志级别可以针对单个服务:
feign:
  client:
    config:
      userservice: # 针对某个微服务的配置
        loggerLevel: FULL #  日志级别
也可以针对所有服务:
feign:
  client:
    config:
      default: # 这里用default就是全局配置,如果是写服务名称,则是针对某个微服务的配置
        loggerLevel: FULL #  日志级别
- 代码方式
public class DefaultFeignConfiguration  {
    @Bean
    public Logger.Level feignLogLevel(){
        return Logger.Level.BASIC; // 日志级别为BASIC
    }

    //设置feign发送请求的拦截器,解决feign远程调用请求头丢失的问题
    @Bean
    public RequestInterceptor requestInterceptor(){
        //设置以后,Feign在远程调用之前,会先执行apply方法
        return requestTemplate -> {
            //1.使用RequestContextHolder获取在Controller层进入的请求的所有属性,底层是使用ThreadLocal的机制
            ServletRequestAttributes attributes = (ServletRequestAttributes) RequestContextHolder.getRequestAttributes();
            if(attributes == null)
                return;
            HttpServletRequest request = attributes.getRequest();
            //2.同步请求头数据  (Cookie)
            String cookie = request.getHeader("Cookie");
            requestTemplate.header("Cookie",cookie);
        };
    }
}

2.3 Feign的性能优化
使用连接池代替默认的URLConnection
- 引入依赖
<!--httpClient的依赖 -->
<dependency>
    <groupId>io.github.openfeign</groupId>
    <artifactId>feign-httpclient</artifactId>
</dependency>
- 添加配置
feign:
  httpclient:
    enabled: true # 开启feign对HttpClient的支持
    max-connections: 200 # 最大的连接数
    max-connections-per-route: 50 # 每个路径的最大连接数
2.4 最佳实践
把Feign抽取成模块,然后需要用到的服务再引入即可
- 创建模块 feign
- 引入依赖
<dependency>
    <groupId>org.springframework.cloud</groupId>
    <artifactId>spring-cloud-starter-openfeign</artifactId>
</dependency>
- 抽取公共类(pojo类,Feign类,FeignConfig类等等)
- 给需要用到的服务 引入依赖
<dependency>
     <groupId>com.cc</groupId>
     <artifactId>feign</artifactId>
     <version>1.0</version>
</dependency>
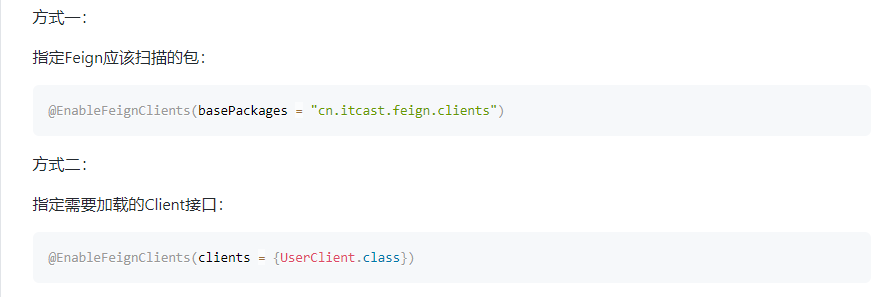
- 解决包扫描问题(服务的启动类上)
3. Gateway网关
3.1 Gateway入门
- 创建 Gateway 模块并引入依赖
<!--网关-->
<dependency>
    <groupId>org.springframework.cloud</groupId>
    <artifactId>spring-cloud-starter-gateway</artifactId>
</dependency>
<!--nacos服务发现依赖-->
<dependency>
    <groupId>com.alibaba.cloud</groupId>
    <artifactId>spring-cloud-starter-alibaba-nacos-discovery</artifactId>
</dependency>
- 编写配置信息(application.yml)
server:
  port: 10010 # 网关端口
spring:
  application:
    name: gateway # 服务名称
  cloud:
    nacos:
      server-addr: localhost:8848 # nacos地址
    gateway:
      routes: # 网关路由配置
        - id: user-service # 路由id,自定义,只要唯一即可
          # uri: http://127.0.0.1:8081 # 路由的目标地址 http就是固定地址
          uri: lb://userservice # 路由的目标地址 lb就是负载均衡,后面跟服务名称
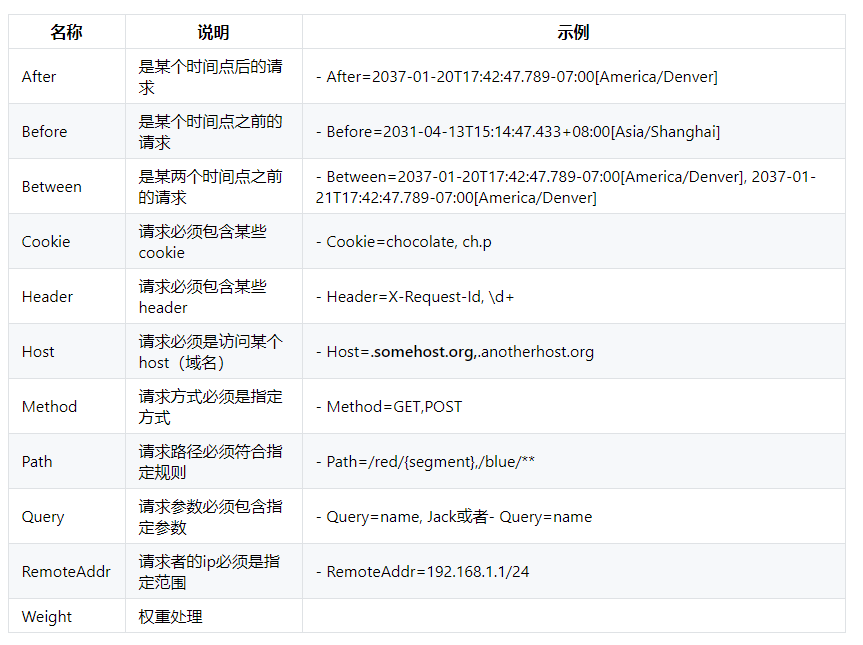
          predicates: # 路由断言,也就是判断请求是否符合路由规则的条件
            - Path=/user/** # 这个是按照路径匹配,只要以/user/开头就符合要求
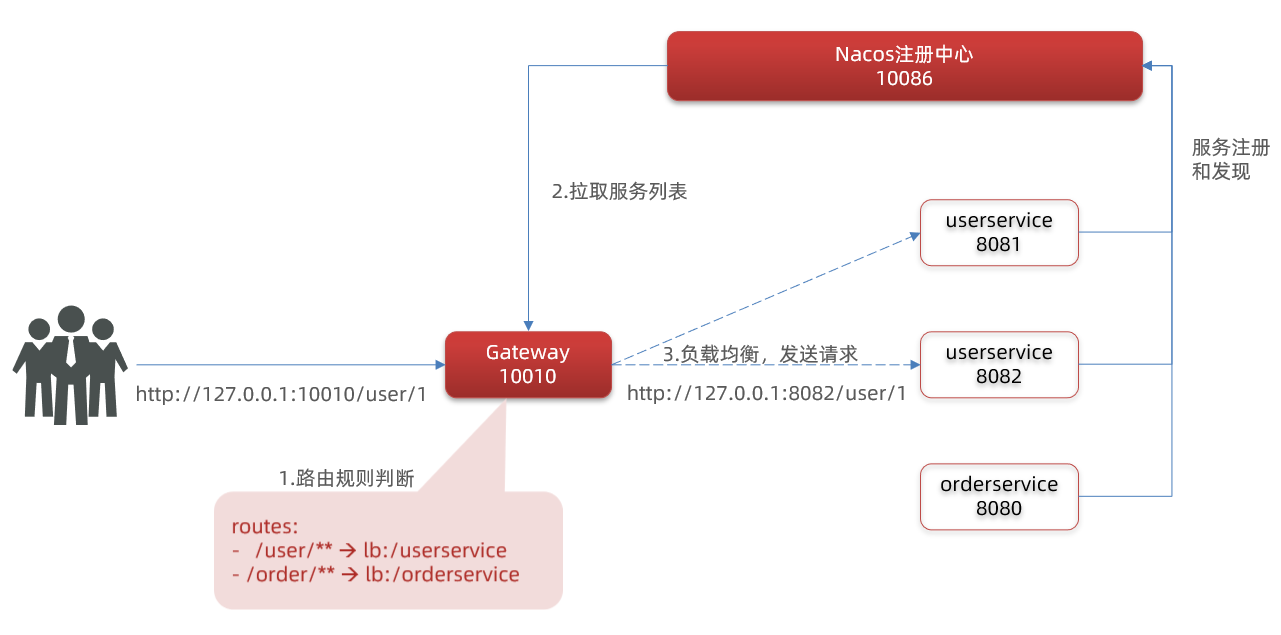
- 运行流程
- 断言工厂(predicates属性)
- 过滤器工厂

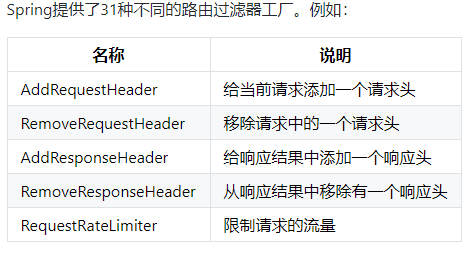
5.1 过滤器种类
5.1.1 例子:请求头过滤器
给所有进入userservice的请求添加一个请求头:Truth=itcast is freaking awesome! 修改application.yml文件就好
spring:
  cloud:
    gateway:
      routes:
      - id: user-service
        uri: lb://userservice
        predicates:
        - Path=/user/**
        filters: # 过滤器
        - AddRequestHeader=Truth, Itcast is freaking awesome! # 添加请求头
5.2 默认过滤器
spring:
  cloud:
    gateway:
      routes:
      - id: user-service
        uri: lb://userservice
        predicates:
        - Path=/user/**
      default-filters: # 默认过滤项
      - AddRequestHeader=Truth, Itcast is freaking awesome!
5.3 全局过滤器,用来添加自己的逻辑
实现 GlobalFilter 接口
@Order(-1)  // order指定的越小,同等级Filter就先执行
@Component
public class AuthFilter implements GlobalFilter {
    @Override
    public Mono<Void> filter(ServerWebExchange exchange, GatewayFilterChain chain) {
        ServerHttpRequest request = exchange.getRequest();

        // 如果满足条件就放行(执行下一个过滤器)
        if(request.getQueryParams().get("auth") != null){
            return chain.filter(exchange);
        }

        // 如果不满足条件就重定向到 "https://www.baidu.com/"
        ServerHttpResponse response = exchange.getResponse();
        response.setStatusCode(HttpStatus.SEE_OTHER);
        response.getHeaders().set("Location", "https://www.baidu.com/");
        return exchange.getResponse().setComplete();
    }
}
- 跨域问题
在application.yml中添加如下配置
spring:
  cloud:
    gateway:
      globalcors: # 全局的跨域处理
        add-to-simple-url-handler-mapping: true # 解决options请求被拦截问题
        corsConfigurations:
          '[/**]':
            allowedOrigins: # 允许哪些网站的跨域请求
              - "http://localhost:8090"
            allowedMethods: # 允许的跨域ajax的请求方式
              - "GET"
              - "POST"
              - "DELETE"
              - "PUT"
              - "OPTIONS"
            allowedHeaders: "*" # 允许在请求中携带的头信息
            allowCredentials: true # 是否允许携带cookie
            maxAge: 360000 # 这次跨域检测的有效期
- 如果GateWay无法使用Feign
将以下类加入IOC容器
@Configuration
public class GateWayConfig {
    @Bean
    @ConditionalOnMissingBean
    public HttpMessageConverters messageConverters(ObjectProvider<HttpMessageConverter<?>> converters) {
        return new HttpMessageConverters(converters.orderedStream().collect(Collectors.toList()));
    }
}


