实验二:函数重载、模板、简单类的定义和实现
【实验结论】
#函数重载
编写重载函数add(),实现对int型,double型,Complex型数据的加法。在main()函数中定义不同类型 数据,调用测试。
#include<iostream>
using namespace std;
struct Complex
{
double real;
double imaginary;
};
//函数声明
int add(int a, int b);
double add(double a,double b);
Complex add(Complex a, Complex b);
int main()
{
    int a,b;
    double c,d;
    Complex e,f,g;
    //输入各项数据
    cout<<"Please enter integer data:";
    cin>>a>>b;
    cout<<"Please enter bouble data:";
    cin>>c>>d;
    cout<<"Please enter the data in struct:";
    cout<<endl<<"e:";
    cin>>e.real>>e.imaginary;
    cout<<"f:";
    cin>>f.real>>f.imaginary;
    //虚实部分别相加函数调用
    g=add(e,f);
    //调用其余各项函数并输出
    cout<<"The result:\n";
    cout<<"int:\t"<<add(a,b)<<endl;
    cout<<"double:\t"<<add(c,d)<<endl;
    cout<<"struct:\t"<<g.real<<"+"<<g.imaginary<<endl;
    return 0;
}
//函数定义
int add(int a,int b)
{
    return a+b;
}
double add(double a,double b)
{
    return a+b;
}
Complex add(Complex a,Complex b)
{
    Complex c;
    c.real=a.real+b.real;
    c.imaginary=a.imaginary+b.imaginary;
    return c;
}
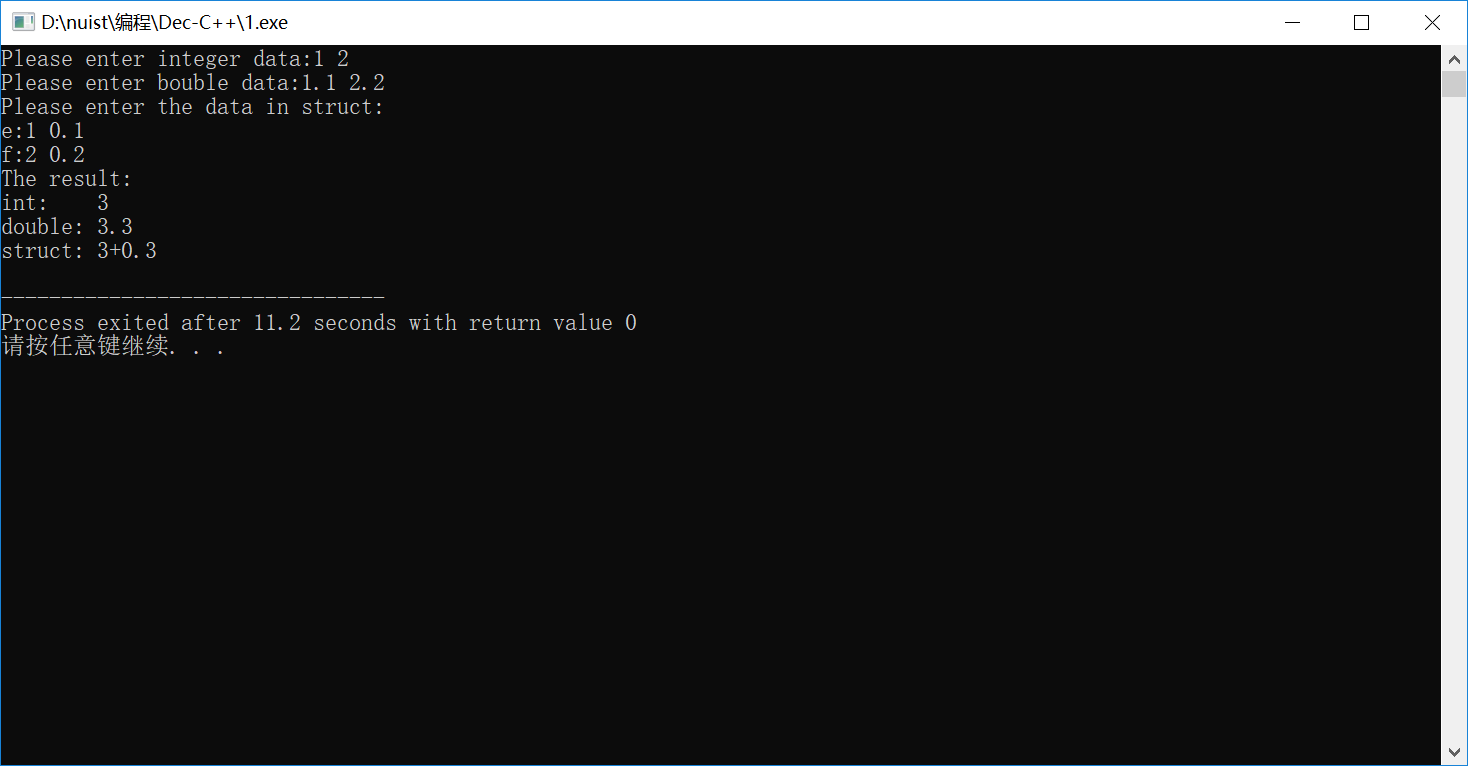
[运行结果]
#函数模板
编写实现快速排序函数模板,并在main()函数中,定义不同类型数据,调用测试。
·Pivotkey.h定义
#ifndef HEADER_Pivotkety_H
#define HEADER_Pivotkety_H
template<class T>
//对所取某记录排序
int Pivotkey(T a[],int low,int high)
{
a[0]=a[low];
T mid=a[low];  //取第一个记录作为基准 (对称轴记录)
while(low<high)
{
while(low<high&&a[high]>=mid) high--;//从最后一个记录开始与基准比较,若大于基准,则继续向前比较
a[low]=a[high];                      //若小于基准,则放入从第一个记录开始空的地址中
while(low<high&&a[low]<=mid) low++;  //和上面相似的,从前往后
a[high]=a[low];
}
a[low]=a[0];
return low;
}
#endif
·Quicksort.h定义
#ifndef HEADER_Quicksort_H
#define HEADER_Quicksort_H
#include"Pivotkey.h"
template<class T>
void Quicksort(T a[],int low,int high)
{
    if(high>low)
    {
        int mid=Pivotkey(a,low,high);  //排序
        Quicksort(a,low,mid-1);   //对排序之后以基准为分割线两个长度减半的子序列分别进行快速排序
        Quicksort(a,mid+1,high);
    }
}
#endif
·main()
#include<iostream>
#include"Pivotkey.h"
#include"Quicksort.h"
using namespace std;
int main()
{
    int a[10];
    double b[10];
    //输入
    cout<<"a[]:";
    for(int i=1;i<10;i++)     //由于a[0]用于存放第一个记录,所以不能存放输入数
    cin>>a[i];
    cout<<"b[]:";
    for(int j=1;j<10;j++)
    cin>>b[j];
    //调用快速排序函数
    Quicksort(a,1,9);
    Quicksort(b,1,9);
    //输出
    for(int i=1;i<10;i++)
    cout<<a[i]<<ends;
    cout<<endl;
    for(int j=1;j<10;j++)
    cout<<b[j]<<ends;
    cout<<endl;
    return 0;
}
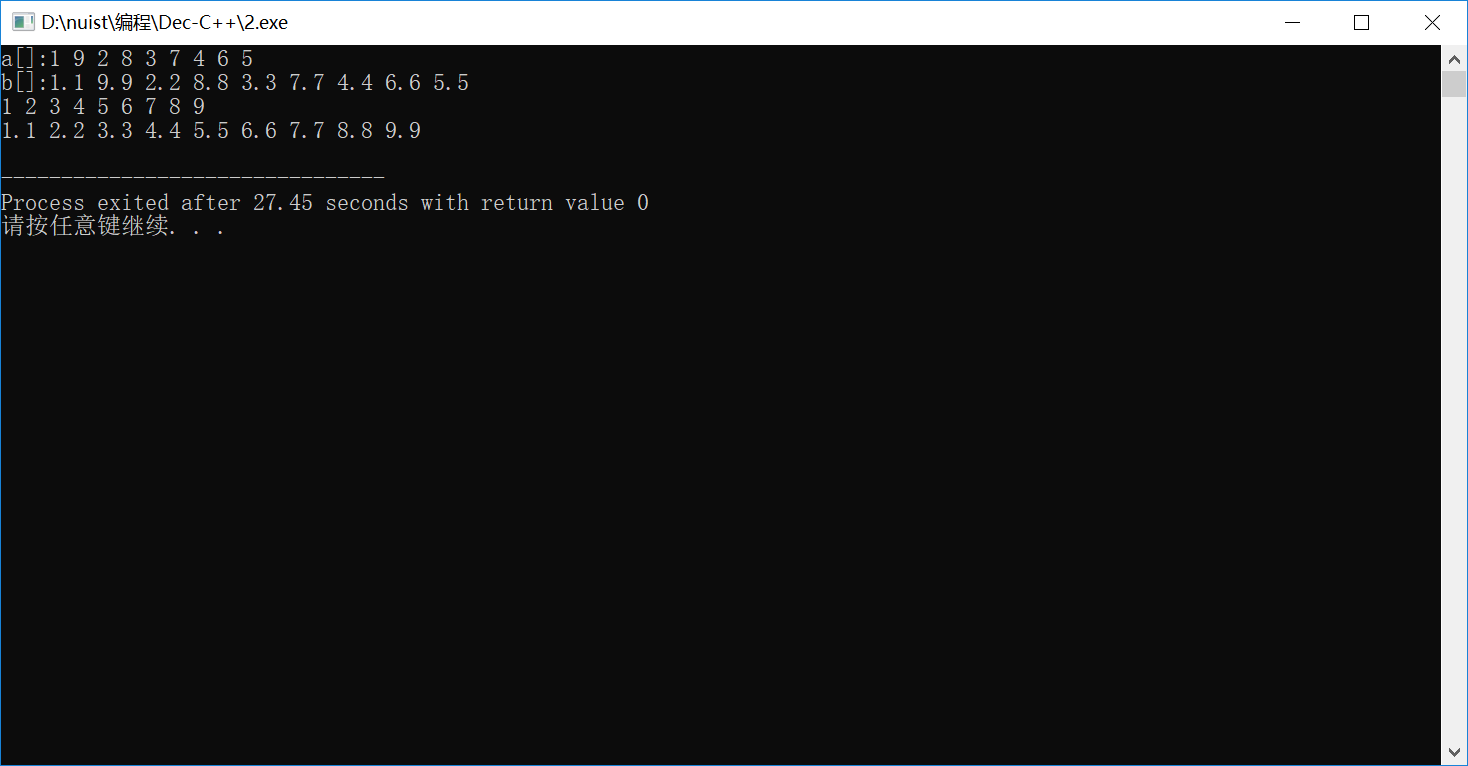
[运行结果]
#简单类的定义和实现
设计并实现一个用户类User,并在主函数中使用和测试这个类。具体要求如下: 每一个用户有用户名(name), 密码(passwd),联系邮箱(email)三个属性。 支持设置用户信息setInfo()。允许设置信息时密码默认为6个1,联系邮箱默认为空串。 支持打印用户信息printInfo()。打印用户名、密码、联系邮箱。其中,密码以6个*方式显示。 支持修改密码changePasswd(),。在修改密码前,要求先输入旧密码,验证无误后,才允许修改。 如果输入旧密码时,连续三次输入错误,则提示用户稍后再试,暂时退出修改密码程序。 在main()函数中创建User类实例,测试User类的各项操作(设置用户信息,修改密码,打印用户信 息)
-未改进
#include <iostream>
#include <string>
using namespace std;
// User类的声明
class User
{
public:
 void setInfo(string name0,string passwd0="111111",string email0="");
 void changePasswd();
 void printInfo();
private:
 string name;
 string passwd;
 string email;
};
//User类的实现
//成员函数setInfo()的实现
void User::setInfo(string name0,string passwd0,string email0)
{
 name=name0;
 passwd=passwd0;
 email=email0;
}
void User::changePasswd()
{
 string passwd1;
 int count=1;
 cout<<"Please enter the oled password first and verify it correctly before allowing modification:";
 cin>>passwd1;
 while(passwd1!="111111"&&count<3)
 {
  count++;
  cout<<"Wrong!Please re-enter again:";
  cin>>passwd1;
 }
 if(count>3)
 {
  cout<<"Please try again later and temporarily quit the program."<<endl;
 }
 else
 {
  cout<<"Please enter the new password:";
  cin>>passwd1;
  cout<<"The password is modified successfully!"<<endl;
  passwd=passwd1;
 }
 }
void User::printInfo()
{
 cout<<"name:\t"<<name<<endl;
 cout<<"passwd:\t"<<"******"<<endl;
 cout<<"email:\t"<<email<<endl;
}
int main()
{
 cout<<"testing 1......"<<endl;
 User user1;
 user1.setInfo("Leonard");
 user1.printInfo();
 user1.changePasswd();
 user1.printInfo();
 cout<<endl<<"testing 2......"<<endl<<endl;
 User user2;
 user2.setInfo("Jonny","92197","xyz@hotmail.com");
 user2.printInfo();
 return 0;
}
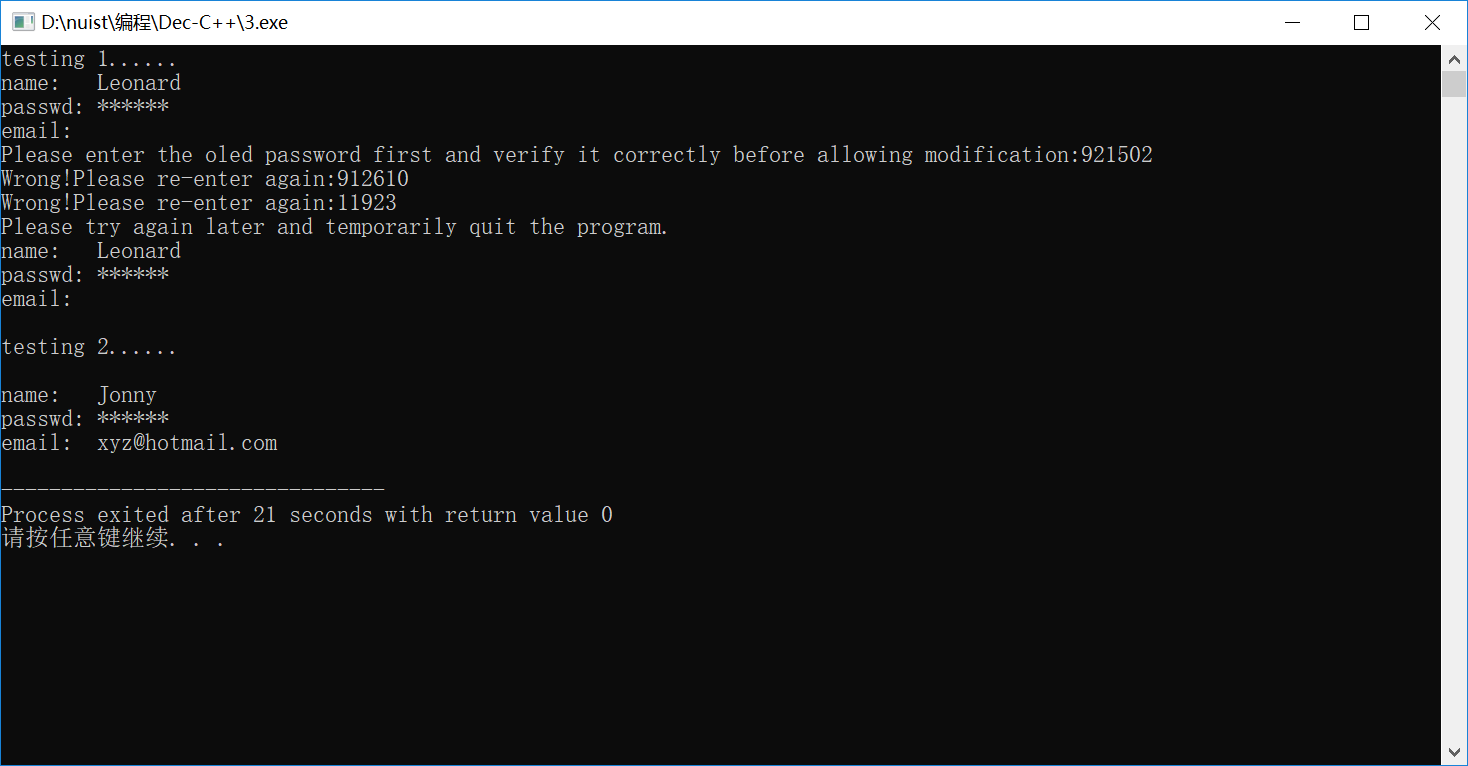
[运行结果]
-改进之后
#include <iostream>
#include <string>
#include<conio.h>
using namespace std;
// User类的声明
class User
{
public:
    void setInfo(string name0,string passwd0="111111",string email0="");
    void changePasswd();
    void changeEmail();
    string hidePasswd();
    void printInfo();
private:
    string name;
    string passwd;
    string email;
};
//User类的实现
//成员函数setInfo()的实现
void User::setInfo(string name0,string passwd0,string email0)
{
    name=name0;
    passwd=passwd0;
    email=email0;
}
void User::changePasswd()   //修改密码
{
    string passwd1;
    int count=1;
    cout<<"Please enter the old password first and verify it correctly before allowing modification:";
    passwd1=hidePasswd();
    while(passwd1!="111111"&&count<3&&(passwd1.size()<6||passwd1.size()>12))
    {
    count++;
    cout<<"Wrong!Please re-enter again:";
    passwd1=User::hidePasswd();
    }
    if(count>3)
    {
    cout<<"Please try again later and temporarily quit the program."<<endl;
    }
    else
    {
    cout<<"Please enter the new password:";
    passwd1=hidePasswd();
    cout<<"The password is modified successfully!"<<endl;
    passwd=passwd1;
    }
}
void User::changeEmail()
{
    string email1;
    cout<<"Please enter the new email:";
    cin>>email1;
    while(email1.find("@")==string::npos) //在字符串email1中查找是否出现@,若出现则进入循环体
    {
        cout<<"Wrong!Please re-enter again:";
        cin>>email1;
    }
    while(email1.find(".com")==string::npos) //在字符串email1中查找是否出现.com,若出现则进入循环体
    {
        cout<<"Wrong!Please re-enter again:";
        cin>>email1;
    }
    email=email1;
}
string User::hidePasswd()
{
    string passwd4;
    char a[20],ch;
    int i=0;
    while((ch=_getch())!='\r')     //_getch()函数支持输入一个字符但不显示
    {
        if(ch!='\b')
        {
            a[i++]=ch;
            cout<<"*";           //如果本次没有修改输入的密码,则输出一个*
        }
        else
        {
            cout<<"\b\b";     //如果本次输入密码被修改,因为i++所以输出两个退格符
            i--;
        }
    }
    a[i]='\0';          //使输出的一串*****成为字符串
    passwd4=a;
    cout<<endl;
    return passwd4;
}
void User::printInfo()
{
    cout<<"name:\t"<<name<<endl;
    cout<<"passwd:\t"<<"******"<<endl;
    cout<<"email:\t"<<email<<endl;
}
int main()
{
    cout<<"testing 1......"<<endl;
    User user1;
    user1.setInfo("Leonard");
    user1.printInfo();
    user1.changePasswd();
    user1.printInfo();
    cout<<endl<<"testing 2......"<<endl<<endl;
    User user2;
    user2.setInfo("Jonny","92197","xyz@hotmail.com");
    user2.printInfo();
    user2.changeEmail();
    user2.printInfo();
    return 0;
}
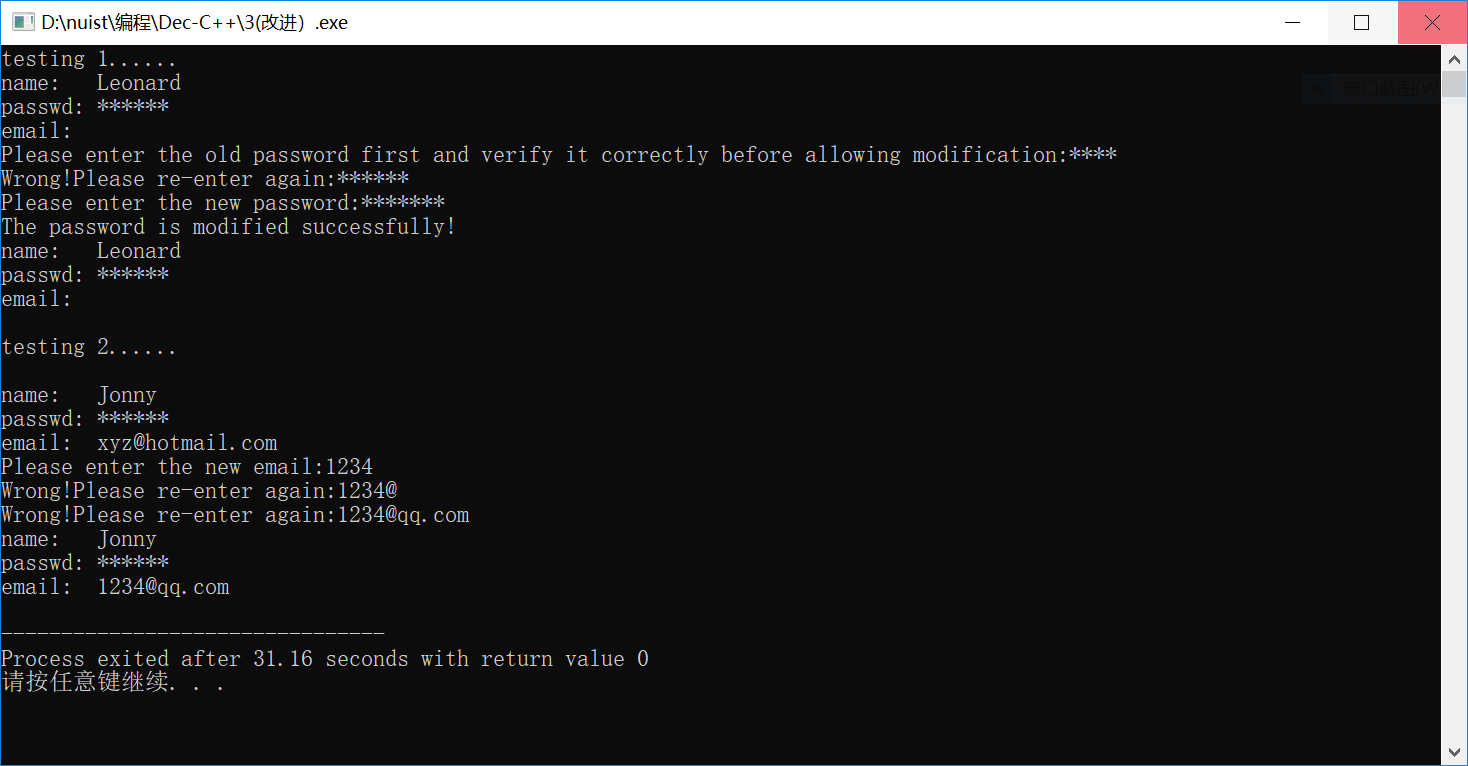
[运行结果]
【实验总结】
#函数模板 中的快速排序详细算法如下图(来自李老师):
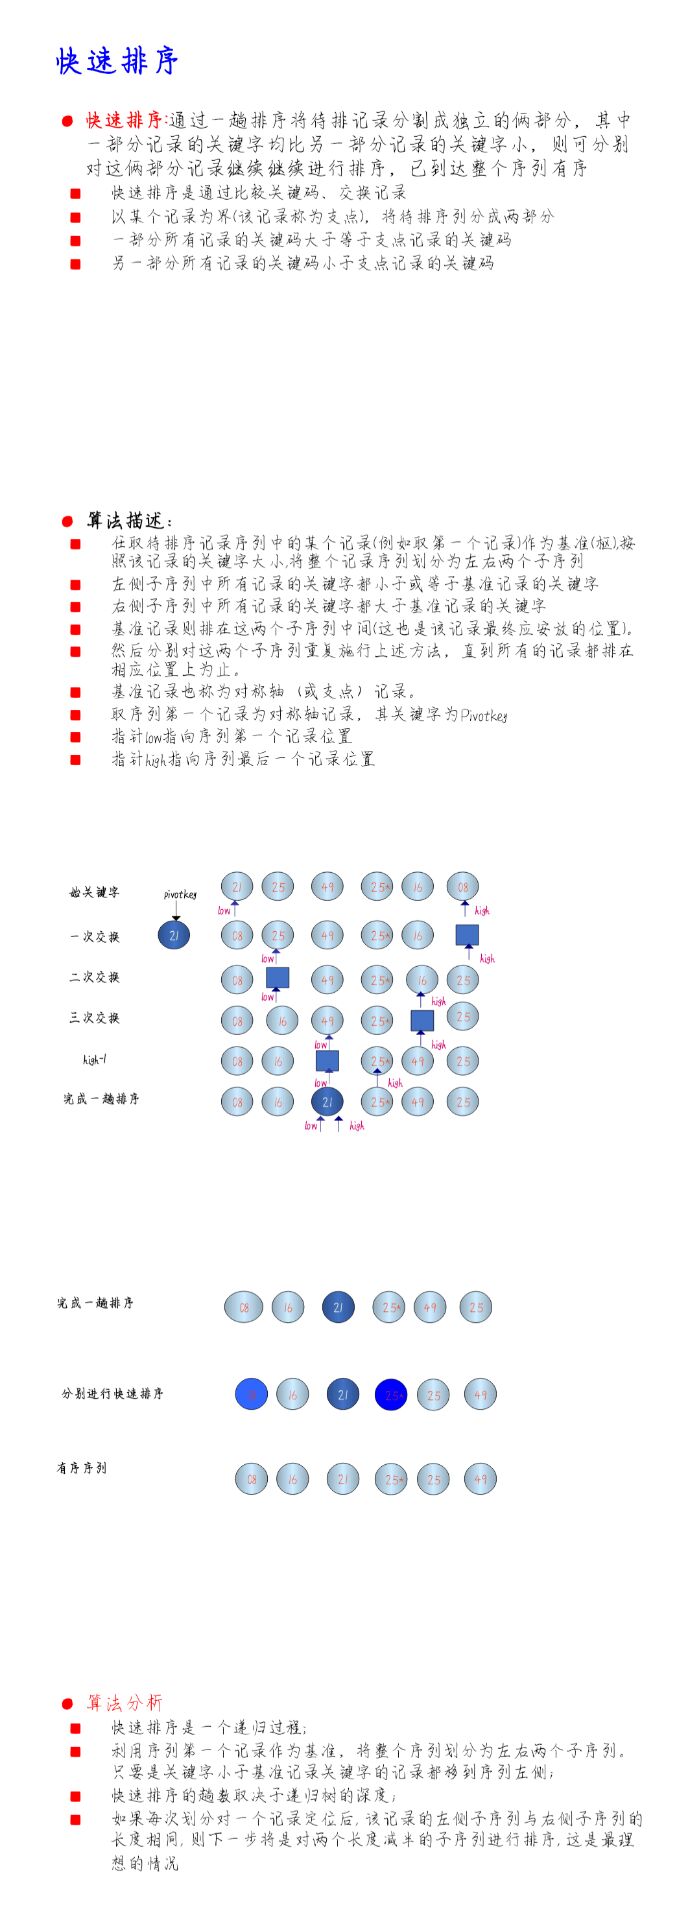
个人感觉,如果单论程序的长短而言,用sort/qsort会比较方便点。
在项目里添加上面写的两个头文件的时候,因着刚开始写的是< >,所以一直编译错误,在按照提示按“Ctrl”键点击main()中的头文件也跳到了所编写的头文件界面之后,发现程序本身是没有错误的,尝试着将< >改为 " " 之后,编译成功了。后来去查了一下上学期的C语言书,发现(如下图):

#简单类的定义和实现
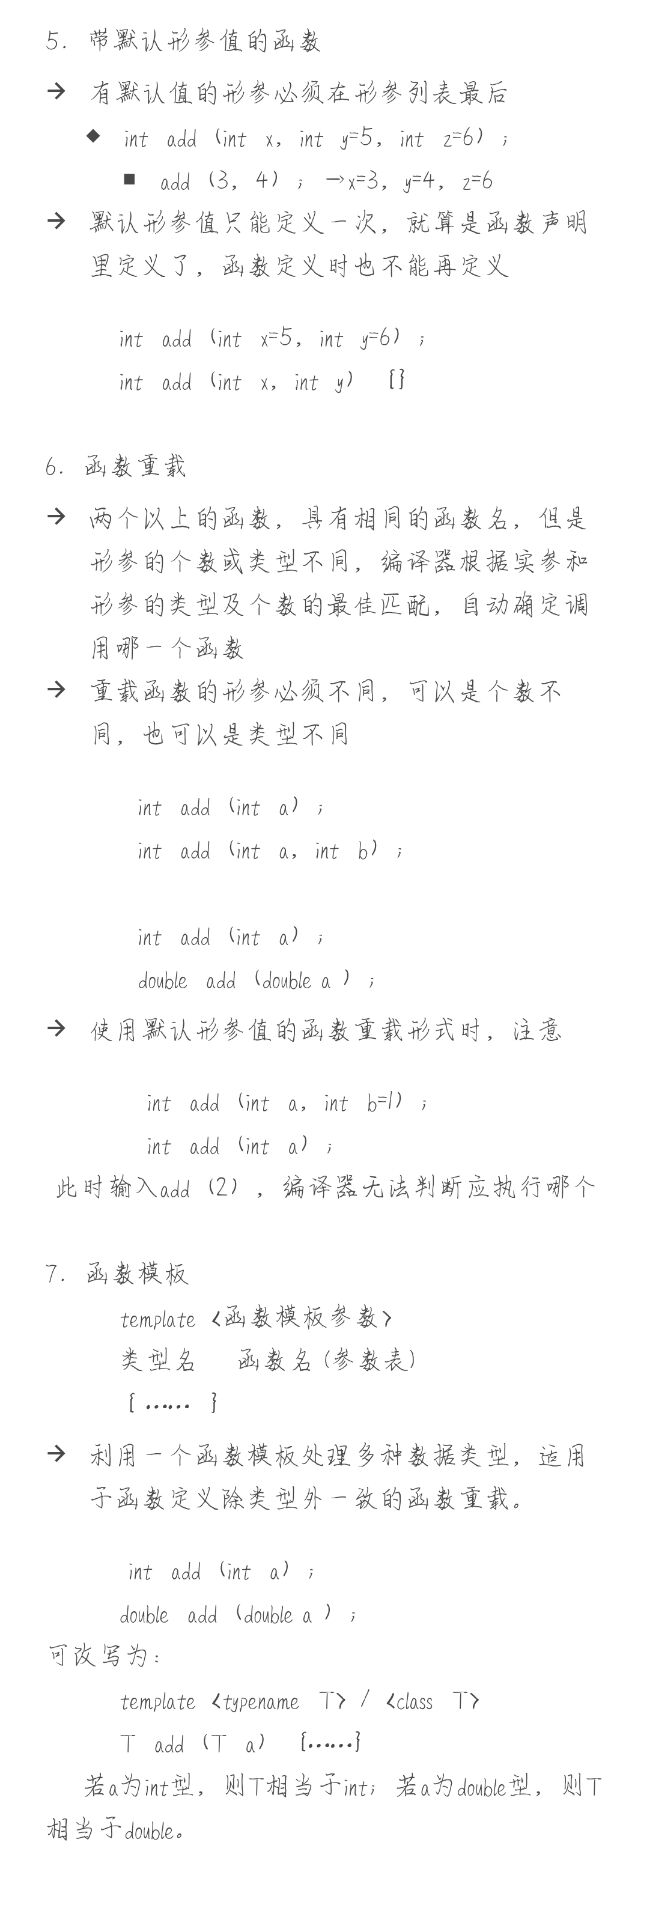
在编译的时候setInfo()函数定义显示错误,但是声明却没错,试了很久还是没用。就把错误提示复制百度(error: default argument given for parameter 2 of......),发现是因为初值重复定义了。(具体见下图,另外把函数模板和重载预习时的的知识点一起发了)
最后改进的版本因为能力有限,所以有些比较常见的东西表达不出来,比如密码不能有特殊字符,必须要有字母,数字,和邮箱的合法性也没办法严格的检查,能想到的就只能判断“@”,和“.com”,像是哪个网站的,是否正确就没法判断了,嗯,有想法的可以交流一下~就这样吧。
【评论地址】
https://www.cnblogs.com/1499978329f/p/10581354.html
https://www.cnblogs.com/wjh1022/p/10589198.html
https://www.cnblogs.com/mzx1999/p/10597319.html


