深度学习进阶自然语言处理
2. 自然语言和单词的分布式表示
单词含义的表示方法有3种
- 基于同义词词典的方法
- 基于计数的方法
- 基于推理的方法
2.2 同义词词典
p61
难以顺应时代变化,人力成本高,无法表示单词的微妙差异
2.3 基于计数的方法
p63
这里需要使用语料库(corpus)
2.3.1 基于python的语料库的预处理
p63
text  = 'You say goodbye and I say hello.'
text = text.lower()
text = text.replace('.',' .')
text # 'you say goodbye and i say hello .'

words = text.split(' ')
words # ['you', 'say', 'goodbye', 'and', 'i', 'say', 'hello', '.']
现在单词拿到了,但是直接拿文本操作,还是有些不方便,我们需要给单词标上ID
word_to_id = {}
id_to_word = {}

for word in words:
    if word not in word_to_id:
        new_id = len(word_to_id)
        word_to_id[word] = new_id
        id_to_word[new_id] = word

print(word_to_id)
print(id_to_word)

#{'you': 0, 'say': 1, 'goodbye': 2, 'and': 3, 'i': 4, 'hello': 5, '.': 6}
#{0: 'you', 1: 'say', 2: 'goodbye', 3: 'and', 4: 'i', 5: 'hello', 6: '.'}
将单词列表转换我单词ID列表
import numpy as np
corpus = [word_to_id[w] for w in words]
corpus = np.array(corpus)
corpus
# array([0, 1, 2, 3, 4, 1, 5, 6])
封装成一个函数
text  = 'You say goodbye and I say hello.'
def preprocess(text):
    text = text.lower()
    text = text.replace('.', ' .')
    words = text.split(' ')

    word_to_id = {}
    id_to_word = {}
    for word in words:
        if word not in word_to_id:
            new_id = len(word_to_id)
            word_to_id[word] = new_id
            id_to_word[new_id] = word

    corpus = np.array([word_to_id[w] for w in words])

    return corpus,word_to_id,id_to_word

corpus,word_to_id,id_to_word = preprocess(text)
print(corpus) # [0 1 2 3 4 1 5 6]
print(word_to_id) # {'you': 0, 'say': 1, 'goodbye': 2, 'and': 3, 'i': 4, 'hello': 5, '.': 6}
print(id_to_word) # {0: 'you', 1: 'say', 2: 'goodbye', 3: 'and', 4: 'i', 5: 'hello', 6: '.'}
2.3.4 共现矩阵
p69
基于分布式假设(用向量表示单词p67)表示单词,最直接的实现方法是对其周围的单词的数量进行计数,然后汇总。这里设窗口为1,you旁边为1的窗口,只有say这个单词,设其为1,其余的词为0,就有you的one-hot向量[0,1,0,0,0,0]
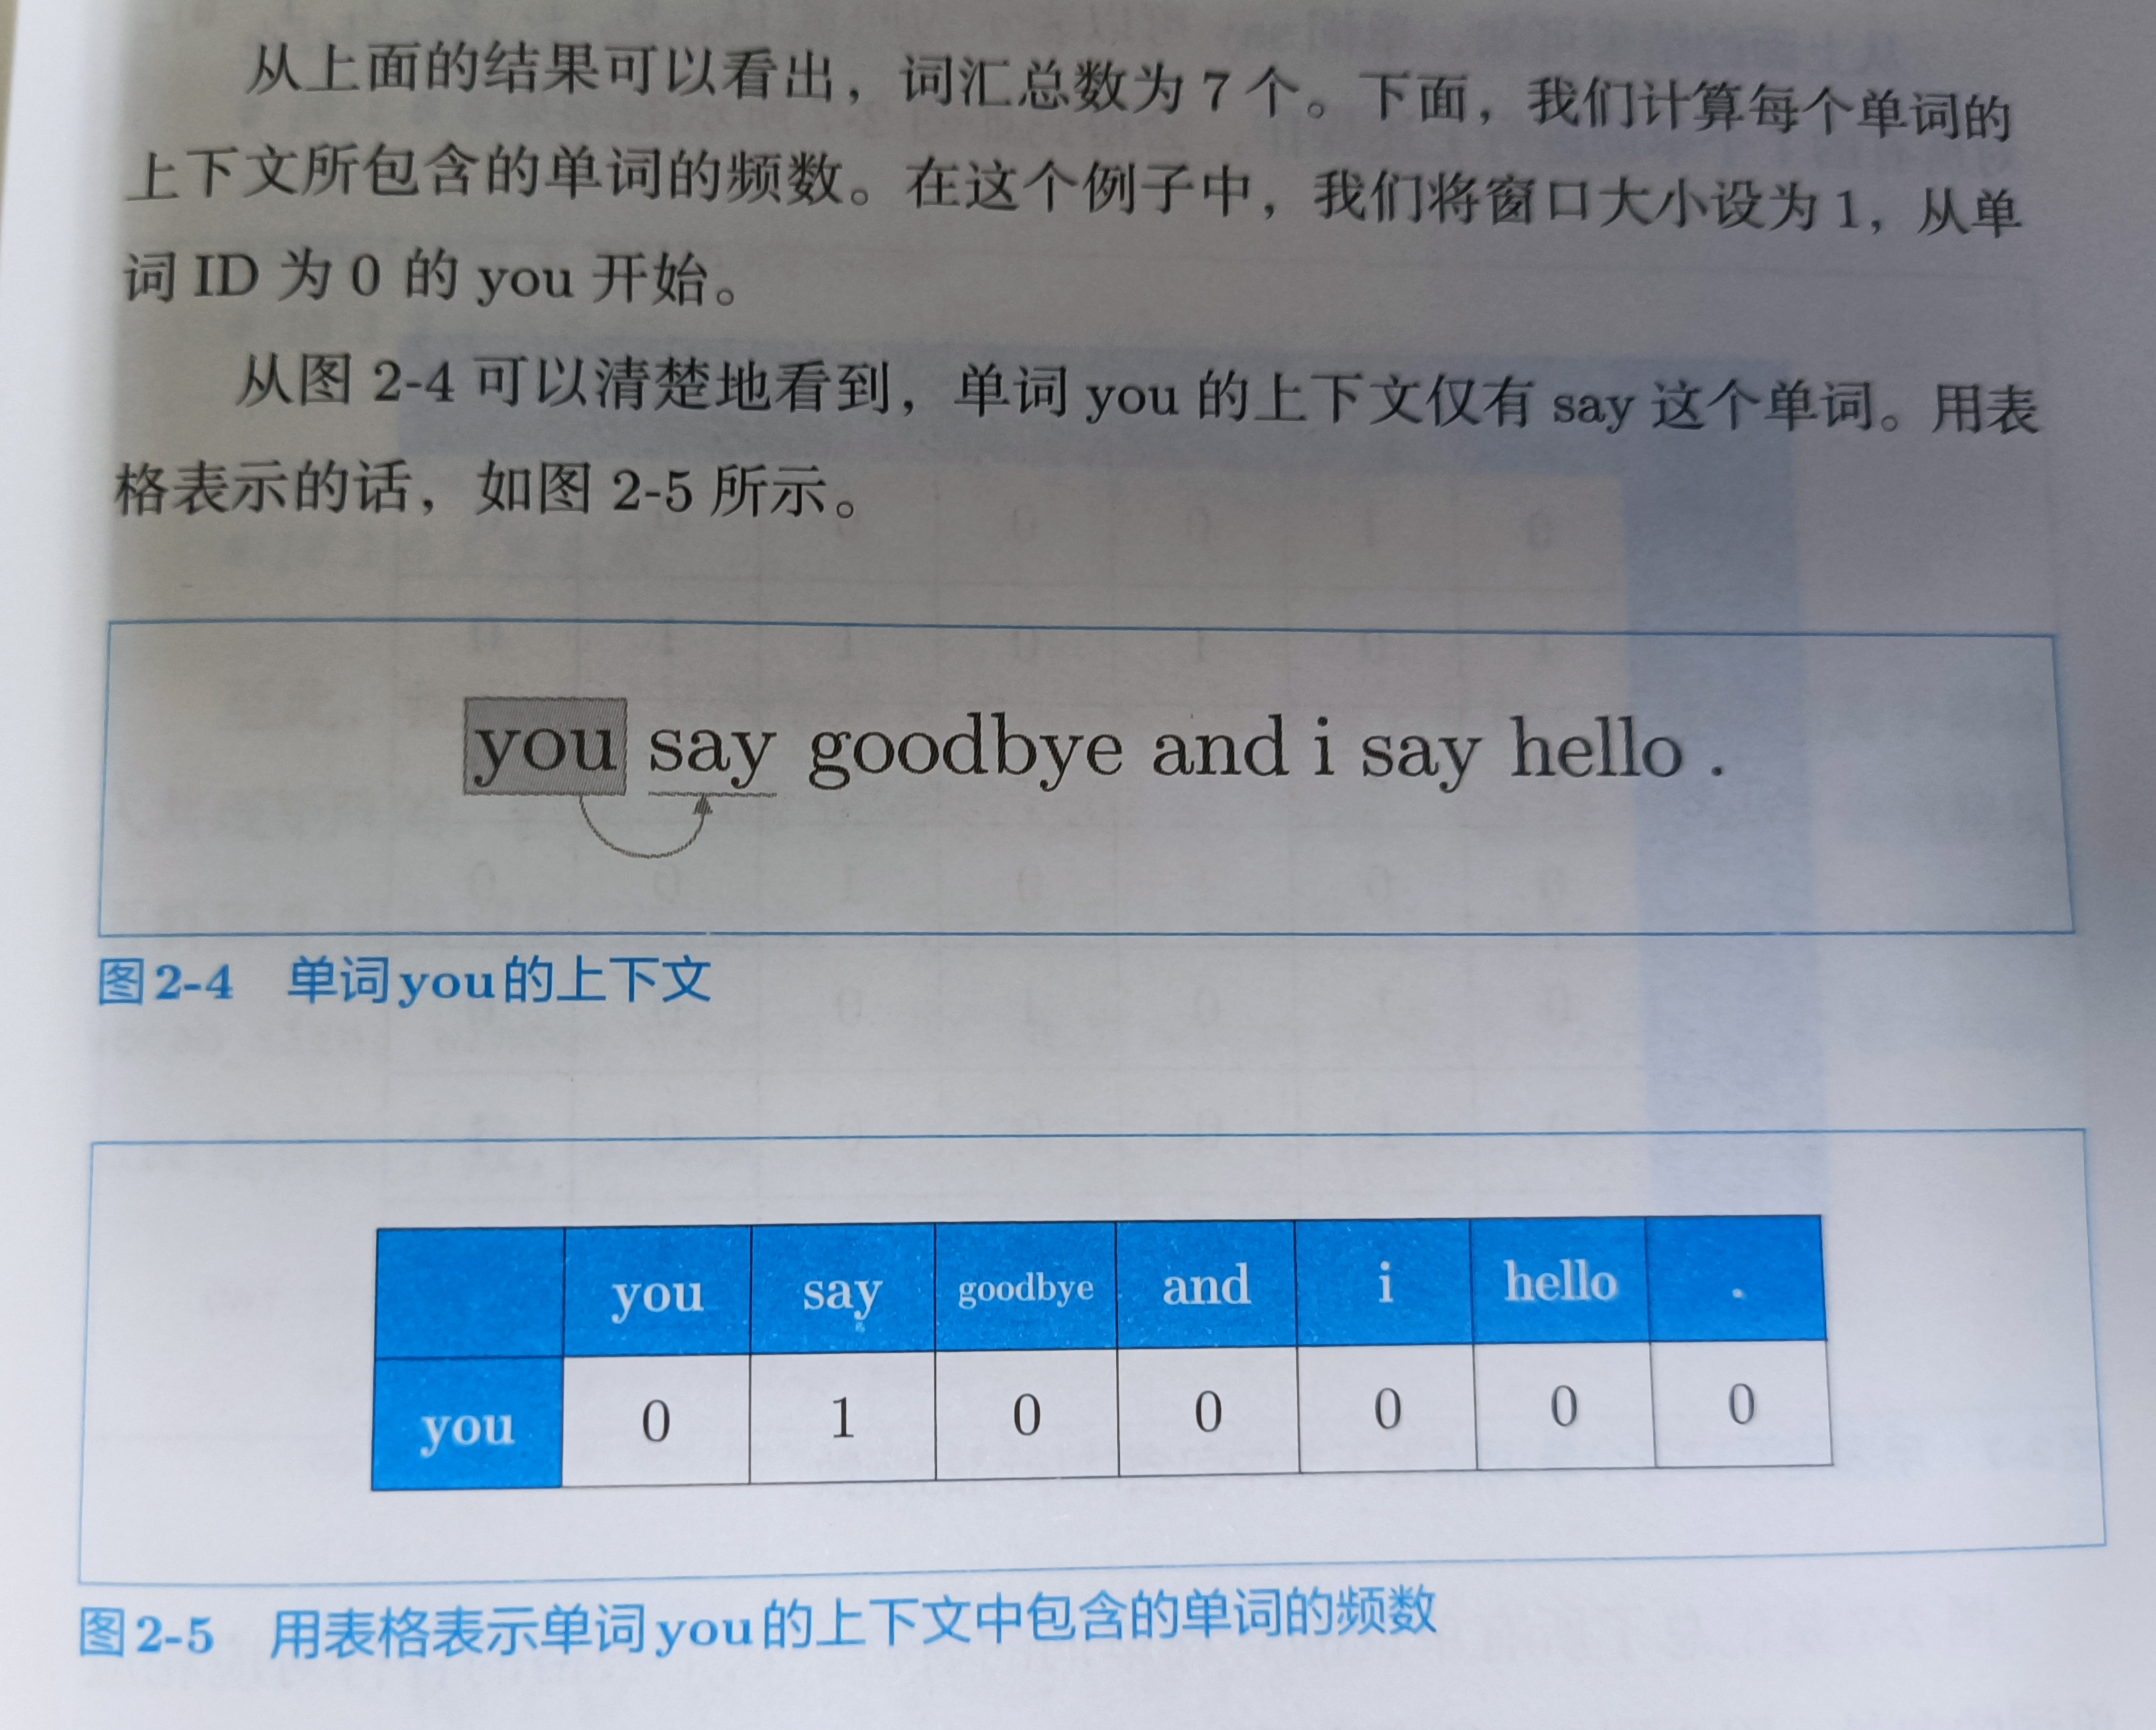
同样把say旁边的单词表示出来
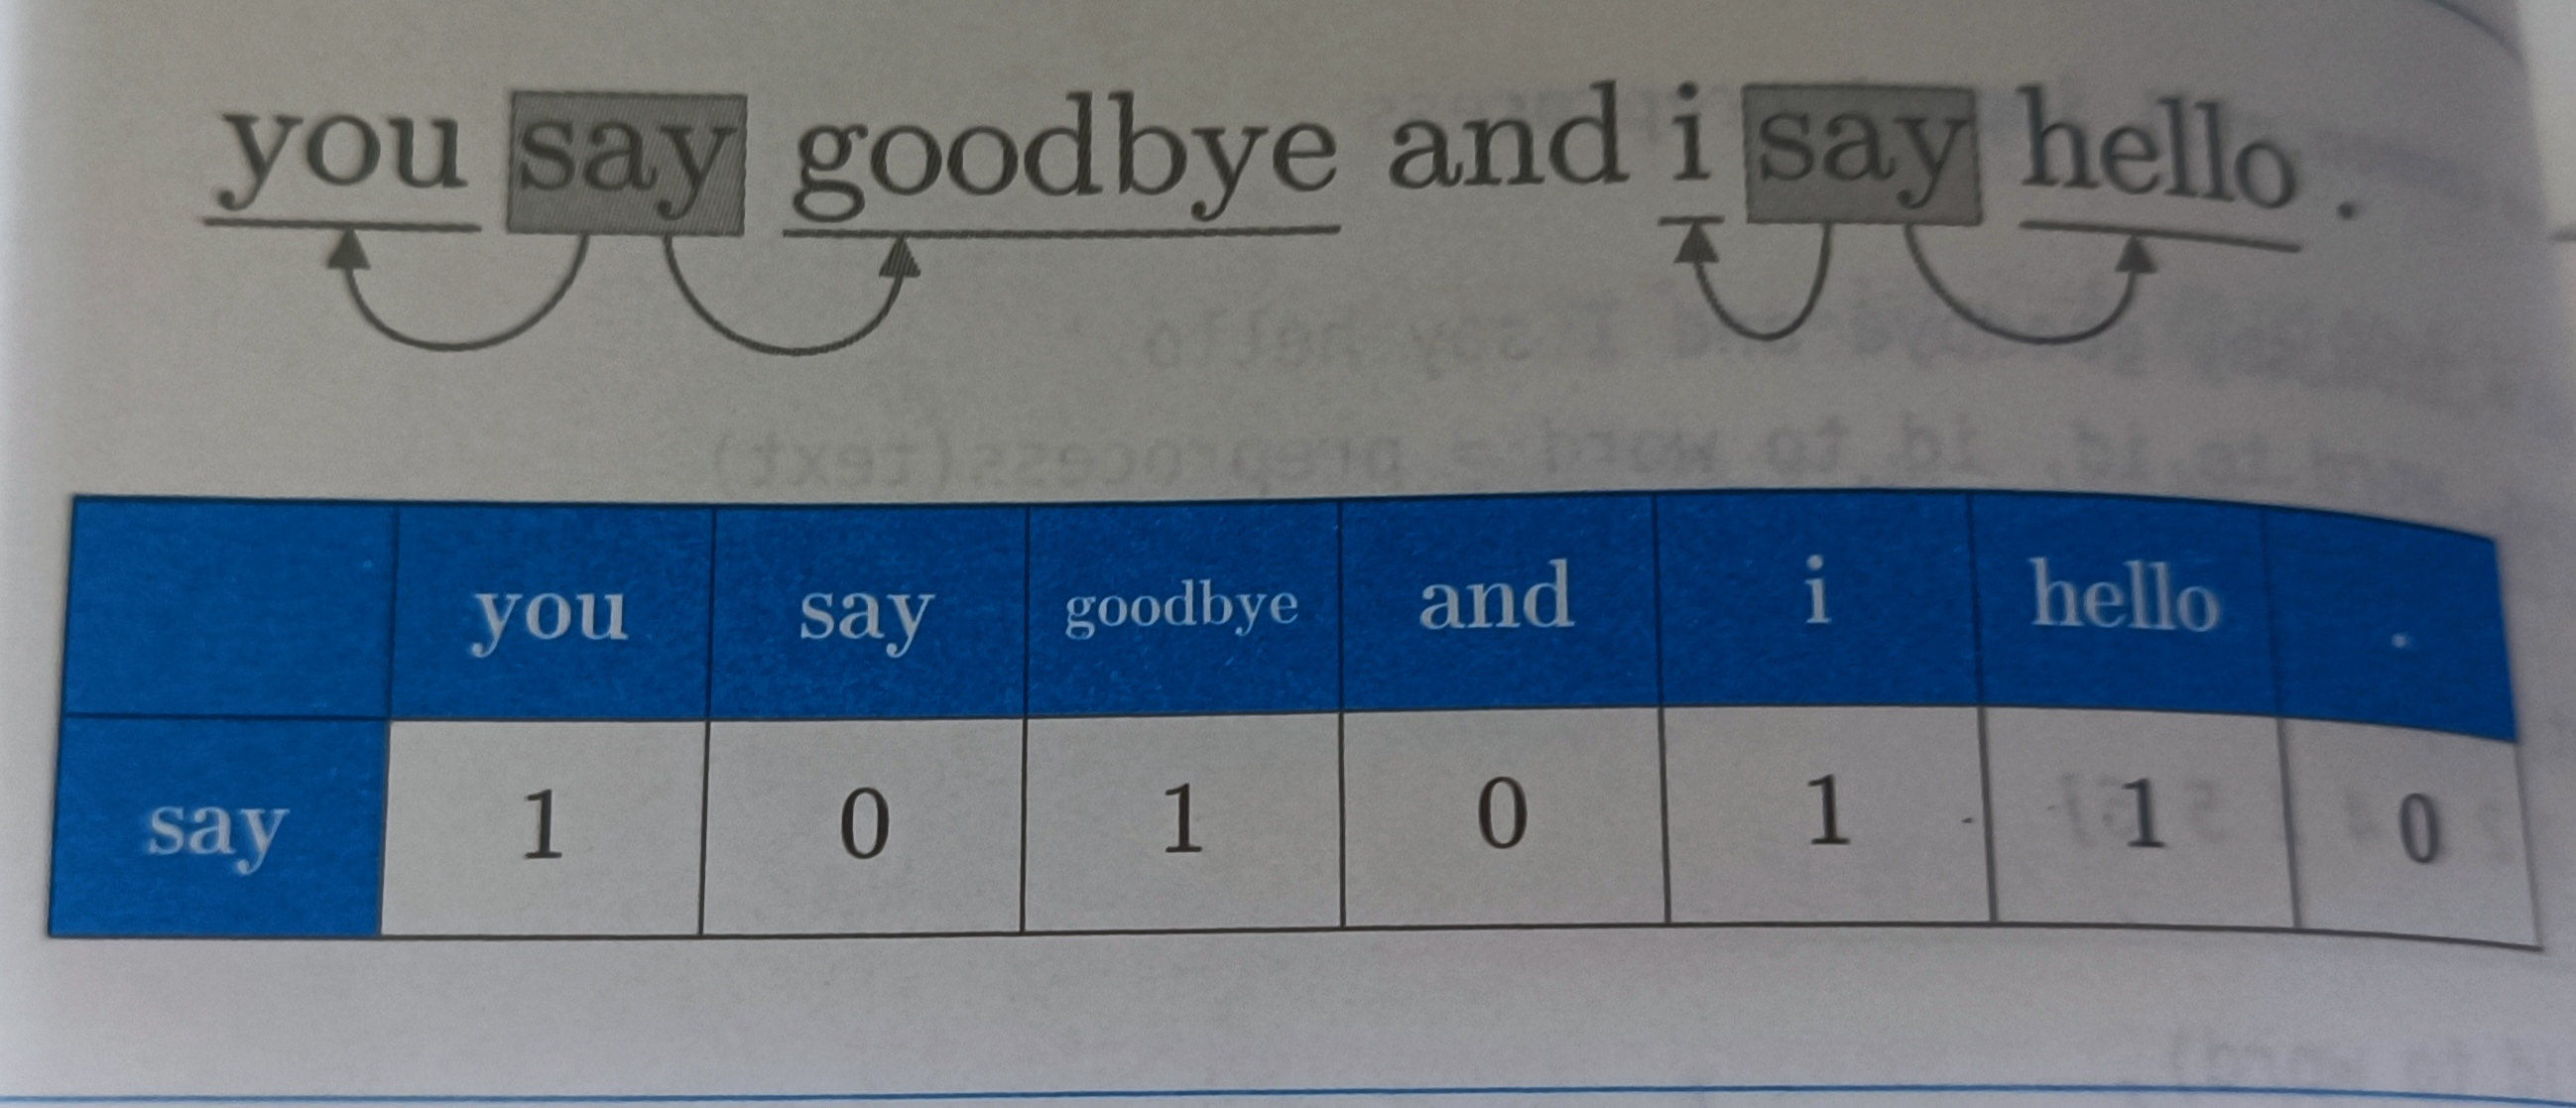
把剩下的单词表示出来,这个就叫做共现矩阵
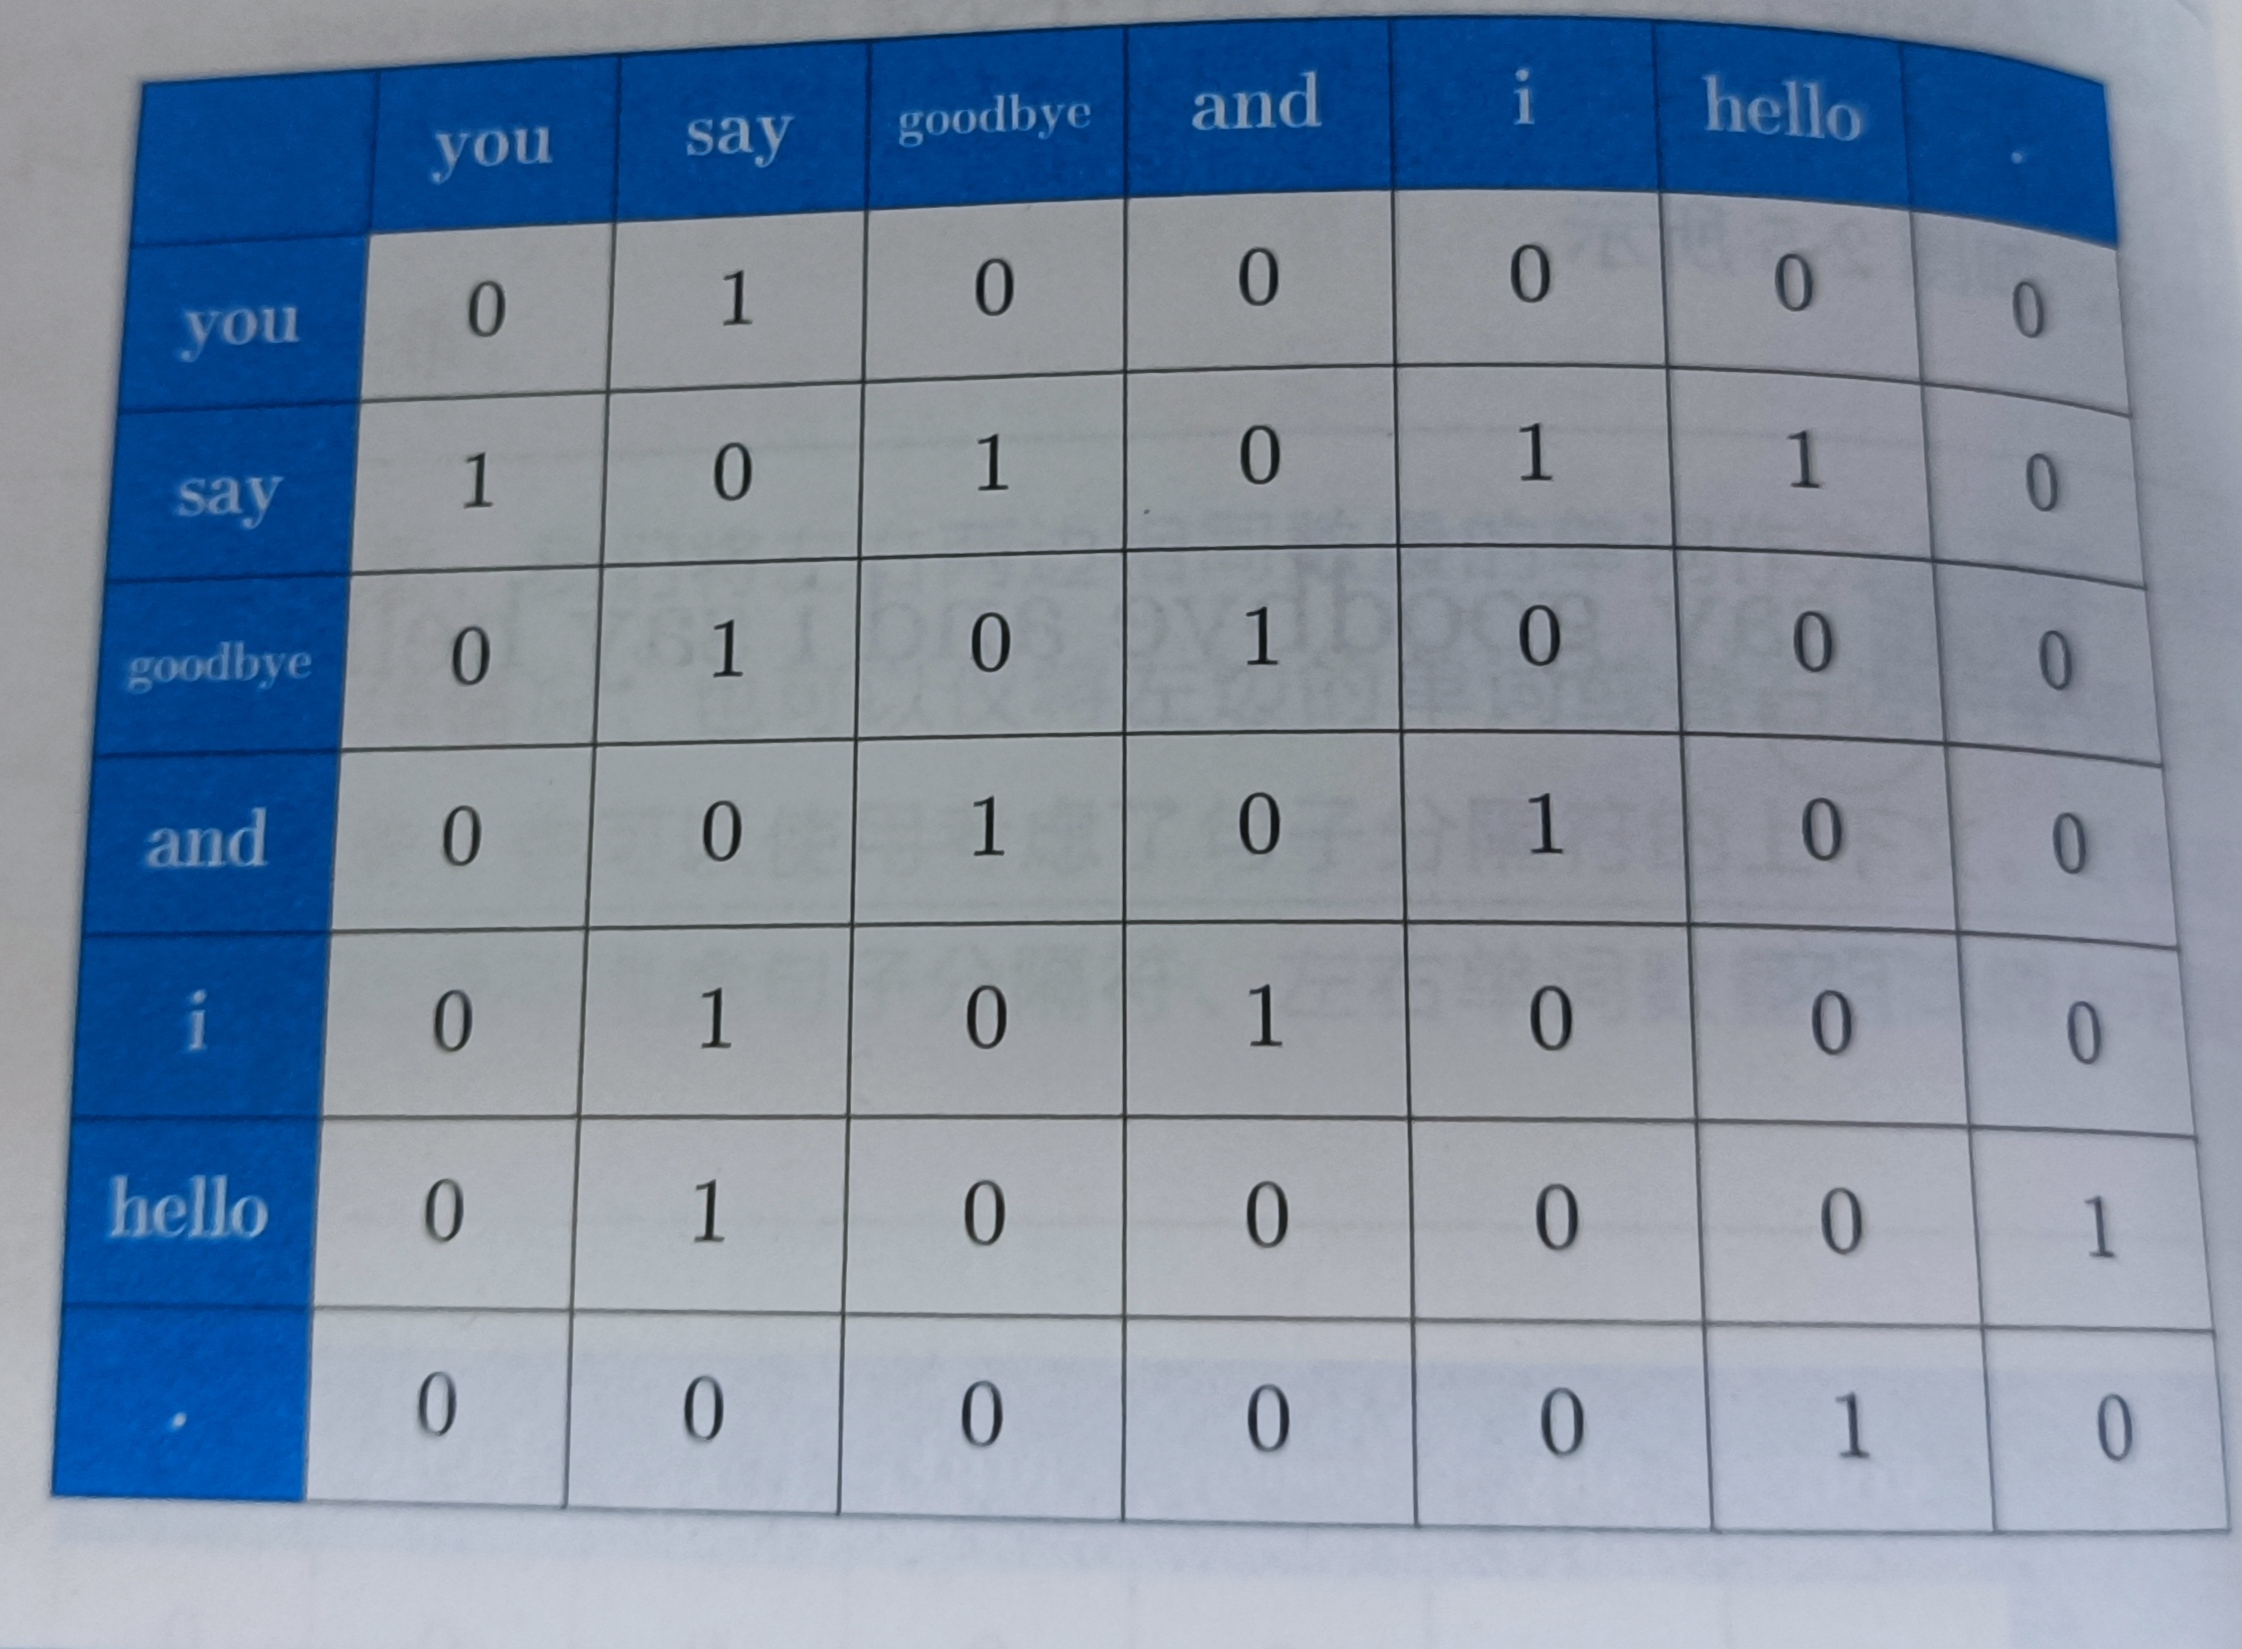
我们创建一个可以根据语料库生成(p72)
def create_co_matrix(corpus,vocab_size,window_size=1):
    corpus_size = len(corpus)
    co_matrix = np.zeros((vocab_size,vocab_size),dtype=np.int32)

    for idx,word_id in enumerate(corpus):
        for i in range(1,window_size+1):
            left_idx = idx - i
            right_idx = idx + i
            if left_idx >= 0:
                left_word_id = corpus[left_idx]
                co_matrix[word_id,left_word_id] += 1

            if right_idx < corpus_size:
                right_word_id = corpus[right_idx]
                co_matrix[word_id,right_word_id] += 1
    return matrix
2.3.5 向量间的相似度
p72
余弦相似度是最常用的,表示了“两个向量在多大程度上指向同一方向”,当两个向量完全指向相同的方向时,余弦相似度为1,完全指向相反的方向,余弦相似度指向-1
其中||x||表示范数,这里求的是L2范数,首先正则化,然后求它们的内积
代码实现(p73)
def cos_similarity(x,y):
    nx = x / np.sqrt(np.sum(x**2))
    ny = y / np.sqrt(np.sum(y**2))
    return np.dot(nx,ny)

# 改进版,防止除0

def cos_similarity(x,y,eps=1e-8):
    nx = x / (np.sqrt(np.sum(x**2)) + eps)
    ny = y / (np.sqrt(np.sum(y**2)) + eps)
    return np.dot(nx,ny)
利用这个函数,可以求得单词向量间的相似度,这里我们求you和i的相似度
text  = 'You say goodbye and I say hello.'
corpus,word_to_id,id_to_word = preprocess(text)
vocab_size = len(word_to_id)
C = create_co_matrix(corpus,vocab_size)

c0 = C[word_to_id['you']]
c1 = C[word_to_id['i']]
print(cos_similarity(c0,c1))

# 0.7071067691154799
2.3.6 相似单词的排序
p74
def most_similiar(query,word_to_id,id_to_word,word_matrix,top=5):
    # 取出查询词
    if query not in word_to_id:
        print('%s is not found' % query)
        return
    print('\n[query] ' + query)
    query_id = word_to_id[query]
    query_vec = word_matrix[query_id]

    # 计算余弦相似度
    vocab_size = len(id_to_word)
    similarity = np.zeros(vocab_size)
    for i in range(vocab_size):
        similarity[i] = cos_similarity(word_matrix[i],query_vec)


    # 基于余弦相似度,按降序输出值
    count = 0
    for i in (-1 * similarity).argsort():
        # 与自己做余弦相似度时,跳过
        if id_to_word[i] == query:
            continue
        print(' %s: %s' % (id_to_word[i],similarity[i]))

        count += 1
        if count >= top:
            return
- argsort()
x = np.array([100,-20,2])
x.argsort()
# array([1, 2, 0], dtype=int64)
(-x).argsort() # 负号表示反着来,就是降序
# array([0, 2, 1], dtype=int64)
显示和you最为相近的单词p76
import sys
sys.path.append('..')
from common.util import preprocess,create_co_matrix,most_similar

text = "you say goodbye and i say hello."
corpus,word_to_id,id_to_word = preprocess(text)

corpus
# array([0, 1, 2, 3, 4, 1, 5, 6])
word_to_id
#{'you': 0, 'say': 1, 'goodbye': 2, 'and': 3, 'i': 4, 'hello': 5, '.': 6}
id_to_word
#{0: 'you', 1: 'say', 2: 'goodbye', 3: 'and', 4: 'i', 5: 'hello', 6: '.'}

vocab_size = len(word_to_id)
C = create_co_matrix(corpus,vocab_size)

most_similar('you',word_to_id,id_to_word,C,top=5)
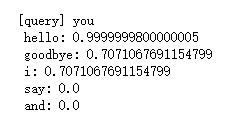
可以看出you和hello和goodbye和i最为接近
2.4 基于计数的方法的改进
2.4.1 点互信息
p77
通常我们会看到the car这样的短语,the和car共现的次数很大。但是并不意味着the和car的关联度就很高,drive相比the具有更高的关联度。但是如果只看短语出现的次数来认定它们之间的关联度就不太恰当,为了解决这个问题,可以用点互信息(PMI)。定义如下:
P(x,y)是联合概率,也可以写作P(x∩y)或者P(xy)

P(x),P(y)分别表示x和y发生的概率
PMI的值越高,表示相关性越高,这里举个例子:
语料库中一共有10000个词,the出现的次数是100,那么p("the")=\(\frac{100}{10000}=0.01\),假设the和car出现的次数是10,那么p("the","car") = \(\frac{10}{10000}=0.001\)
现在,使用共现矩阵C,来表示PMI,单词x和y共现次数表示为C(x,y),将x和y出现的次数分别表示为C(x),C(y)。带入PMI式子中得:
这里假设语料库(corpus)的数量(N)为10000,the出现1000次,car出现20次,drive出现10次,the和car共现10次,car和drive共现5次。如果只从共现的次数来看,the和car的相关性更高。如果从PMI的角度来看,就不一样
car和drive的相关性就比the高,但是有个问题是如果两个单词共现次数是0时,log20 = -∞。为了解决这个问题,我们会使用正的点互信息(PPMI)
代码实现
p79
def ppmi(C,verbose=False,eps=1e-8):
    # 创建一个和共现矩阵形状一样的全0矩阵
    M = np.zeros_like(C,dtype=np.float32)
    N = np.sum(C)
	print(N) # 14 N是共现矩阵的值
    S = np.sum(C,axis=0)
    total = C.shape[0] * C.shape[1]
    cnt = 0

    for i in range(C.shape[0]):
        for j in range(C.shape[1]):
            pmi = np.log2(C[i,j] * N / (S[j]*S[i]) + eps)
            M[i,j] = max(0,pmi)

            if verbose:
                cnt += 1
                if cnt % (total//100+1) == 0:
                    print('%.1f%% done' % (100*cnt/total))

    return M
- C
C是共现矩阵
- verbose
决定是否输出运行情况的标志,处理大语料库时,设置verbose=True
- C(x),C(y),C(x,y)
C(x) = \(\sum_{i}C(i,x)\),C(y) = \(\sum_{i}C(i,y)\),N = \(\sum_{i}\sum_{j}C(i,j)\),
import numpy as np
from common.util import preprocess,create_co_matrix,cos_similarity

text = "you say goodbye and i say hello."
corpus,word_to_id,id_to_word = preprocess(text)
vocab_size = len(word_to_id)
C = create_co_matrix(corpus,vocab_size)
W = ppmi(C)

np.set_printoptions(precision=3) # 有效位数为3位
print('covariance matrix')
print(C)
print('-'*50)
print('PPMI')
print(W)
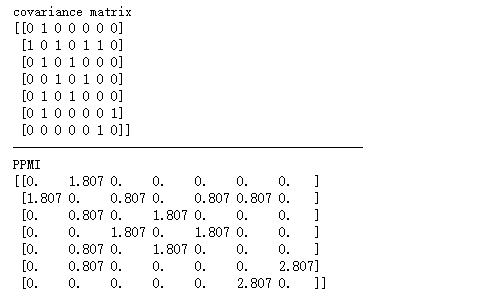
但是,PPMI还有问题是,PPMI矩阵会随着语料库的词汇量增加,单词向量的维数同样增加
2.4.2 降维
p81
减少维度,不是简单的减少,而是尽量保留“重要信息"的基础上减少。我们要观察数据的分布,从而找到重要的”轴“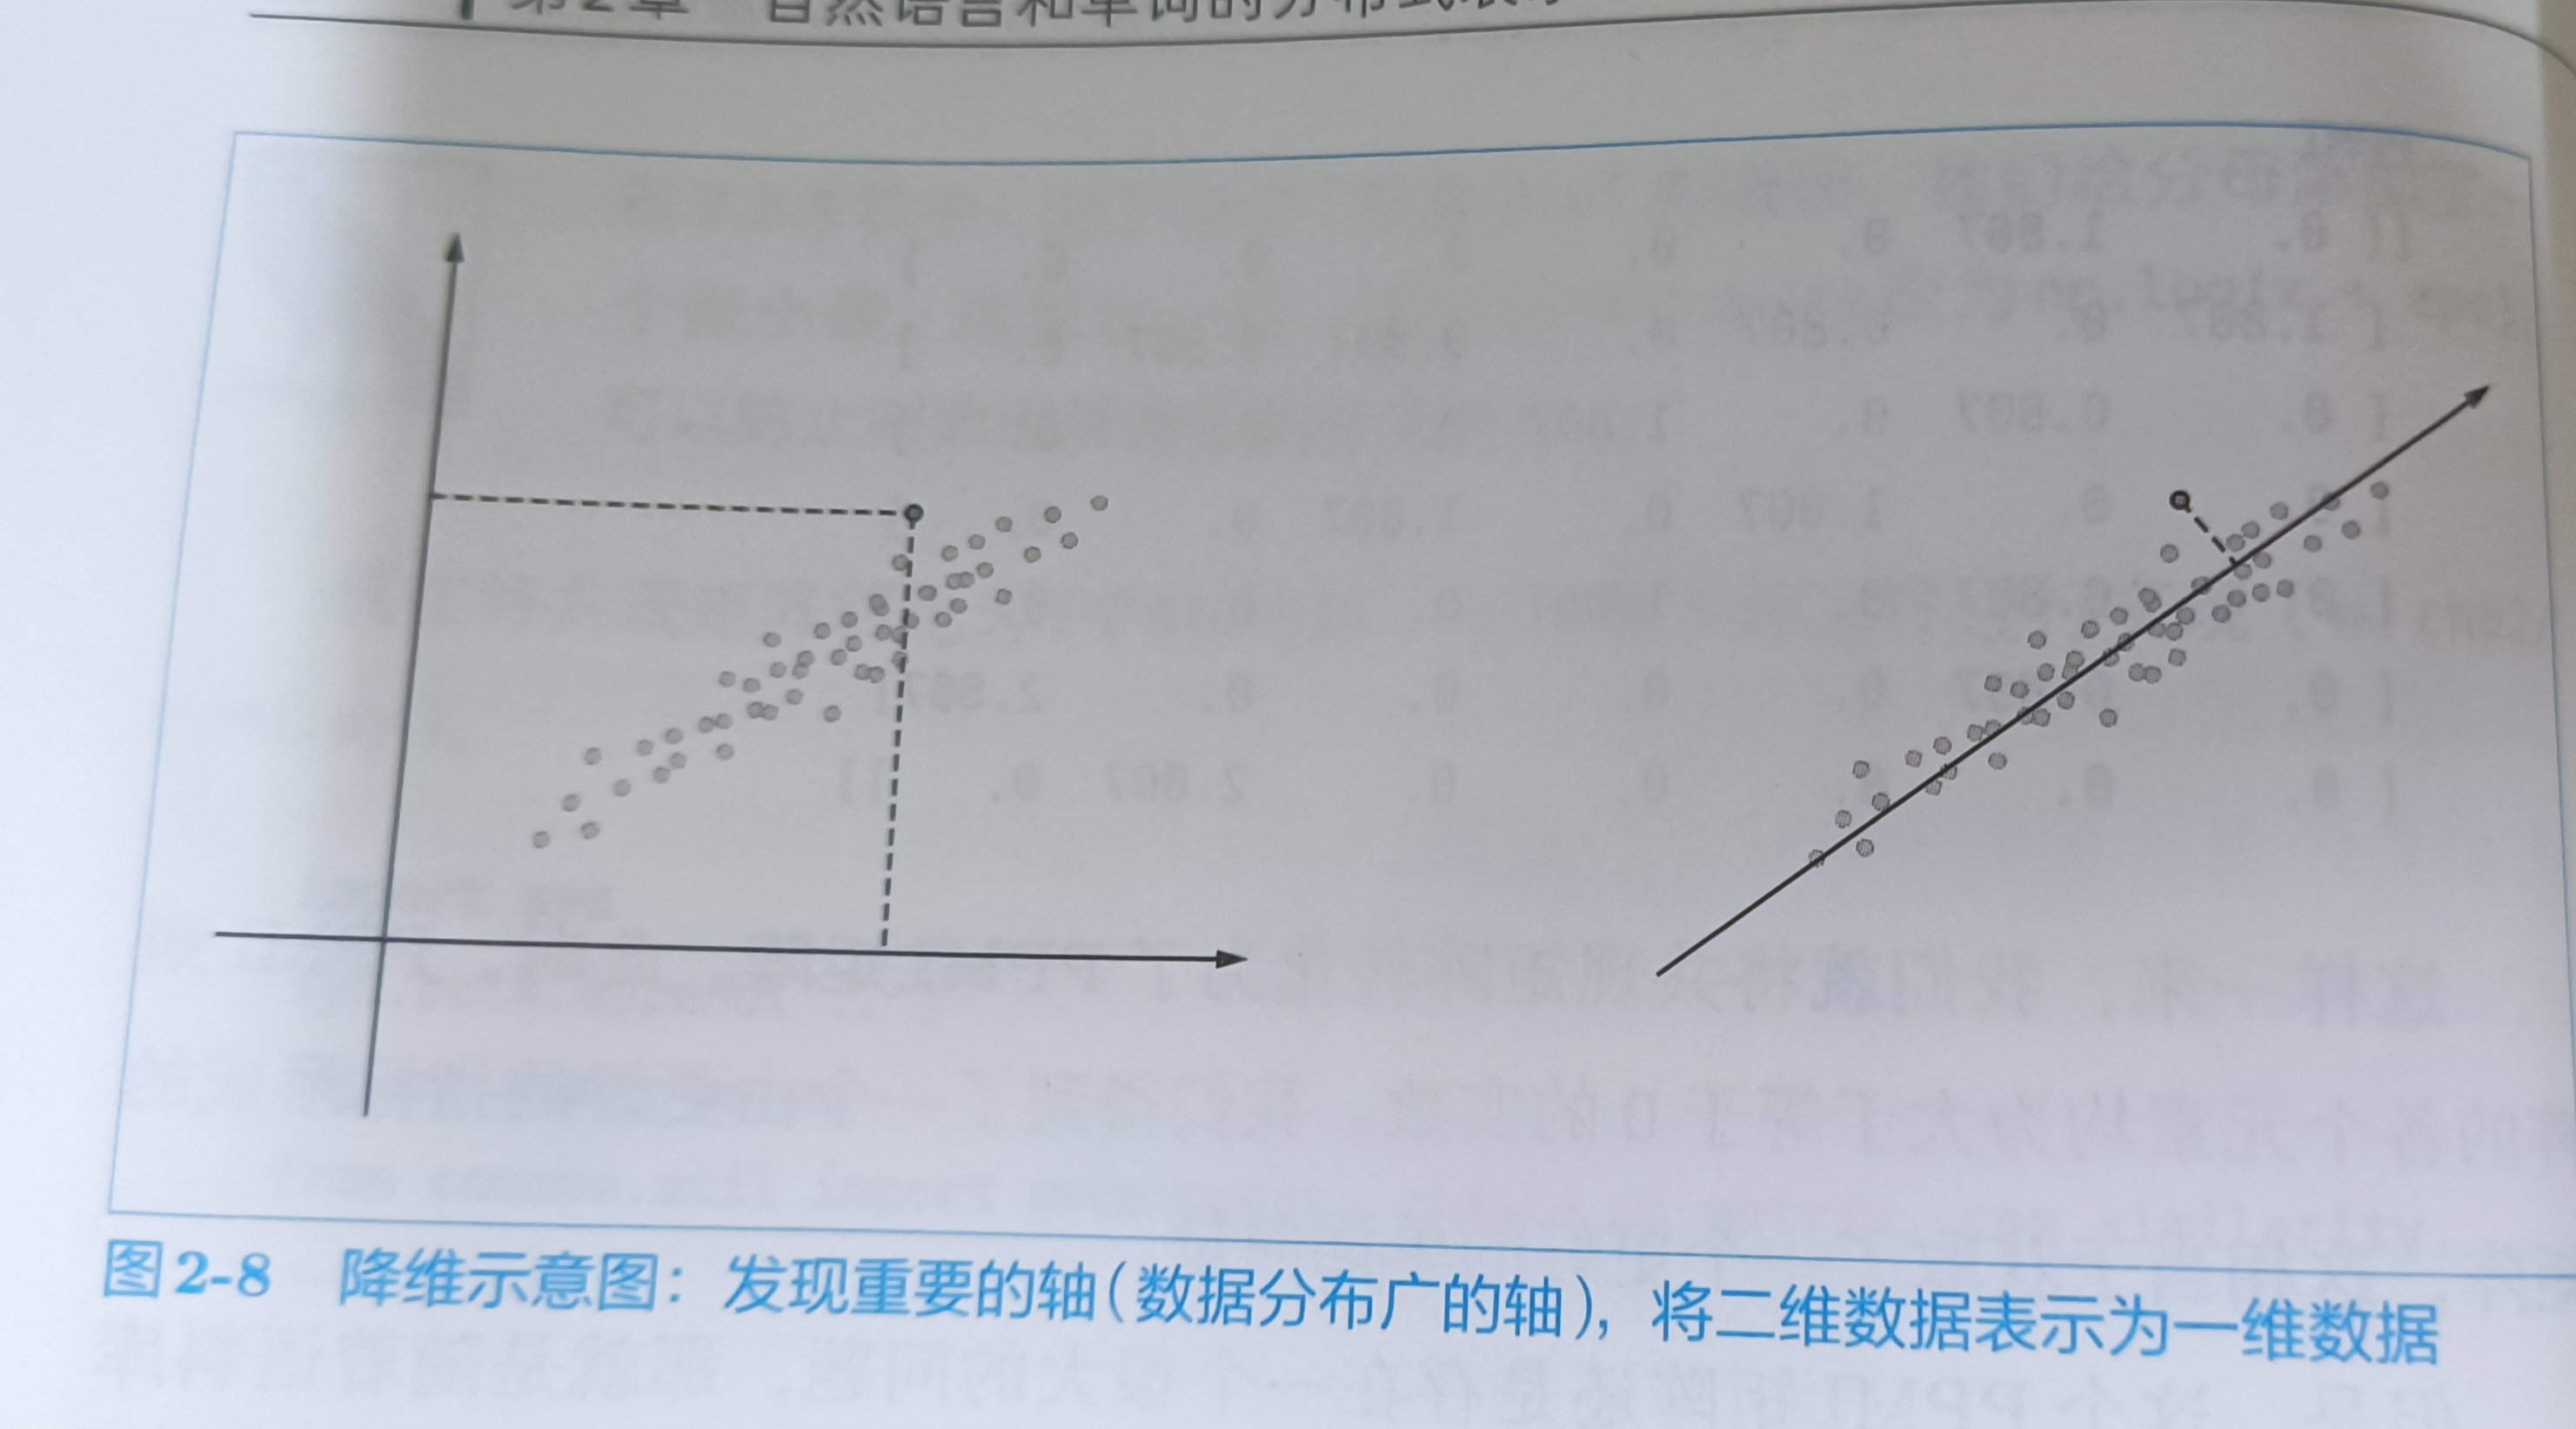
选择新轴是,需要考虑数据的广度,这样就可以用一维的值也能捕获数据的本质差异,在多维数据中,也可以进行同样的处理。
在稀疏矩阵中,要找出重要的轴,用更少的维度对其进行重新表示。结果,稀疏矩阵就会被转化成大多数元素均不为0的密集矩阵。这个密集矩阵就是单词的分布式表示。
降维的方法有很多,这里使用SVD(奇异值分解),将任何矩阵分解为3个矩阵的乘积。
SVD将任意的矩阵X分解为U、S、V这个3个矩阵的乘积,其中U和V是列向量相互正交的正交矩阵,S是除了对角线元素以外均为0的对角矩阵
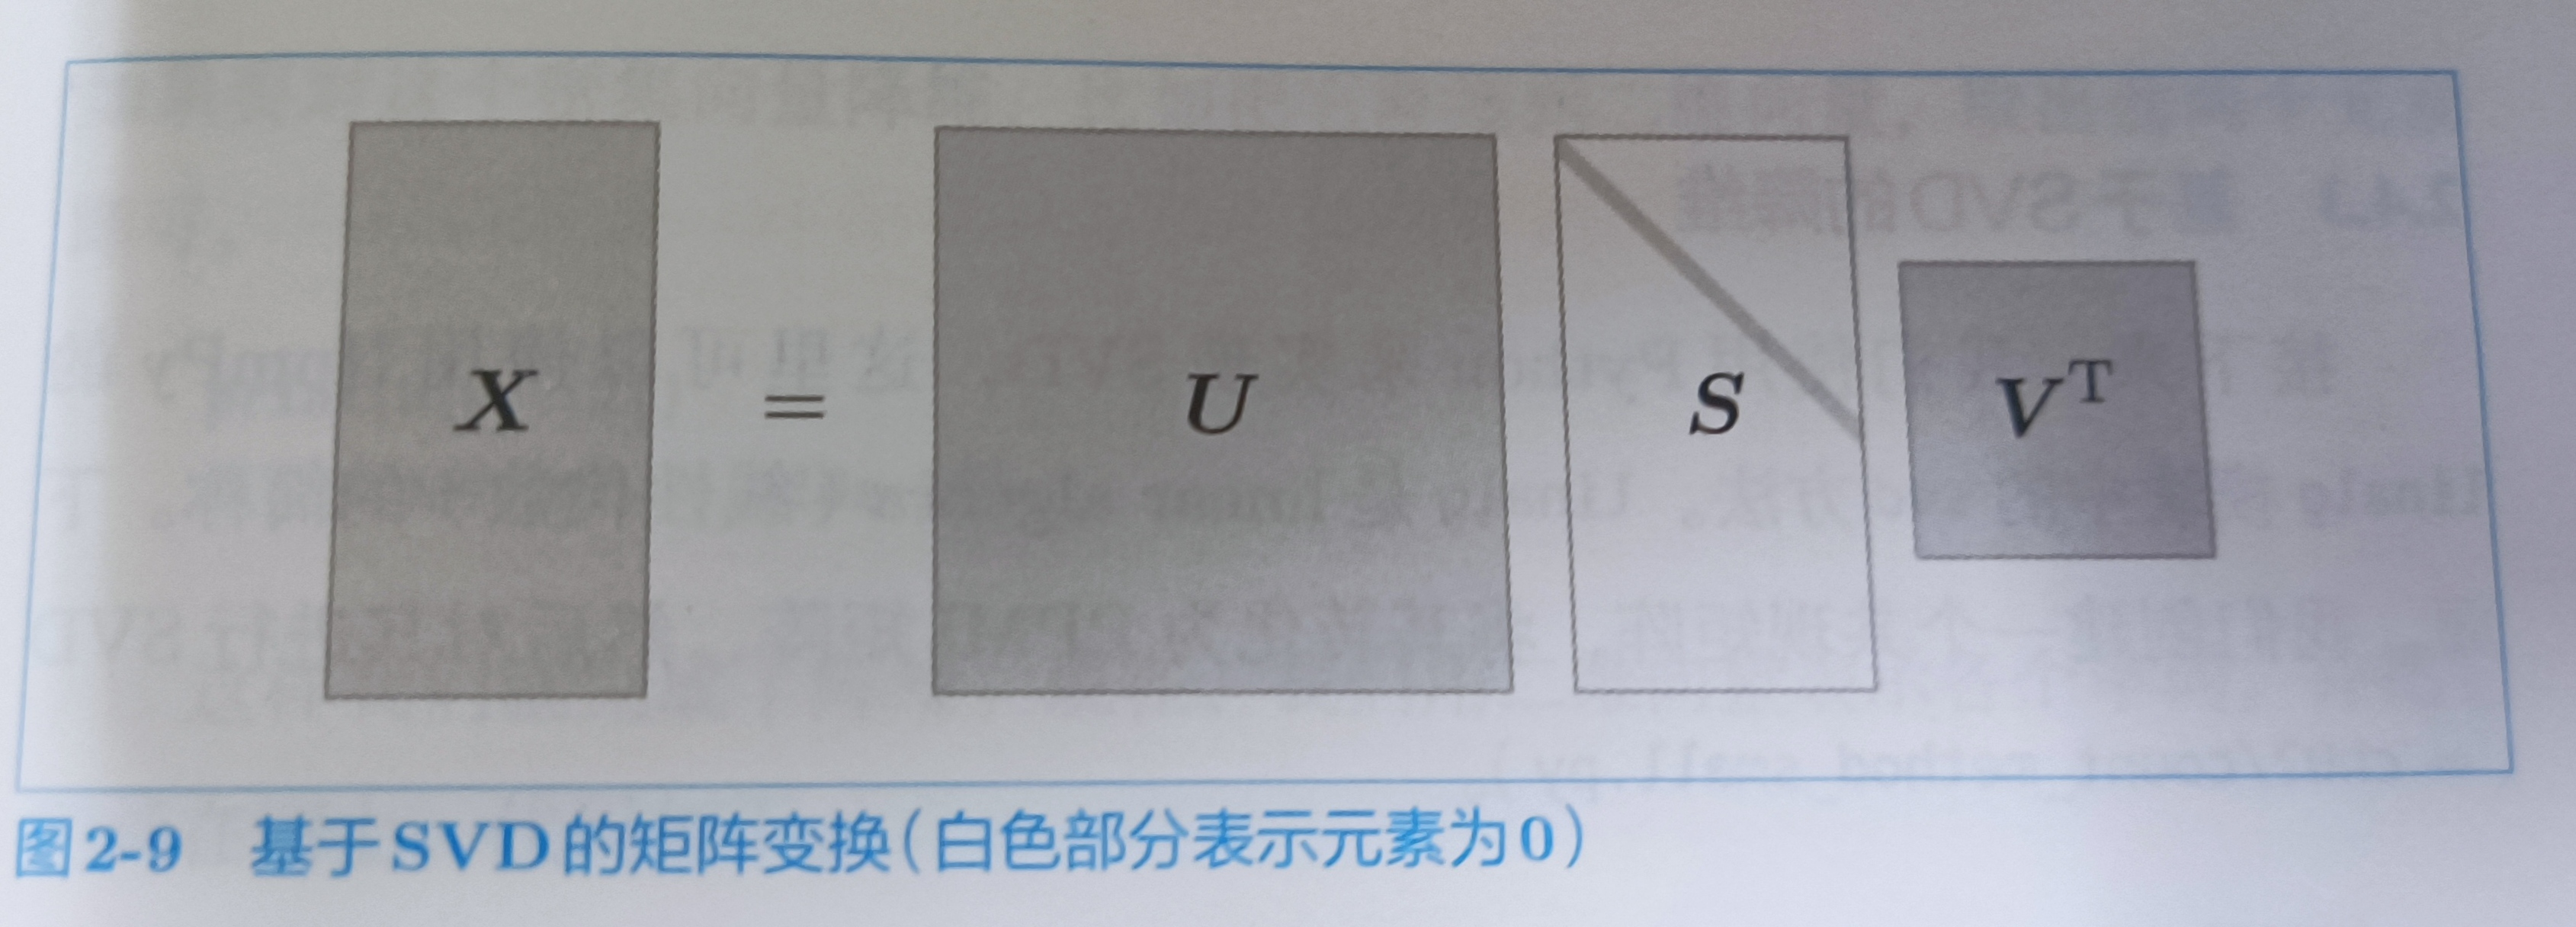
U是正交矩阵。这个正交矩阵构成了一些空间中的基轴(基向量),把U称为“单词空间”。S是对角矩阵,奇异值在对角线上降序排列。简单说,可以将奇异值视为“对应的基轴”
- 基向量
基向量是这个向量空间里最最基本的组成部分【因为基向量必定线性无关】,由这部分可以表示该向量空间的每一个向量,不就是母体嘛
- 奇异值
可以理解奇异值为矩阵中重要信息,其重要程度与奇异值大小息息相关
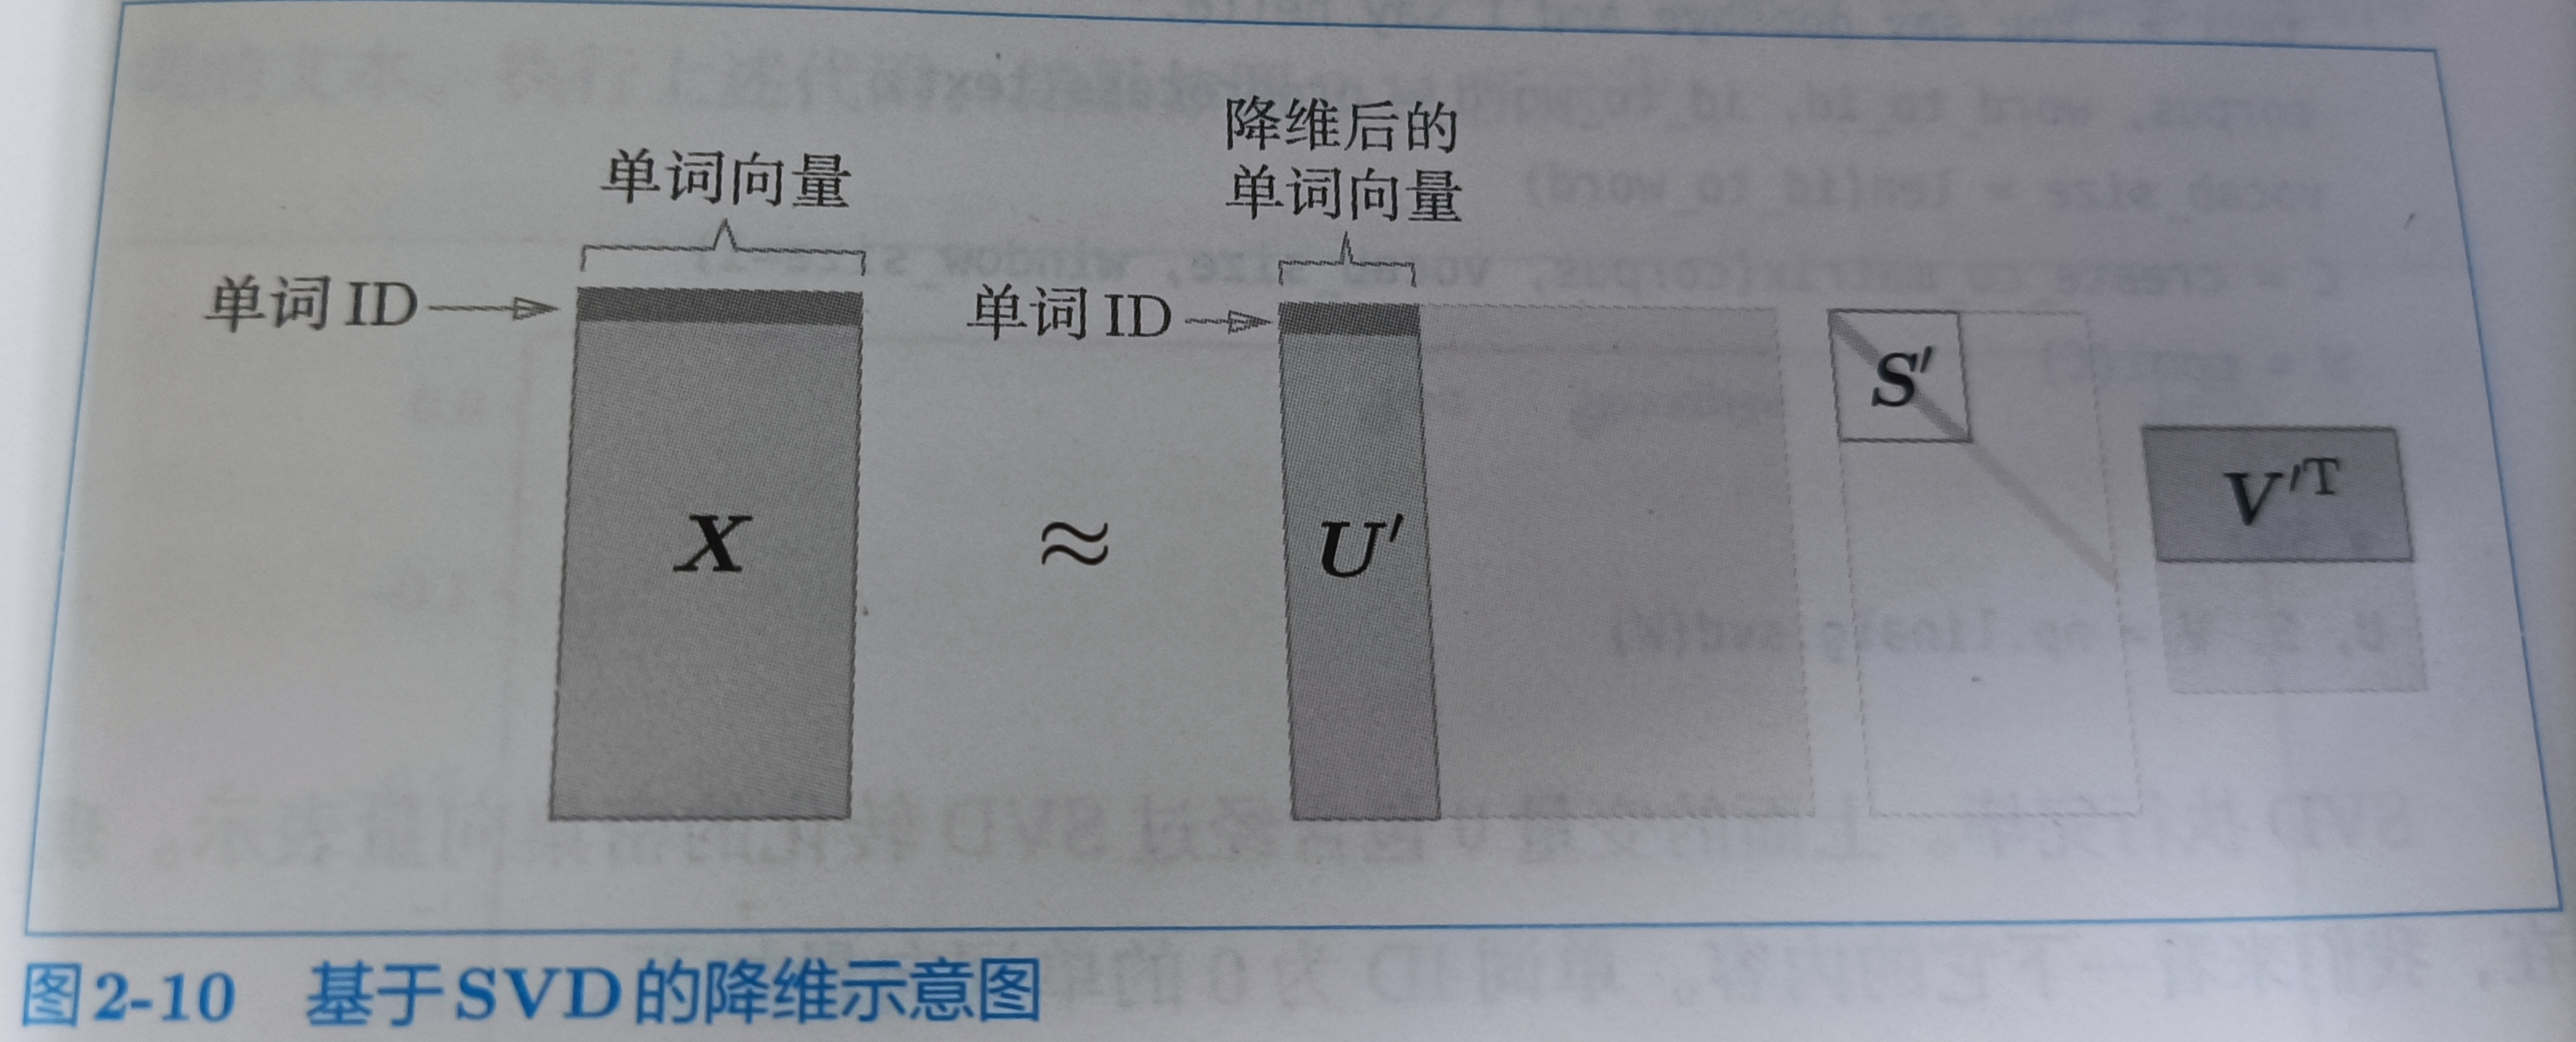
矩阵的S的奇异值越小,对应的基轴的重要性越低,因此,可以通过去出矩阵U中多余的列向量来近似原始矩阵(如果饶话,可以看这个链接奇异值的物理意义是什么? - 知乎 (zhihu.com),看为什么图片越来越清晰)
2.4.3 基于SVD的降维
p84
import numpy as np
import matplotlib.pyplot as plt
from common.util import preprocess,create_co_matrix,ppmi

text  = 'You say goodbye and I say hello.'
corpus,word_to_id,id_to_word = preprocess(text)
vocab_size = len(id_to_word)
# 共现矩阵
C = create_co_matrix(corpus,vocab_size,window_size=1)
W = ppmi(C)

# SVD
U,S,V = np.linalg.svd(W)
共现矩阵
print(C[0])
# [0 1 0 0 0 0 0]
ppmi矩阵
print(W[0])
# [0.        1.8073549 0.        0.        0.        0.        0.       ]
SVD
print(U[0])
# [-1.1102230e-16  3.4094876e-01 -1.2051624e-01 -3.8857806e-16
#  0.0000000e+00 -9.3232495e-01  8.7683712e-17]
稀疏向量W[0]经过SVD被转换成了密集向量U[0],如果要对这个密集向量降维,比如把它降维到二维向量,取出前两个元素即可
print(U[0,:2])
# [-1.1102230e-16  3.4094876e-01]
这样我们完成了降维,现在,我们用二维向量表示各个单词
for word,word_id in word_to_id.items():
    plt.annotate(word,(U[word_id,0],U[word_id,1]))

plt.scatter(U[:,0],U[:,1],alpha=0.5)
plt.show()
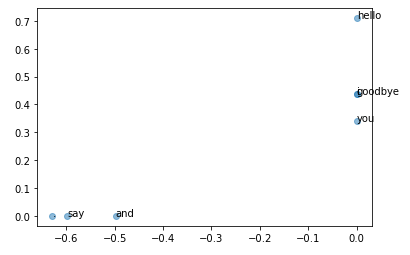
- plt.annotate(word,x,y)
在坐标(x,y)处,绘制单词的文本
- plt.scatter()
散点图
2.4.4 PTB数据集
PTB语料库中,多了若干预处理,包括将稀有单词替换成特殊字符
from dataset import ptb

corpus,word_to_id,id_to_word = ptb.load_data('train')

print('corpus size:',len(corpus))
print('corpus[:30]:',corpus[:30])
print()
print('id_to_word[0]:',id_to_word[0])
print('id_to_word[1]:',id_to_word[1])
print('id_to_word[2]:',id_to_word[2])
print()
print("word_to_id['car']:",word_to_id['car'])
print("word_to_id['happy']:",word_to_id['happy'])
print("word_to_id['lexus']:",word_to_id['lexus'])

- plt.load_data()
使用plt.load_data()加载数据时,需要指定参数'train','test','valid'
2.4.5 基于PTB数据集的评价
p88
corpus,word_to_id,id_to_word = ptb.load_data('train')
vocab_size = len(word_to_id)

print(corpus.shape) # (929589,)
print(len(word_to_id)) # 10000

print('counting co-occurrence .....')
C = create_co_matrix(corpus,vocab_size,window_size)
print(C.shape) # (10000, 10000)

print('calculating PPMI .....')
W = ppmi(C,verbose=True)

print('calculating SVD ...')
try:
    # 使用truncated SVD更快
    from sklearn.utils.extmath import randomized_svd
    U,S,V = randomized_svd(W,n_components=wordvec_size,n_iter=5,random_state=None)

except ImportError:
    # SVD比上面的慢些
    U,S,V = np.linalg.svd(W)

# 取出U中较大的基轴
word_vecs = U[:,:wordvec_size]
print('-----word_vecs-------------')
print(word_vecs.shape) # (10000, 100)

querys = [ta']
for query in querys:
   	# most_similar的作用是,将query转换为词向量和PPMI矩阵(奇异值分解后)做余弦相似度
    most_similar(query,word_to_id,id_to_word,word_vecs,top=5)
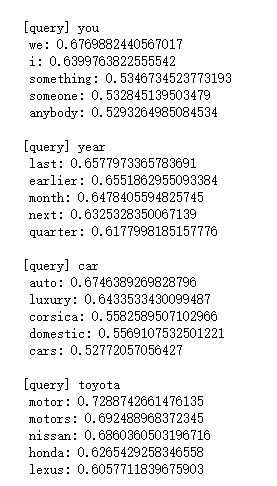
将单词含义编码成向量,基于语料库,计算单词出现次数,然后转成PPMI矩阵,再基于SVD降维得到的单词向量,这就是单词的分布式表示。
总结
- 基于同义词词典的方法,费时费力,且不能表示单词之间细微的差别
- 基于计数的方法,从语料库中自动提取单词含义,并将其表示为向量,首先先创建共现矩阵,将其转换成PPMI矩阵,再基于SVD降维得到单词的分布式表示
3. word2vec
p93
这里使用的word2vec是基于计数方法的改进版,是基于推理的方法,这里的推理机制使用的是神经网络
3.1 基于推理的方法和神经网络
p93
3.1.1 基于计数的方法的问题
p94
现实中,语料库处理的单词数量非常大,比如英文单词可能在100万,基于计数的方法要创建一个100万×100万的庞大矩阵,这么庞大的矩阵对执行SVD显然是不现实的。
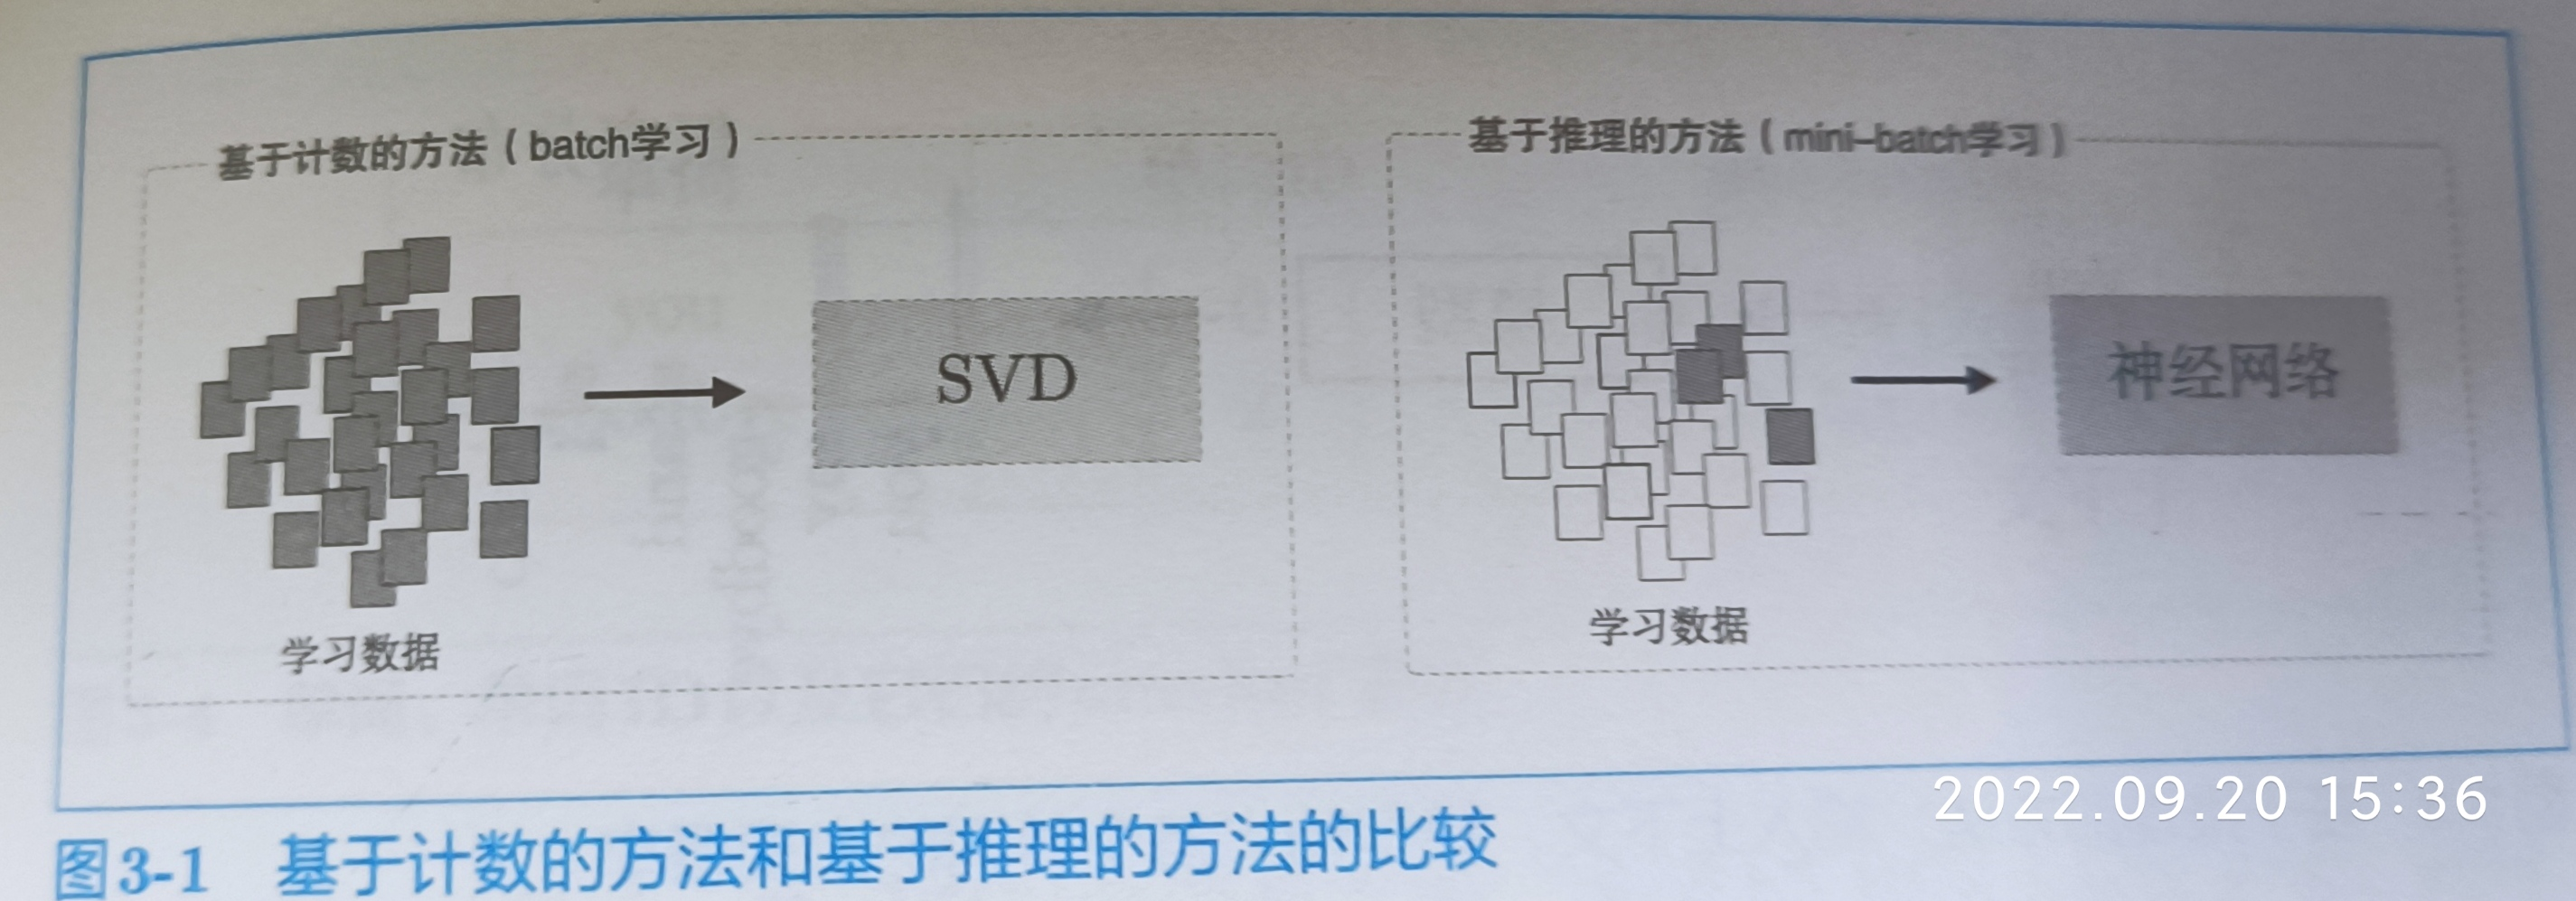
基于计数的方法一次性处理全部学习数据,基于推理的方法通常在mini-batch数据上进行学习。这意味着神经网络一次只需要看一部分学习数据(mini-batch),并反复更新权重,逐步学习。神经网络的学习可以使用多台机器,多个GPU并行执行,加速学习过程
3.1.2 基于推理的方法的概要
p95
基于推理的方法的主要操作是“推理”。例如,给出上下文,预测?处出现什么单词。

基于推理的方法,引入某种模型,这个模型接收上下文信息作为输入,并输出可能的单词的出现概率
3.1.3 神经网络中单词的处理方法
p96
神经网络无法直接这些单词,需要先将单词转换成固定长度的向量
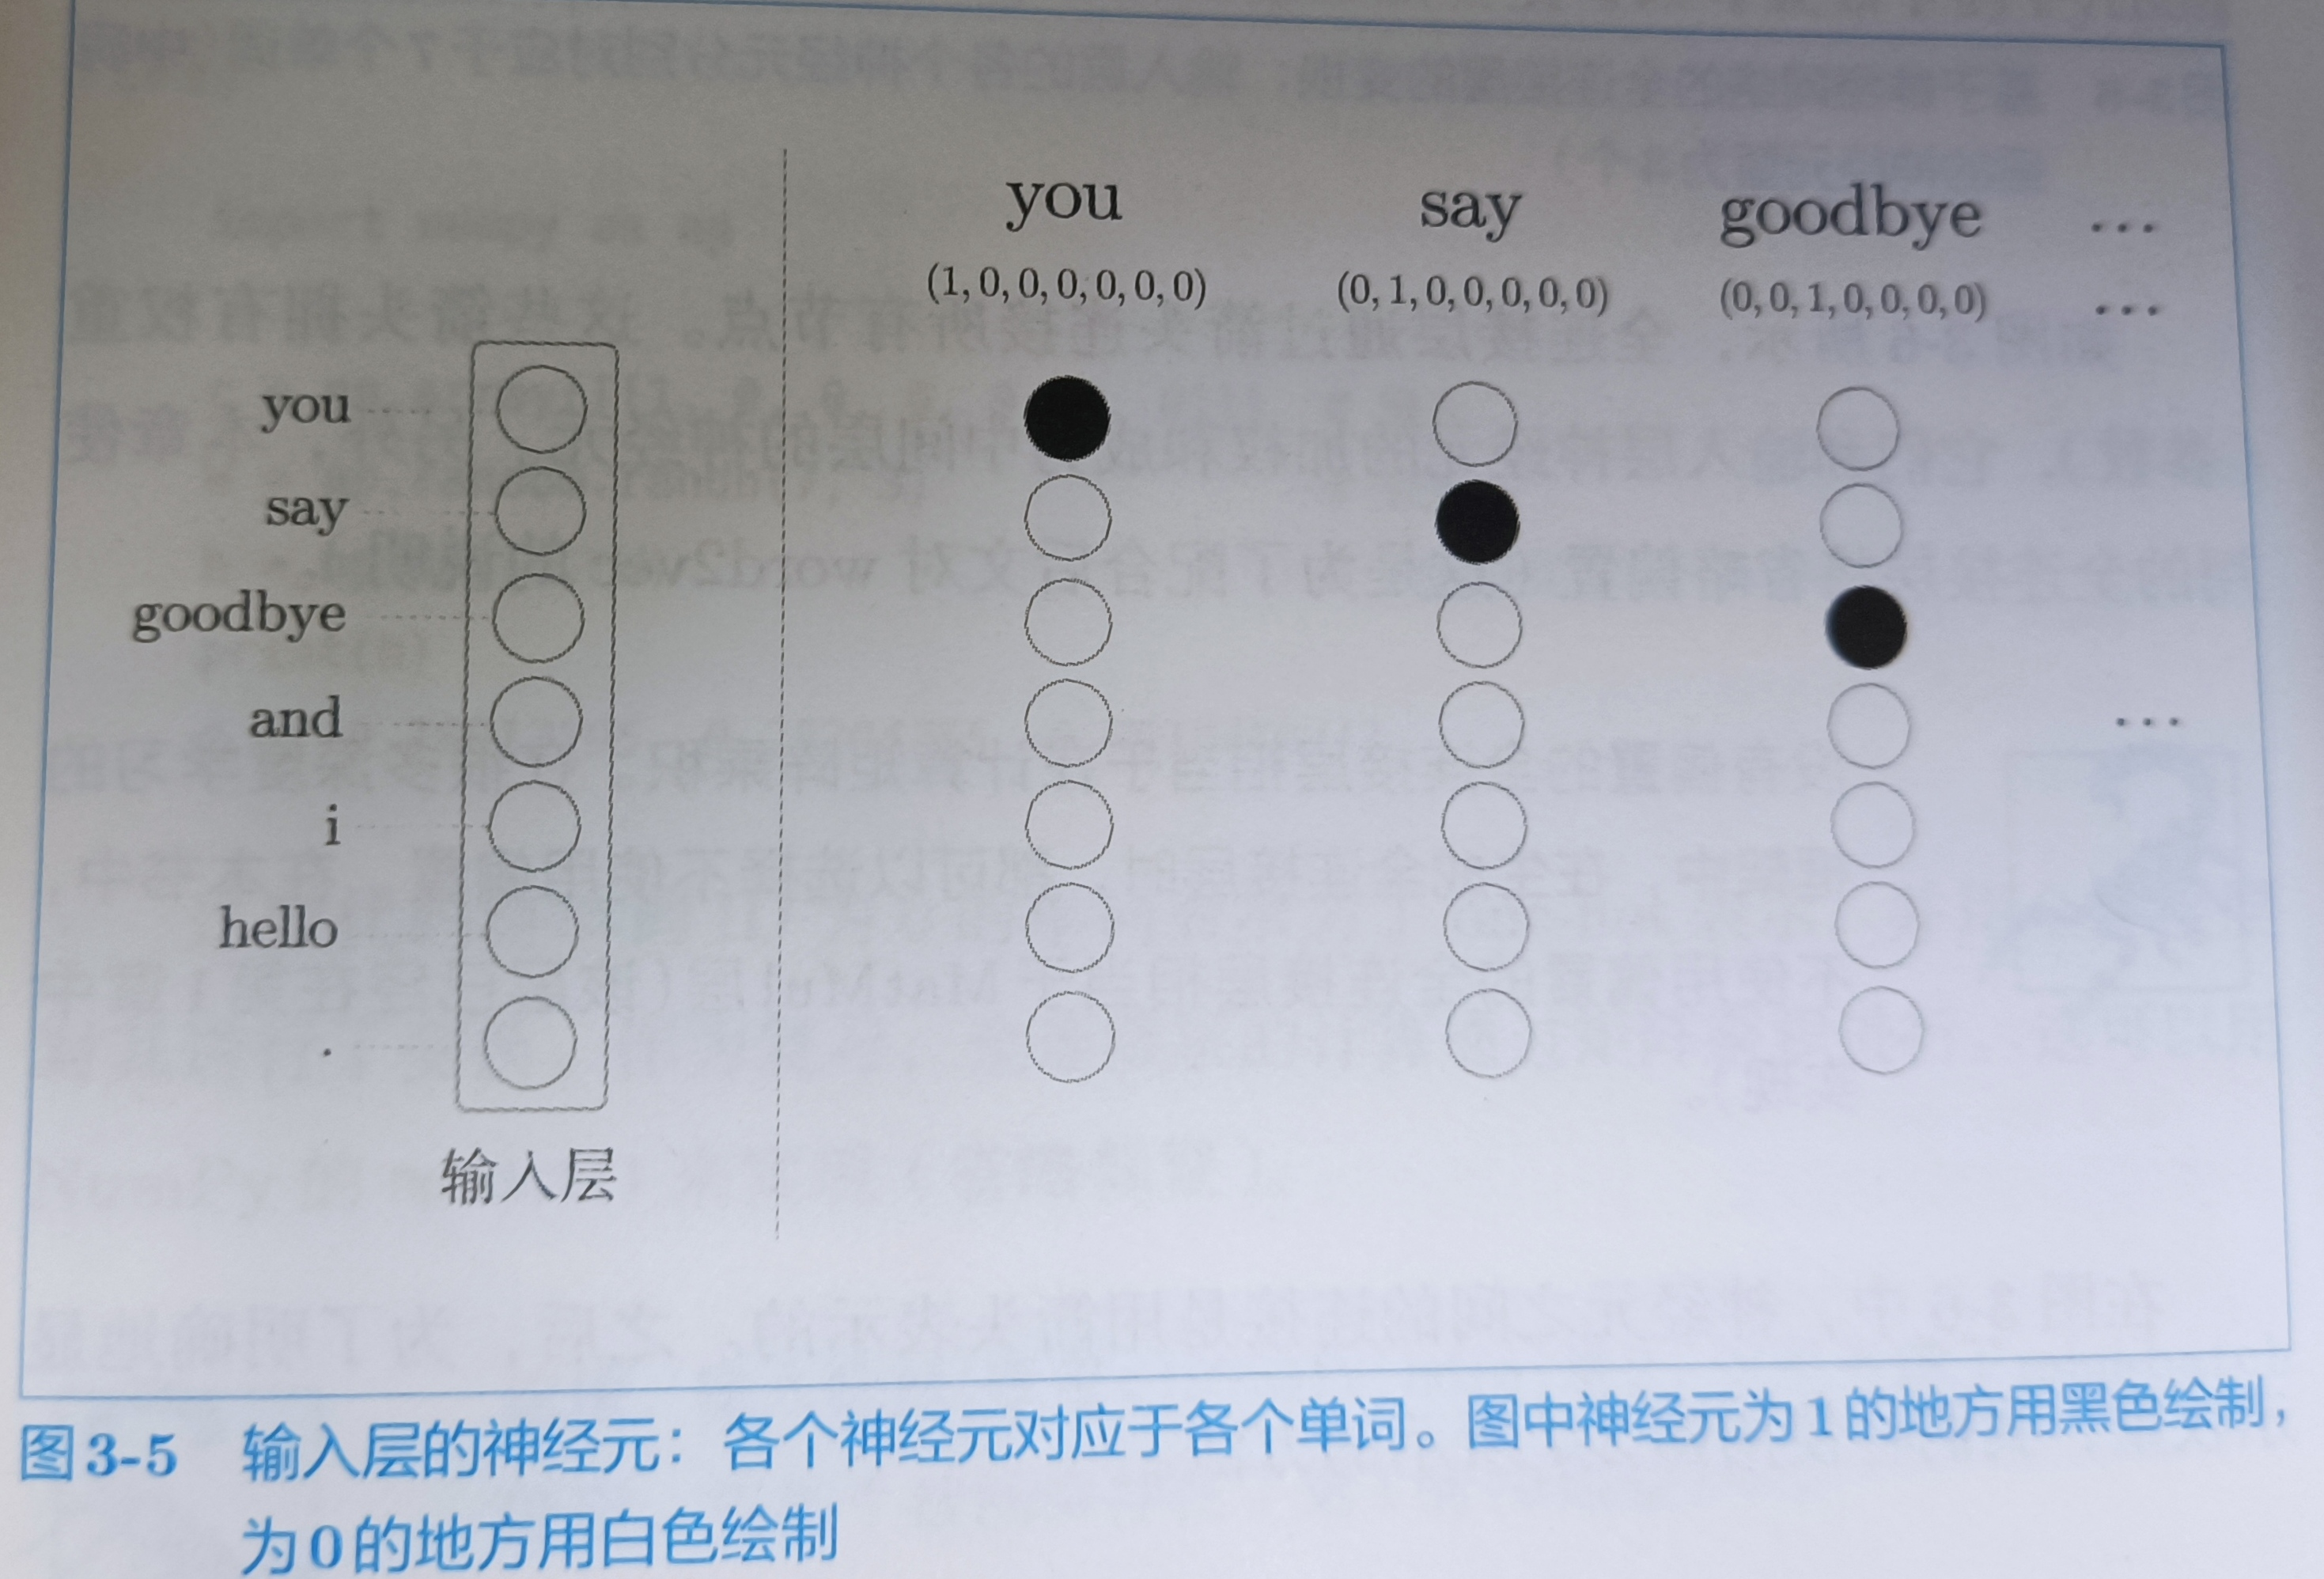
输入层由7个神经元表示,分别对应7个单词(第一个神经元对应于you,第二个对应于say)
3.2 简单的word2vec
p101
3.2.1 CBOW模型的推理
p101
CBOW模型是根据上下文预测目标词的神经网络(目标词是指中间的单词,它周围的单词是“上下文”)。CBOW模型的输入是上下文。这个上下文用['you','goodbye'](?处上下文单词是you和goodbye)这样的单词列表表示。我们将其表示为one-hot表示。CBOW模型的网络可以画成下图
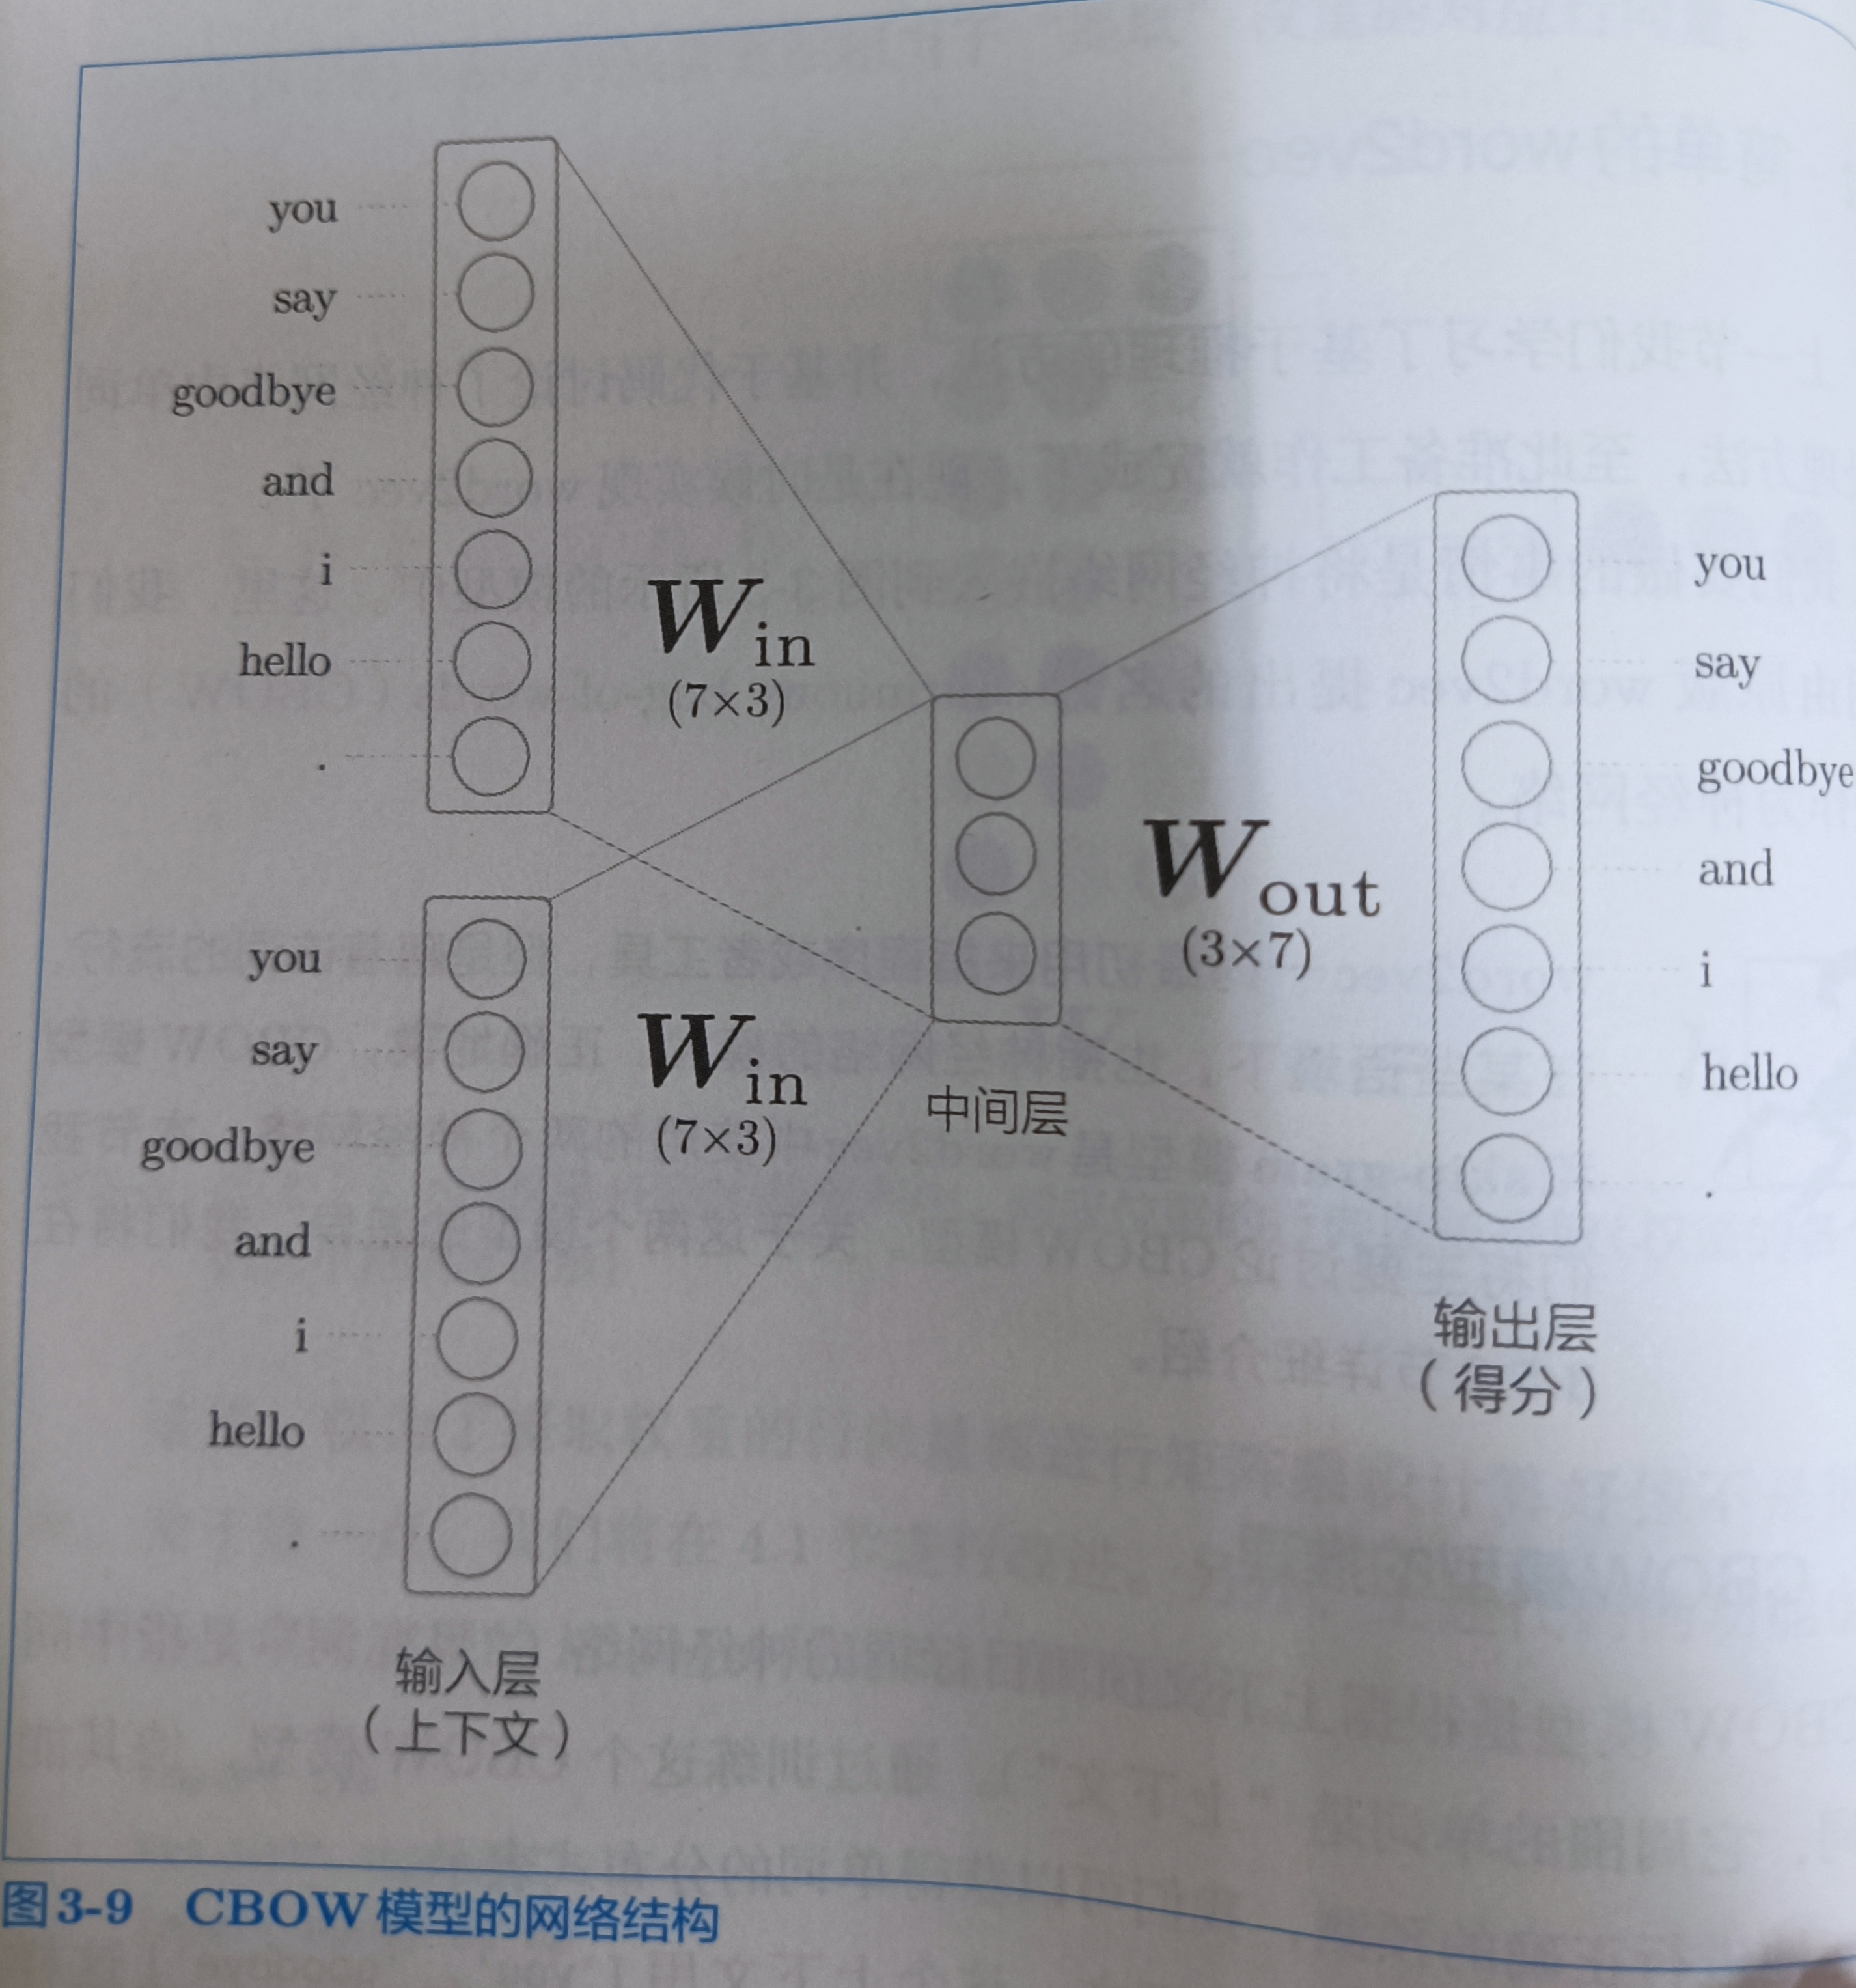
因为,这里上下文仅考虑两个单词,所以输入层有两个。如果对上下文考虑N个单词,则输入层由N个。
这个中间层神经元是各个输入层经全连接层变换后得到的值的“平均”。输出层就是各个单词的得分。值越大,出现概率越高。
从输入层到中间层的变换由全连接层(权重是Win)完成。此时,全连接层的权重Win是一个7×3的矩阵。这个矩阵就是单词的分布式表示
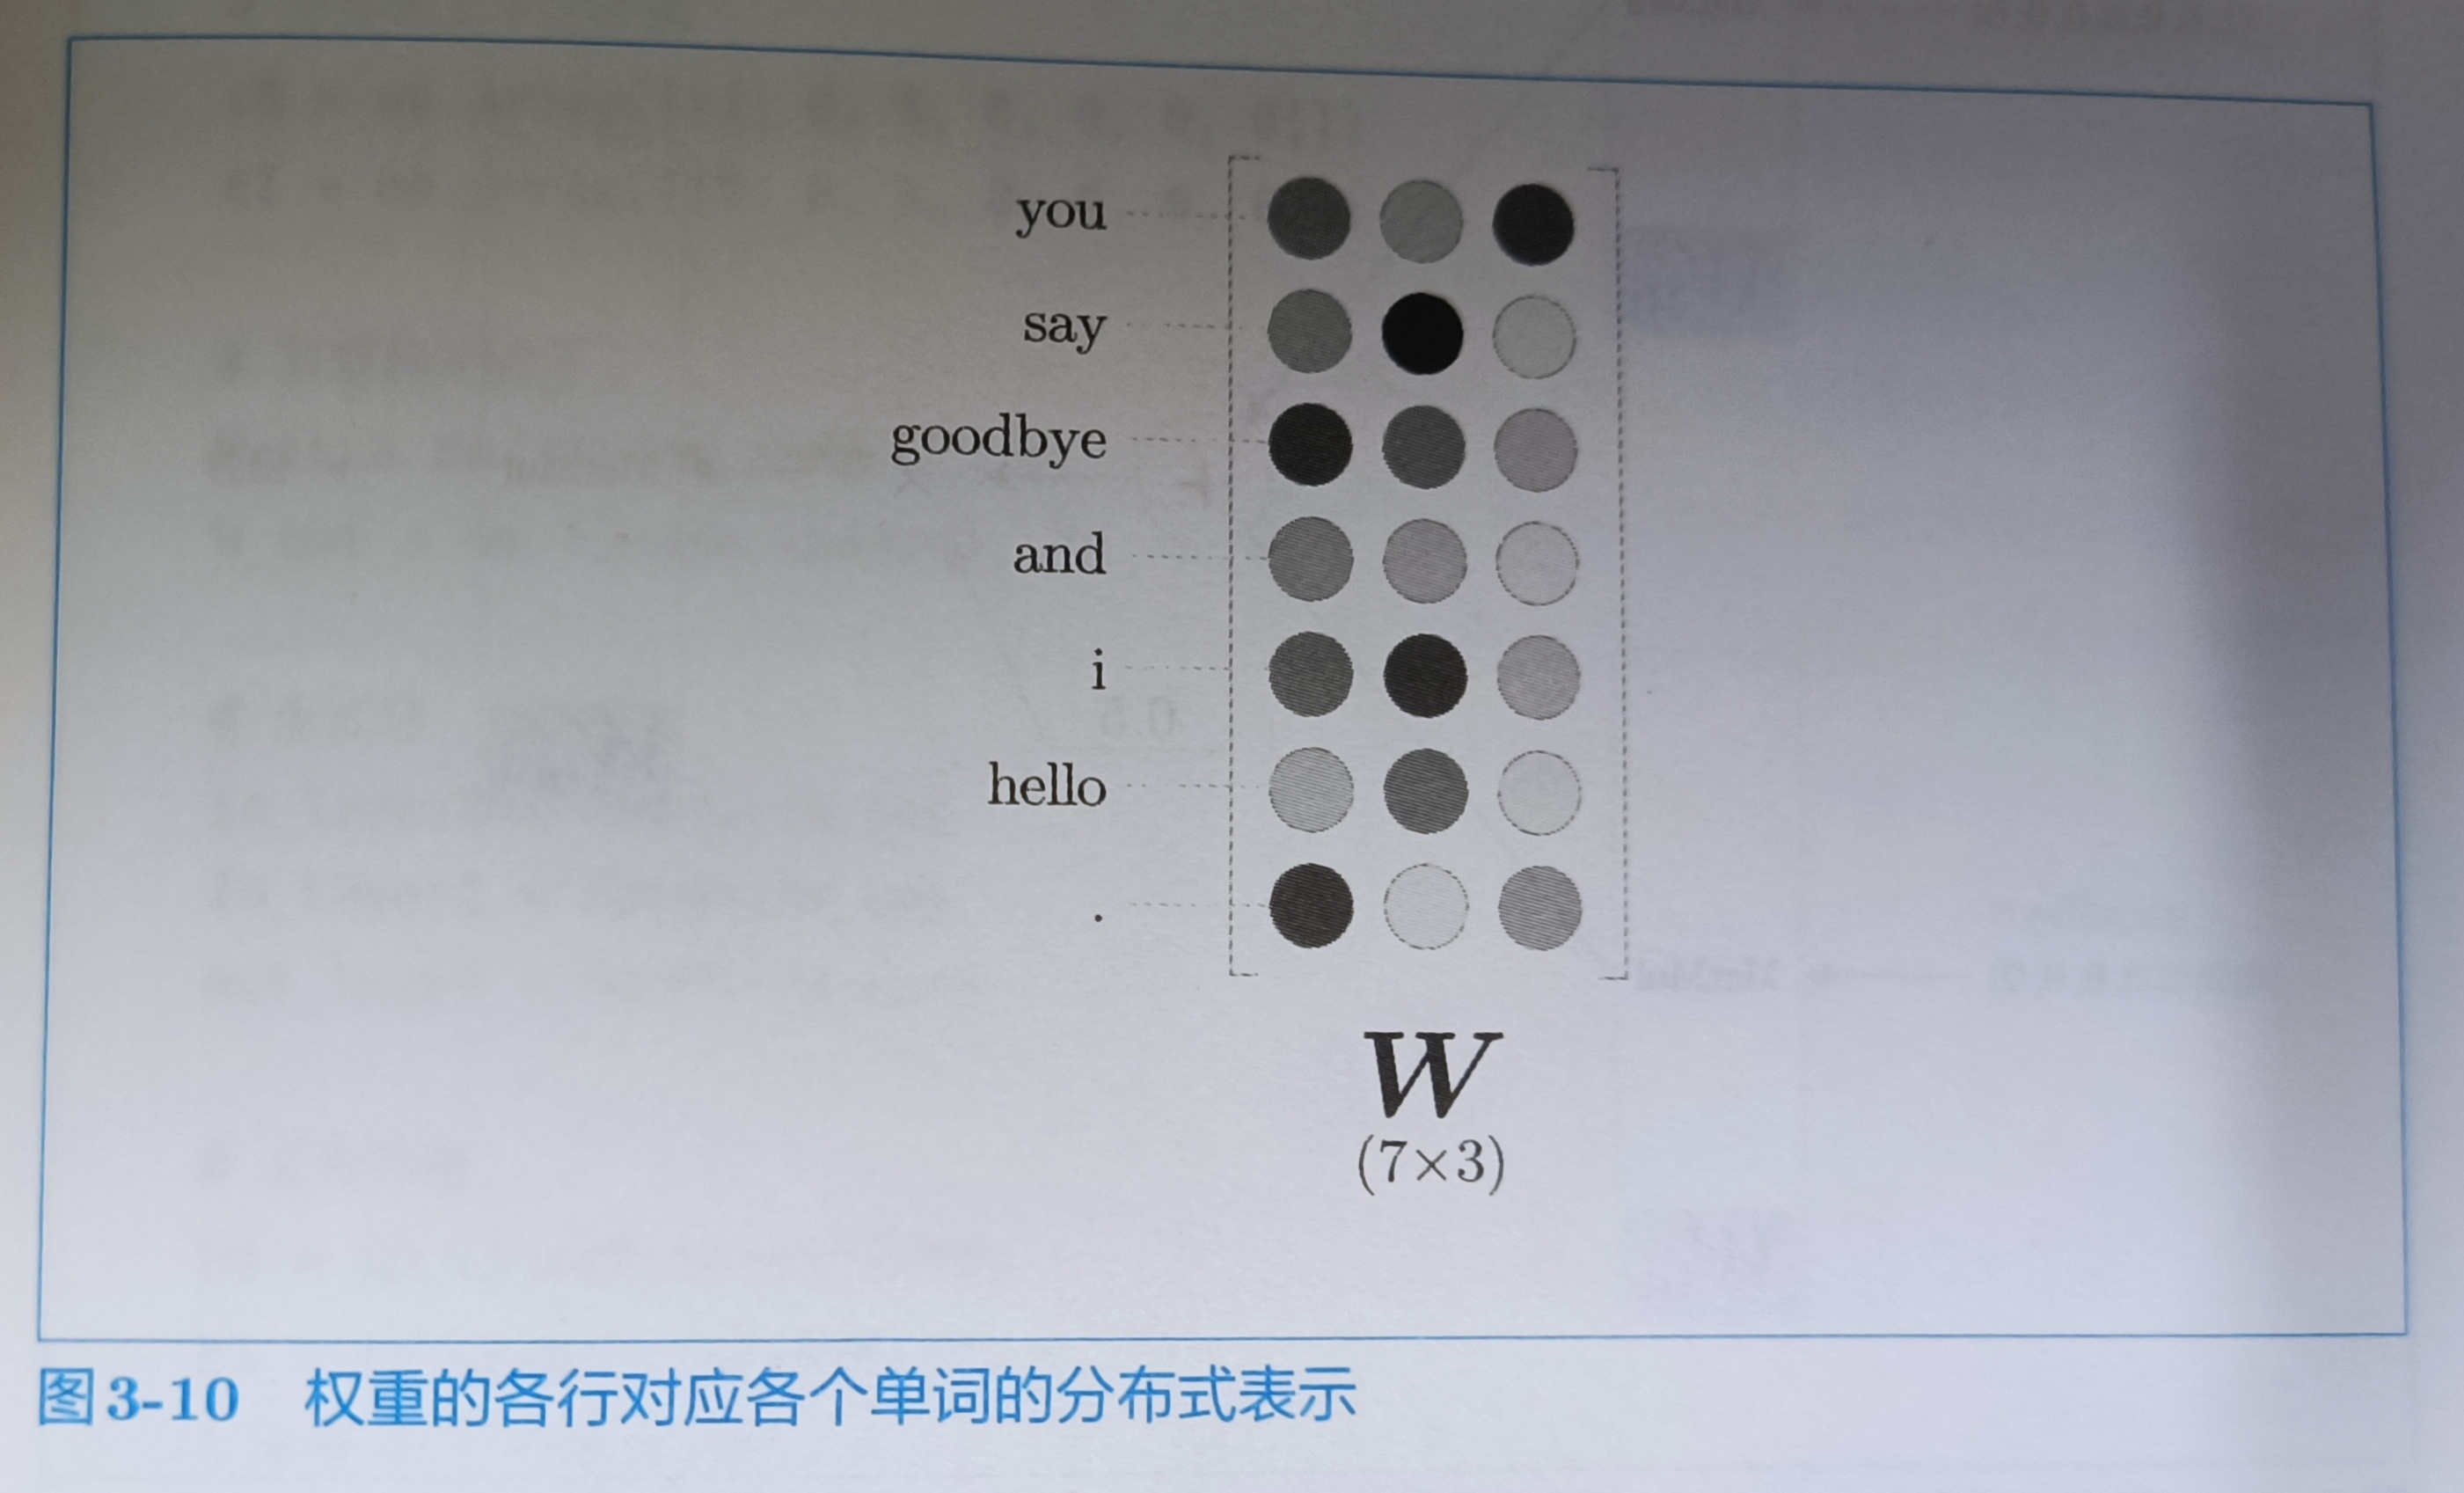
如上图所示,权重Win的各行保存着各个单词的分布式表示。通过不断学习,不断更新单词的分布式表示。就是word2vec的全貌。
中间层的神经元数量比如输入层少,这一点很重要,中间层需要将预测单词所需的信息压缩保存,从而产生密集的向量表示。
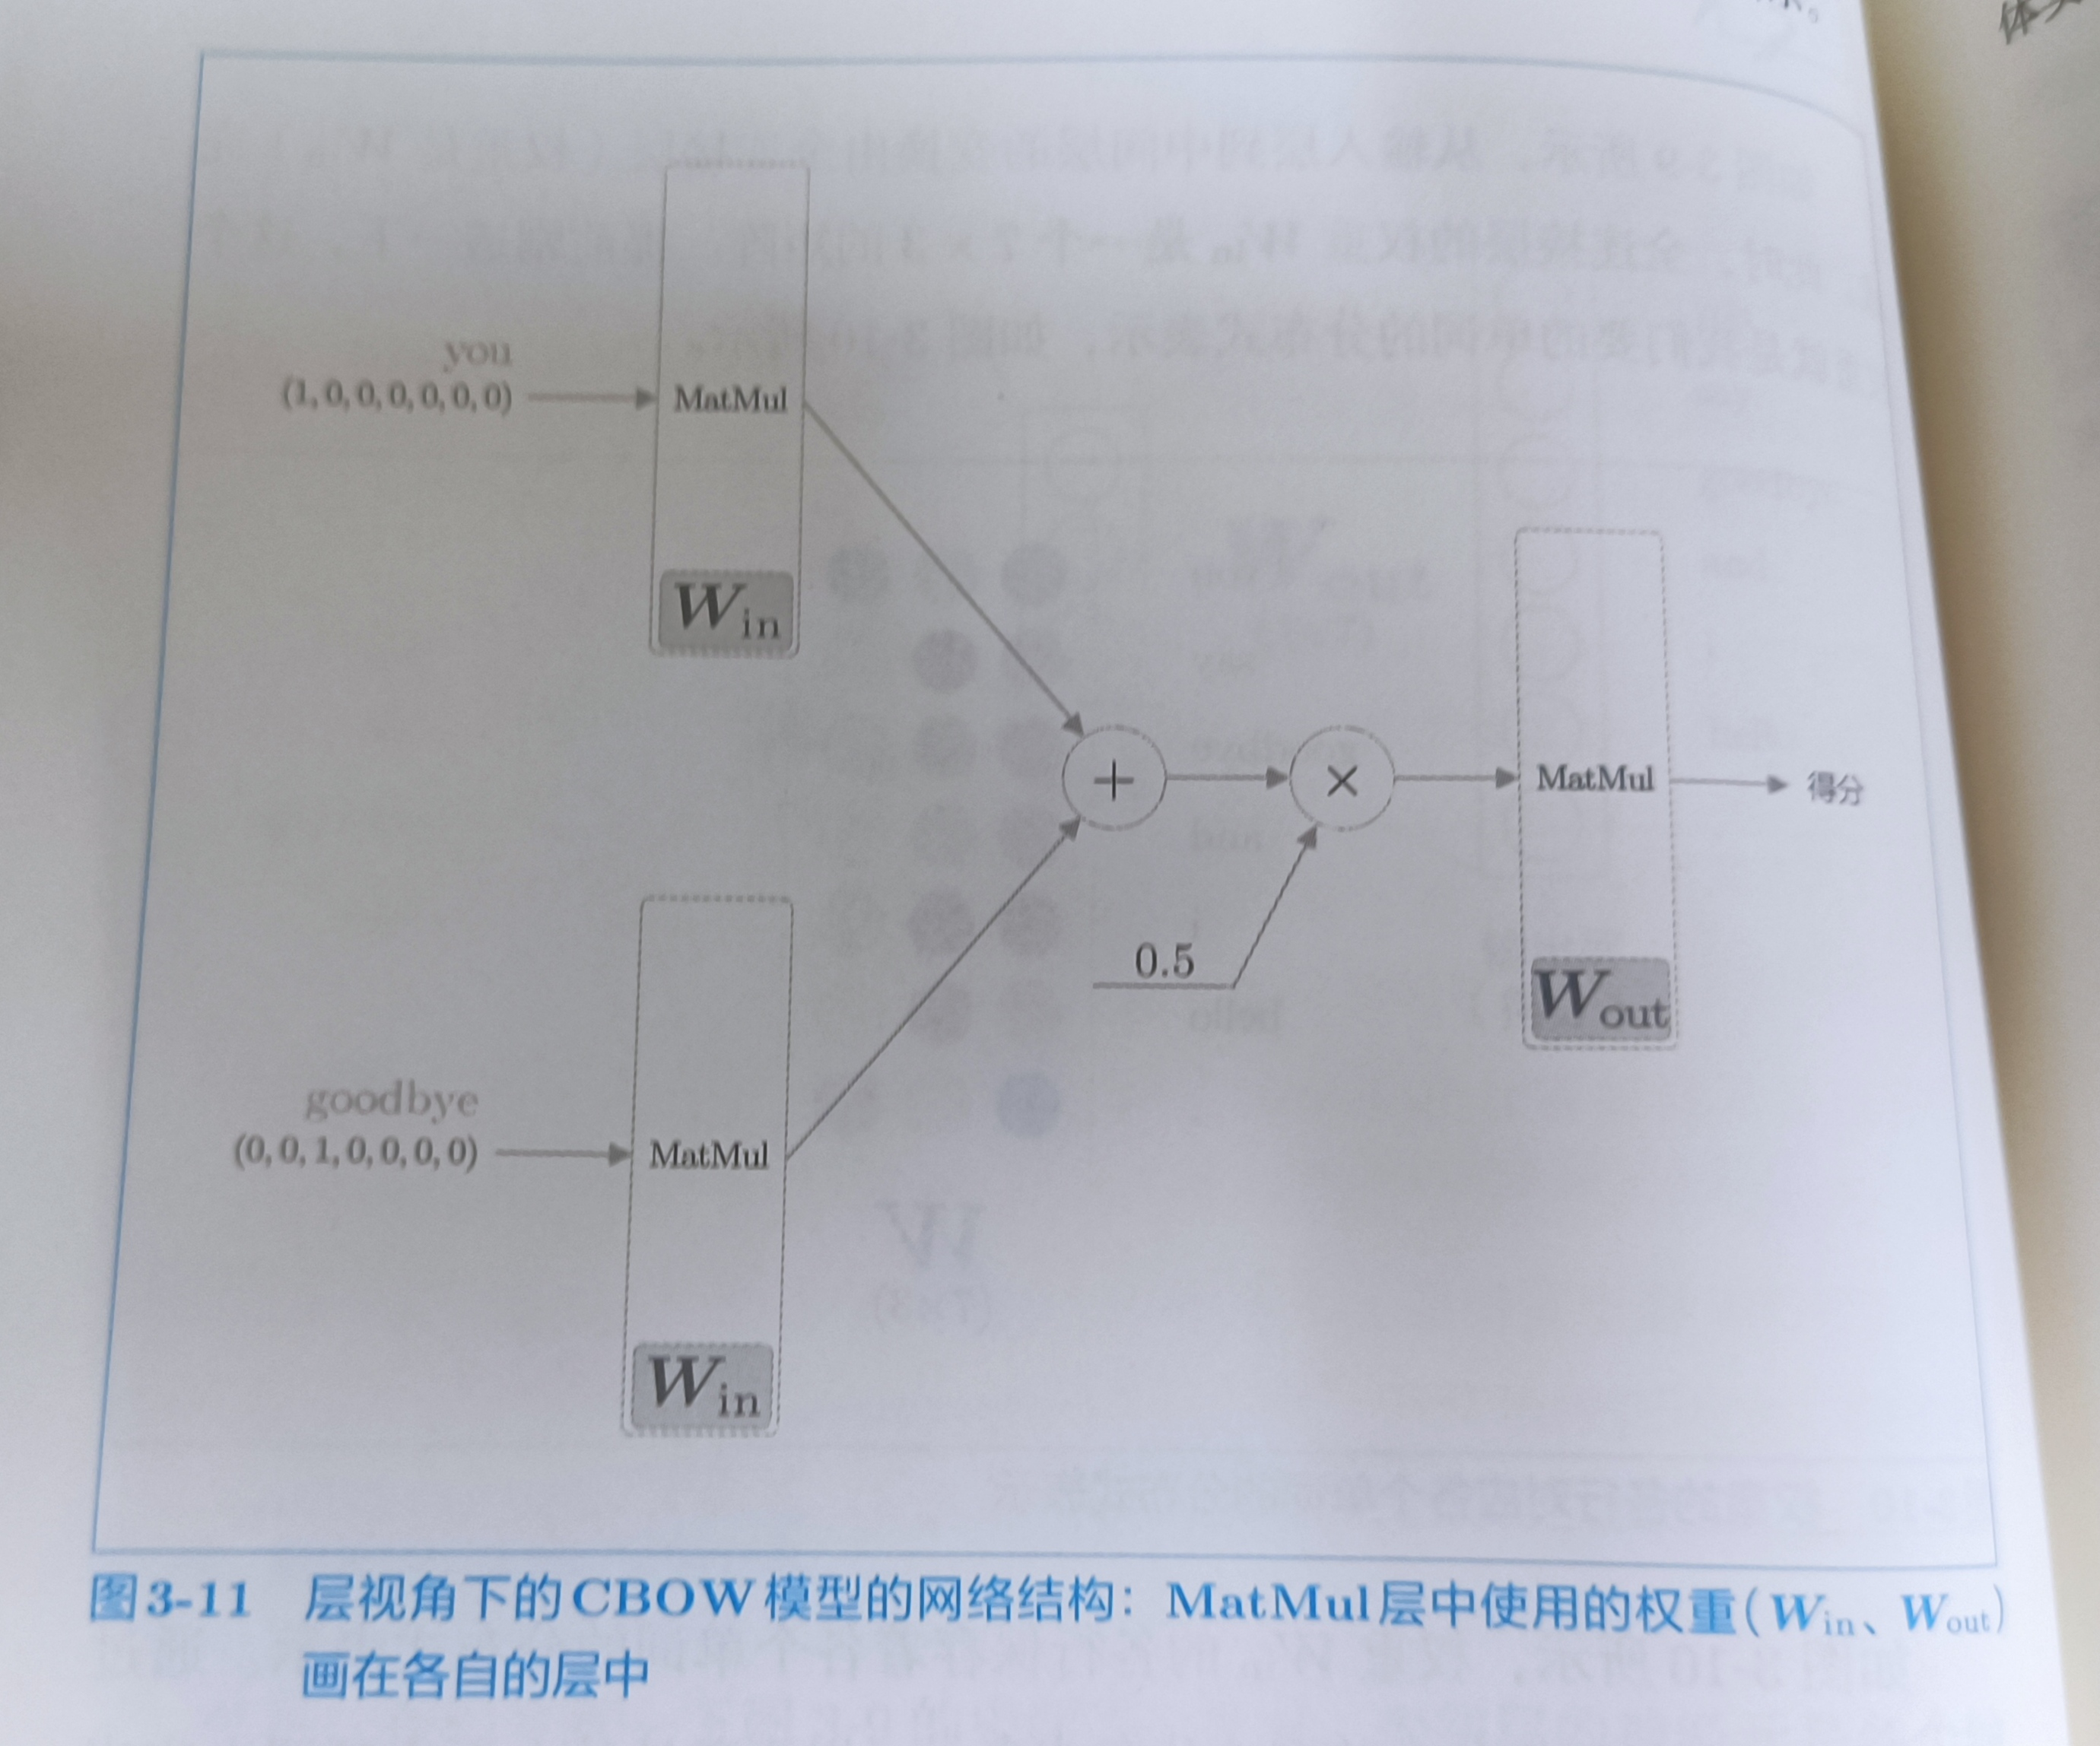
如上图所示,CBOW模型有两个MatMul层,这两个MatMul的输出被加在一起。然后乘以0.5求平均。得到中间层的神经元。最后,将另一个MatMul层应用于中间层的神经元,得到输出得分。
代码实现
import numpy as np
from common.layers import MatMul

# 样本的上下文数据
c0 = np.array([[1,0,0,0,0,0,0]])
c1 = np.array([[0,0,1,0,0,0,0]])

# 权重的初始化
W_in = np.random.randn(7,3)
W_out = np.random.randn(3,7)

# 生成层
in_layer0 = MatMul(W_in)
in_layer1 = MatMul(W_in)
out_layer = MatMul(W_out)

# 正向传播
h0 = in_layer0.forward(c0)
h1 = in_layer1.forward(c1)
h = 0.5 * (h0 + h1)
s = out_layer.forward(h)

print(s.shape) # (1, 7)
print(s)
# [[ 0.33901709  0.73718094  2.10042435 -3.27163436 -0.5974134   1.48779824
#   1.44842419]]
将权重初始化后,生成与上下文单词数量等量(这里是2个)的处理输入层的MatMul层。输出那边只生成一个MatMul层,输入层的MatMul层共享权重W_in
3.3 学习数据的准备
p110
3.3.1 上下文和目标词
p110
我们从语料库中生成上下文和目标词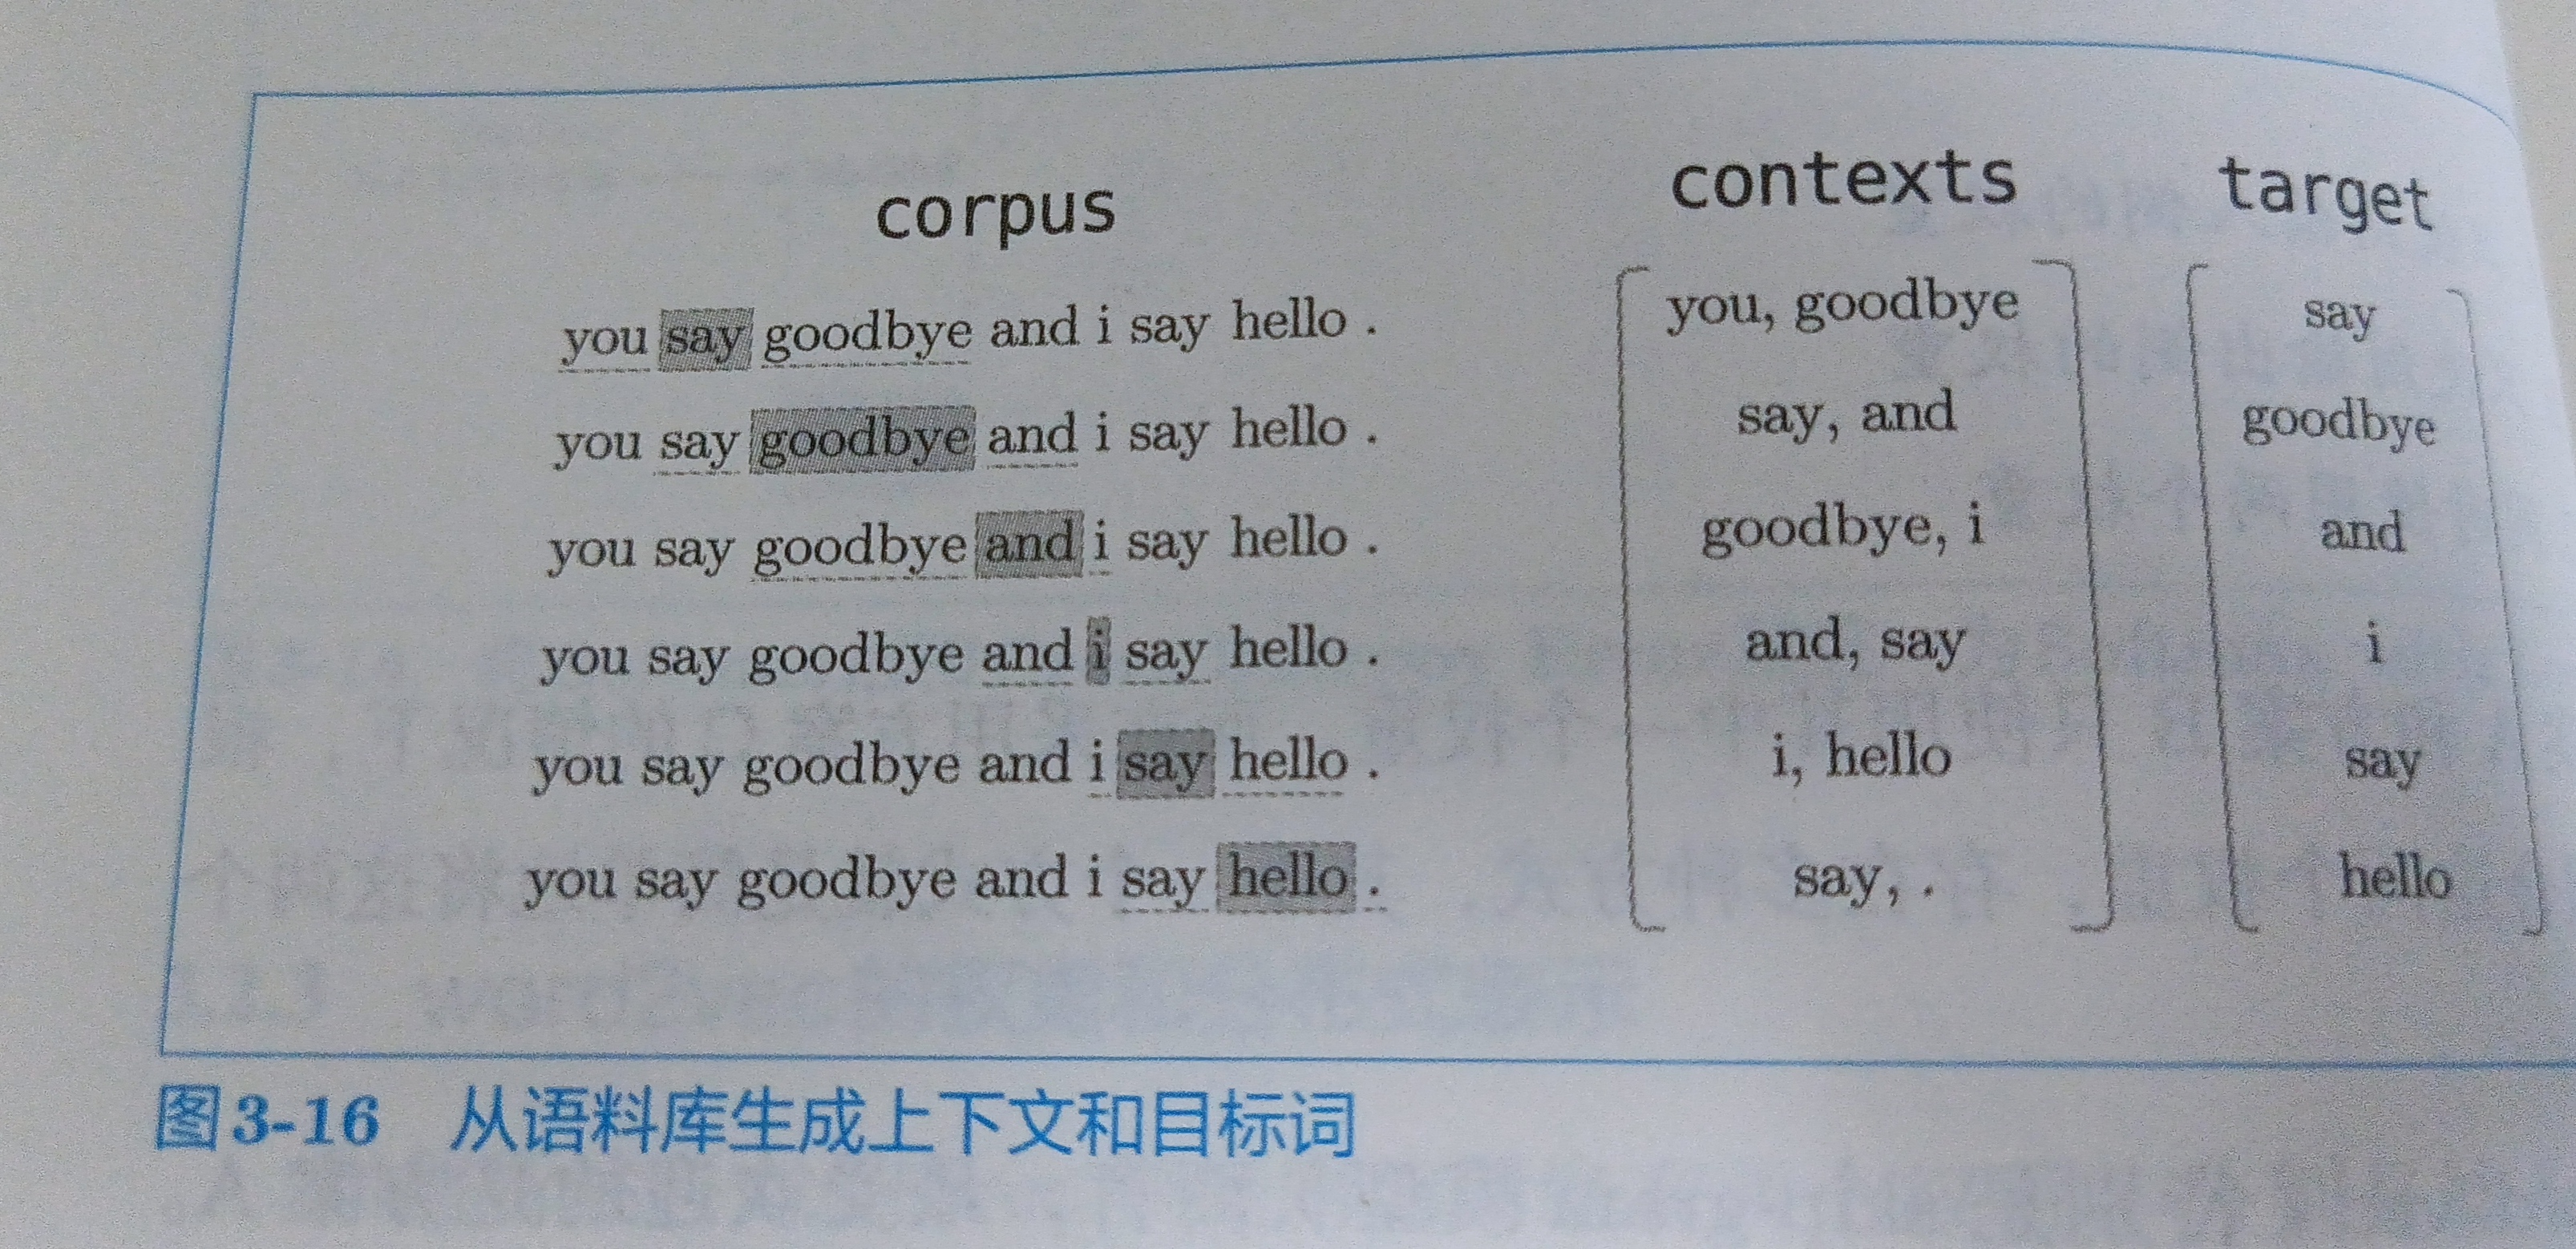
然后,生成contexts和target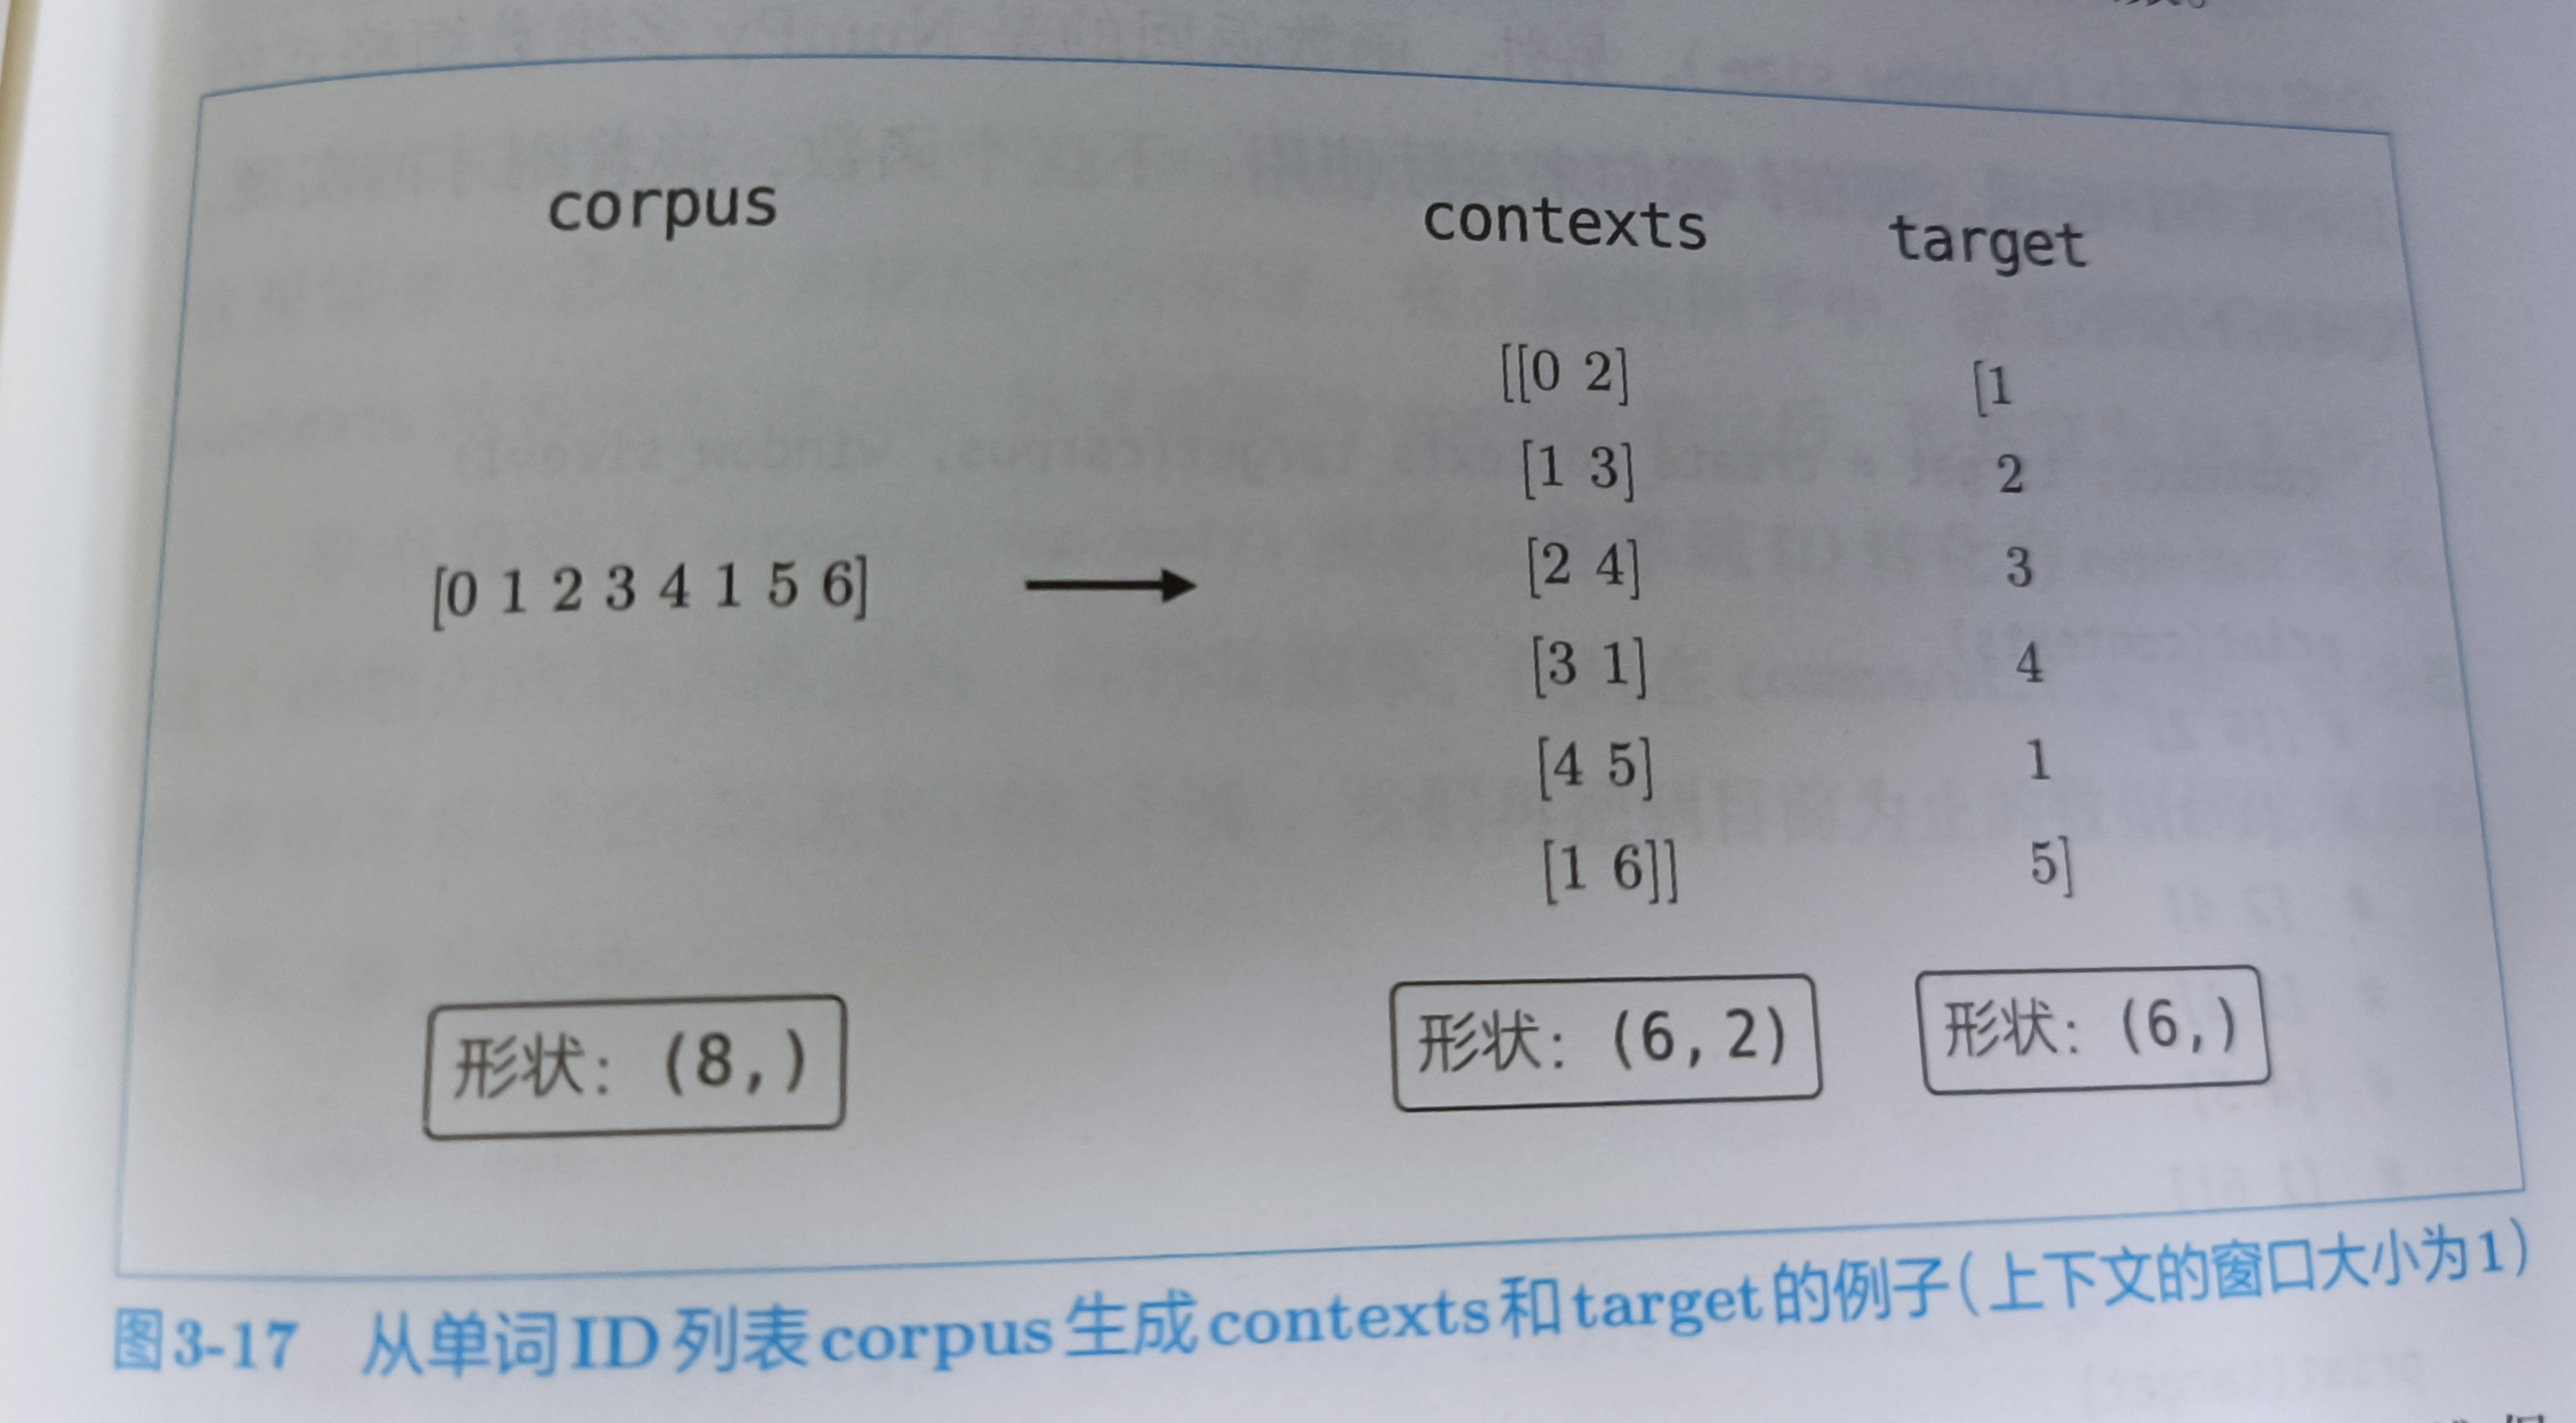
代码实现
from common.util import preprocess

text = "You say googbye and I say hello."
corpus,word_to_id,id_to_word = preprocess(text)
print('-----------------corpus-------------------')
print(corpus)
print('-----------------id_to_word-------------------')
print(id_to_word)

def create_contexts_target(corpus,window_size=1):
    target = corpus[window_size:-window_size]
    contexts = []

    for idx in range(window_size,len(corpus) - window_size):
        cs = []
        # 每次取target值的前一个和后一个值
        for t in range(-window_size,window_size + 1):
            if t == 0:
                continue
            cs.append(corpus[idx + t])
        contexts.append(cs)
    return np.array(contexts),np.array(target)

contexts,target = create_contexts_target(corpus)
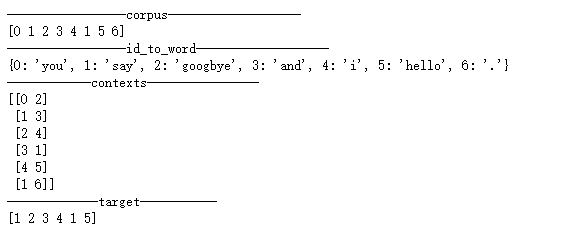
print('------------contexts----------------')
print(contexts)
print('-------------target-----------')
print(target)
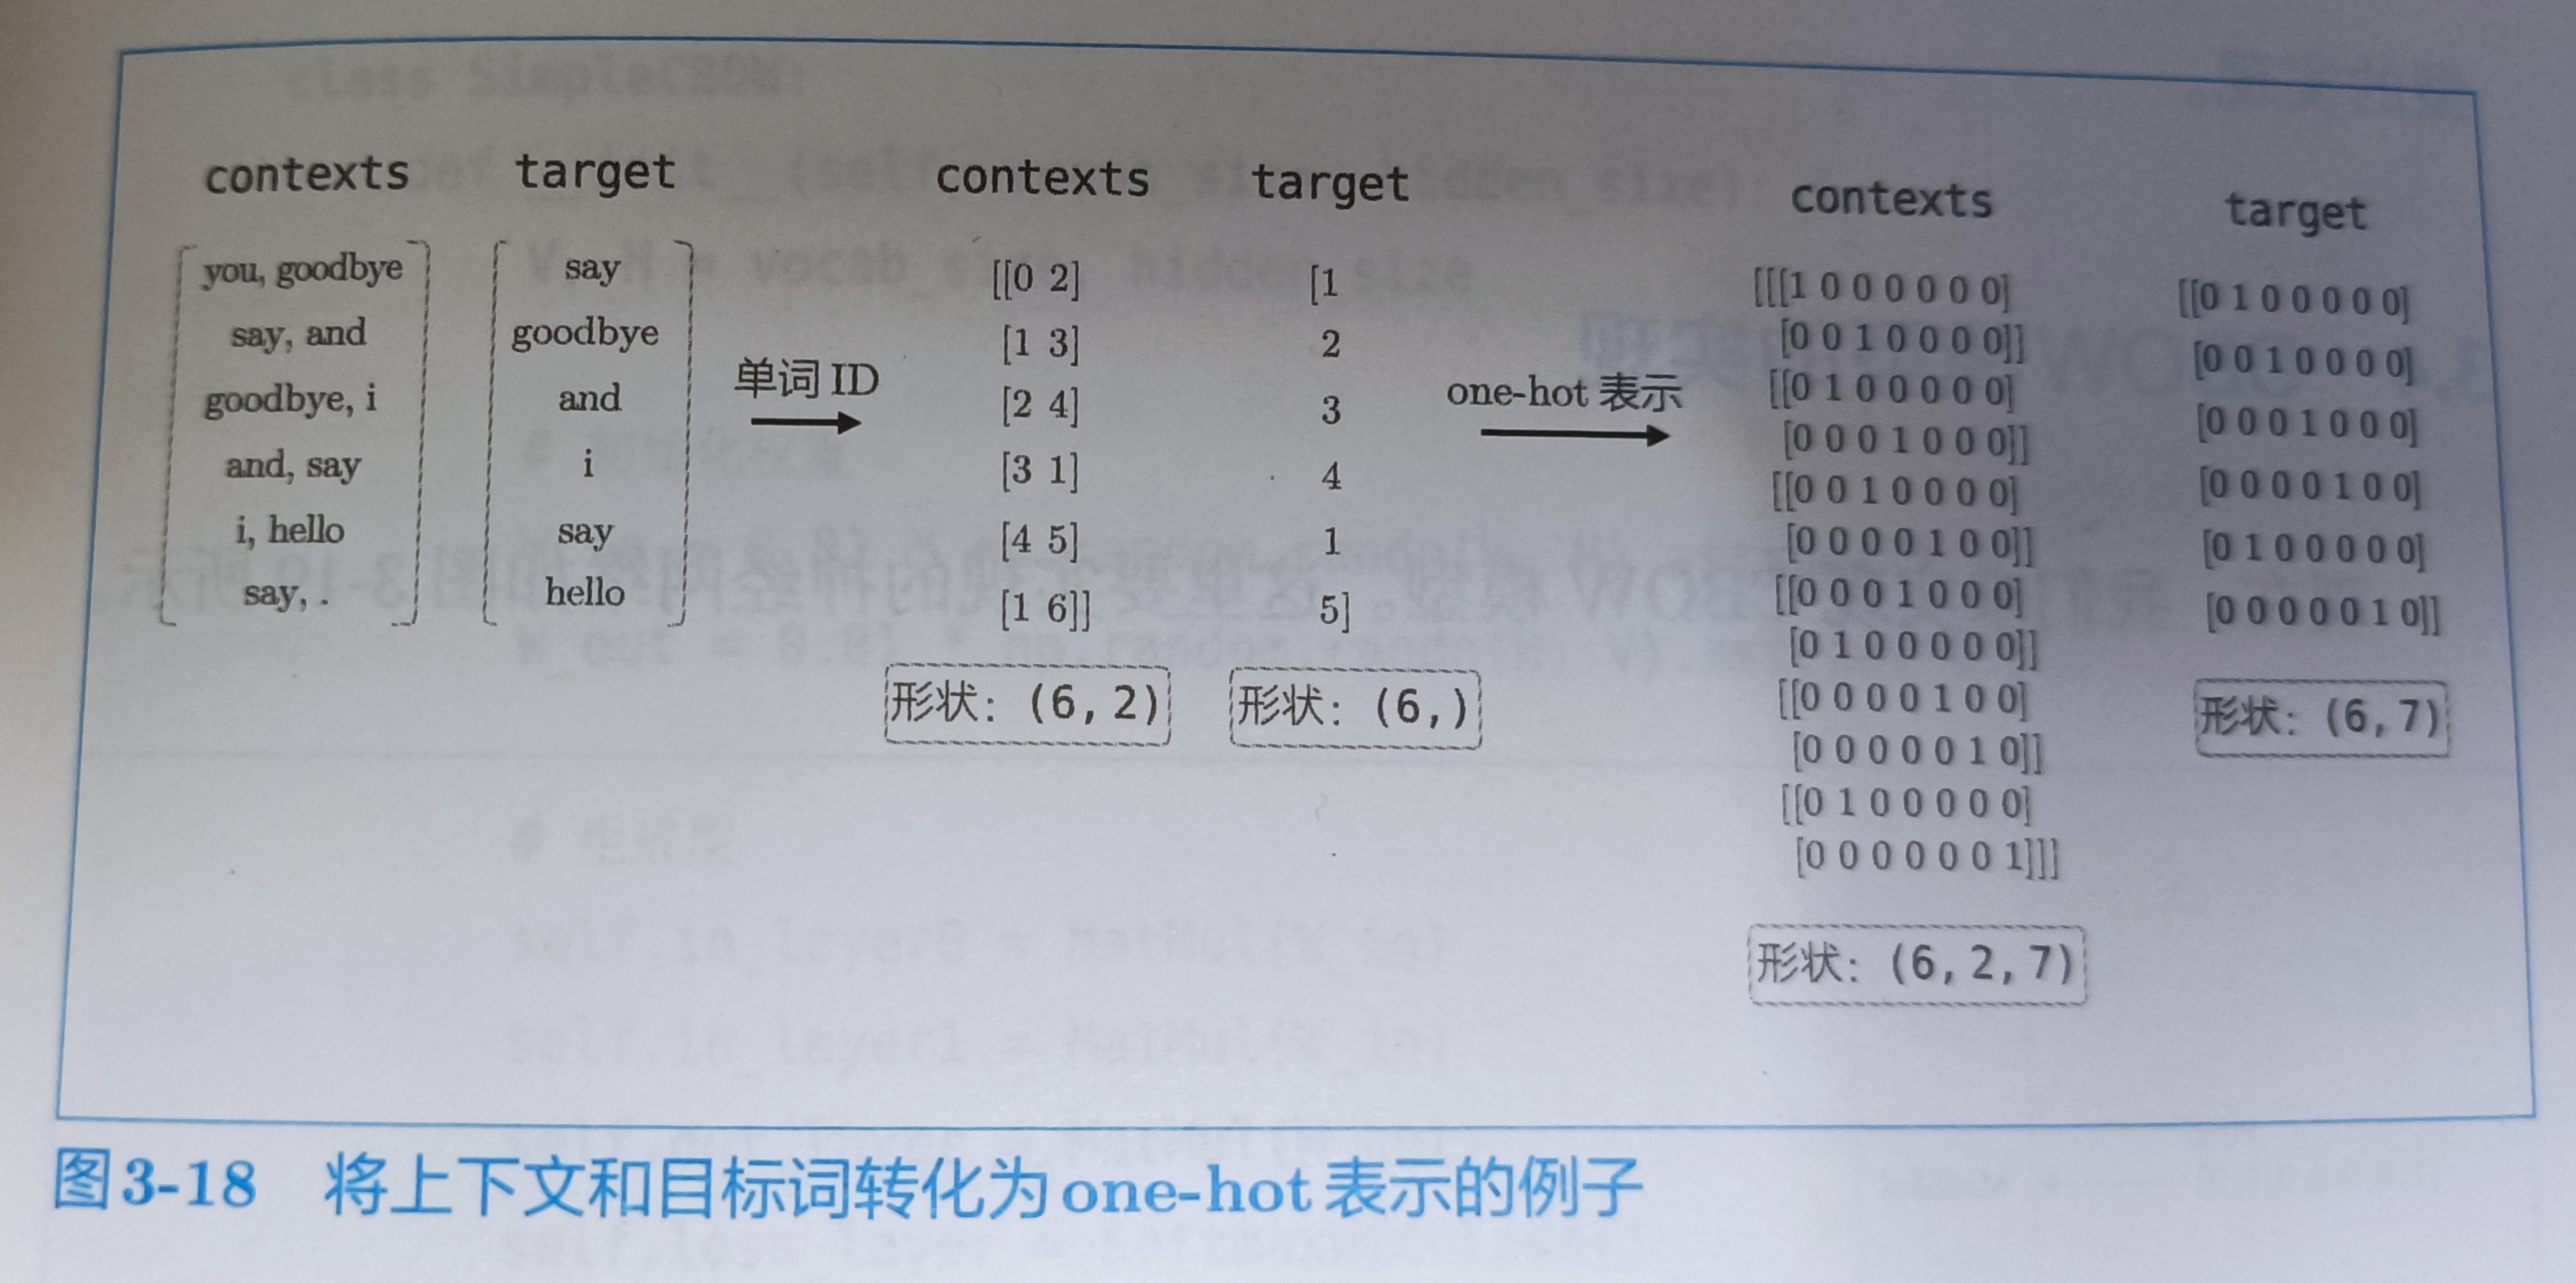
3.3.2 转换为one-hot表示
p113
from common.util import preprocess,create_contexts_target,convert_one_hot

text = "You say googbye and I say hello."
corpus,word_to_id,id_to_word = preprocess(text)

contexts,target = create_contexts_target(corpus,window_size=1)

vocab_size = len(word_to_id)
target = convert_one_hot(target,vocab_size)
contexts = convert_one_hot(contexts,vocab_size)
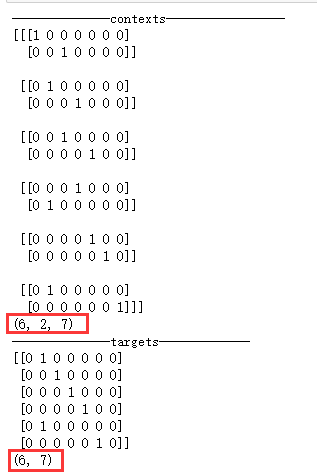
print('--------------contexts-----------------')
print(contexts)
print(contexts.shape)
print('--------------targets-------------')
print(target)
print(target.shape)
3.4 CBOW模型的实现
p114
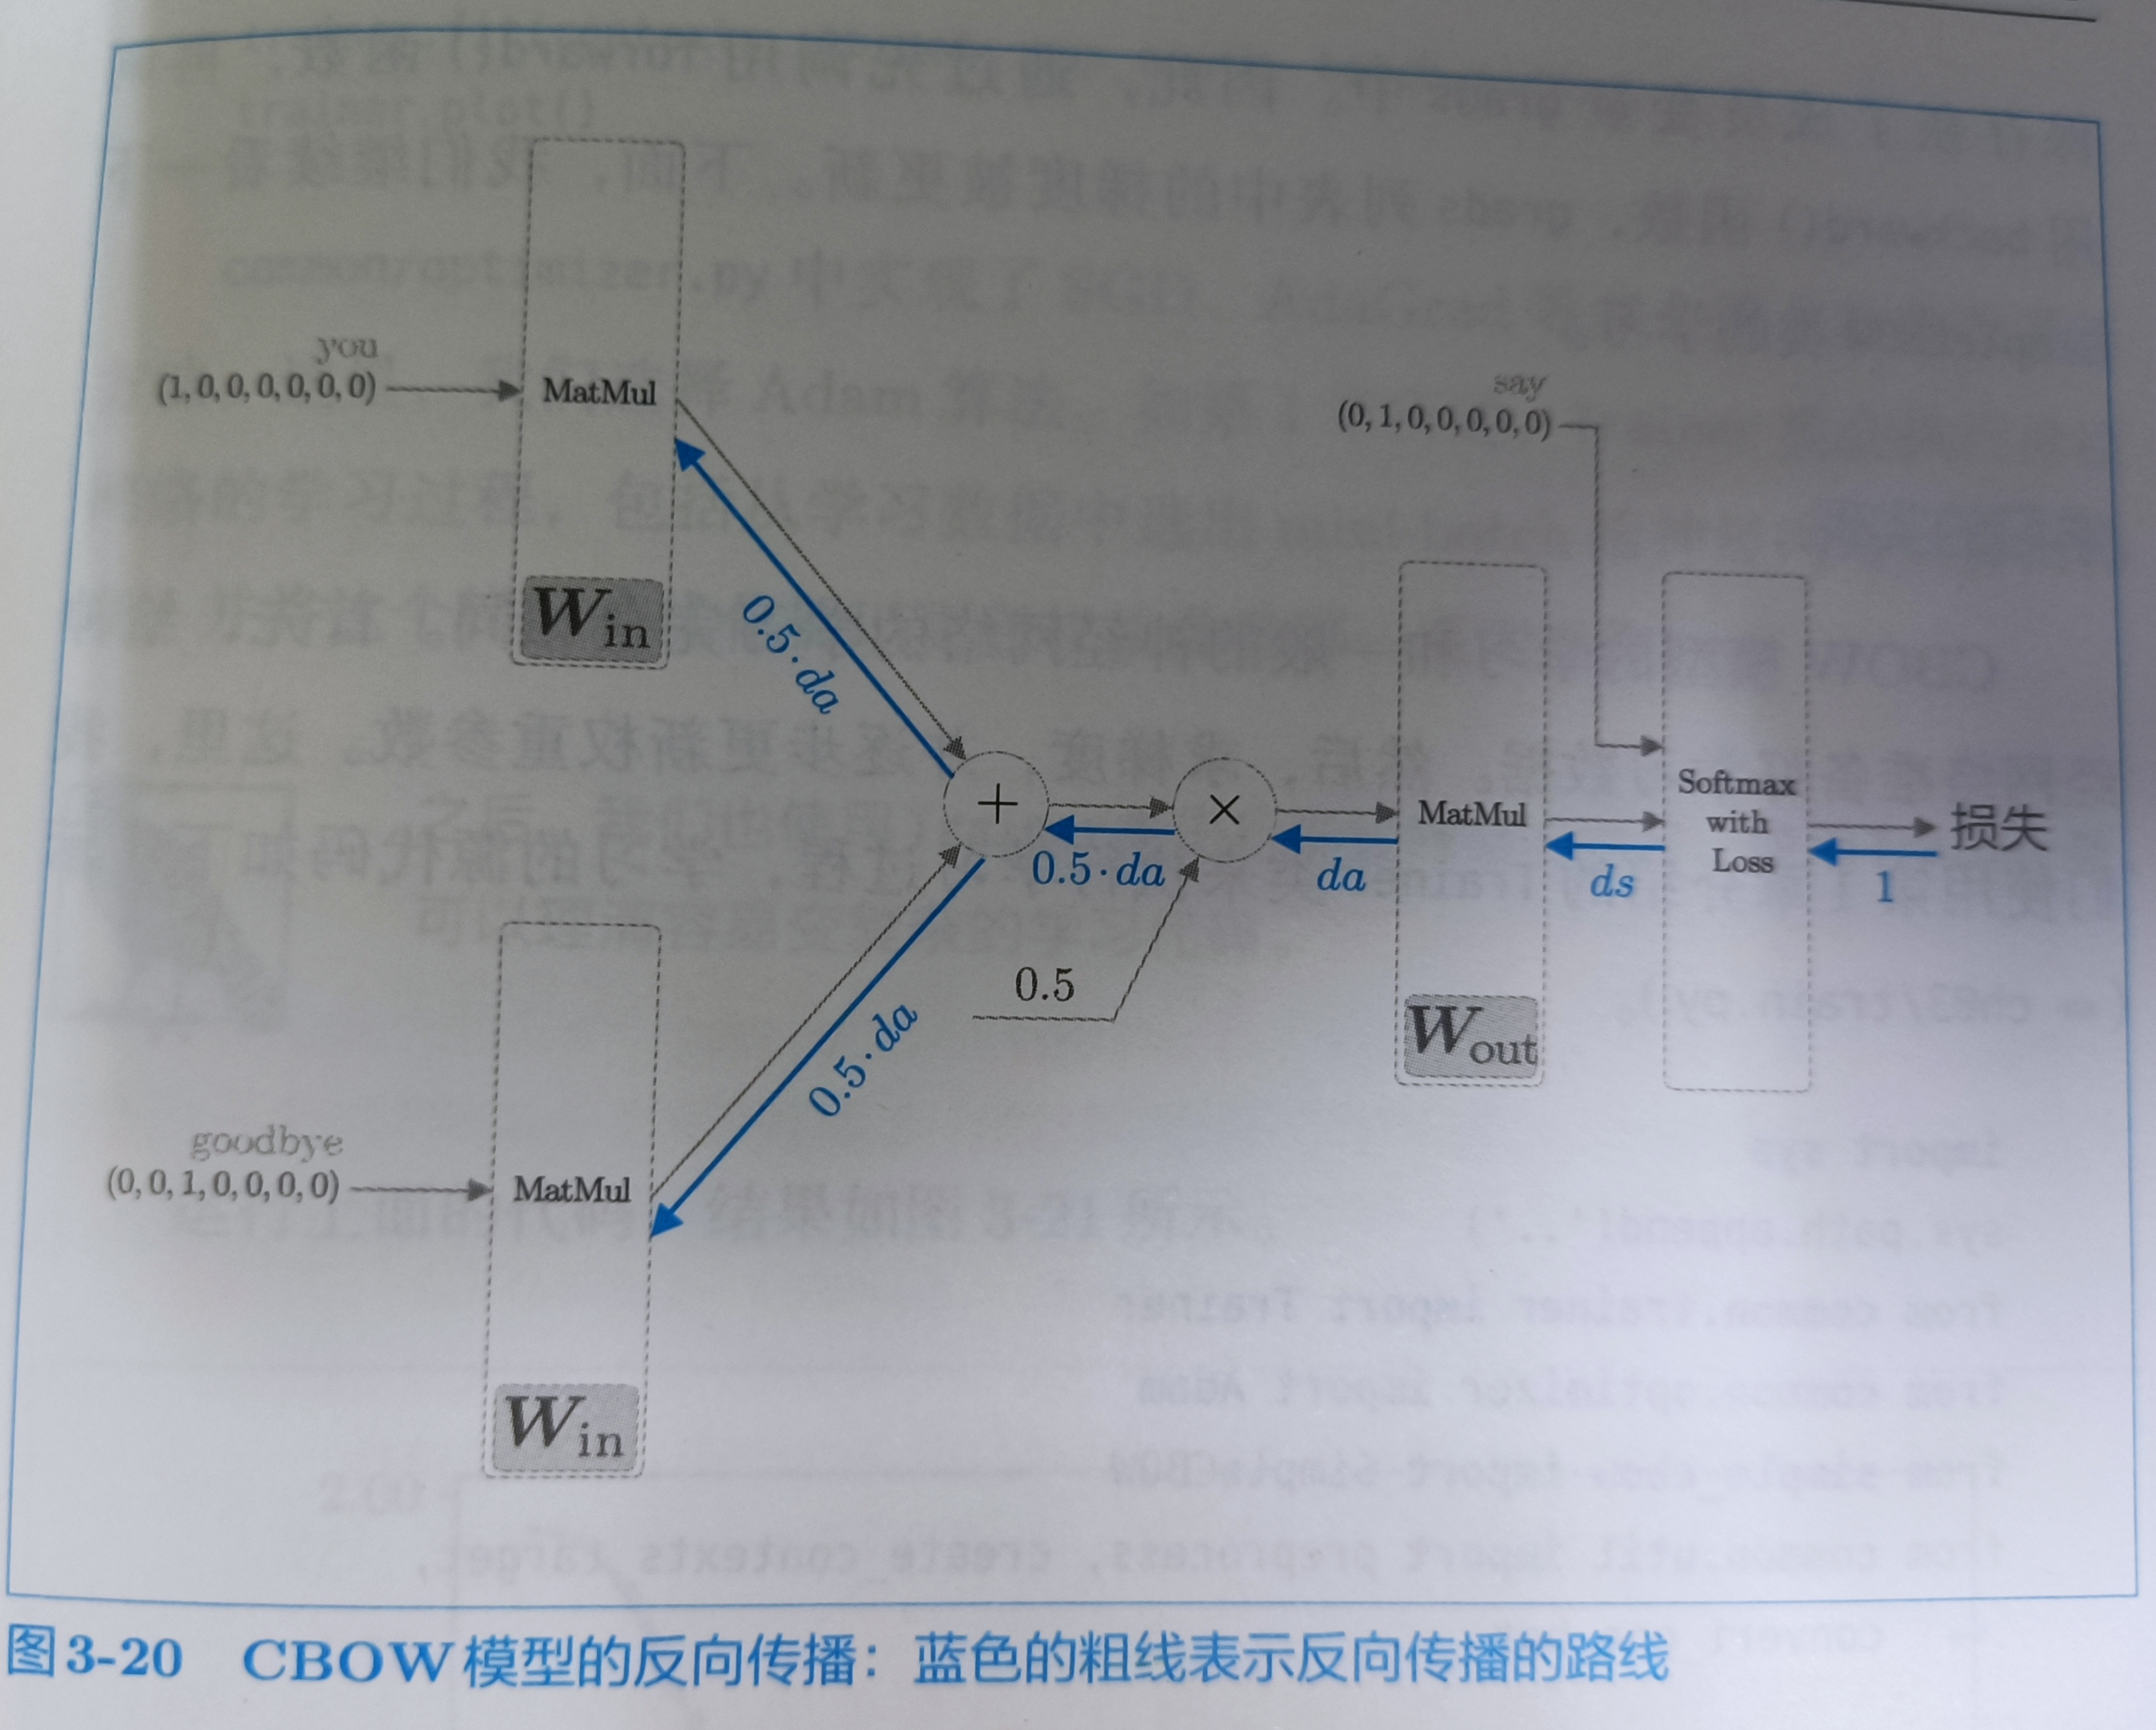
- 反向传播是输入乘以局部导数
代码实现
import numpy as np
from common.layers import MatMul,SoftmaxWithLoss

class SimpleCBOW:
    def __init__(self,vocab_size,hidden_size):
        # vocab_size:神经元个数
        # hidden_size:神经元个数
        V,H = vocab_size,hidden_size

        # 初始化权重
        W_in = 0.01 * np.random.randn(V,H).astype('f') # 32位浮点型
        W_out = 0.01 * np.random.randn(H,V).astype('f')

        # 生成层
        self.in_layer0 = MatMul(W_in)
        self.in_layer1 = MatMul(W_in)
        self.out_layer = MatMul(W_out)
        self.loss_layer = SoftmaxWithLoss()

        # 将所有的权重和梯度整理到列表中
        layers = [self.in_layer0,self.in_layer1,self.out_layer]
        self.params,self.grads = [],[]
        for layer in layers:
            self.params += layer.params
            self.grads += layer.grads

        # 将单词的分布式表示设置为成员变量
        self.word_vecs = W_in

    def forward(self,contexts,target):
        h0 = self.in_layer0.forward(contexts[:,0])
        h1 = self.in_layer1.forward(contexts[:,1])
        h = (h0+h1)*0.5
        score = self.out_layer.forward(h)
        loss = self.loss_layer.forward(score,target)
        return loss

    def backward(self,dout=1):
        ds = self.loss_layer.backward(dout)
        da = self.out_layer.backward(ds)
        da *= 0.5
        self.in_layer0.backward(da)
        self.in_layer1.backward(da)
        return None


window_size = 1
hidden_size = 5
batch_size = 3
max_epoch = 1000

text = "You say googbye and I say hello."
corpus,word_to_id,id_to_word = preprocess(text)

vocab_size = len(word_to_id)
contexts,target = create_contexts_target(corpus,window_size)
target = convert_one_hot(target,vocab_size)
contexts = convert_one_hot(contexts,vocab_size)

model = SimpleCBOW(vocab_size,hidden_size)
optimizer = Adam()
trainer = Trainer(model,optimizer)
trainer.fit(contexts,target,max_epoch,batch_size)
trainer.plot()
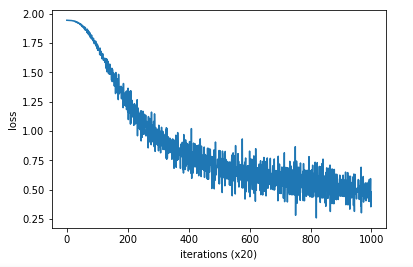
通过权重查看每个单词的分布式表示
word_vecs = model.word_vecs
for word_id,word in id_to_word.items():
    print(word,word_vecs[word_id])

3.5 word2vec的补充说明
3.5.1 CBOW模型和概率
p121
对第t个单词,考虑窗大小为1的上下文
表示当前给定上下文wt-1和wt+1时目标词为wt的概率,使用后验概率,有
CBOW模型可以上面的式子建模为式。CBOW模型的损失函数为交叉熵损失函数。式子如下
其中yk表示第k个事件发生的概率。tk是监督标签,它是one-hot向量的元素。wt发生,这一事件是正确解,它对应的one-hot向量的元素是1,其他元素都是0(wt之外的事件发生时,对应的one-hot向量的元素均为0)。根据这一点,可以推导出下式
CBOW模型的损失函数只是对\(P(w_{t}|w_{t-1},w_{t+1})\)取log,并加上负号,这也成为负对数似然。式(3.2)是一笔样本数据的损失函数。如果将其扩展到整个语料库,则损失函数是
3.5.2 skip-gram模型
p122
word2vec有两个模型,一个是CBOW,一个是skip-gram。skip-gram是反转了CBOW的。

CBOW是根据上下文预测中间的词,而skip-gram是通过中间的词去预测上下文。skip-gram结构如下
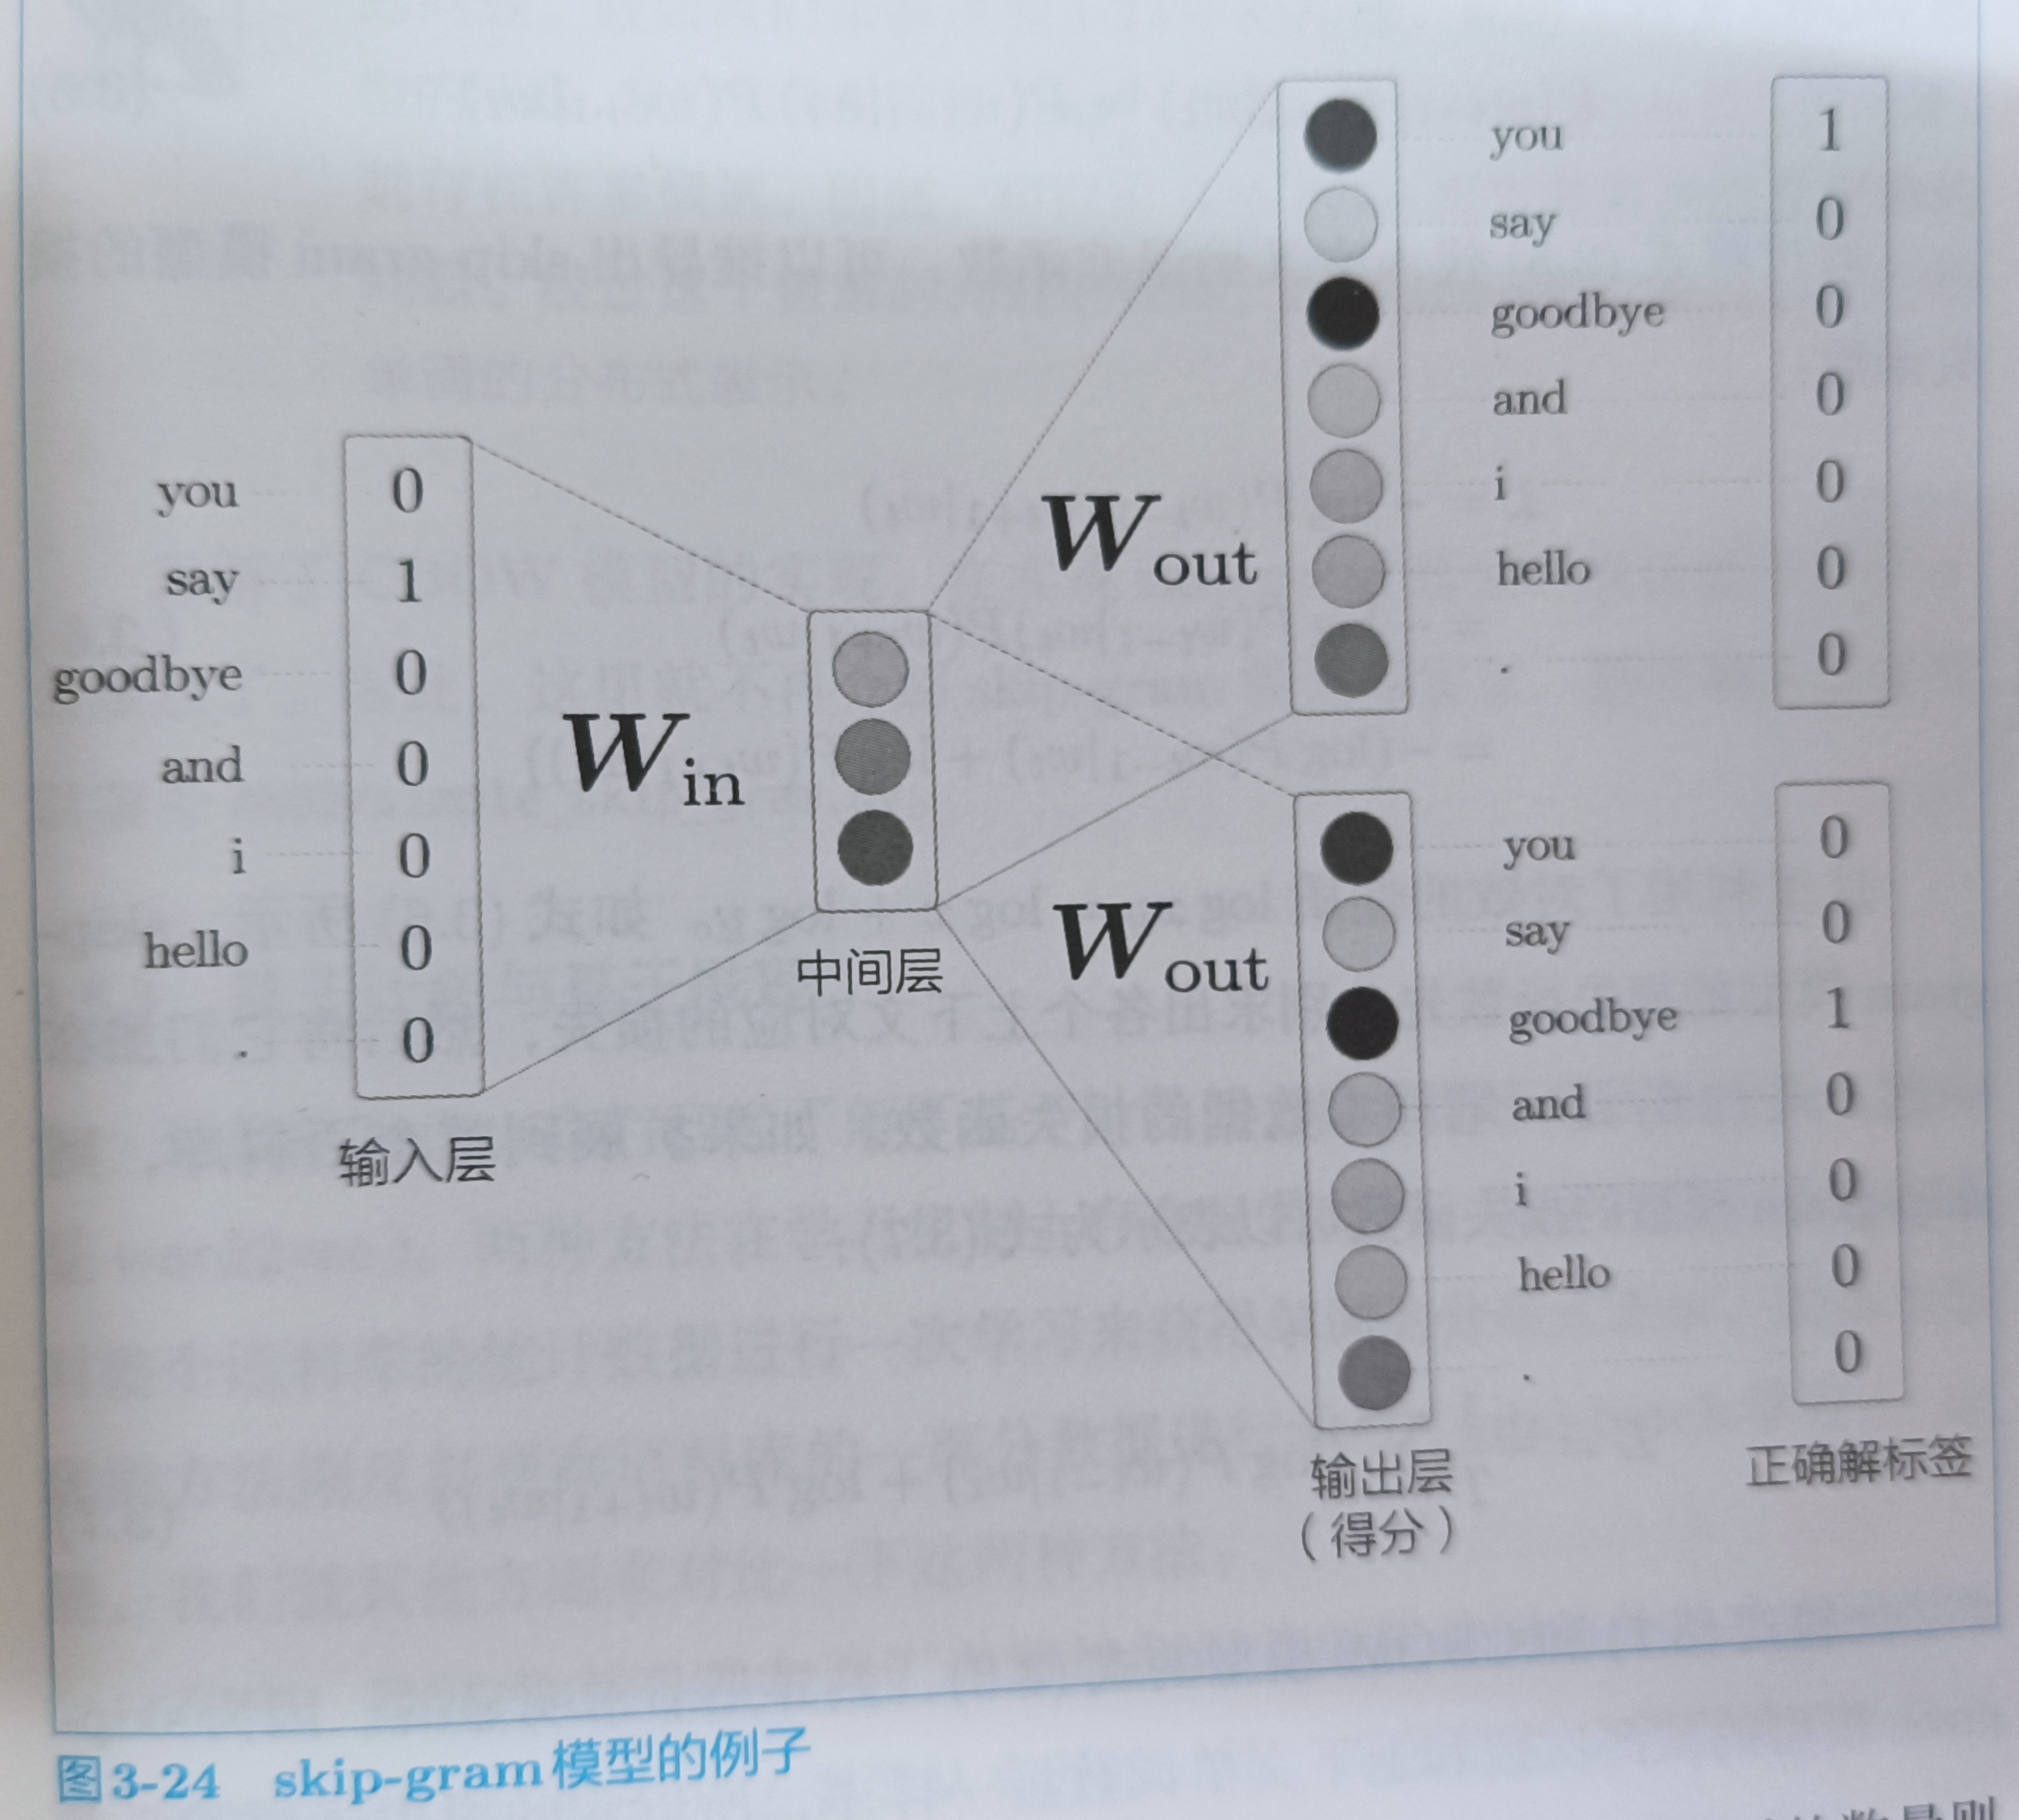
skip-gram输入层只有一个,输出层的数量与上下文单词数量相等。可以建立skip-gram的式子
对上面的式子进行分解得
将(3.5)式子带入交叉熵误差函数,可以推出skip-gram模型的损失函数
扩展到整个语料库 上就是
skip-gram模型需要求对上下文对应各个单词的损失总和,而CBOW模型只需要求目标单词的损失。但是,我们还是要用skip-gram模型。
因为,大多数情况下,skip-gram模型的效果更好。
总结
word2vec是基于推理的方法,由简单的2层神经网络构成
word2vec有skip-gram和cbow模型
CBOW模型从多个单词(上下文)预测一个单词
skip-gram从一个单词预测多个单词(上下文)
4. word2vec的高速化
4.1 word2vec的改进
p129
前面的输入层只有7个神经元,这好弄,但是如果词汇量有100万个,CBOW模型的中间的神经元只有100个,输入层和输出层存在100万个神经元。这么多神经元的情况下,中间的计算过程需要很长时间。也会出现两个问题
- 输入层的one-hot表示和权重矩阵win的乘积
- 中间层和权重矩阵wout的乘积及softmax层的计算
第一个问题与输入层的one-hot表示有关,随着单词的增加,one-hot表示的向量大小也会增加。如果有100万个单词,那么one-hot就需要100万个,计算这就很麻烦。需要大量的计算资源,解决这个问题可以使用Embedding层,解决第二个问题可以使用Negative Sampling损失函数解决。
4.1.1 Embedding层
p132
这里考虑单词量是100万个情况下,中间层有100个神经元。MatMul的结构如下
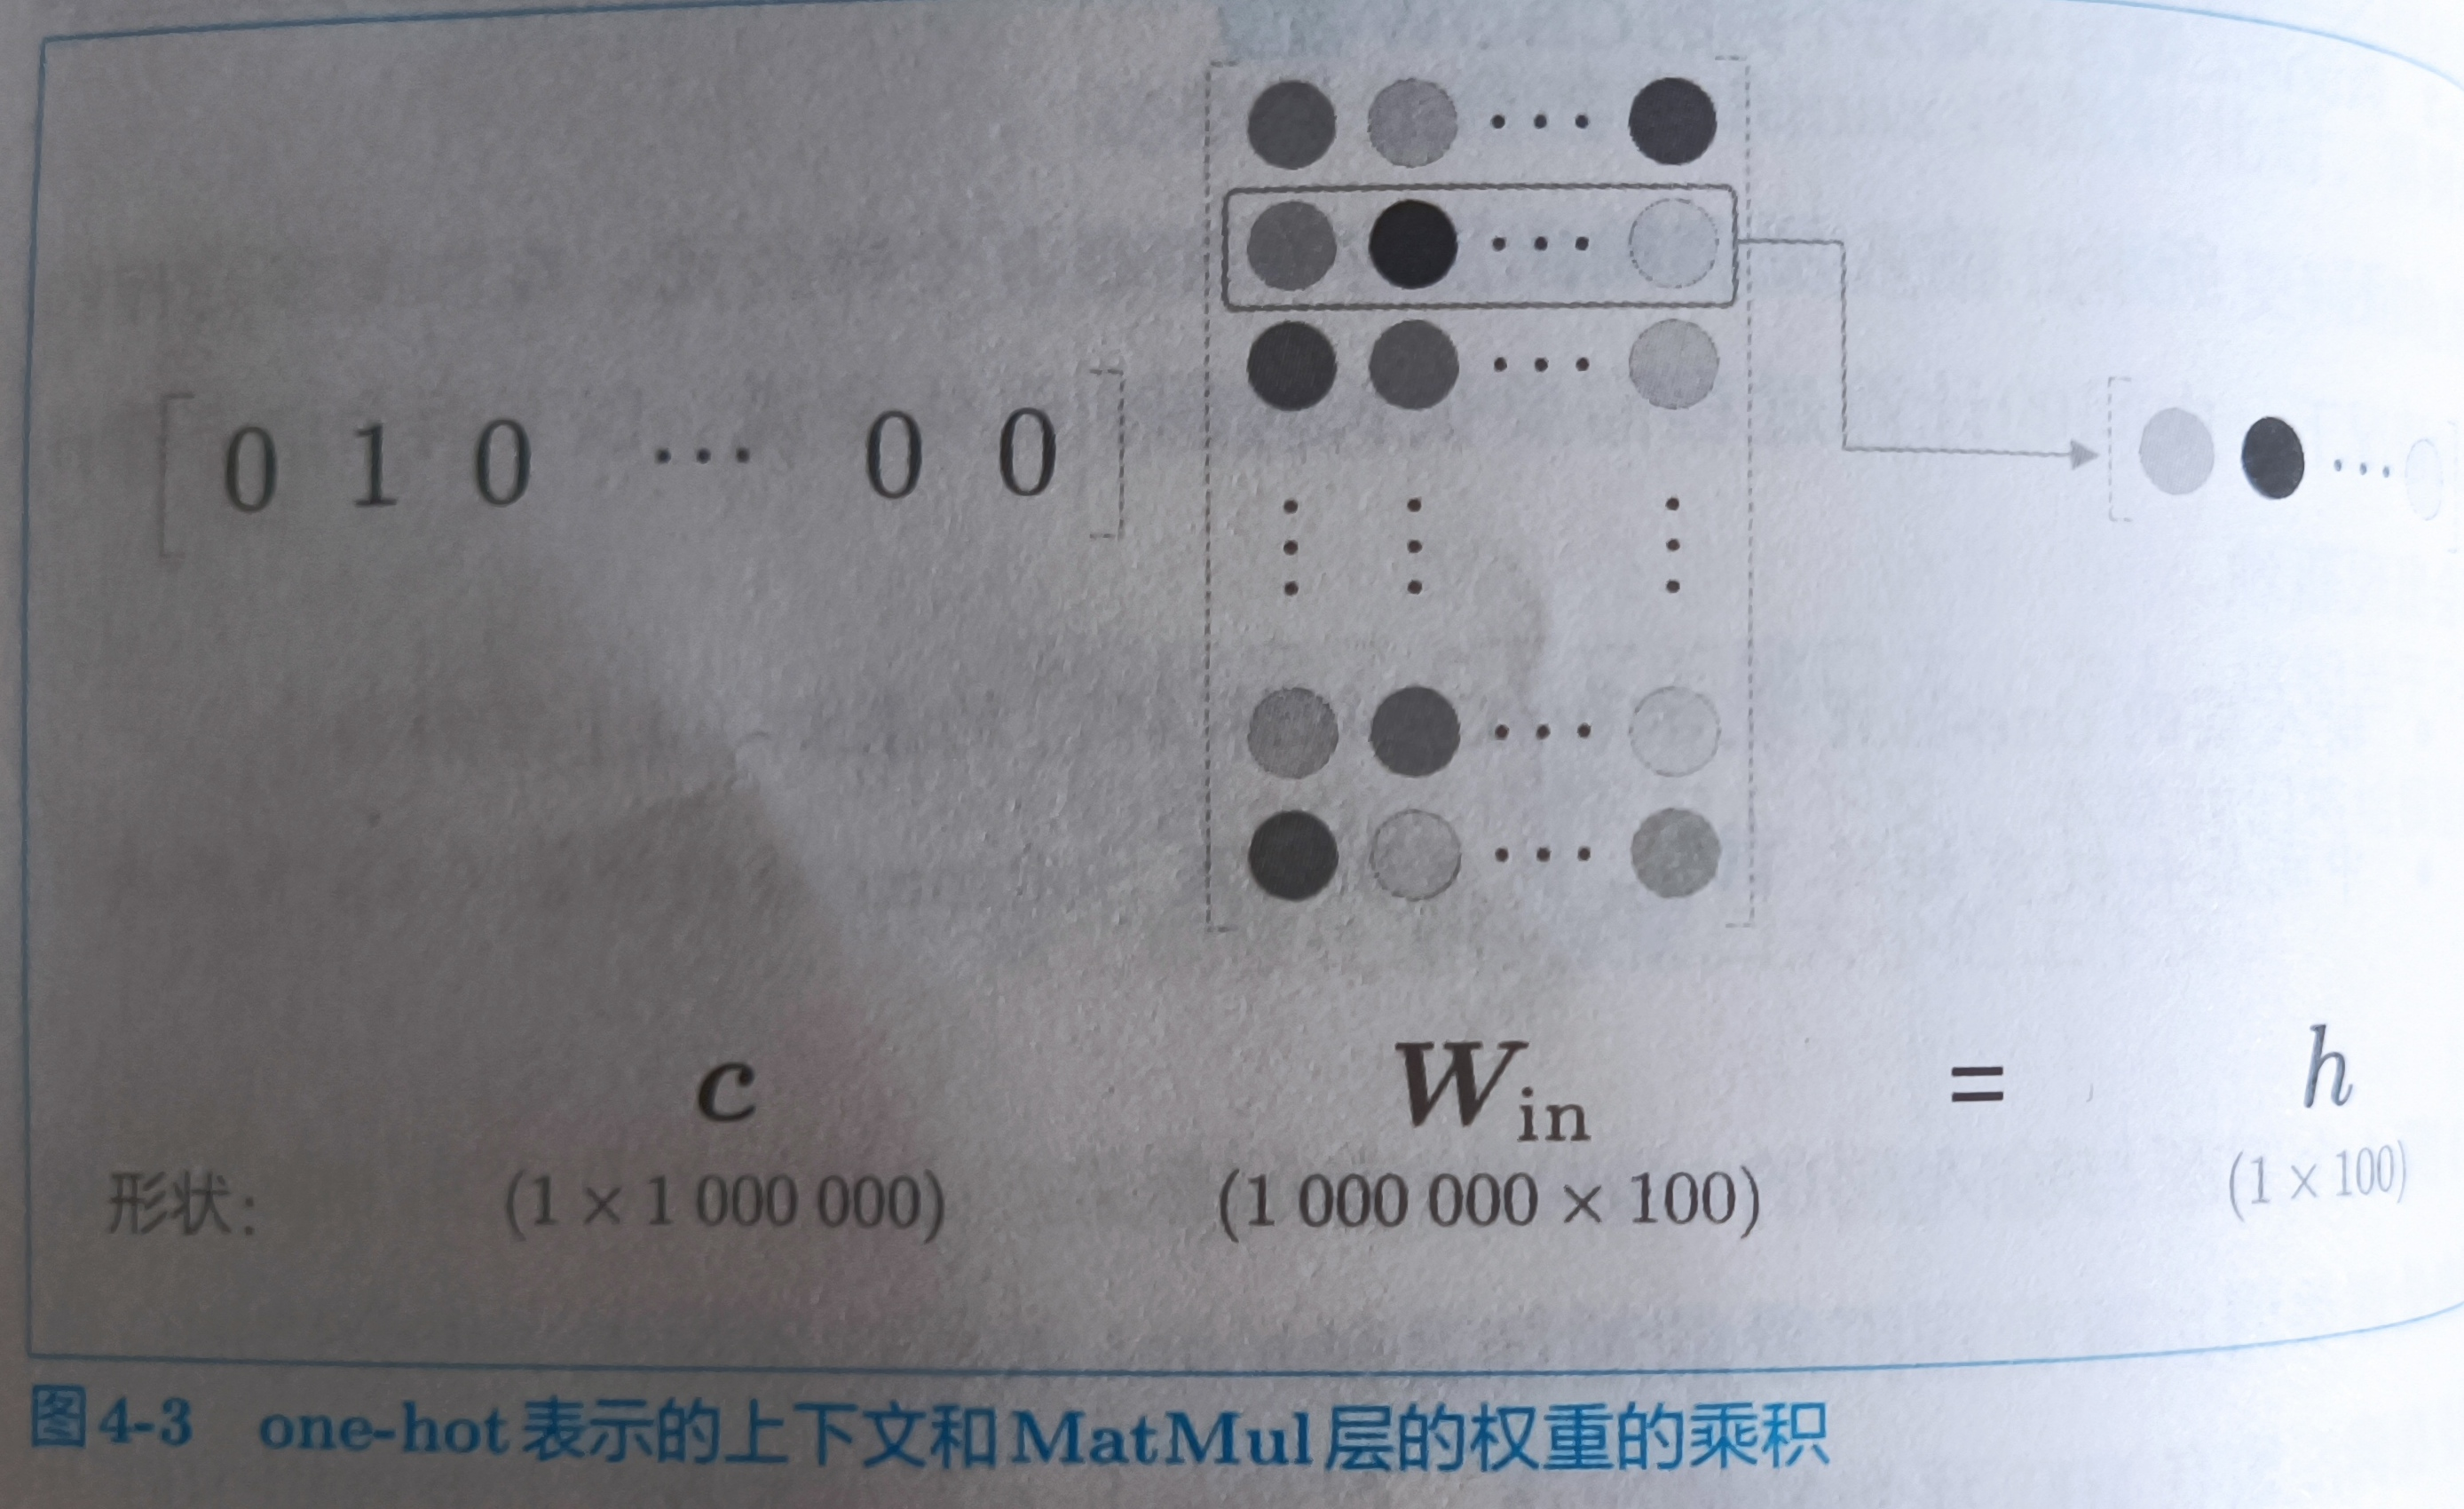
我们发现,如果语料库词汇量有100万个,则单词的one-hot表示的维数也会是100万,我们需要计算这个巨大向量和权重矩阵的乘积。但是上图中,无非是从Win中取一行而已,而我却需要花费这么大计算量,很不必要。我们创建一个从参数权重中抽取“单词ID对应的向量”的层,叫做Embedding层。
从权重矩阵中取一行很简单,例如:W[索引]就可以取到某一行
import numpy as np

class Embedding:
    def __init__(self,W):
        self.params = [W]
        self.grads = [np.zeros_like[W]]
        self.idx = None

    def forward(self,idx):
        W, = self.params
        self.idx = idx
        out = W[idx]
        return out
Embedding的正向传播只是从权重矩阵W中提取特定的行,并将该行的神经元原样传给下一层。
在反向传播时,输出侧的层传过来的梯度将原样传给输入层。不过,从输出层传过来的梯度会被应用到权重梯度的特定行(idx),
我们可以一次取多行的索引(前提是mini-batch,mini-batch可以用GPU进行并行计算)
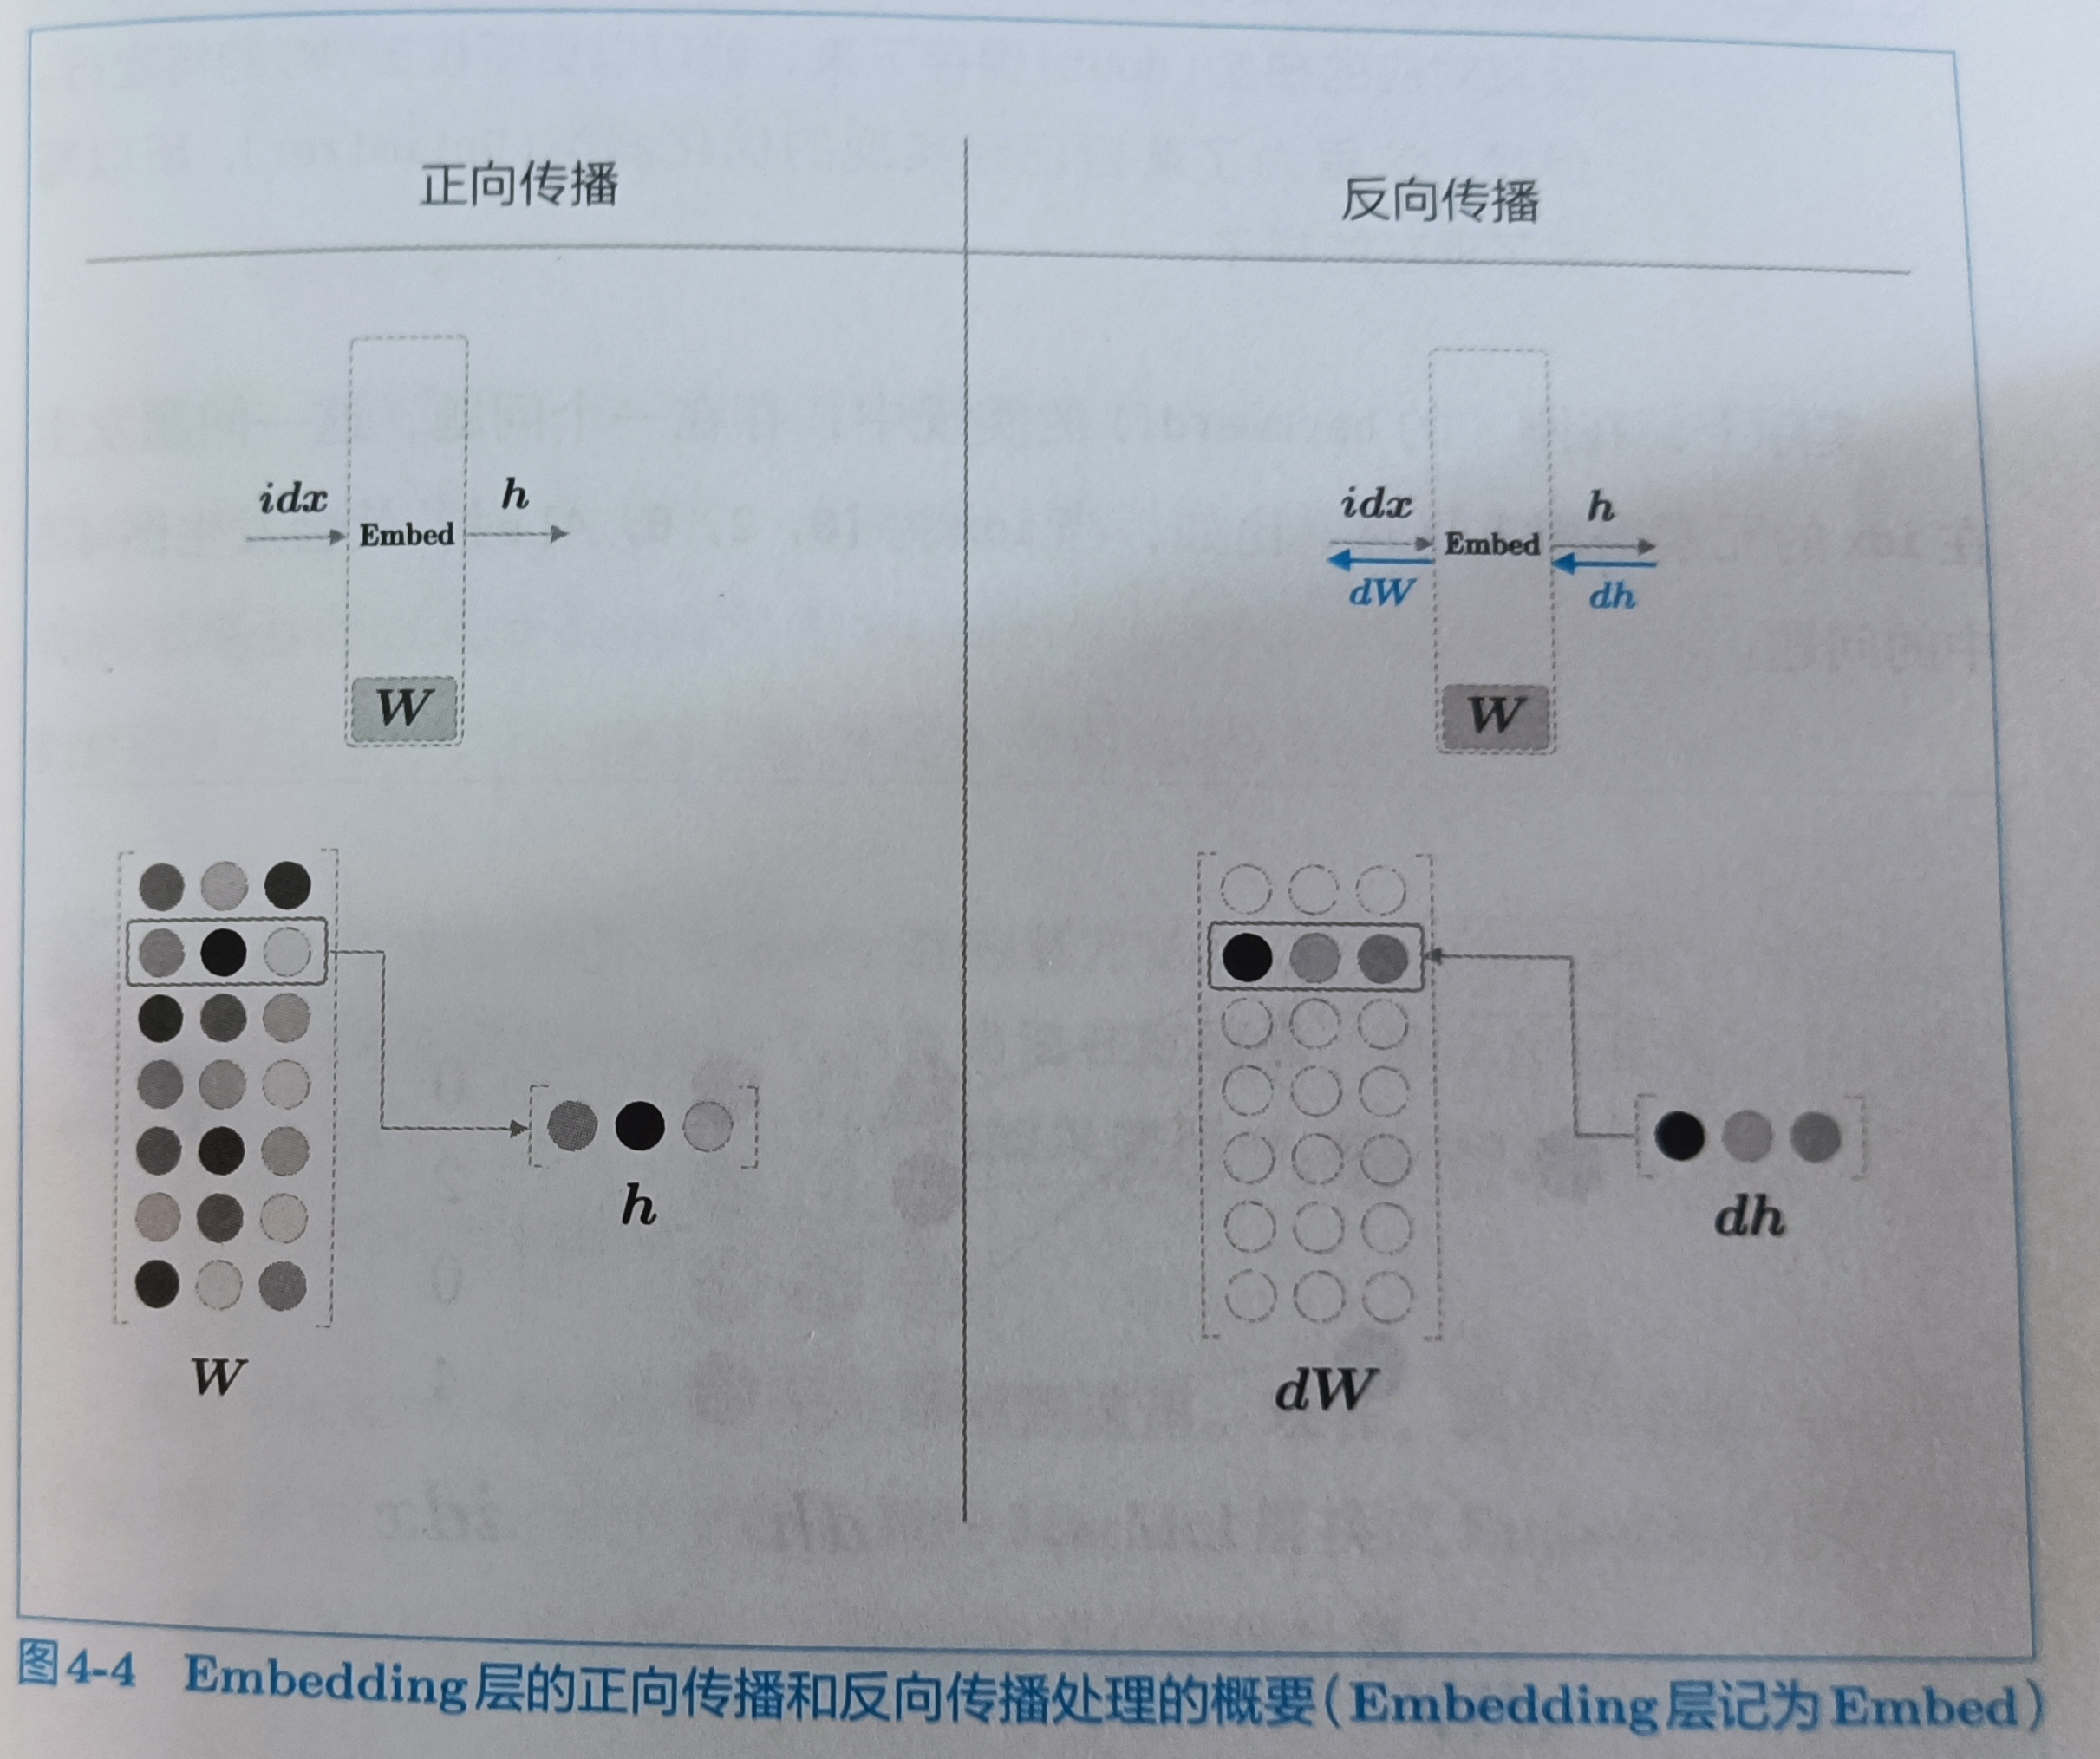
反向传播的实现,如果我们一次取多行的索引的话,比如取索引[0,1,0,2]的话第0行会被写入两次,这里的解决方法是将那行的值进行累加
def backward(self,dout):
    dW, = self.grads
    dW[...] = 0

    for i,word_id in enumerate(self.idx):
        dW[word_id] += dout[i]

	# np.add.at(dW,self.idx,dout) 比for循环更快

    return None
我们可以将MatMul层换成Embedding层。这样一来,既能减少内存开销,又能避免不必要的计算
4.2 word2vec的改进
p137
4.2.1 中间层之后的计算问题
word2vec的第二个改进是中间层之后的处理,即矩阵乘积和softmax层的计算。这里采用的方法是负采样。使用Negative Sampling替代Softmax,无论词汇多么大,都可以使计算量保持较低或恒定。
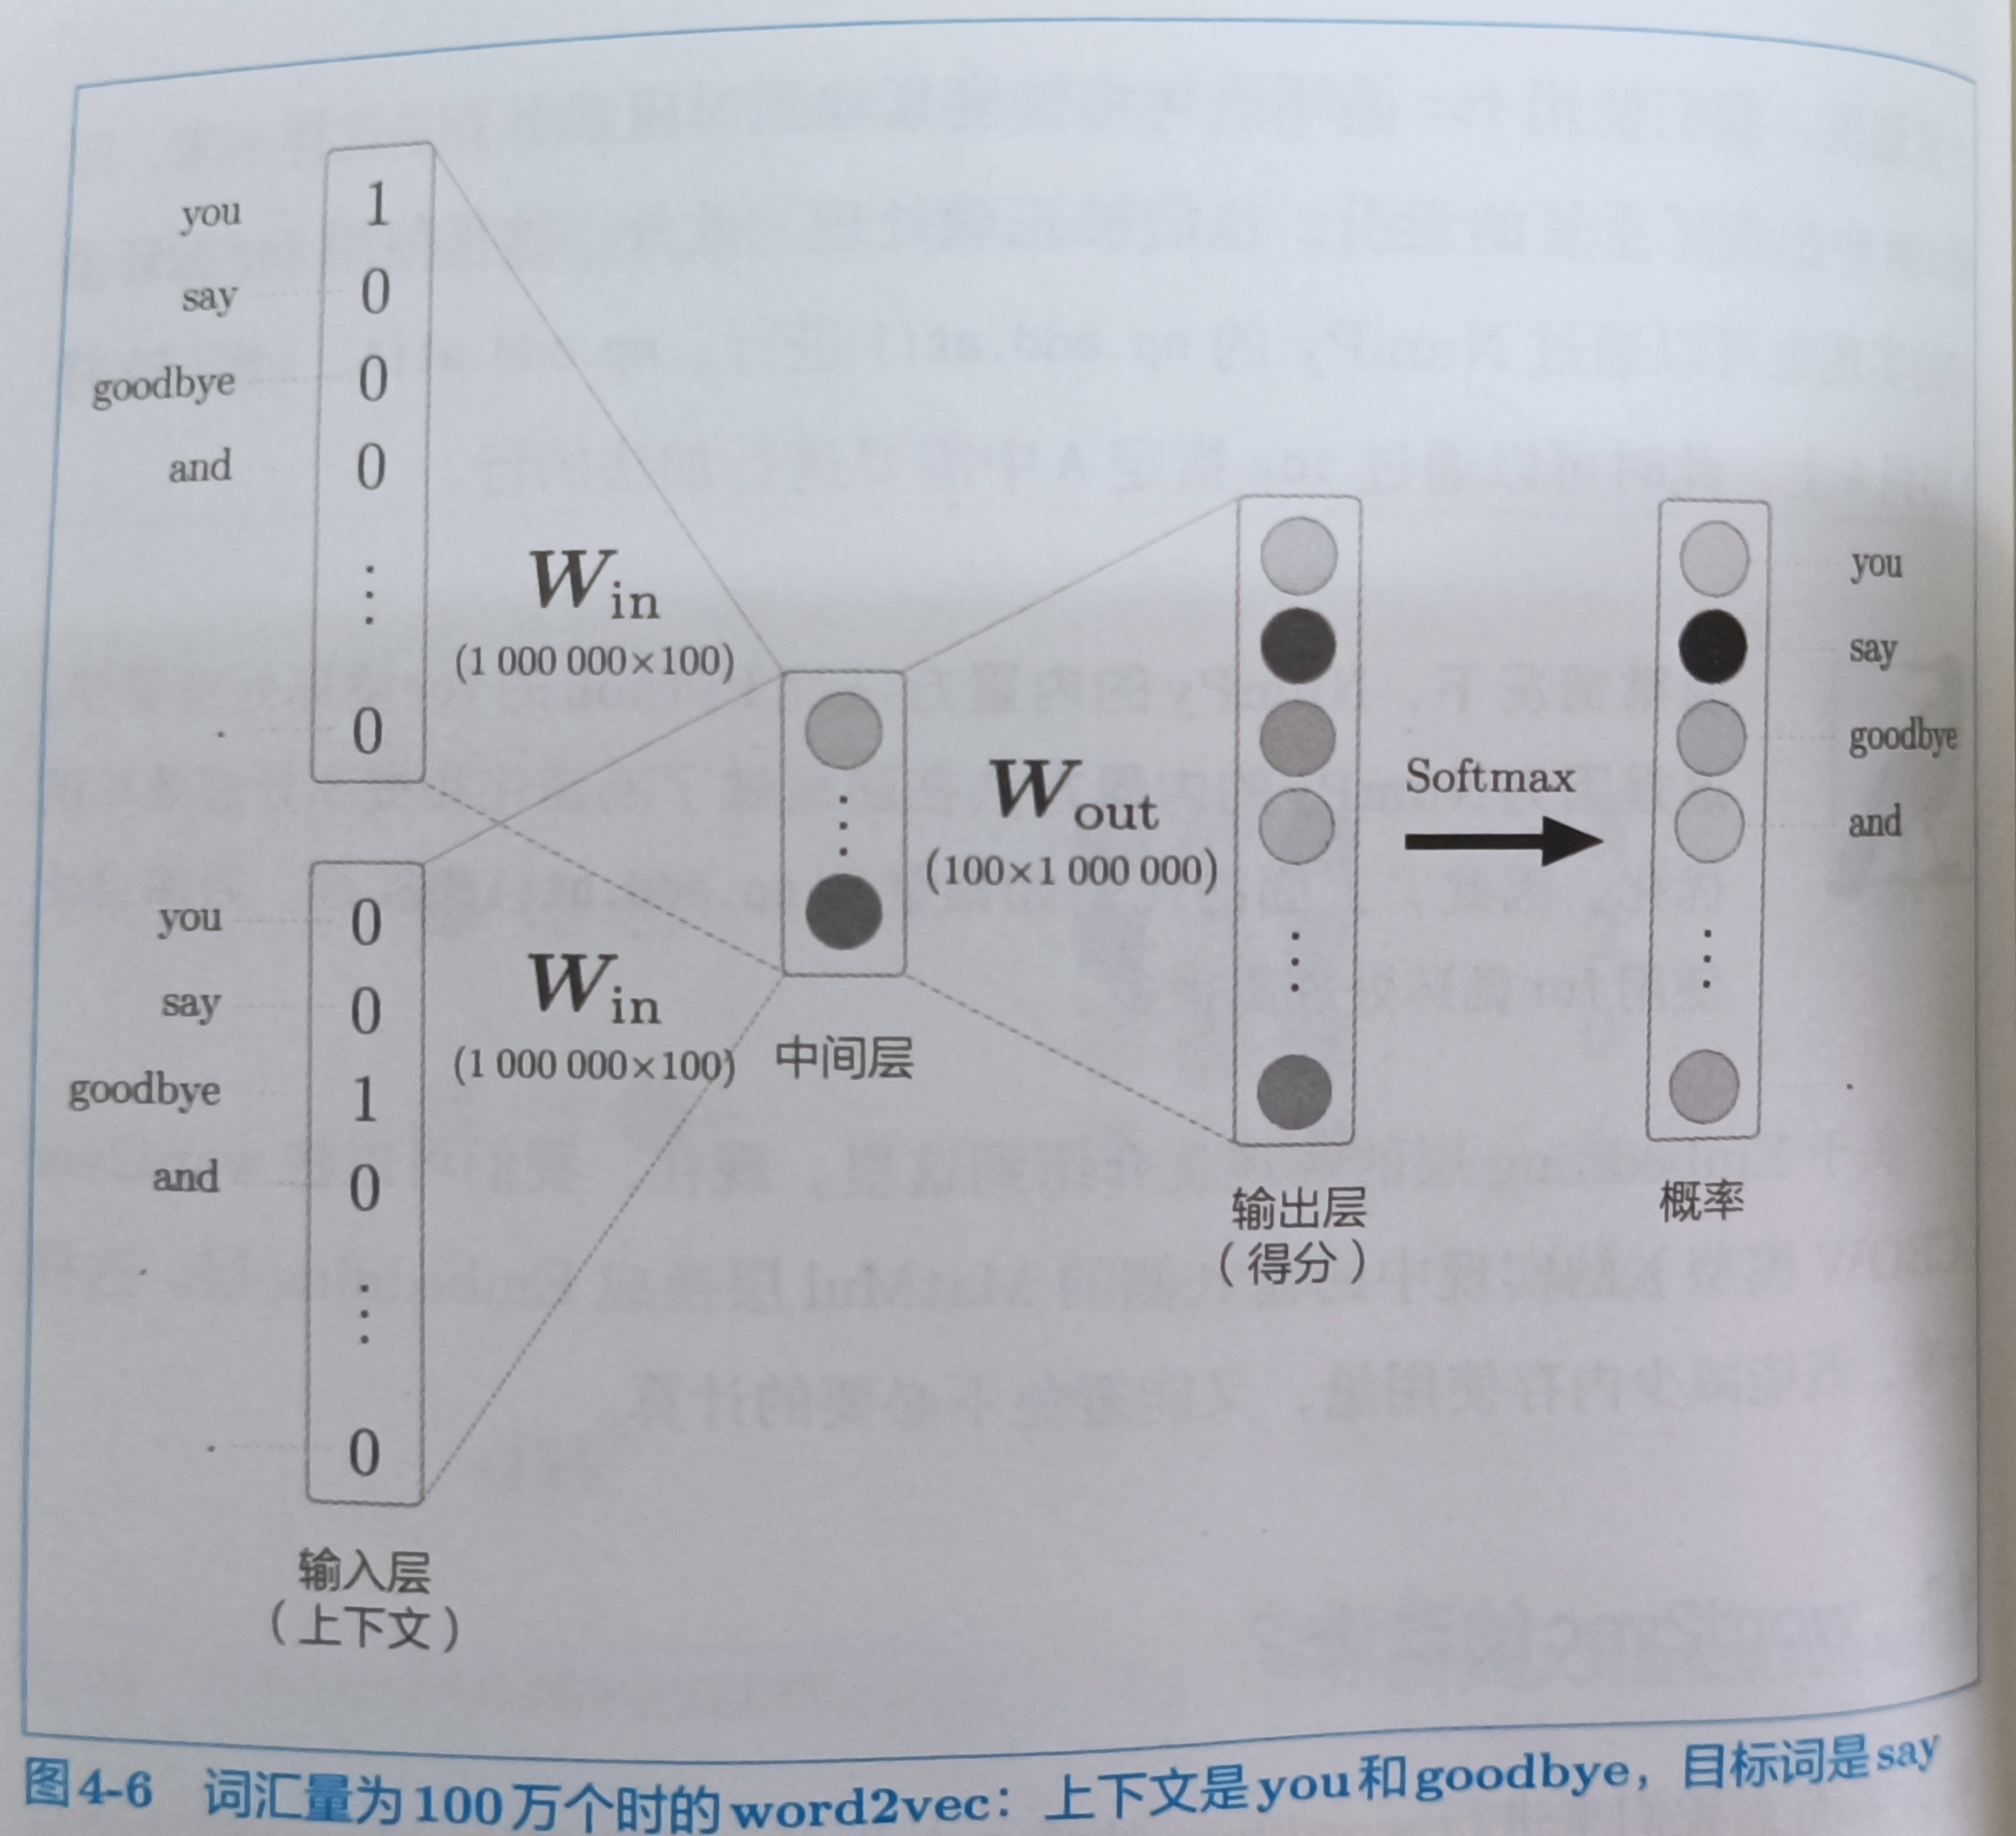
这里有两个问题
- 中间层的神经元和权重矩阵(Wout)的乘积
- Softmax层的计算
第一个问题是巨大的矩阵计算,需要对矩阵进行轻量化。其次softmax随着单词数的增加,计算会变得慢起来。
4.2.2 从多分类到二分类
p139
负采样的关键思想在于二分类问题,更准确的说,是用二分类问题拟合多分类问题。(二分类问题就是回答yes或no的问题)
我们可以把从100万个单词中选择1个正确单词的任务,当做二分类问题。
假如,现在上下文是you和goodbye,我想知道say的得分的话,其实,输出层只要一个神经元就可以了。如下图所示
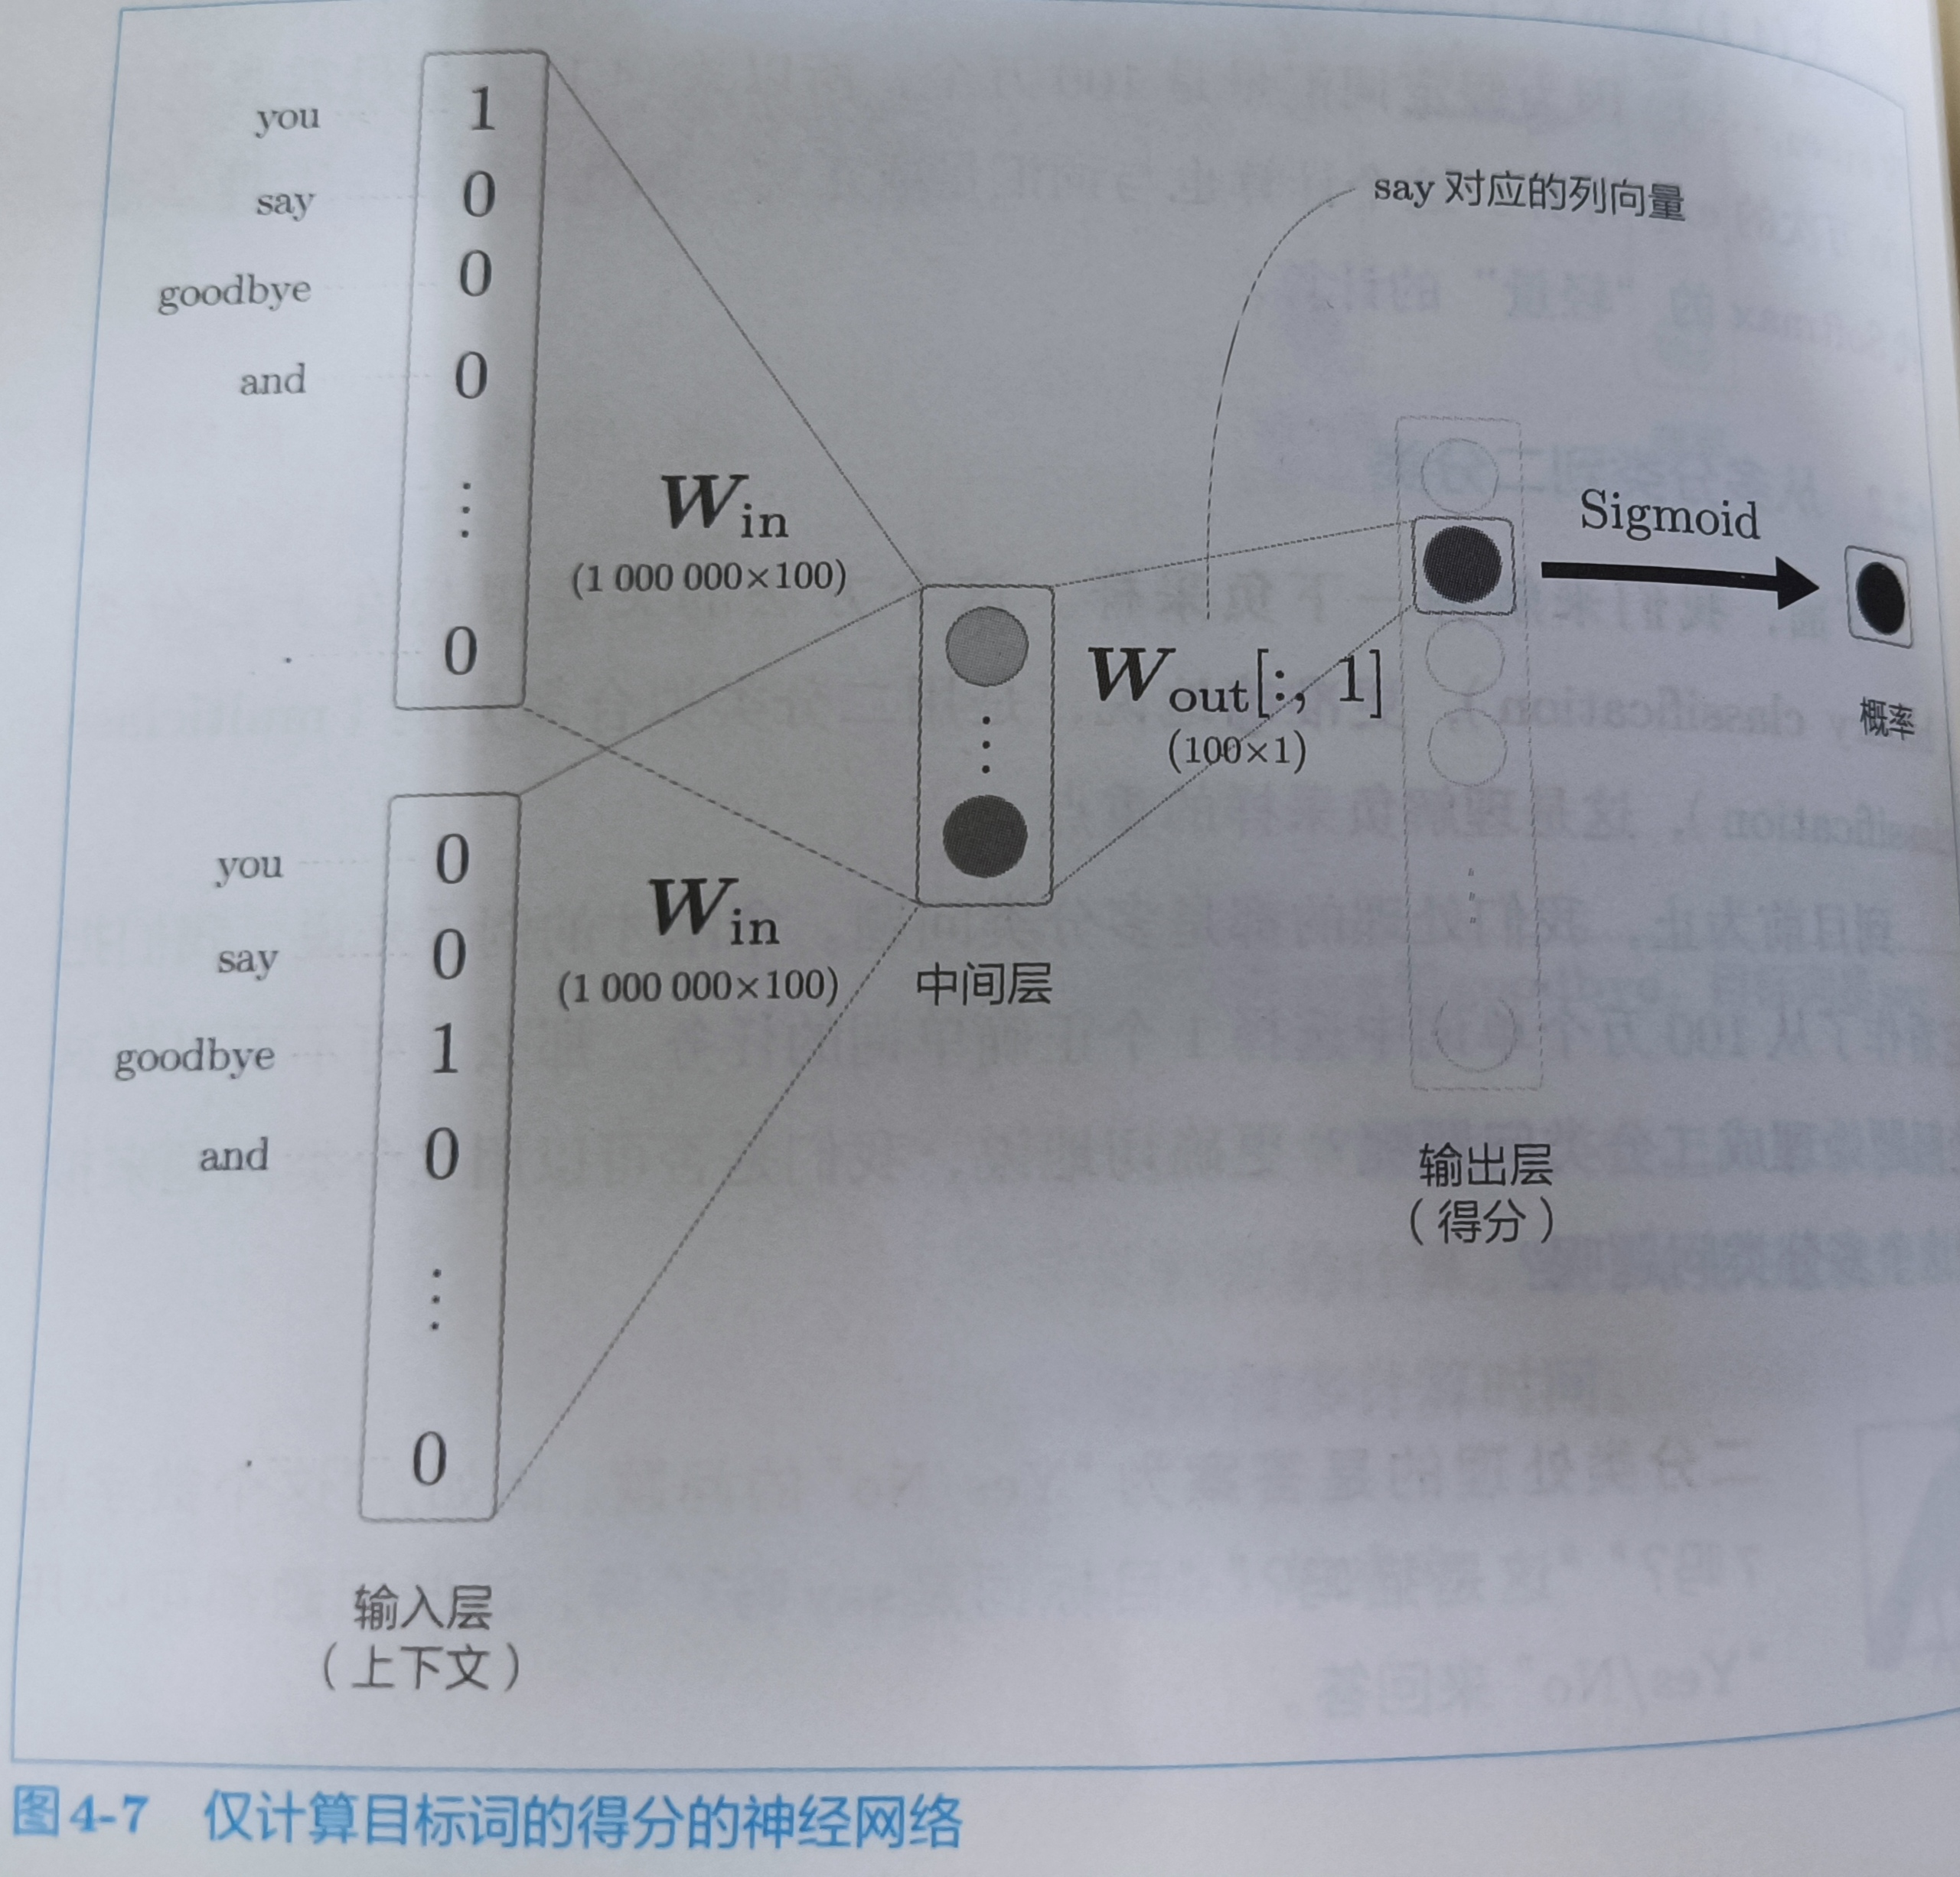
注意,这里CBOW模型规定you和goodbye乘以Win后会加在一块,然后取平均,也就是最后shape是(1,100)
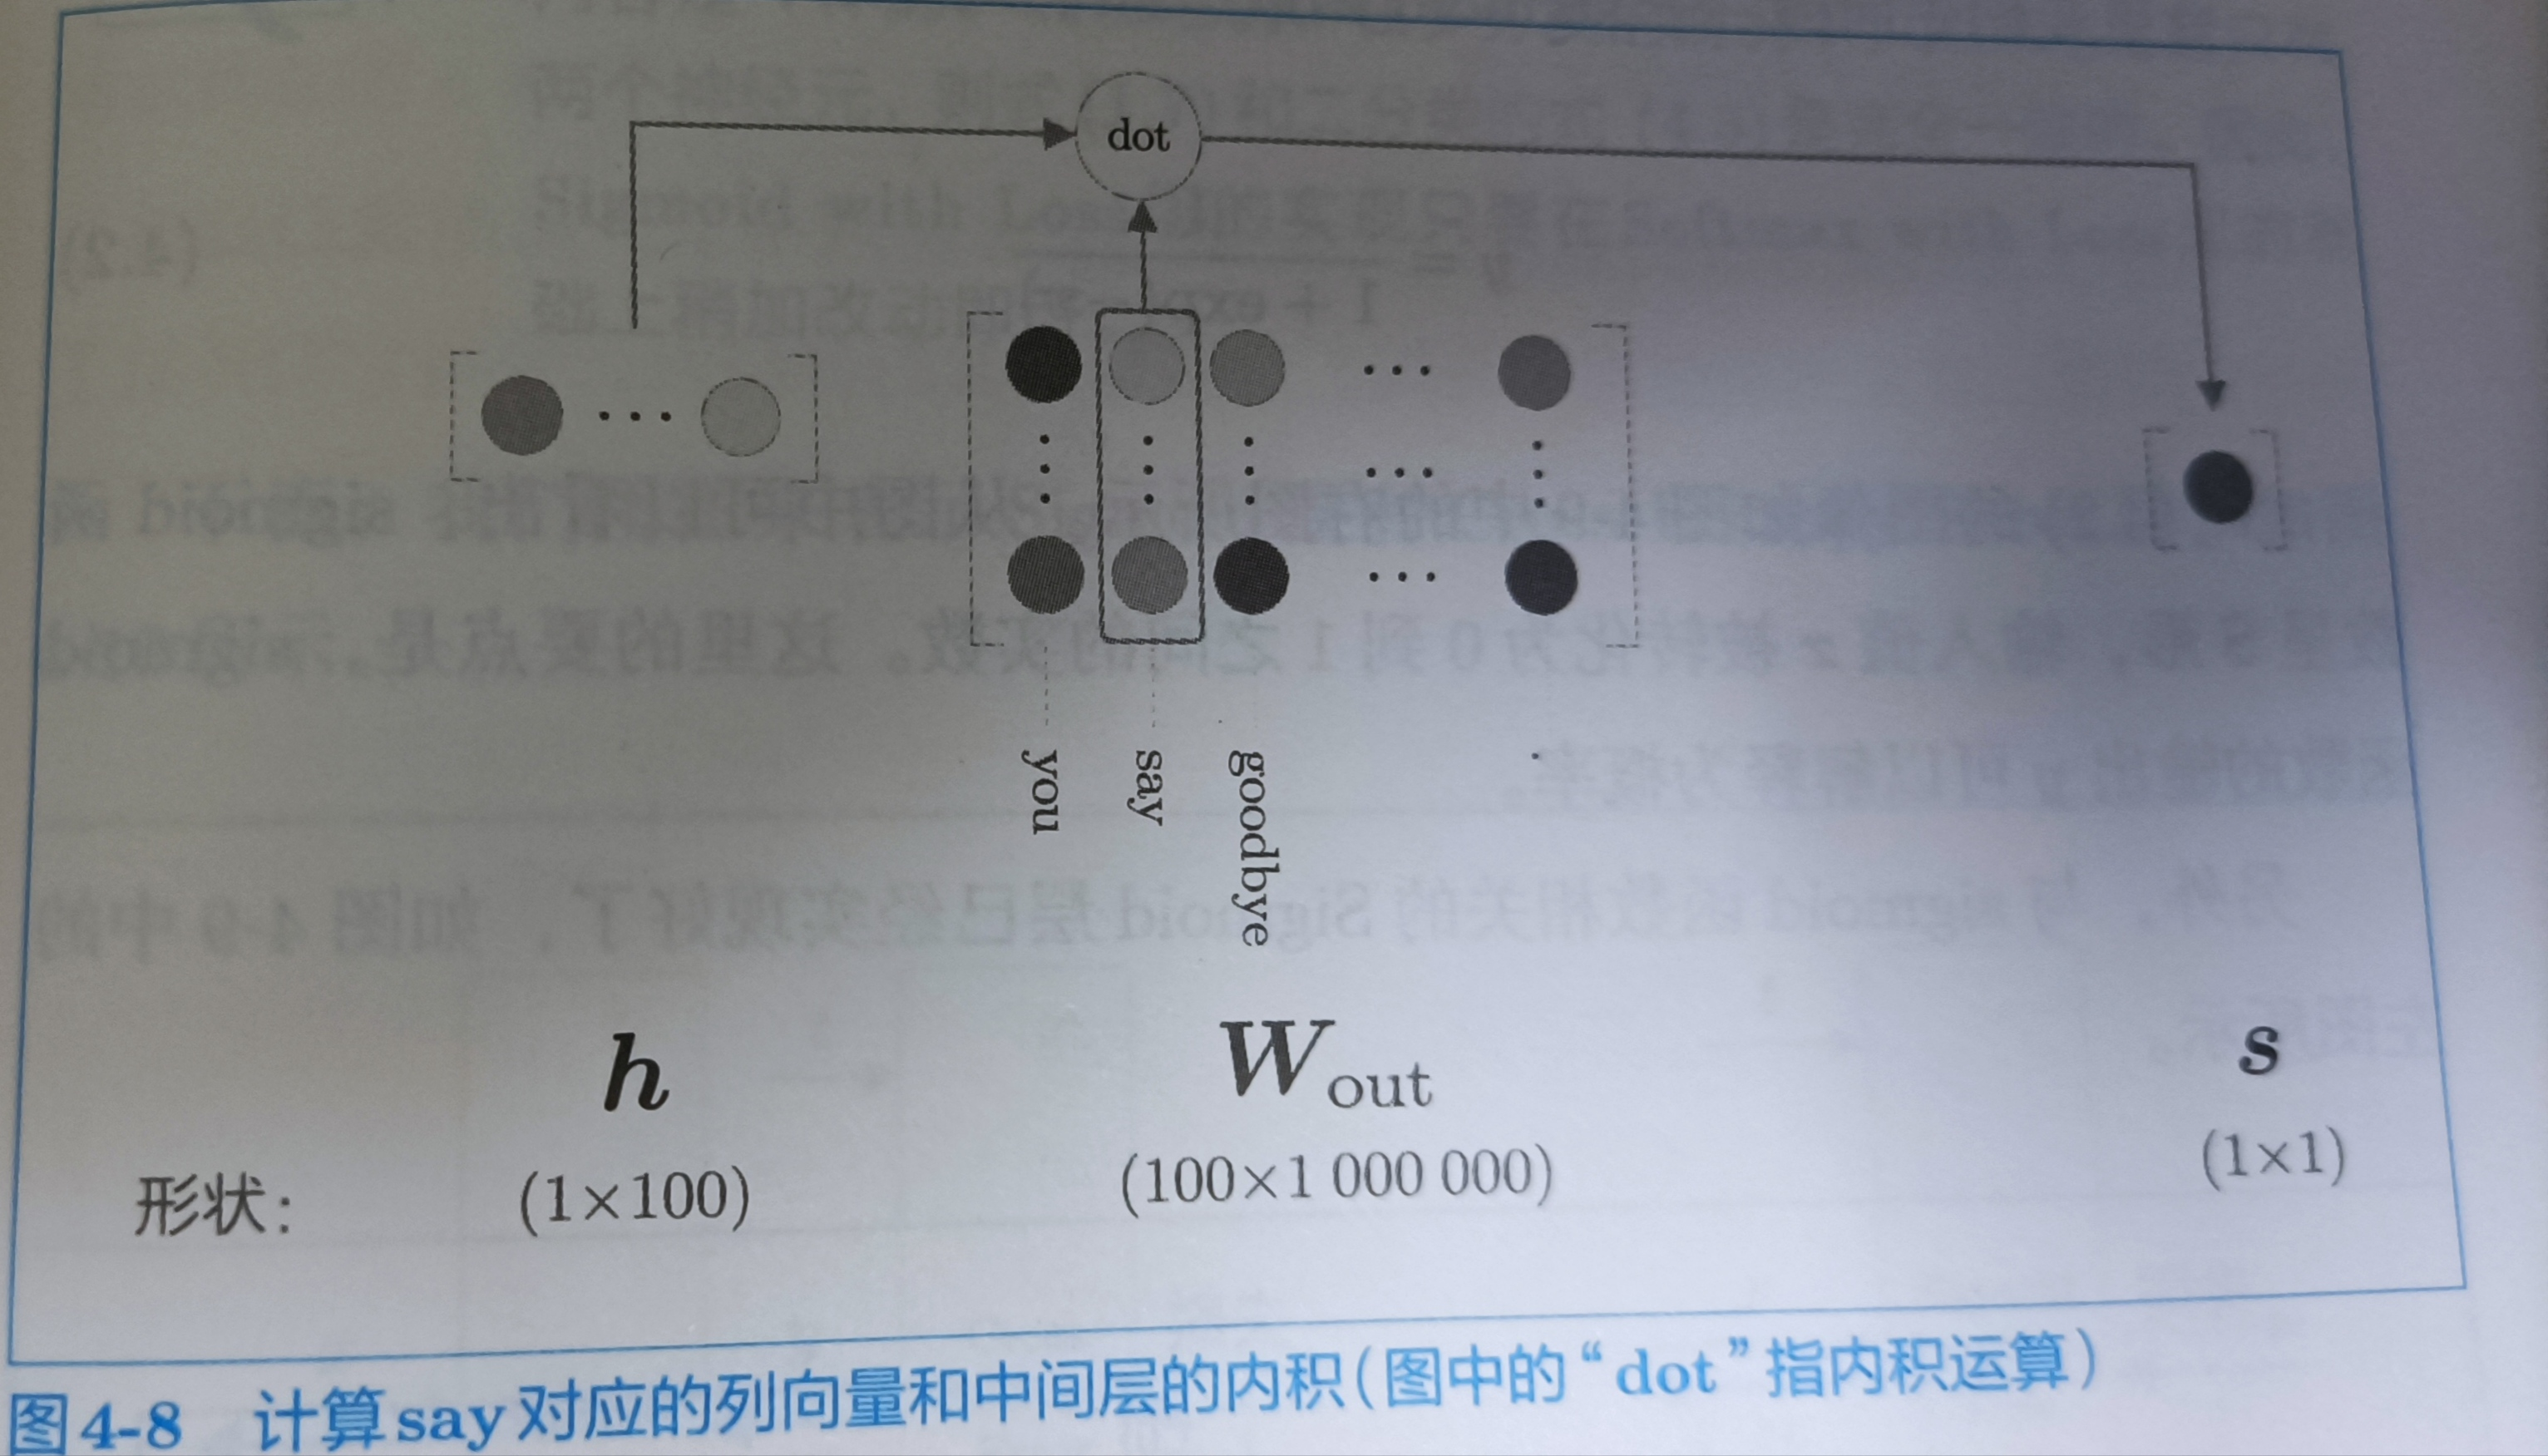
如上图所示,输出层的神经元只有一个。要想计算中间层和输出层的权重,只需要提取say对应的列,然后与中间层的神经元计算内积就可以了。计算过程如下
4.2.3 sigmoid函数和交叉熵误差
p141
要使用神经网络解决二分类问题,需要使用sigmoid函数将得分转换为概率。交叉熵作为损失函数。通过sigmoid函数得到概率y后,可以由概率y计算损失,用于sigmoid的损失函数也是交叉熵误差,其数学式如下
y是sigmoid的输出,t是正确解标签,取值为0或者1。1为Yes,0为No。sigmoid函数和交叉熵误差的组合产生了y-t这样漂亮的结果,softmax函数和交叉熵误差的组合,或者恒等函数和均方误差的组合也会在反向传播时传播y-t。
4.2.4 多分类到二分类的实现
p144
二分类的网络结构图,dot:在原来的位置上乘,还有就是之前是多分类问题,target可以是0和1以外的其它的值,现在变为二分类问题,target(正确解标签)变为1,这点注意
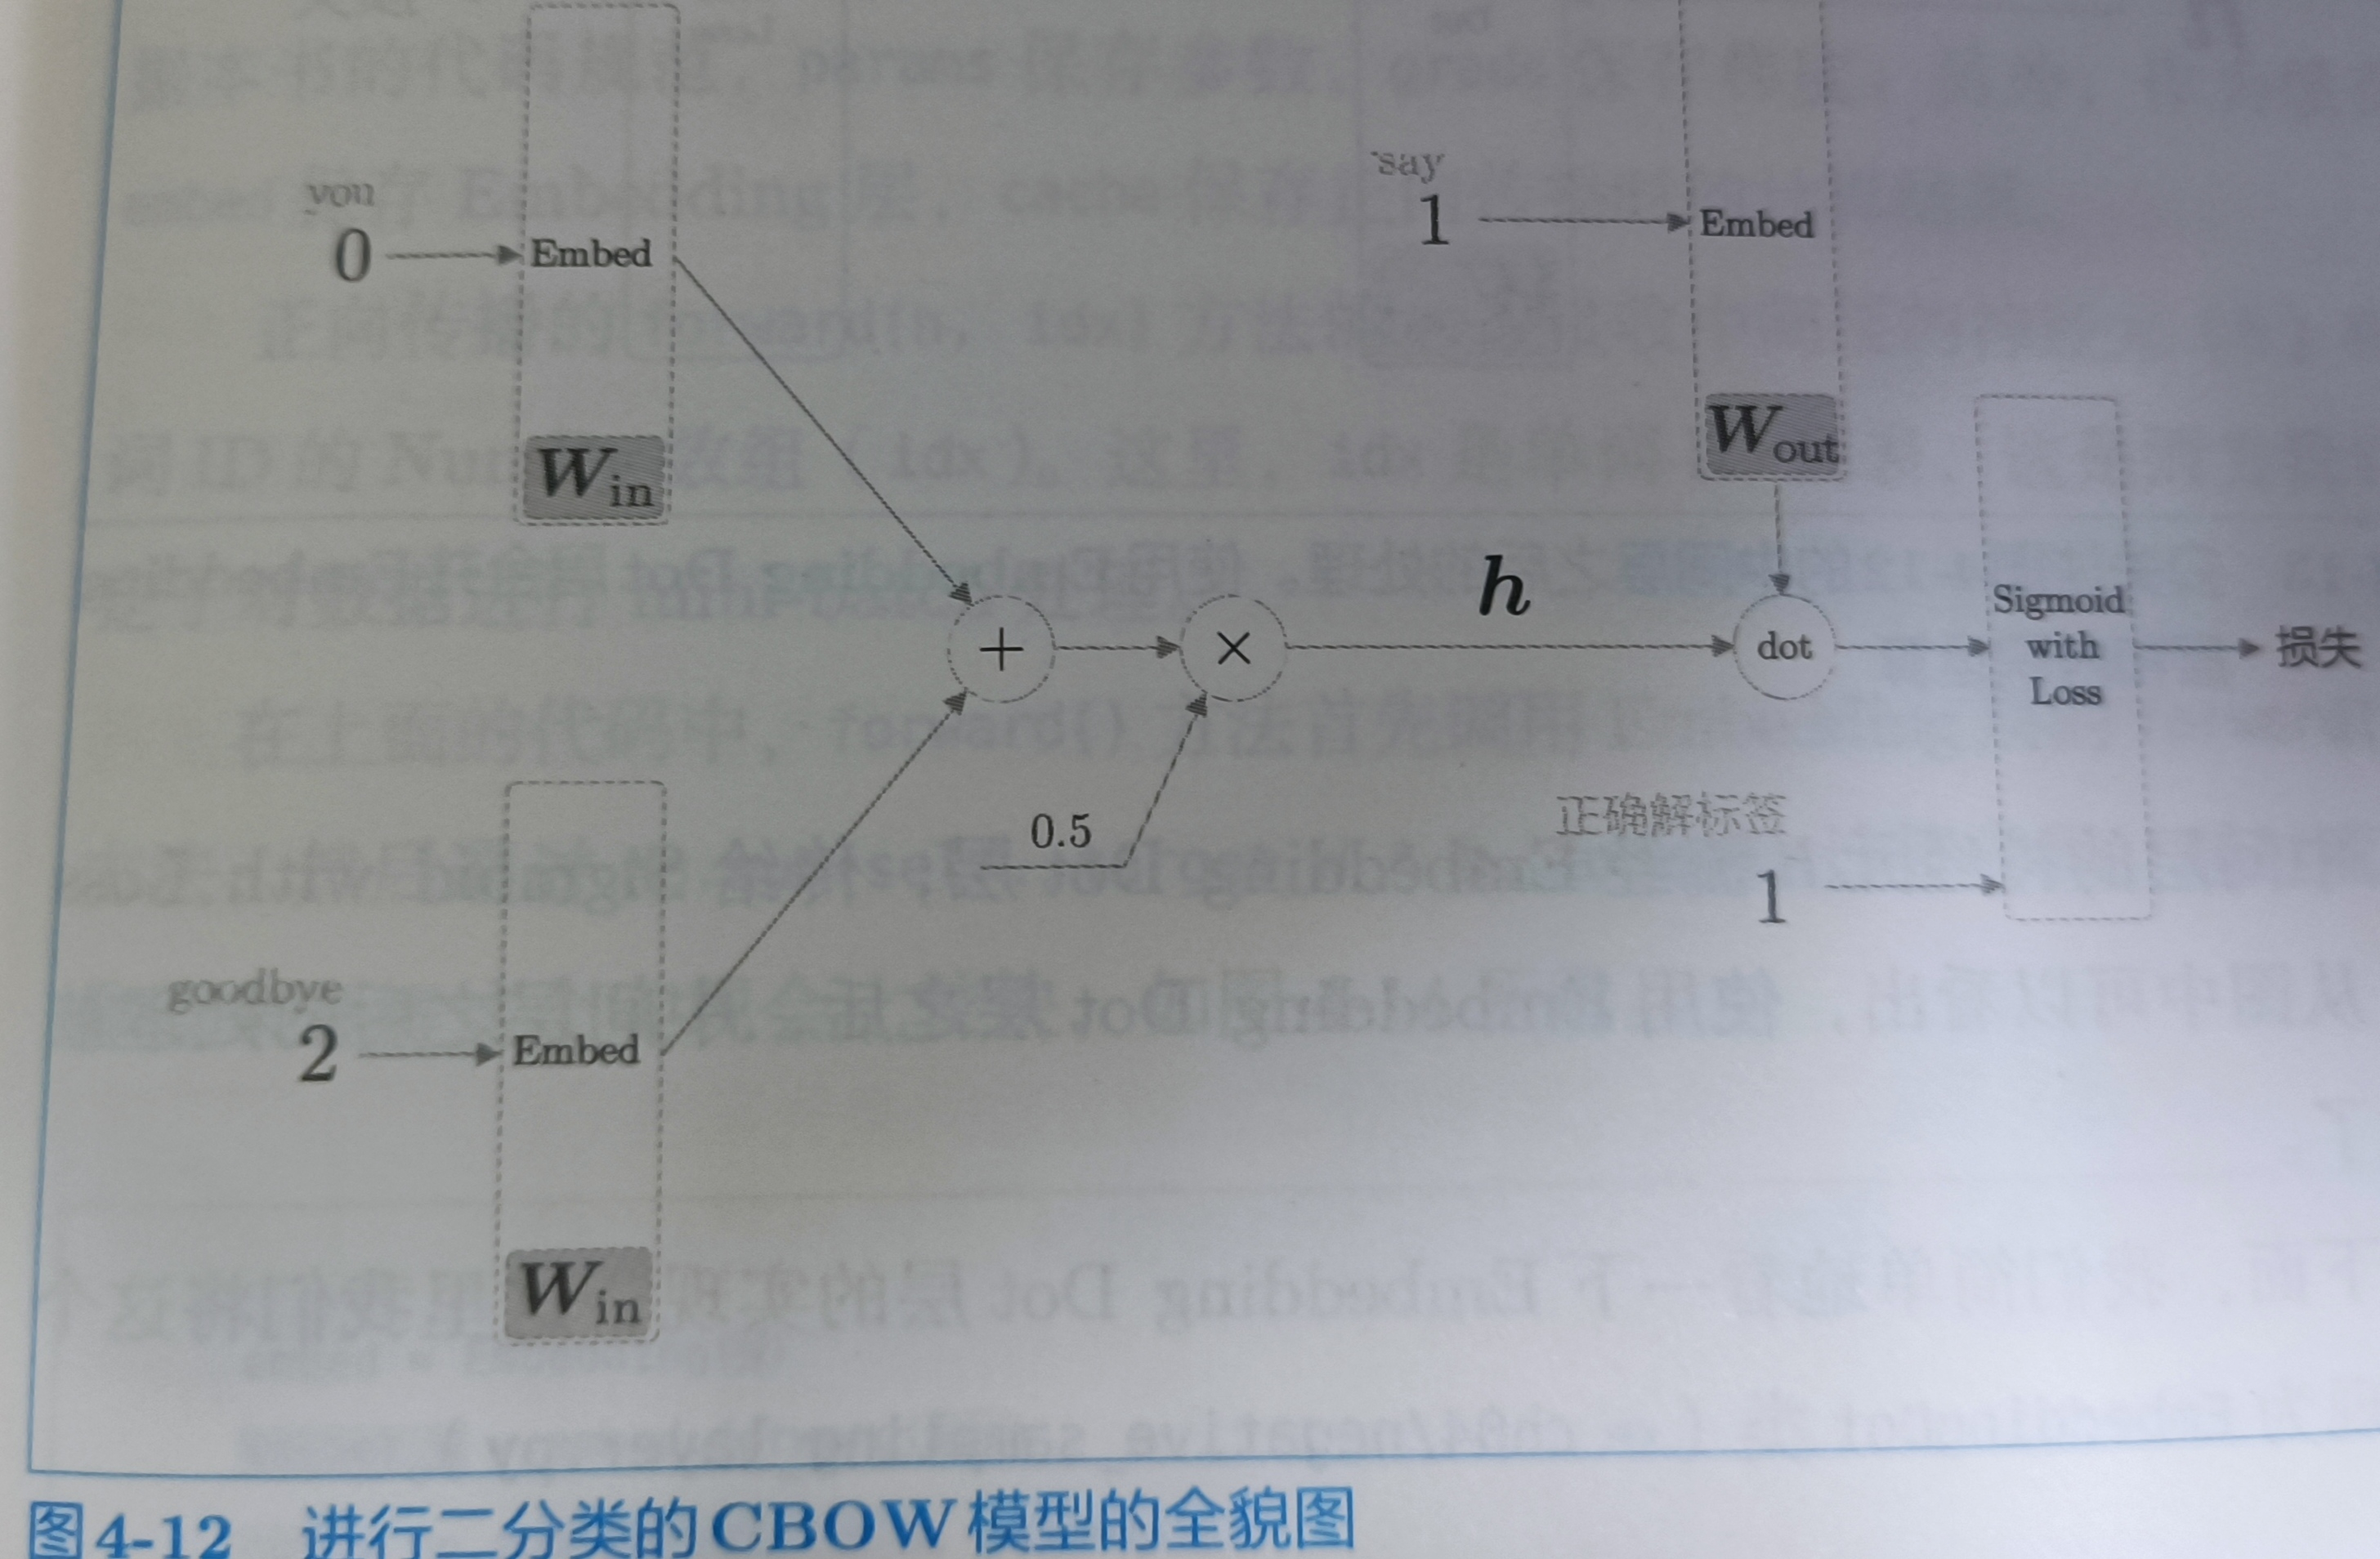
后半部分可以画成下图
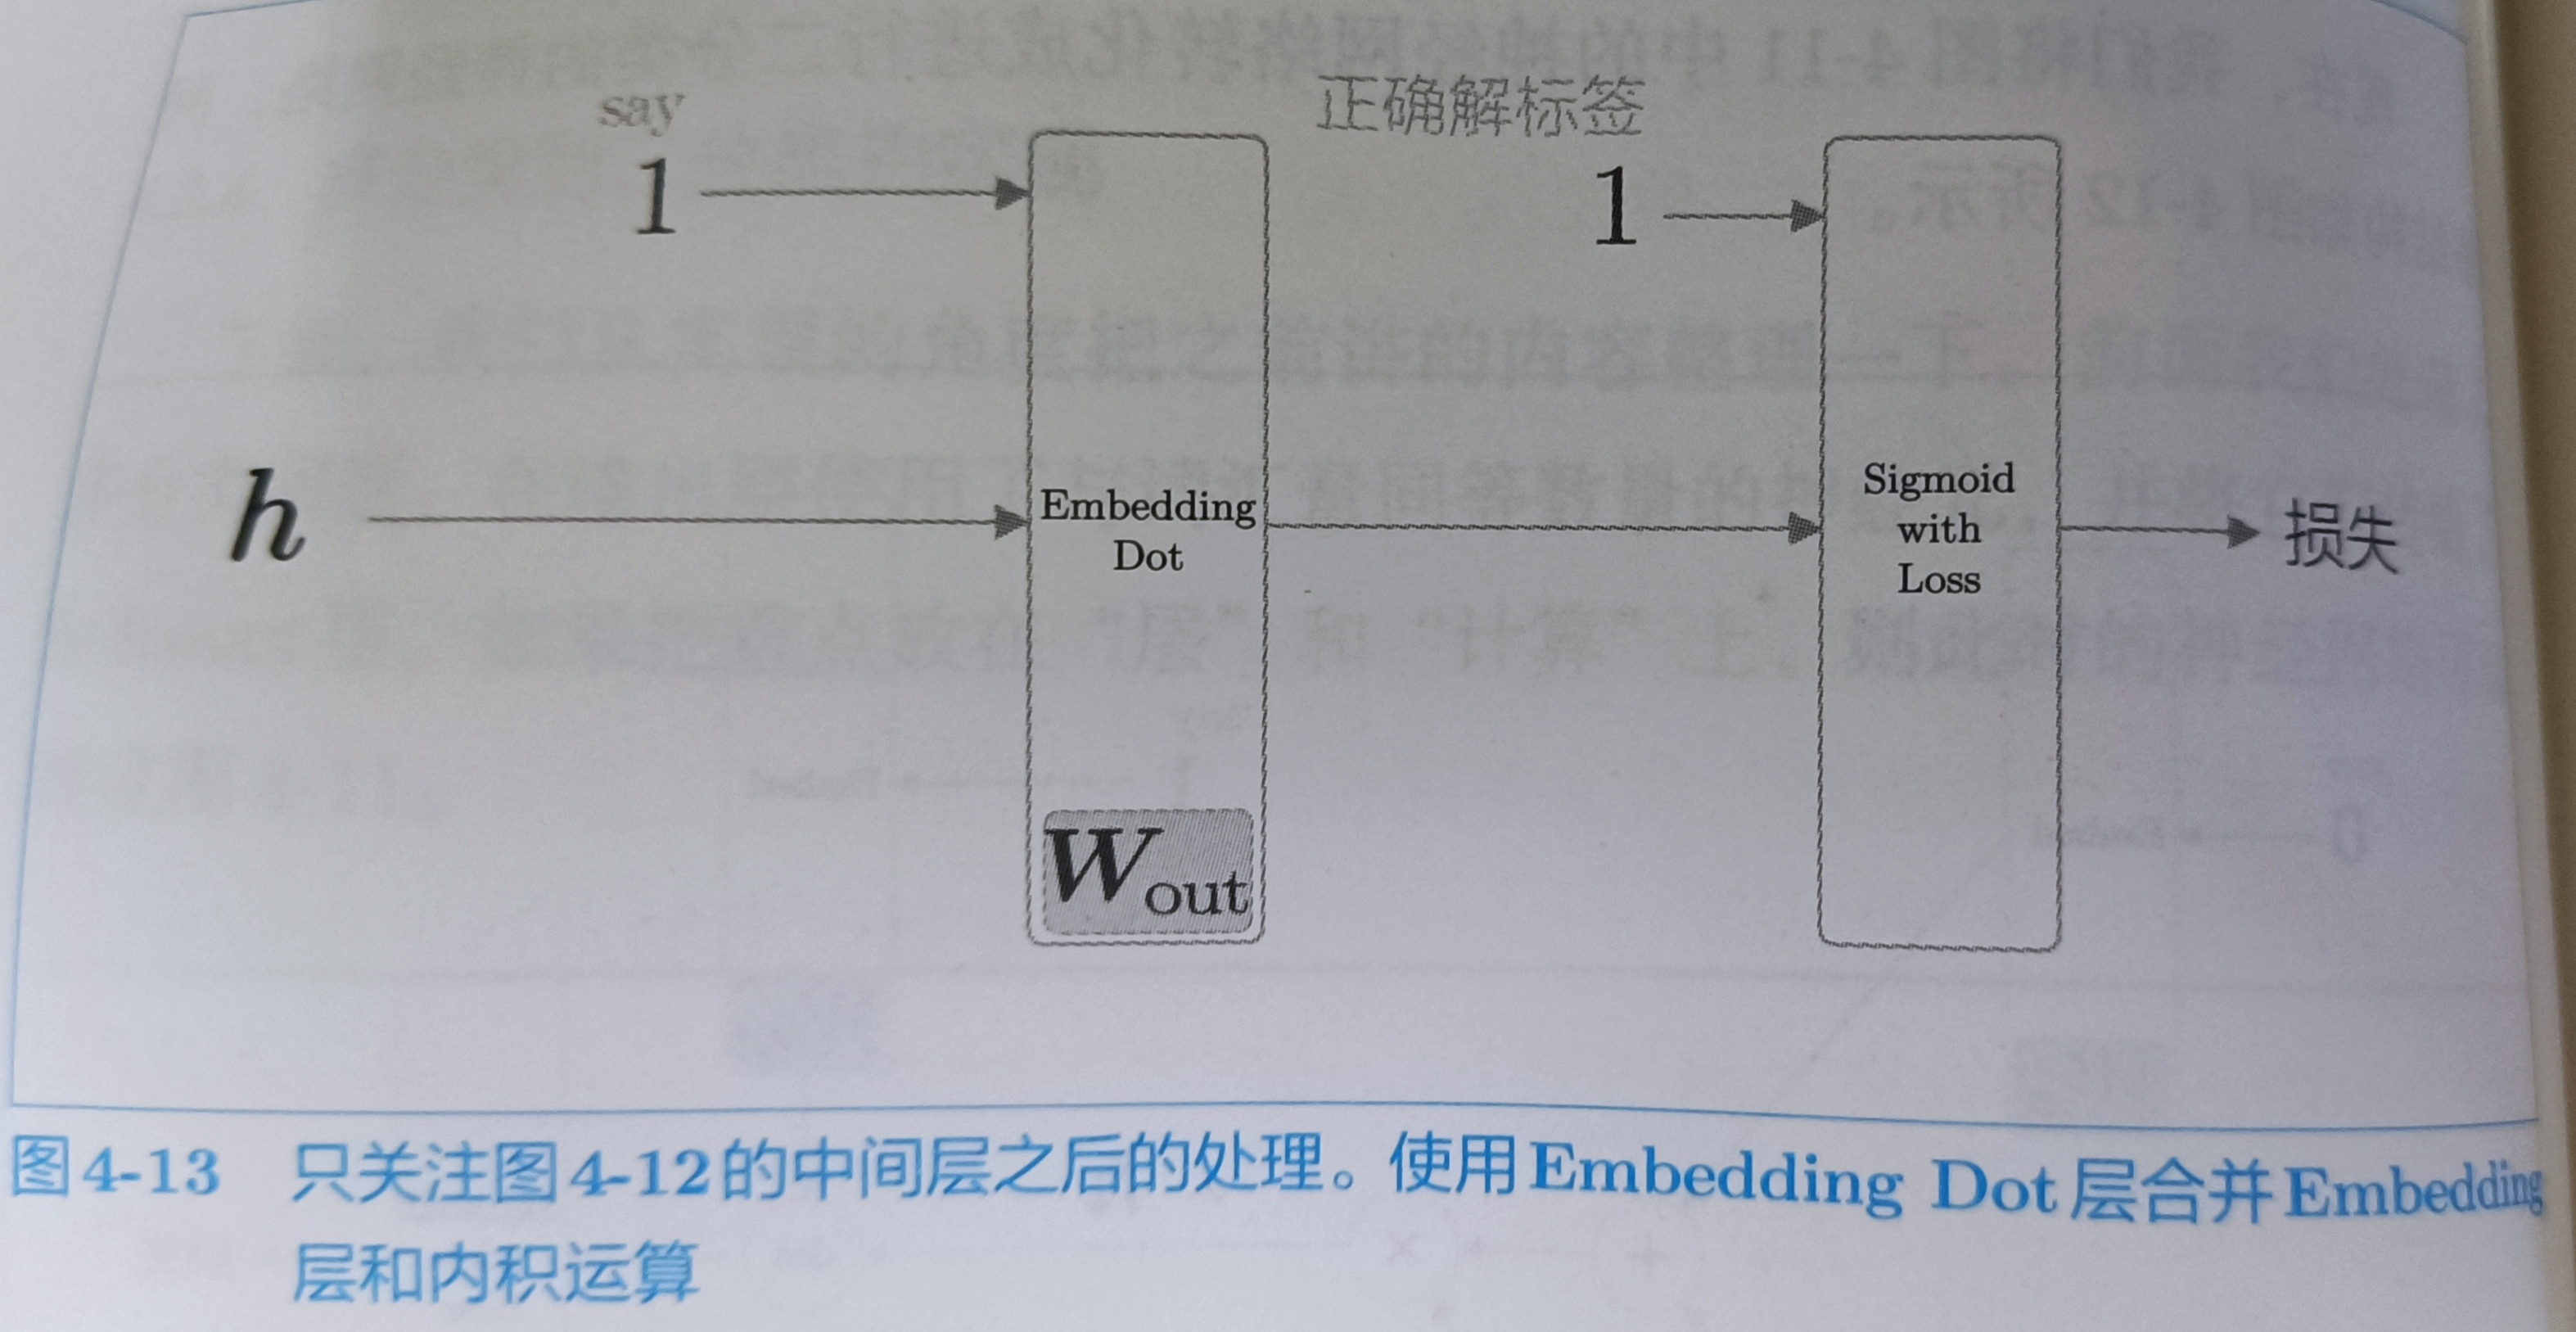
EmbeddingDot实现
import numpy as np

class EmbeddingDot:
    def __init__(self,W):
        self.embed = Embedding(W)
        self.params = self.embed.params
        self.grads = self.embed.grads
        self.cache = None

    def forward(self,h,idx):
        target_W = self.embed.forward(idx)
        # 因为算的是内积,target_w * h 和 h * target_w 没有区别
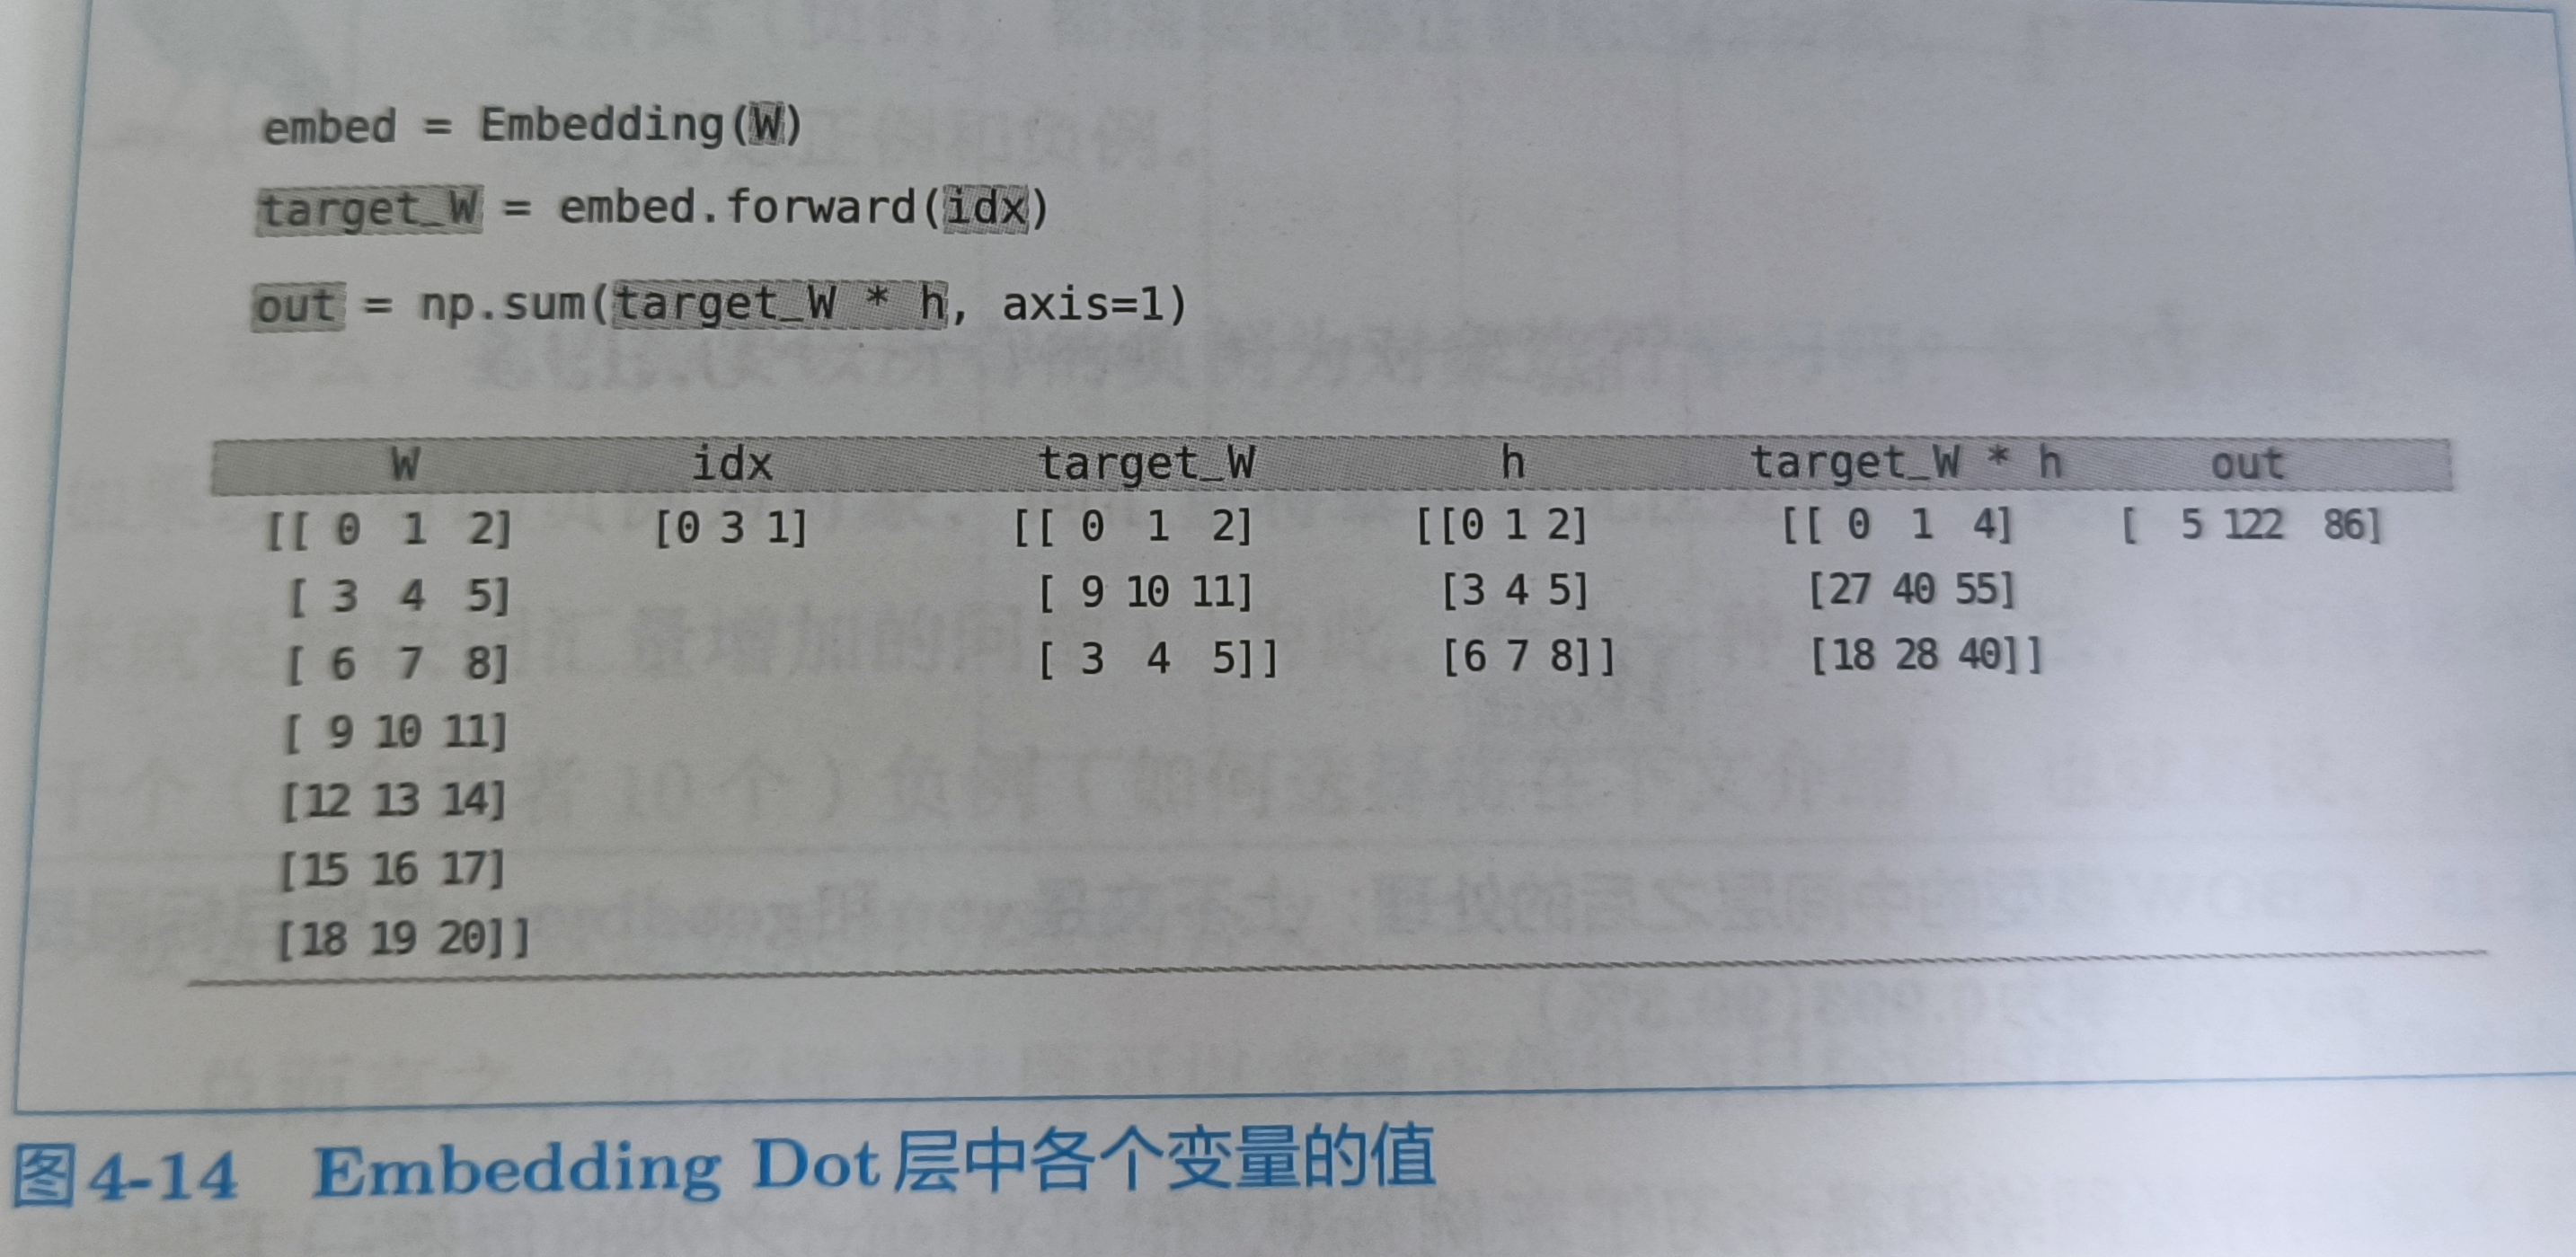
        out = np.sum(target_W * h ,axis=1)

        # 保存正向传播的结果
        self.cache = (h,target_W)
        return out

    def backward(self,dout):
        h,target_W = self.cache
        dout = dout.reshape(dout.shape[0],1)

        dtarget_W  = dout * h
        self.embed.backward(dtarget_W)l
        dh = dout * target_W
        return dh
内积的先后顺序不影响
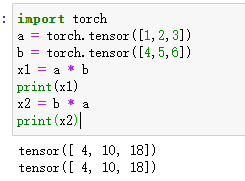
可以通过下图理解
4.2.5 负采样
p148
当前的神经网络只学习了正例say,但是对say之外的负例一无所知。我们要做的是让正例的sigmoid输出无限接近1,负例的sigmoid输出无限接近0。为了把多分类问题转换为二分类问题,能够正确的处理正例和负例,需要同时考虑正例和负例。当然这里只考虑少量负例,然后将正例和负例的损失累加起来。
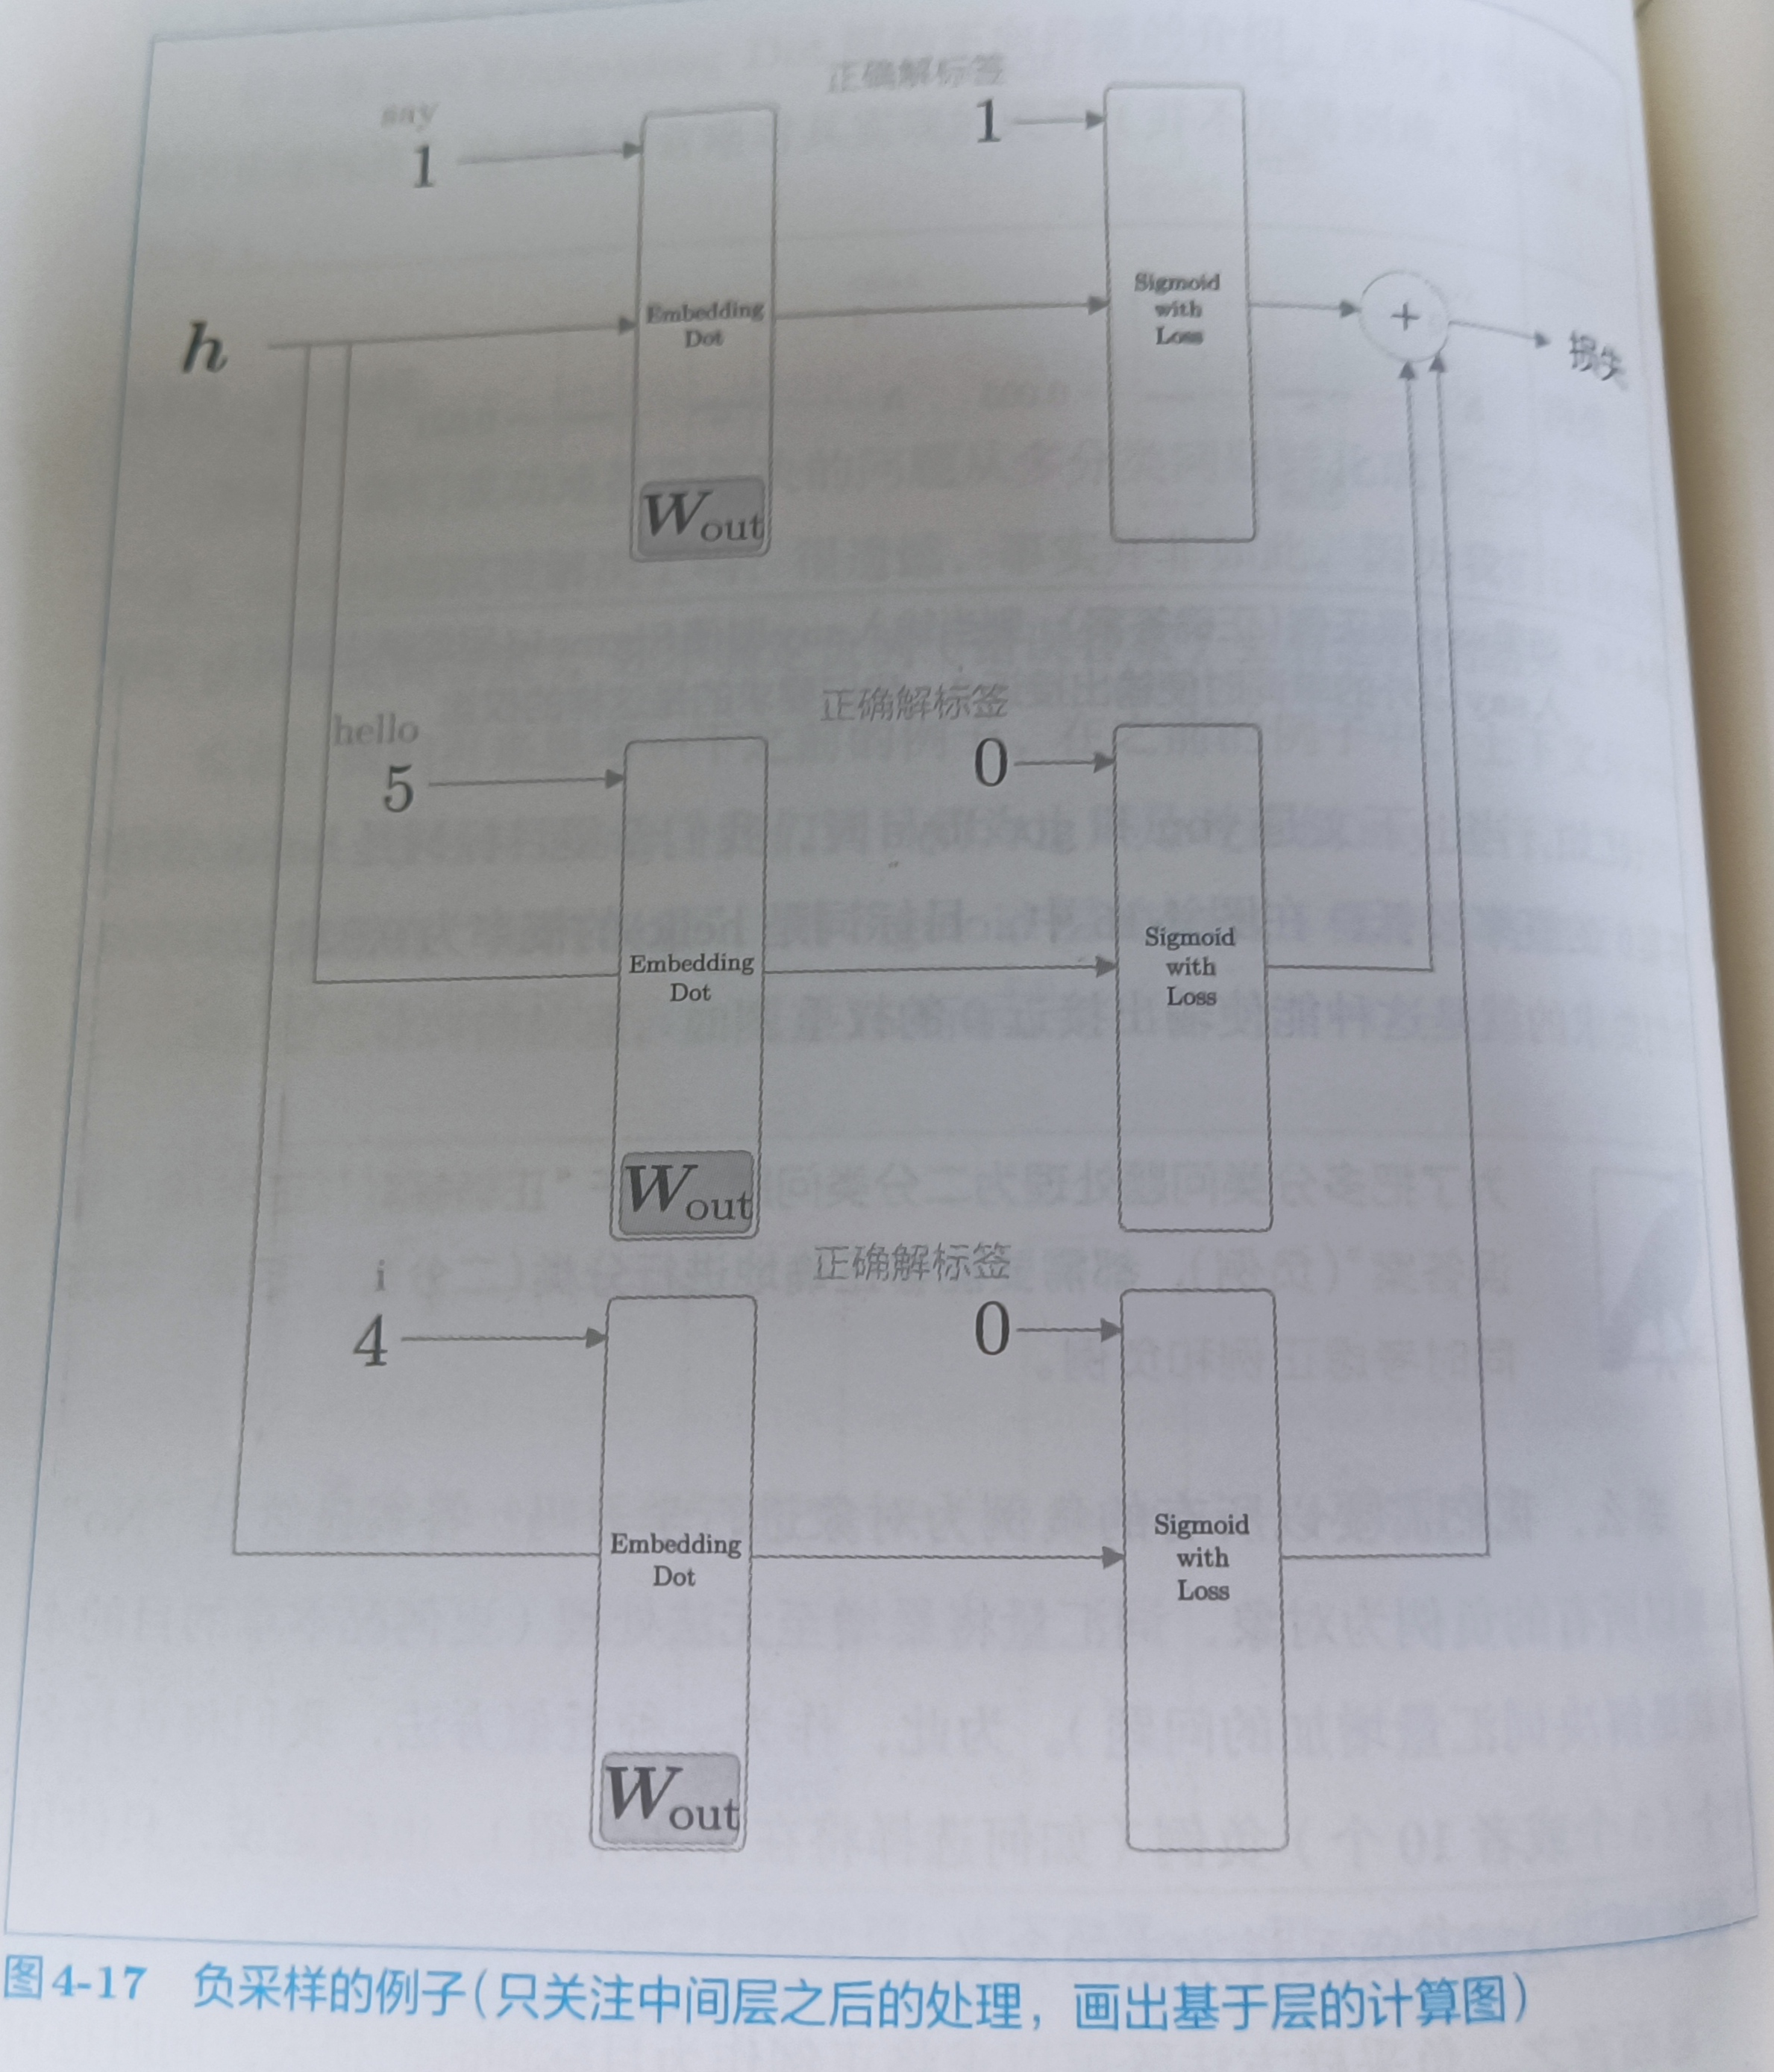
4.2.6 负采样的采样方法(没弄懂)
p151
如何抽取负例,基于语料库的统计数据进行采样的方法比随机抽样要好,具体就是,让高频词容易被抽到,低频词不容易被抽到,有必要将负例限定在较小范围内(5个或10个)。
在采样之前,我们先用下np.random.choice()方法
# 从0到9中随机挑选一个数字
np.random.choice(10) # 9

# 随机选一个元素
words = ['you','say','goodbye','I','hello','.']
np.random.choice(words) # hello

# 有放回采样5次
np.random.choice(words,size=5) # array(['goodbye', '.', 'you', 'I', '.'], dtype='<U7')

# 无放回采样5次
np.random.choice(words,size=5,replace=False) # array(['say', 'hello', 'goodbye', 'you', '.'], dtype='<U7')

# 基于概率分布进行采样
p = [0.5,0.1,0.05,0.2,0.05,0.1]
np.random.choice(words,p=p) # 'I'
word2vec中提出的负采样对刚才的概率分布增加了一个步骤,对原来的概率分布取0.75次方
通过这个0.75次方可以让低频单词的概率稍微变高
p = [0.7,0.29,0.01]
new_p = np.power(p,0.75)
new_p /= np.sum(new_p)
print(new_p) # [0.64196878 0.33150408 0.02652714]
至于为啥取0.75,这个随缘取的哈
corpus = np.array([0,1,2,3,4,1,2,3])
power = 0.75
sample_size = 2

sampler = UnigramSampler(corpus,power,sample_size)
target = np.array([1,3,0])# 这里的target的作用是在embedding层,现在的正确解是1,不是其它
negative_sample = sampler.get_negative_sample(target)
print(negative_sample)
# [[0 3]
#  [1 2]
#  [2 3]]
这个UnigramSampler()作用生成负例样本
class NegativeSamplingLoss:
    def __init__(self, W, corpus, power=0.75, sample_size=5):
        self.sample_size = sample_size
        self.sampler = UnigramSampler(corpus, power, sample_size)
        self.loss_layers = [SigmoidWithLoss() for _ in range(sample_size + 1)]  # 5个负例样本,一个正例,所以+1
        self.embed_dot_layers = [EmbeddingDot(W) for _ in range(sample_size + 1)]

        self.params, self.grads = [], []
        for layer in self.embed_dot_layers:
            self.params += layer.params
            self.grads += layer.grads

    def forward(self, h, target):
        # target是一维的,batch_size就是target的个数
        batch_size = target.shape[0]
        # 根据target个数,生成相应的负样本
        negative_sample = self.sampler.get_negative_sample(target)

        # 正例的正向传播,target是向量,h计算完后,h分别与正例和负例进行dot运算,正例和负例都是从w_out来的,不同h对应不同的target,不然为什么h和target是dot运算,不懂看上面的图4-14,那个batch_size是3,h是3×3
        score = self.embed_dot_layers[0].forward(h, target)
        # 正确标签是1
        correct_label = np.ones(batch_size, dtype=np.int32)
        # target是向量,正确标签是1,计算它们之间的loss,算完后还是向量
        loss = self.loss_layers[0].forward(score, correct_label)

        # 负例的正向传播,h与w_out的embedding中负样本(这里的负样本是随机选的)进行dot运算
        negative_label = np.zeros(batch_size, dtype=np.int32)
        for i in range(self.sample_size):
            negative_target = negative_sample[:, i]
            score = self.embed_dot_layers[1 + i].forward(h, negative_target)
            loss += self.loss_layers[1 + i].forward(score, negative_label)

        return loss

    def backward(self, dout=1):
        dh = 0
        for l0, l1 in zip(self.loss_layers, self.embed_dot_layers):
            dscore = l0.backward(dout)
            dh += l1.backward(dscore)

        return dh
4.3 改进版word2vec的学习
p156
class CBOW:
    def __init__(self,vocab_size,hidden_size,window_size,corpus):
        V,H = vocab_size,hidden_size

        # 初始化权重
        W_in = 0.01 * np.random.randn(V,H).astype('f')
        W_out = 0.01 * np.random.randn(H,V).astype('f')

        # 生成层
        self.in_layers = []
        for i in range(2 * window_size):
            layer = Embedding(W_in)
            self.in_layers.append(layer)
        self.ns_loss = NegativeSamplingLoss(W_out,corpus,power=0.75,sample_size=5)

        # 将所有的权重和梯度整理到列表中
        layers = self.in_layers + [self.ns_loss]
        self.params,self.grads = [],[]
        for layer in layers:
            self.params += layer.params
            self.grads += layer.grads

        # 将单词的分布式表示设置为成员变量
        self.word_vecs = W_in

    def forward(self,context,target):
        h = 0
        for i,layer in enumerate(self.in_layers):
            h += layer.forward(contexts[0][i])
        h *= 1 / len(self.in_layers) # 对应计算图的中乘以0.5
        loss = self.ns_loss.forward(h,target)
        return loss

    def backward(self,dout=1):
        dout = self.ns_loss.backward(dout)
        dout *= 1 / len(self.in_layers)
        for layer in self.in_layers:
            layer.backward(dout)
        return None
vocab_size:词汇量
hidden_size:中间层的神经元个数
corpus:单词ID列表
window_size:上下文的大小


