此次目标为搭建一个简单的基于springboot的ssm(spring + springmvc + mybatis)的maven项目,使用的数据库为mysql。
最终项目目录结构
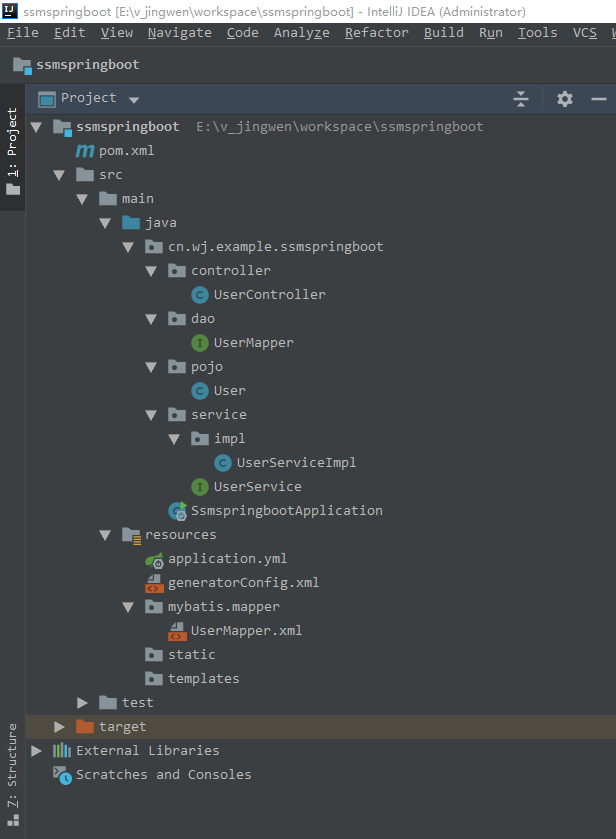
创建过程
1、项目创建步骤如下:
为了创建快速。我们在idea中通过插件创建一个spring boot项目。
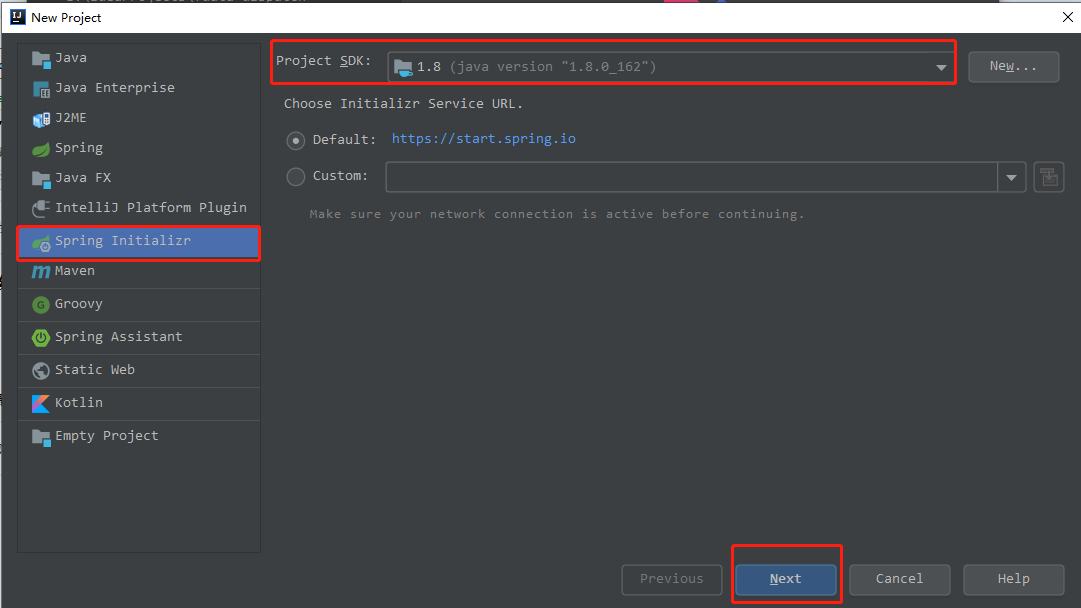
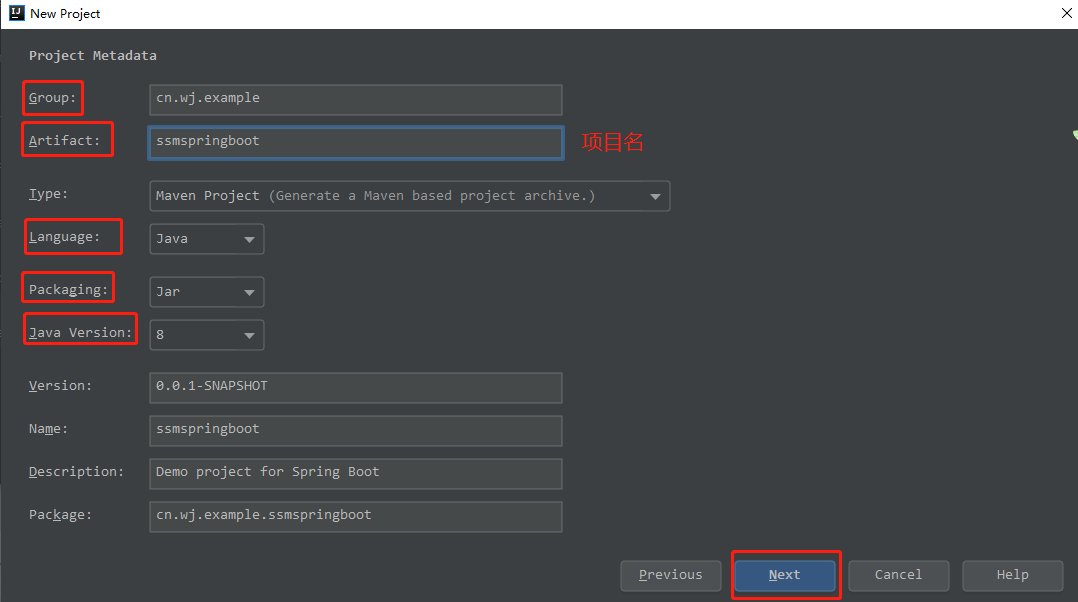
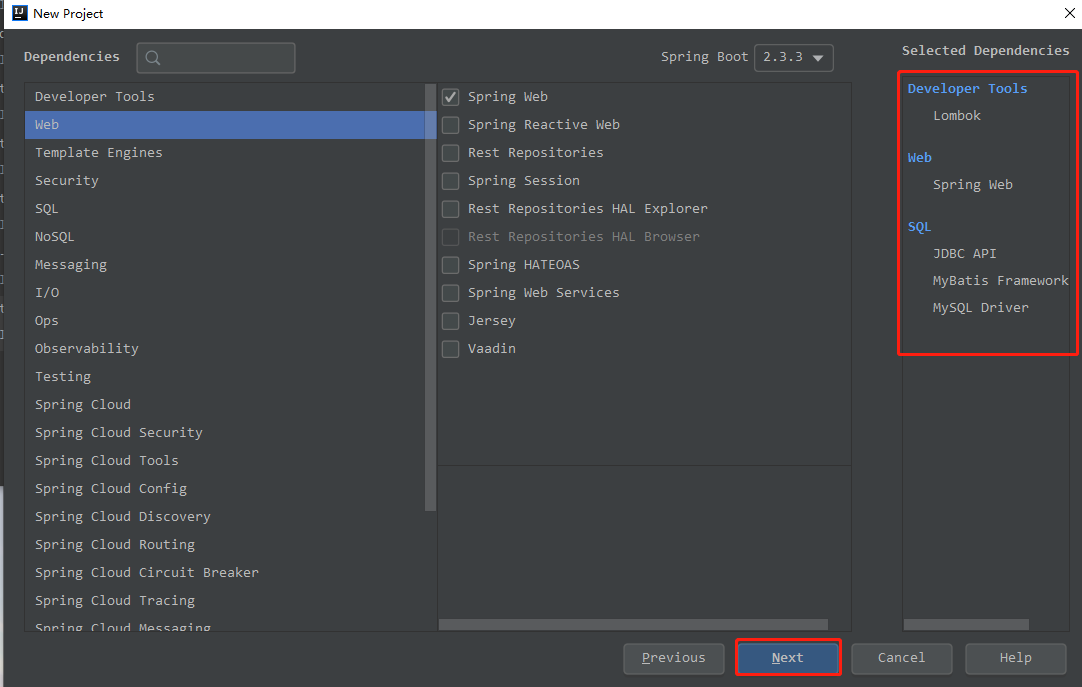
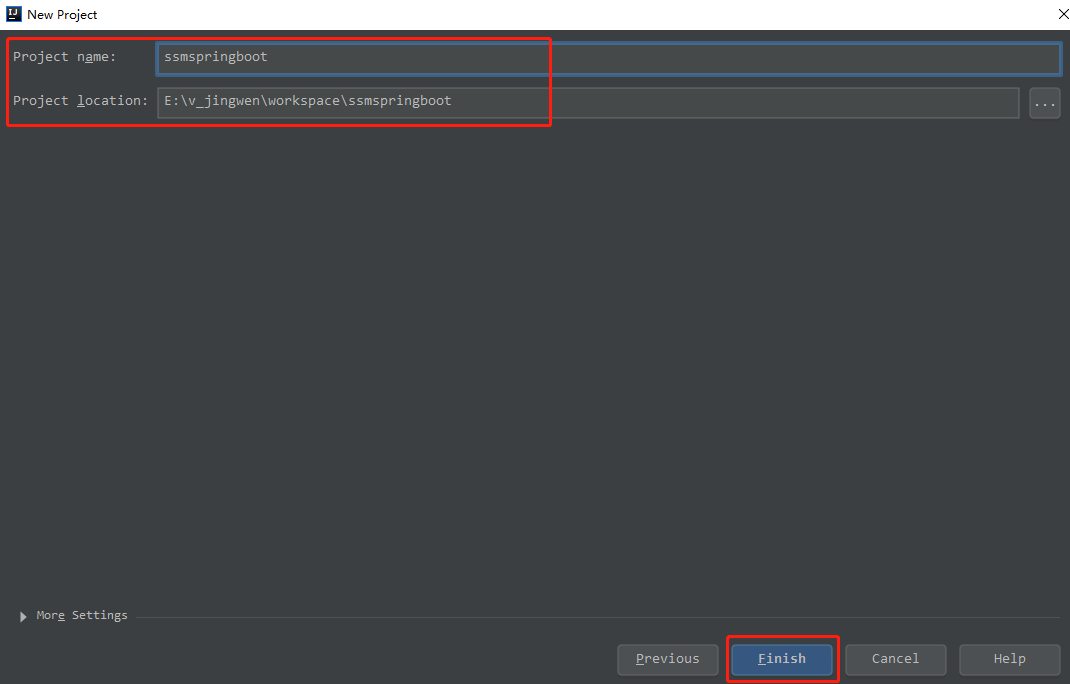
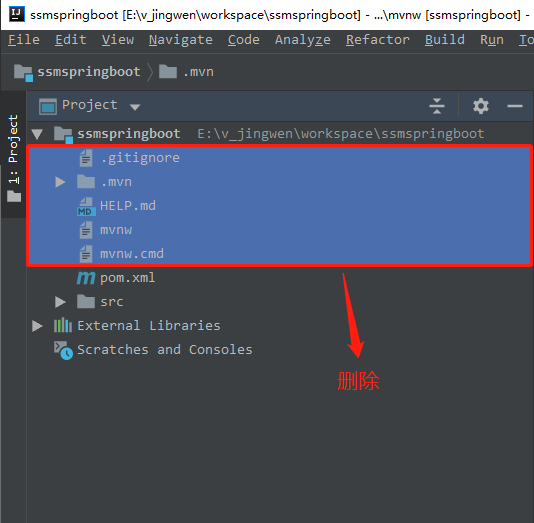
到此,我们的初始项目创建完成了。项目结构如下图所示
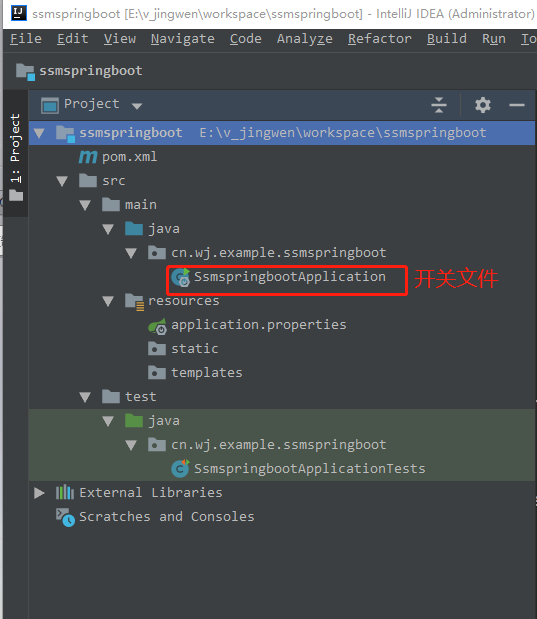
此时运行 SsmspringbootApplication 这个文件,会报未配置dataSource
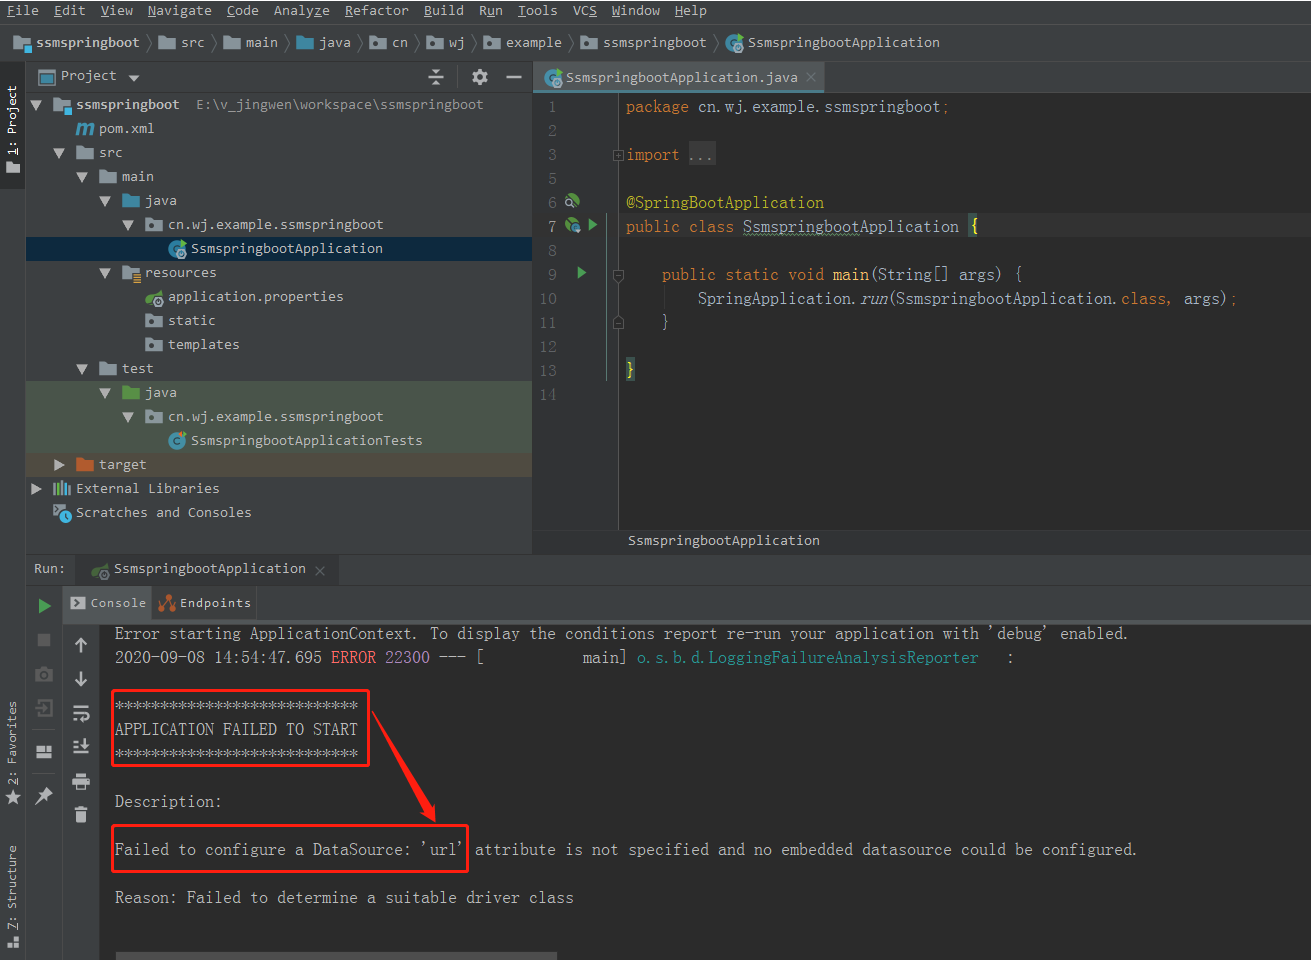
如下图所示进行一下配置(替换配置文件类型:.properties换为.yml然后增加datasource相关配置)即可完成一个最简单的springboot项目进行跑通
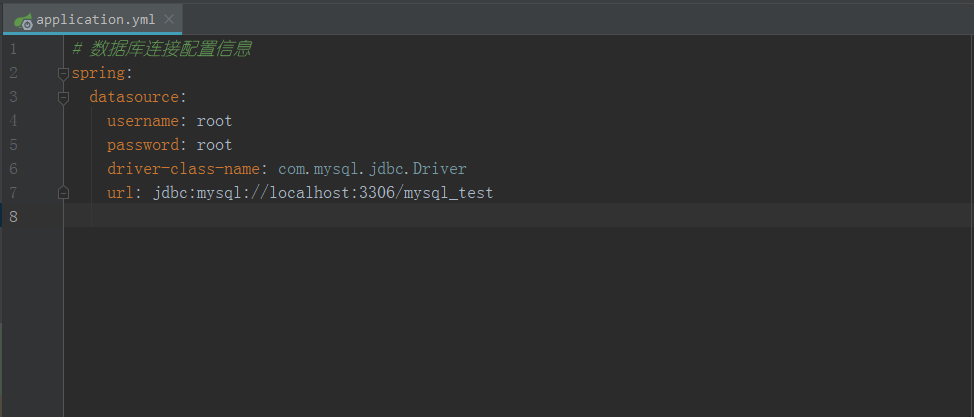
# 数据库连接配置信息
spring:
  datasource:
    username: root
    password: root
    driver-class-name: com.mysql.jdbc.Driver
    url: jdbc:mysql://localhost:3306/mysql_test?serverTimezone=UTC
账号密码对应要配置成你自己的,到此项目可以跑起来了。最简单的springboot项目搭建完成了,生成的pom.xml文件的内容如下,接下来我们开始加入我们的ssm。
<?xml version="1.0" encoding="UTF-8"?>
<project xmlns="http://maven.apache.org/POM/4.0.0"
    xmlns:xsi="http://www.w3.org/2001/XMLSchema-instance"
    xsi:schemaLocation="http://maven.apache.org/POM/4.0.0 https://maven.apache.org/xsd/maven-4.0.0.xsd">
    <modelVersion>4.0.0</modelVersion>
    <parent>
        <groupId>org.springframework.boot</groupId>
        <artifactId>spring-boot-starter-parent</artifactId>
        <version>2.3.3.RELEASE</version>
        <relativePath/> <!-- lookup parent from repository -->
    </parent>
    <groupId>cn.wj.example</groupId>
    <artifactId>ssmspringboot</artifactId>
    <version>0.0.1-SNAPSHOT</version>
    <name>ssmspringboot</name>
    <description>Demo project for Spring Boot</description>

    <properties>
        <java.version>1.8</java.version>
    </properties>

    <dependencies>
        <!--begin spring-->
        <dependency>
            <groupId>org.springframework.boot</groupId>
            <artifactId>spring-boot-starter-jdbc</artifactId>
        </dependency>
        <dependency>
            <groupId>org.springframework.boot</groupId>
            <artifactId>spring-boot-starter-web</artifactId>
        </dependency>
        <dependency>
            <groupId>org.mybatis.spring.boot</groupId>
            <artifactId>mybatis-spring-boot-starter</artifactId>
            <version>2.1.3</version>
        </dependency>

        <dependency>
            <groupId>mysql</groupId>
            <artifactId>mysql-connector-java</artifactId>
            <scope>runtime</scope>
        </dependency>
        <dependency>
            <groupId>org.projectlombok</groupId>
            <artifactId>lombok</artifactId>
            <optional>true</optional>
        </dependency>
        <dependency>
            <groupId>org.springframework.boot</groupId>
            <artifactId>spring-boot-starter-test</artifactId>
            <scope>test</scope>
            <exclusions>
                <exclusion>
                    <groupId>org.junit.vintage</groupId>
                    <artifactId>junit-vintage-engine</artifactId>
                </exclusion>
            </exclusions>
        </dependency>
        <!--end spring-->
    </dependencies>

    <build>
        <plugins>
            <plugin>
                <groupId>org.springframework.boot</groupId>
                <artifactId>spring-boot-maven-plugin</artifactId>
            </plugin>
        </plugins>
    </build>

</project>
2、整合:基于开发的最基本的三层架架构进行开发
需求:从数据库中查询出某一用户的所有信息返回给前台页面
先康康数据库的表结构~
CREATE TABLE `t_user` (
  `user_id` int(11) NOT NULL AUTO_INCREMENT,
  `user_name` char(20) NOT NULL,
  `user_sex` char(2) NOT NULL DEFAULT 'F',
  `user_address` char(20) NOT NULL,
  PRIMARY KEY (`user_id`)
) ENGINE=InnoDB DEFAULT CHARSET=utf8
为了方便我这里通过mybatis-generator自动生成mapper dao model,详情可参考SpringBoot之使用mybatis generator自动生成bean、mapper、mapper xml,自动生成后的项目结构如下:
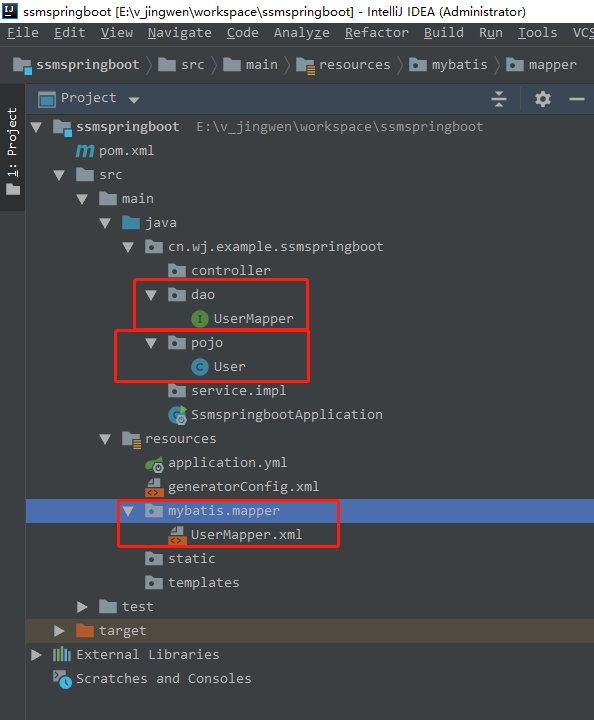
接下来手动加下service层跟controller层的实现,项目结构如下:

service层
package cn.wj.example.ssmspringboot.service;

import cn.wj.example.ssmspringboot.pojo.User;

/**
 * UserService
 * @author v_jingwen
 *
 */
public interface UserService {

    /**
     * 新增用户信息
     * @param user
     * @return
     */
    public int addUser(User user);

    /**
     * 根据ID查询用户信息
     * @param userId
     * @return
     */
    public User selectUserById(Integer userId);
}
package cn.wj.example.ssmspringboot.service.impl;

import cn.wj.example.ssmspringboot.dao.UserMapper;
import cn.wj.example.ssmspringboot.pojo.User;
import cn.wj.example.ssmspringboot.service.UserService;
import org.springframework.beans.factory.annotation.Autowired;
import org.springframework.stereotype.Service;

@Service
public class UserServiceImpl implements UserService {

    @Autowired
    private UserMapper userMapper;

    @Override
    public int addUser(User user) {
        return userMapper.insert(user);
    }

    @Override
    public User selectUserById(Integer userId) {
        return userMapper.selectByPrimaryKey(userId);
    }
}
controller层
package cn.wj.example.ssmspringboot.controller;

import cn.wj.example.ssmspringboot.pojo.User;
import cn.wj.example.ssmspringboot.service.UserService;
import java.util.HashMap;
import java.util.Map;

import javax.servlet.http.HttpServletRequest;

import org.slf4j.Logger;
import org.slf4j.LoggerFactory;
import org.springframework.beans.factory.annotation.Autowired;
import org.springframework.web.bind.annotation.RequestMapping;
import org.springframework.web.bind.annotation.RestController;

/**
 * 用户 Controller
 *
 * @author v_jingwen
 * @date 2020年9月9日 下午15:18:08
 *
 */
@RestController
@RequestMapping(value = "/ssmTest/user", produces = "application/json;charset=UTF-8")
public class UserController {

    private final static Logger logger = LoggerFactory.getLogger(UserController.class);

    @Autowired
    private UserService userService;

    /***
     * 增加测试用户
     * @param request
     */
    @RequestMapping(value="/addUser.do")
    public Map<String,Object> addUser(HttpServletRequest request){
        Map<String,Object> resultMap = new HashMap<>();
        try {
            User user = new User();
            user.setUserName("Nancy橙");
            user.setUserSex("F");// F=女性,M=男性,
            user.setUserAddress("广东深圳市南山区");
            int id = userService.addUser(user);
            resultMap.put("data",id);// 返回记录主键id
            resultMap.put("code","200");
            resultMap.put("msg","操作成功");
        } catch (Exception e) {
            logger.error("error", e);
            resultMap.put("code","500");
            resultMap.put("msg","操作失败"+e.getMessage());
        }
        return resultMap;
    }

    /***
     * 根据ID查询用户信息
     * @param request
     */
    @RequestMapping(value="/getUserById.do")
    public Map<String,Object> getUserById(HttpServletRequest request){
        Map<String,Object> resultMap = new HashMap<>();
        try {
            String userId = request.getParameter("userId");// 记录主键id
            User user = userService.selectUserById(Integer.parseInt(userId));
            resultMap.put("data",user);
            resultMap.put("code","200");
            resultMap.put("msg","操作成功");
        } catch (NumberFormatException e) {
            logger.error("error", e);
            resultMap.put("code","500");
            resultMap.put("msg","操作失败,userId必须为数字");
        } catch (Exception e) {
            logger.error("error", e);
            resultMap.put("code","500");
            resultMap.put("msg","操作失败"+e.getMessage());
        }
        return resultMap;
    }
}
注册mapper,主要作用是扫包,不进行注册会导致dao层bean无法注入。
例如:
使用
@Autowired
private UserMapper userMapper;
报错如下:
Field userMapper in cn.wj.example.ssmspringboot.service.impl.UserServiceImpl required a bean of type 'cn.wj.example.ssmspringboot.dao.UserMapper' that could not be found.
The injection point has the following annotations:
- @org.springframework.beans.factory.annotation.Autowired(required=true)
注册mapper方式,本例中使用方法1:
方法1、在springboot启动类中加@MapperScan("cn.wj.example.ssmspringboot.dao")
方法2、在对应dao层加上@Mapper
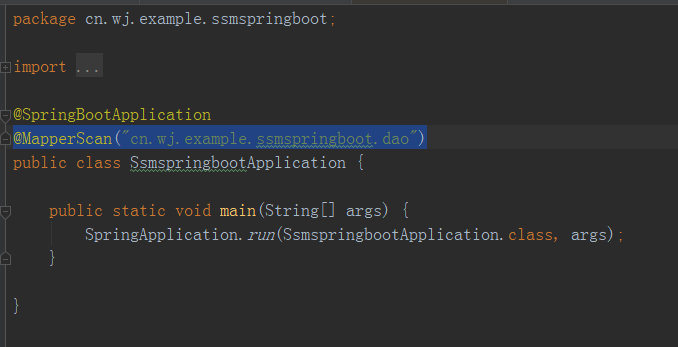
在application.yml中指定mybatis配置文件的路径,否则会报错,例如:Invalid bound statement (not found): cn.wj.example.ssmspringboot.dao.UserMapper.selectByPrimaryKey。
#指定mybatis配置文件的路径
mybatis:
 mapper-locations: classpath:mybatis/mapper/*.xml
测试
新增了默认用户,返回对应的主键id1
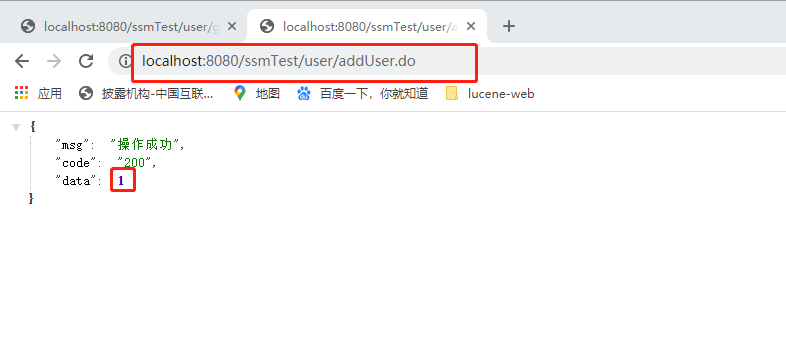
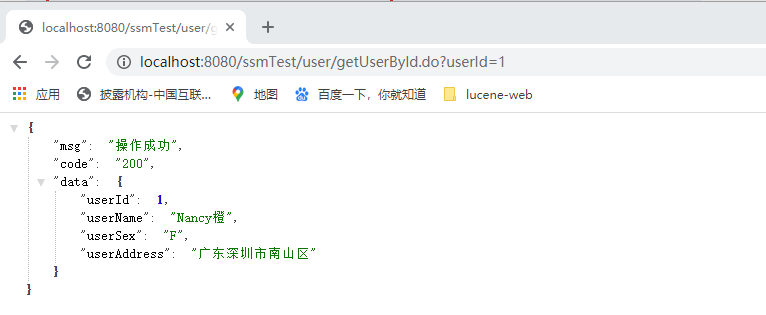
查询主键id=1的用户信息
啦啦啦♪(^∇^*),完结~
代码:有需要的亲可以参考,github - ssmspringboot项目
参考资料:MyBatis-Spring-Boot-Starter简要说明


