SpringCloud学习笔记(三、SpringCloud Netflix Eureka)
目录:
- 服务发现简介
- SpringCloud Netflix Eureka应用
- Eureka高可用
- Eureka源码分析 >>> Eureka Client初始化(客户端定时获取服务列表、客户端定时发送心跳续约、客户端定时注册)源码分析、服务下线源码分析
- 总结
服务发现简介:
1、什么是服务发现
程序通过一个标识来获取服务列表,且这个服务列表能够跟随服务的状态而动态变更。
那为什么要有服务发现呢,这其实也是一个解耦的过程;因为在微服务架构中,一个服务一般都会有多个节点,如果没有一个统一管理的地方,那么服务的上下线是非常麻烦的,客户端也需要改动调用的服务。
当然这只是服务发现的基本功能,向Eureka还集成了Ribbon来实现负载均衡,以及你可以通过集成Spring Retry来增强RestTemplate的重试能力,当一次服务调用失败后,不会立即抛出异常,而是重试其它服务节点。
2、服务发现的两种模式
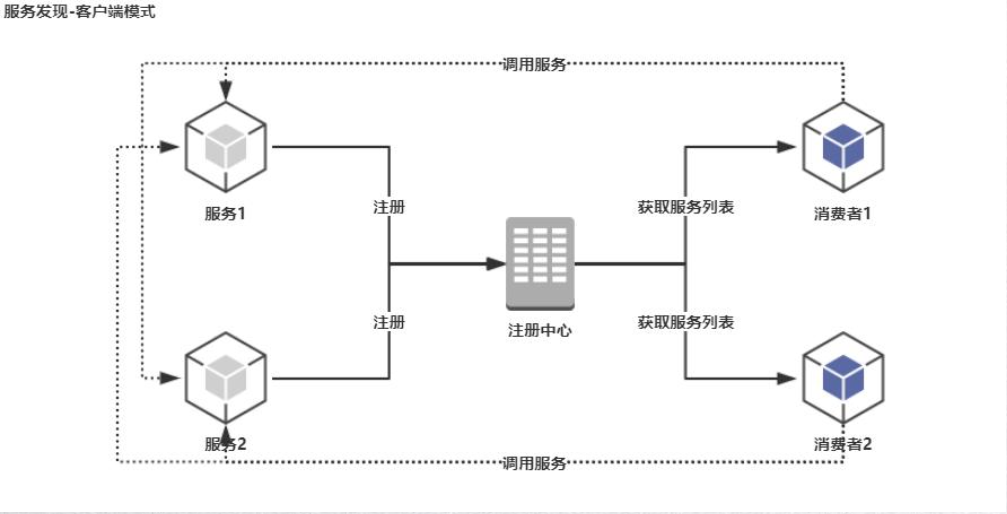
)客户端模式:服务调用时,首先到注册中心获取服务列表,然后再根据调用本地的负载均衡策略进行服务调用,并且本地会缓存一份服务列表。
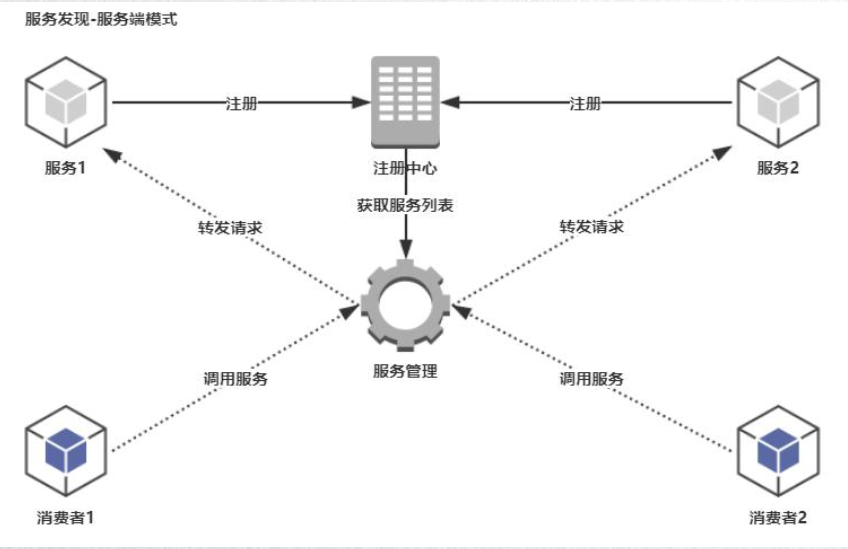
)服务端模式:调用端直接向注册中心发起请求,注册中心再通过自身的负载均衡策略进行服务调用,调用端自身是不需要维护服务发现逻辑。
3、客户端、服务端两种模式的比较
)客户端
a、获取列表为周期性,在调用上减少了一次链路,但每个客户端都需要维护获取服务列表的逻辑。
b、可用性高,因为本地缓存了一份服务列表的原因,所以即使注册中心出现故障了也不会影响客户端的正常使用。
c、服务端上下线先会对客户端有一定的影响,会出现短暂的调用失败。
)服务端
a、简单,客户端不需要维护获取服务列表的逻辑。
b、可用性由服务管理者觉定,若服务管理者发生故障则所有的客户端将不可用;同时,所有的调用及存储都由服务管理者来完成,这样服务管理者可能会负载过高。
c、服务端上下线客户端无感知。
SpringCloud Netflix Eureka应用:
1、Eureka服务端
)添加Eureka Server依赖
1 <dependency>
2     <groupId>org.springframework.cloud</groupId>
3     <artifactId>spring-cloud-starter-netflix-eureka-server</artifactId>
4 </dependency>
)启动类加上@EnableEurekaServer注解
)配置properties
 1 ## Eureka注册中心实例名
 2 spring.application.name=eureka-server
 3 ## Eureka注册中心端口
 4 server.port=9090
 5
 6 ## 关闭Actuator验证开关
 7 management.security.enabled=false
 8
 9 ## 不向注册中心获取服务列表
10 ## eureka服务端的eureka.client.fetch-registry配置必须为false让他不要去找server节点,因为它本身就是server节点
11 eureka.client.fetch-registry=false
12 ## 不注册到注册中心上
13 eureka.client.register-with-eureka=false
14
15 ## 配置 注册中心的 地址
16 eureka.client.service-url.defaultZone=http://localhost:9090/eureka
启动后可通过http://localhost:9090/eureka查看服务端情况
2、Eureka客户端
)添加Eureka Client依赖
1 <dependency>
2     <groupId>org.springframework.cloud</groupId>
3     <artifactId>spring-cloud-starter-netflix-eureka-client</artifactId>
4 </dependency>
)启动类加上@EnableEurekaClient或@EnableDiscoveryClient
二者的共同点是:都是能够让注册中心能够发现,扫描到该服务。
不同点:@EnableEurekaClient只适用于Eureka作为注册中心,而@EnableDiscoveryClient可以是其他的注册中心。
)配置properties
 1 ## Eureka服务提供者实例名
 2 spring.application.name=eureka-provider
 3 ## Eureka服务提供者端口
 4 server.port=8070
 5
 6 ## 关闭Actuator验证开关
 7 management.security.enabled=false
 8
 9 ## 配置 注册中心的 地址
10 eureka.client.service-url.defaultZone=http://localhost:9090/eureka/
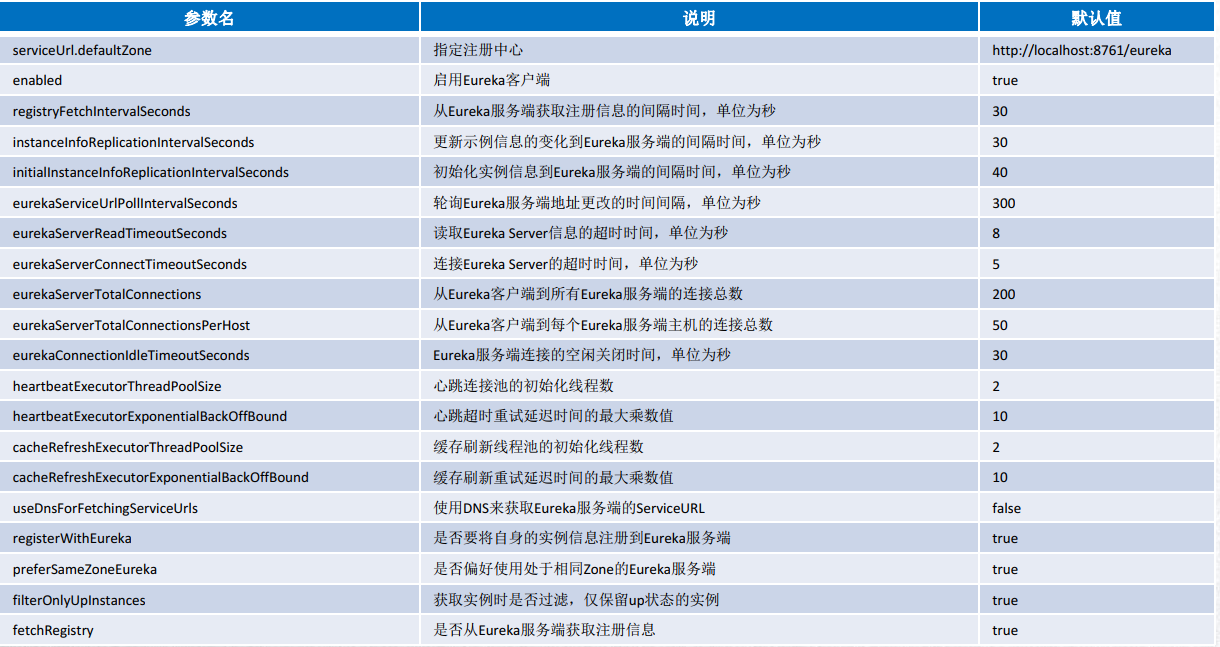
3、一些常用的配置
)客户端配置
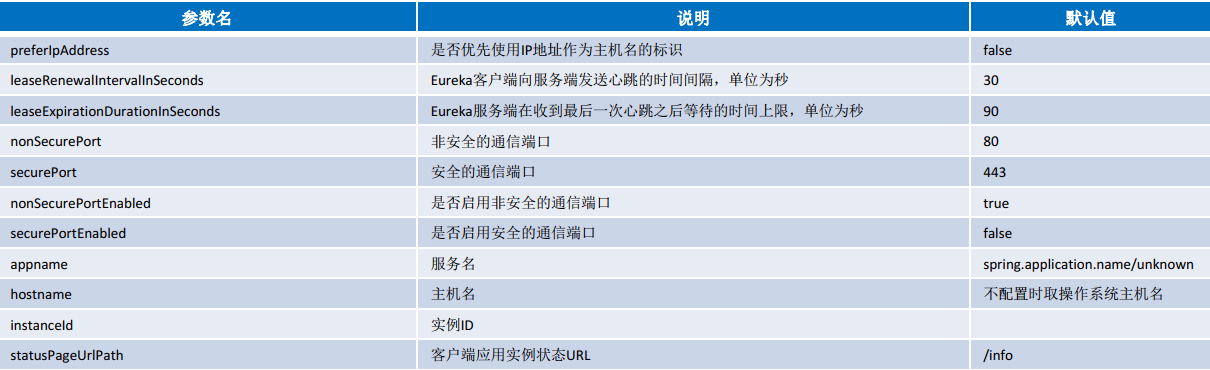
)服务实例配置
Eureka高可用:
我们都知道Eureka分为服务端和客户端,所以搭建高可用的Eureka时二者都需要高可用。
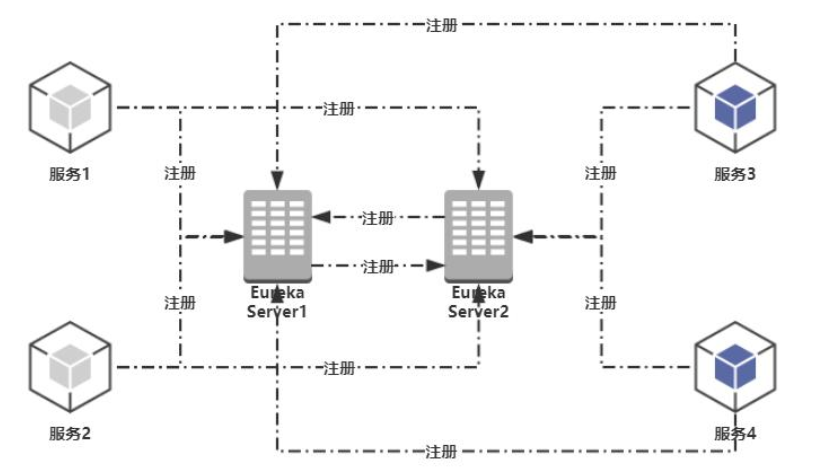
1、服务端
服务端的高可用其实就是让客户端获取服务列表时尽可能的少失败,所以我们只需要启动两个Eureka Server,让他们相互复制服务列表即可。
1 server.port=9091
2 eureka.client.service-url.defaultZone=http://localhost:9092/eureka
1 server.port=9092
2 eureka.client.service-url.defaultZone=http://localhost:9091/eureka
那么可以注册三个嘛,当然可以,但是没必要。
你可以想下,当Server1挂了后还有Server2能提供服务,当Server1和Server2都挂了,那么其实Server3也是可能会挂的,所以两个Server相互注册就够了,当然土豪随意咯。
配置原理同上,用逗号分隔即可,defaultZone=http://localhost:9092/eureka,http://localhost:9093/eureka。
2、客户端
客户端的高可用就是在获取服务列表时尽可能的少失败,所以我们只需要配置多个注册中心即可
1 eureka.client.service-url.defaultZone=http://localhost:9091/eureka,http://localhost:9092/eureka
Eureka Client源码分析:
Eureka作为一个服务发现中间件,会有如下三个角色,以及五大基本功能;在看源码前,首先我们要明白这几个概念:
角色:
- 服务提供者:提供一些自己能够执行的服务给外界。
- 服务消费者:使用提供者提供的用户。
- 服务中介:提供者与消费者之间的桥梁,提供者可以把自己注册在中介里,而消费者使用服务时可以在中介中寻找已注册的提供者。
功能:
- 服务注册:Eureka客户端向Eureka服务端注册时,会提供自身的元数据,如ip、port、运行状况等
- 服务续约:默认情况下Eureka客户端每隔30秒会发送一次心跳来续约,通过这个续约来告诉Eureka服务端自己依然还是存活状态。
- 获取注册列表信息:Eureka客户端从服务端获取注册表信息,并将其缓存在本地,客户端会根据该信息找到对应服务并进行服务的调用。该注册列表默认每30秒更新一次,且每次返回的列表信息可能与之前客户端缓存的不同,该情况Eureka客户端会自动处理。
- 服务下线:Eureka客户端在程序关闭时会向Eureka服务端发送取消请求,服务端在收到请求后会将该服务从注册列表中删除(下线请求不会自动完成,它会调用DiscoveryManager.getInstance().shutdownComponent())。
- 服务剔除:默认情况下Eureka服务端连续90秒,也就是3个续约周期没有收到Eureka客户端的服务续约,则会剔除该服务。
后续我们会根据源码来看看这些功能分别是如何实现的。
Eureka Client初始化:
首先我们知道若想将一个应用程序注册为Eureka的客户端那最主要的便是在启动类上加上@EnableDiscoveryClient这个注解,这便是Eureka Client的初始化。
阅读目的:为什么加上@EnableDiscoveryClient注解后且配置eureka.client.service-url.defaultZone=http后,就能将此服务注册到eureka,且能够让其它注册的服务发现此服务。
1、首先以@EnableDiscoveryClient注解来分析
从注解的字面意思来看就是启动DiscoveryClient,我们来大胆的猜测下 φ(>ω<*)
emmmmm,程序中应该有DiscoveryClient这个类吧,Ctrl + n,(⊙o⊙)…果真有这个类!

根据IDEA的检索结果,发现满足条件的有两个,一个是com.netflix.discovery.DiscoveryClient,一个是org.springframework.cloud.client.discovery.DiscoveryClient
看源码嘛,肯定先看结构咯~~~
)com.netflix.discovery.DiscoveryClient

)org.springframework.cloud.client.discovery.DiscoveryClient是一个接口,其实现有很多,但Eureka的是org.springframework.cloud.netflix.eureka.EurekaDiscoveryClient

所以两个DiscoveryClient的逻辑结构便如下图:

2、了解结构后,我们再略读下这两个DiscoveryClient的实现
)首先从SpringCloud的看起,实现类org.springframework.cloud.netflix.eureka.EurekaDiscoveryClient
a、通过略读可以看出比较重要的public List<ServiceInstance> getInstances(String serviceId)、public List<String> getServices()两个方法都有使用一个eurekaClient的属性
b、而eurekaClient正是,Netflix的EurekaClient接口,所以我们可以得知SpringCloud应该仅是对Netflix的一个包装
c、所以我们直接看Netflix的EurekaClient接口(com.netflix.discovery.EurekaClient)的实现 >>> com.netflix.discovery.DiscoveryClient
)com.netflix.discovery.DiscoveryClient的实现
a、一般看类的实现是从构造函数入手,所以我们先找到最全的构造函数:DiscoveryClient(ApplicationInfoManager applicationInfoManager, EurekaClientConfig config, AbstractDiscoveryClientOptionalArgs args, Provider<BackupRegistry> backupRegistryProvider);
b、此构造一开始是大量的判断,这块就不看了,我们仅看最重要那部分(正常逻辑下,大量判断中的代码逻辑不是对bug的处理就是特殊情况的处理,所以我们先看那些不在if中的代码或者是少量if的代码) >>> initScheduledTasks()
c、initScheduledTasks():初始化定时器,其主要分为三大块 >>> 客户端定时获取服务列表、客户端定时发送心跳续约、客户端定时注册
客户端定时获取服务列表源码分析:对应“获取注册列表信息”
源码示例(客户端):
 1 if (clientConfig.shouldFetchRegistry()) {
 2     // registry cache refresh timer
 3     int registryFetchIntervalSeconds = clientConfig.getRegistryFetchIntervalSeconds();
 4     int expBackOffBound = clientConfig.getCacheRefreshExecutorExponentialBackOffBound();
 5     scheduler.schedule(
 6         new TimedSupervisorTask(
 7             "cacheRefresh",
 8             scheduler,
 9             cacheRefreshExecutor,
10             registryFetchIntervalSeconds,
11             TimeUnit.SECONDS,
12             expBackOffBound,
13             new CacheRefreshThread() // 定时获取服务列表thread
14         ),
15         registryFetchIntervalSeconds, TimeUnit.SECONDS);
16 }
1、首先我们看第1行,clientConfig.shouldFetchRegistry() == true才会执行获取服务列表的job,我们点进去看,发现其实就是我们properties配置的eureka.client.fetch-registry,而默认值为true。
2、然后执行job的周期单位为秒(11行),执行周期为registryFetchIntervalSeconds,也就是第3行;第3行和第1行同理,为properties配置的eureka.client.registry-fetchInterval-seconds,而默认值为30。
3、最后我们看看其核心线程(13行),可以看到其调用的函数其实是void refreshRegistry();函数最开始一大堆判断,最后一堆debug,这些都不用细究,我们直接看最核心的那行代码boolean success = fetchRegistry(remoteRegionsModified)。
 1 private boolean fetchRegistry(boolean forceFullRegistryFetch) {
 2     Stopwatch tracer = FETCH_REGISTRY_TIMER.start();
 3
 4     try {
 5         // If the delta is disabled or if it is the first time, get all
 6         // applications
 7         // 获取本地缓存的服务注册信息
 8         Applications applications = getApplications();
 9
10         if (clientConfig.shouldDisableDelta()
11                 || (!Strings.isNullOrEmpty(clientConfig.getRegistryRefreshSingleVipAddress()))
12                 || forceFullRegistryFetch
13                 || (applications == null)
14                 || (applications.getRegisteredApplications().size() == 0)
15                 || (applications.getVersion() == -1)) //Client application does not have latest library supporting delta
16         {
17             logger.info("Disable delta property : {}", clientConfig.shouldDisableDelta());
18             logger.info("Single vip registry refresh property : {}", clientConfig.getRegistryRefreshSingleVipAddress());
19             logger.info("Force full registry fetch : {}", forceFullRegistryFetch);
20             logger.info("Application is null : {}", (applications == null));
21             logger.info("Registered Applications size is zero : {}",
22                     (applications.getRegisteredApplications().size() == 0));
23             logger.info("Application version is -1: {}", (applications.getVersion() == -1));
24             // 全量更新,服务第一次启动时调用,并将列表缓存到本地
25             getAndStoreFullRegistry();
26         } else {
27             // 增量更新
28             getAndUpdateDelta(applications);
29         }
30         applications.setAppsHashCode(applications.getReconcileHashCode());
31         logTotalInstances();
32     } catch (Throwable e) {
33         logger.error(PREFIX + appPathIdentifier + " - was unable to refresh its cache! status = " + e.getMessage(), e);
34         return false;
35     } finally {
36         if (tracer != null) {
37             tracer.stop();
38         }
39     }
40
41     // Notify about cache refresh before updating the instance remote status
42     onCacheRefreshed();
43
44     // Update remote status based on refreshed data held in the cache
45     updateInstanceRemoteStatus();
46
47     // registry was fetched successfully, so return true
48     return true;
49 }
从代码中我们可以看出要么是全量更新要么是增量更新:客户端启动时第一次会调用全量更新接口,之后则调用增量更新接口,全量更新时Get调用/{version}/apps,增量Get调用/{version}/apps/delta
——————————————————————————————————————————————————————————————————————
全量更新:
 1 private void getAndStoreFullRegistry() throws Throwable {
 2     long currentUpdateGeneration = fetchRegistryGeneration.get();
 3
 4     logger.info("Getting all instance registry info from the eureka server");
 5
 6     Applications apps = null;
 7     // 调用Eureka服务端全量更新接口(getApplications(remoteRegionsRef.get()))
 8     // http://eurekaHost/eureka.apps
 9     EurekaHttpResponse<Applications> httpResponse = clientConfig.getRegistryRefreshSingleVipAddress() == null
10             ? eurekaTransport.queryClient.getApplications(remoteRegionsRef.get())
11             : eurekaTransport.queryClient.getVip(clientConfig.getRegistryRefreshSingleVipAddress(), remoteRegionsRef.get());
12     if (httpResponse.getStatusCode() == Response.Status.OK.getStatusCode()) {
13         apps = httpResponse.getEntity();
14     }
15     logger.info("The response status is {}", httpResponse.getStatusCode());
16
17     if (apps == null) {
18         logger.error("The application is null for some reason. Not storing this information");
19     } else if (fetchRegistryGeneration.compareAndSet(currentUpdateGeneration, currentUpdateGeneration + 1)) {
20         // 拿到服务列表后更新到本地缓存
21         localRegionApps.set(this.filterAndShuffle(apps));
22         logger.debug("Got full registry with apps hashcode {}", apps.getAppsHashCode());
23     } else {
24         logger.warn("Not updating applications as another thread is updating it already");
25     }
26 }
从上述代码可以看出服务列表是从服务端获取的,所以我们就需要看下http调用,转到其实现类com.netflix.discovery.shared.transport.jersey.AbstractJerseyEurekaHttpClient,看到其调用的http url是apps/
1 @Override
2 public EurekaHttpResponse<Applications> getApplications(String... regions) {
3     return getApplicationsInternal("apps/", regions);
4 }
再点进去看,发现其实就是调用了http://服务端ip:服务端port/eureka/apps(GET请求),并且将结果放入Applications
——————————————————————————————————————————————————————————————————————
增量更新:增量更新与全量同理,但调用的是http://服务端ip:服务端port/eureka/apps/delta接口
全量增量注册讲完后我们来看看服务端的代码(着重看全量,增量与全量原理差不多)
源码示例(服务端):
我们知道全量注册调用的是http://服务端ip:服务端port/eureka/apps接口,我们找下这个接口的实现,com.netflix.eureka.resources.ApplicationsResource#getContainers,并找到最重要的代码块
 1 Response response;
 2 if (acceptEncoding != null && acceptEncoding.contains(HEADER_GZIP_VALUE)) {
 3     response = Response.ok(responseCache.getGZIP(cacheKey))
 4             .header(HEADER_CONTENT_ENCODING, HEADER_GZIP_VALUE)
 5             .header(HEADER_CONTENT_TYPE, returnMediaType)
 6             .build();
 7 } else {
 8     response = Response.ok(responseCache.get(cacheKey))
 9             .build();
10 }
11 return response;
进入responseCache.getZIP(cacheKey)后,我们可以知道代码很简单,就是从缓存中获取数据给客户端。
参数useReadOnlyCache也是客户端配置的,默认为true;6-12行很简单,缓存有取缓存,没有则从readWriteCacheMap拿到后再放入缓存。
 1 @VisibleForTesting
 2 ResponseCacheImpl.Value getValue(final Key key, boolean useReadOnlyCache) {
 3     ResponseCacheImpl.Value payload = null;
 4     try {
 5         if (useReadOnlyCache) {
 6             final ResponseCacheImpl.Value currentPayload = readOnlyCacheMap.get(key);
 7             if (currentPayload != null) {
 8                 payload = currentPayload;
 9             } else {
10                 payload = readWriteCacheMap.get(key);
11                 readOnlyCacheMap.put(key, payload);
12             }
13         } else {
14             payload = readWriteCacheMap.get(key);
15         }
16     } catch (Throwable t) {
17         logger.error("Cannot get value for key :" + key, t);
18     }
19     return payload;
20 }
这里需要记下com.netflix.eureka.registry.ResponseCacheImpl#readOnlyCacheMap与com.netflix.eureka.registry.ResponseCacheImpl#readWriteCacheMap,后续会用到。
综上所述:获取服务列表的流程为,客户端默认每三十秒调用服务端获取服务列表接口,服务端从readOnlyCacheMap和readWriteCacheMap中取出服务列表返回给客户端。
客户端调用的方式分为全量和增量的方式,其目的是为了提升效率,全量的需要把所有的全拿到然后更新,增量只需要更新某一部分。
客户端定时注册:对应“服务注册”
1 instanceInfoReplicator = new InstanceInfoReplicator(
2         this,
3         instanceInfo,
4         clientConfig.getInstanceInfoReplicationIntervalSeconds(),
5         2); // burstSize
进入InstanceInfoReplicator后会发现这个类实现Runnable接口,那既然是线程就去看run方法咯
 1 public void run() {
 2     try {
 3         discoveryClient.refreshInstanceInfo();
 4
 5         Long dirtyTimestamp = instanceInfo.isDirtyWithTime();
 6         if (dirtyTimestamp != null) {
 7             discoveryClient.register();
 8             instanceInfo.unsetIsDirty(dirtyTimestamp);
 9         }
10     } catch (Throwable t) {
11         logger.warn("There was a problem with the instance info replicator", t);
12     } finally {
13         Future next = scheduler.schedule(this, replicationIntervalSeconds, TimeUnit.SECONDS);
14         scheduledPeriodicRef.set(next);
15     }
16 }
然后我们看第7行,一步步跟进去发现其实调用了"apps/" + info.getAppName()接口
接下来我们来看看"apps/" + info.getAppName()接口的实现
1、找到com.netflix.eureka.resources.ApplicationResource的addInstance方法,找到其中的registry.register(info, "true".equals(isReplication));跟进去
2、找到com.netflix.eureka.registry.AbstractInstanceRegistry的register方法
 1 public void register(InstanceInfo registrant, int leaseDuration, boolean isReplication) {
 2     try {
 3         read.lock();
 4         // 根据实例名registrant.getAppName()获取InstanceInfo
 5         Map<String, Lease<InstanceInfo>> gMap = registry.get(registrant.getAppName());
 6         REGISTER.increment(isReplication);
 7         if (gMap == null) {
 8             final ConcurrentHashMap<String, Lease<InstanceInfo>> gNewMap = new ConcurrentHashMap<String, Lease<InstanceInfo>>();
 9             // 若registry没有此实例时,注册一个空的实例
10             gMap = registry.putIfAbsent(registrant.getAppName(), gNewMap);
11             if (gMap == null) {
12                 gMap = gNewMap;
13             }
14         }
15         Lease<InstanceInfo> existingLease = gMap.get(registrant.getId());
16         // Retain the last dirty timestamp without overwriting it, if there is already a lease
17         if (existingLease != null && (existingLease.getHolder() != null)) {
18             Long existingLastDirtyTimestamp = existingLease.getHolder().getLastDirtyTimestamp();
19             Long registrationLastDirtyTimestamp = registrant.getLastDirtyTimestamp();
20             logger.debug("Existing lease found (existing={}, provided={}", existingLastDirtyTimestamp, registrationLastDirtyTimestamp);
21
22             // this is a > instead of a >= because if the timestamps are equal, we still take the remote transmitted
23             // InstanceInfo instead of the server local copy.
24             // 若eureka服务器存在的实例的时间戳大于传入新实例的时间戳,则说明eureka server的实例都是最新的,更新掉。
25             if (existingLastDirtyTimestamp > registrationLastDirtyTimestamp) {
26                 logger.warn("There is an existing lease and the existing lease's dirty timestamp {} is greater" +
27                         " than the one that is being registered {}", existingLastDirtyTimestamp, registrationLastDirtyTimestamp);
28                 logger.warn("Using the existing instanceInfo instead of the new instanceInfo as the registrant");
29                 registrant = existingLease.getHolder();
30             }
31         } else {
32             // The lease does not exist and hence it is a new registration
33             synchronized (lock) {
34                 if (this.expectedNumberOfRenewsPerMin > 0) {
35                     // Since the client wants to cancel it, reduce the threshold
36                     // (1
37                     // for 30 seconds, 2 for a minute)
38                     this.expectedNumberOfRenewsPerMin = this.expectedNumberOfRenewsPerMin + 2;
39                     this.numberOfRenewsPerMinThreshold =
40                             (int) (this.expectedNumberOfRenewsPerMin * serverConfig.getRenewalPercentThreshold());
41                 }
42             }
43             logger.debug("No previous lease information found; it is new registration");
44         }
45         // 根据新的实例创建新的租约
46         Lease<InstanceInfo> lease = new Lease<InstanceInfo>(registrant, leaseDuration);
47         if (existingLease != null) {
48             lease.setServiceUpTimestamp(existingLease.getServiceUpTimestamp());
49         }
50         gMap.put(registrant.getId(), lease);
51         synchronized (recentRegisteredQueue) {
52             recentRegisteredQueue.add(new Pair<Long, String>(
53                     System.currentTimeMillis(),
54                     registrant.getAppName() + "(" + registrant.getId() + ")"));
55         }
56         // This is where the initial state transfer of overridden status happens
57         if (!InstanceInfo.InstanceStatus.UNKNOWN.equals(registrant.getOverriddenStatus())) {
58             logger.debug("Found overridden status {} for instance {}. Checking to see if needs to be add to the "
59                     + "overrides", registrant.getOverriddenStatus(), registrant.getId());
60             if (!overriddenInstanceStatusMap.containsKey(registrant.getId())) {
61                 logger.info("Not found overridden id {} and hence adding it", registrant.getId());
62                 overriddenInstanceStatusMap.put(registrant.getId(), registrant.getOverriddenStatus());
63             }
64         }
65         InstanceInfo.InstanceStatus overriddenStatusFromMap = overriddenInstanceStatusMap.get(registrant.getId());
66         if (overriddenStatusFromMap != null) {
67             logger.info("Storing overridden status {} from map", overriddenStatusFromMap);
68             registrant.setOverriddenStatus(overriddenStatusFromMap);
69         }
70
71         // Set the status based on the overridden status rules
72         InstanceInfo.InstanceStatus overriddenInstanceStatus = getOverriddenInstanceStatus(registrant, existingLease, isReplication);
73         registrant.setStatusWithoutDirty(overriddenInstanceStatus);
74
75         // If the lease is registered with UP status, set lease service up timestamp
76         if (InstanceInfo.InstanceStatus.UP.equals(registrant.getStatus())) {
77             lease.serviceUp();
78         }
79         registrant.setActionType(InstanceInfo.ActionType.ADDED);
80         recentlyChangedQueue.add(new AbstractInstanceRegistry.RecentlyChangedItem(lease));
81         registrant.setLastUpdatedTimestamp();
82         invalidateCache(registrant.getAppName(), registrant.getVIPAddress(), registrant.getSecureVipAddress());
83         logger.info("Registered instance {}/{} with status {} (replication={})",
84                 registrant.getAppName(), registrant.getId(), registrant.getStatus(), isReplication);
85     } finally {
86         read.unlock();
87     }
88 }
综上所述:服务注册流程为,客户端调用/apps/{appName}接口到服务端,服务端首先设置租约时间为90s(默认),然后会根据实例名称spring.application.name获取Application信息,有则更新原来的服务信息,无则添加到map中。
还记得上面获取注册列表信息中说道的readOnlyCacheMap和readWriteCacheMap嘛,就是从上述map中获取的,逻辑包含与com.netflix.eureka.registry.ResponseCacheImpl#generatePayload。
客户端定时发送心跳续约:服务续约
 1 scheduler.schedule(
 2         new TimedSupervisorTask(
 3                 "heartbeat",
 4                 scheduler,
 5                 heartbeatExecutor,
 6                 renewalIntervalInSecs,
 7                 TimeUnit.SECONDS,
 8                 expBackOffBound,
 9                 new HeartbeatThread()
10         ),
11         renewalIntervalInSecs, TimeUnit.SECONDS);
简单的地方我们就不一一看了,直接进入重点,发现第9行就是不断刷新lastSuccessfulHeartbeatTimestamp使之为当前时间戳(永不过期)
1 if (renew()) {
2     lastSuccessfulHeartbeatTimestamp = System.currentTimeMillis();
3 }
那我们再看看更新lastSuccessfulHeartbeatTimestamp的条件renew呗!
查看renew后可以得知,心跳续约调用了服务端的/apps/appName/id接口(PUT请求),然后我们看看服务端实现
1、首先接口在com.netflix.eureka.resources.InstanceResource#renewLease
2、我们向其核心代码boolean isSuccess = registry.renew(app.getName(), id, isFromReplicaNode)里跟进
 1 public boolean renew(String appName, String id, boolean isReplication) {
 2     RENEW.increment(isReplication);
 3     // 还是一样的从registry中拿InstanceInfo
 4     Map<String, Lease<InstanceInfo>> gMap = registry.get(appName);
 5     Lease<InstanceInfo> leaseToRenew = null;
 6     if (gMap != null) {
 7         leaseToRenew = gMap.get(id);
 8     }
 9     // 如果拿不到InstanceInfo就表示服务挂了,心跳续约失败
10     if (leaseToRenew == null) {
11         RENEW_NOT_FOUND.increment(isReplication);
12         logger.warn("DS: Registry: lease doesn't exist, registering resource: {} - {}", appName, id);
13         return false;
14     } else {
15         InstanceInfo instanceInfo = leaseToRenew.getHolder();
16         if (instanceInfo != null) {
17             // touchASGCache(instanceInfo.getASGName());
18             InstanceInfo.InstanceStatus overriddenInstanceStatus = this.getOverriddenInstanceStatus(
19                     instanceInfo, leaseToRenew, isReplication);
20             if (overriddenInstanceStatus == InstanceInfo.InstanceStatus.UNKNOWN) {
21                 logger.info("Instance status UNKNOWN possibly due to deleted override for instance {}"
22                         + "; re-register required", instanceInfo.getId());
23                 RENEW_NOT_FOUND.increment(isReplication);
24                 return false;
25             }
26             if (!instanceInfo.getStatus().equals(overriddenInstanceStatus)) {
27                 Object[] args = {
28                         instanceInfo.getStatus().name(),
29                         instanceInfo.getOverriddenStatus().name(),
30                         instanceInfo.getId()
31                 };
32                 logger.info(
33                         "The instance status {} is different from overridden instance status {} for instance {}. "
34                                 + "Hence setting the status to overridden status", args);
35                 instanceInfo.setStatusWithoutDirty(overriddenInstanceStatus);
36             }
37         }
38         renewsLastMin.increment();
39         // 如果能拿到InstanceInfo就做一个续约
40         leaseToRenew.renew();
41         return true;
42     }
43 }
3、进一步看下续约leaseToRenew.renew()方法
1 public void renew() {
2     lastUpdateTimestamp = System.currentTimeMillis() + duration;
3 }
代码很简单,就是延长lastUpdateTimestamp的时间,duration则是通过构造传入的,若duration没有指定则默认90秒。
服务下线:
若要将此客户端下线的话,要分两步走
)启动下线接口(配置properties)
1 # 启用下线功能
2 endpoints.shutdown.enabled=true
3 # 关闭下线功能的安全校验
4 endpoints.shutdown.sensitive=false
)调用下线接口(http://当前客户端ip/当前客户端port/shutdown)
1、客户端
客户端代码很简单,主要分为两步
)cancelScheduledTasks() >>> 停止客户端初始化的三个job(客户端定时获取服务列表、客户端定时发送心跳续约、客户端定时注册)
)unregister() >>> 注销(调用apps/appName/id接口,delete方式)
2、服务端
首先我们来找到客户端调的那个接口:com.netflix.eureka.resources.InstanceResource#cancelLease
 1 @DELETE
 2 public Response cancelLease(@HeaderParam(PeerEurekaNode.HEADER_REPLICATION) String isReplication) {
 3     boolean isSuccess = registry.cancel(app.getName(), id, "true".equals(isReplication));
 4
 5     if (isSuccess) {
 6         logger.debug("Found (Cancel): " + app.getName() + " - " + id);
 7         return Response.ok().build();
 8     } else {
 9         logger.info("Not Found (Cancel): " + app.getName() + " - " + id);
10         return Response.status(Status.NOT_FOUND).build();
11     }
12 }
我们看核心代码(第3行),并找到方法的实现com.netflix.eureka.registry.PeerAwareInstanceRegistryImpl#cancel
 1 @Override
 2 public boolean cancel(final String appName, final String id, final boolean isReplication) {
 3     if (super.cancel(appName, id, isReplication)) {
 4         replicateToPeers(PeerAwareInstanceRegistryImpl.Action.Cancel, appName, id, null, null, isReplication);
 5         synchronized (lock) {
 6             if (this.expectedNumberOfRenewsPerMin > 0) {
 7                 // Since the client wants to cancel it, reduce the threshold (1 for 30 seconds, 2 for a minute)
 8                 this.expectedNumberOfRenewsPerMin = this.expectedNumberOfRenewsPerMin - 2;
 9                 this.numberOfRenewsPerMinThreshold =
10                         (int) (this.expectedNumberOfRenewsPerMin * serverConfig.getRenewalPercentThreshold());
11             }
12         }
13         return true;
14     }
15     return false;
16 }
看第三行,然后一步步跟进后找到其底层代码:
 1 protected boolean internalCancel(String appName, String id, boolean isReplication) {
 2     try {
 3         read.lock();
 4         CANCEL.increment(isReplication);
 5         // 还是同样的从registry中拿取数据
 6         Map<String, Lease<InstanceInfo>> gMap = registry.get(appName);
 7         Lease<InstanceInfo> leaseToCancel = null;
 8         if (gMap != null) {
 9             // 若拿到数据则移除该数据
10             leaseToCancel = gMap.remove(id);
11         }
12         synchronized (recentCanceledQueue) {
13             recentCanceledQueue.add(new Pair<Long, String>(System.currentTimeMillis(), appName + "(" + id + ")"));
14         }
15         InstanceInfo.InstanceStatus instanceStatus = overriddenInstanceStatusMap.remove(id);
16         if (instanceStatus != null) {
17             logger.debug("Removed instance id {} from the overridden map which has value {}", id, instanceStatus.name());
18         }
19         if (leaseToCancel == null) {
20             CANCEL_NOT_FOUND.increment(isReplication);
21             logger.warn("DS: Registry: cancel failed because Lease is not registered for: {}/{}", appName, id);
22             return false;
23         } else {
24             // 将此InstanceInfo移除
25             leaseToCancel.cancel();
26             InstanceInfo instanceInfo = leaseToCancel.getHolder();
27             String vip = null;
28             String svip = null;
29             if (instanceInfo != null) {
30                 instanceInfo.setActionType(InstanceInfo.ActionType.DELETED);
31                 recentlyChangedQueue.add(new AbstractInstanceRegistry.RecentlyChangedItem(leaseToCancel));
32                 instanceInfo.setLastUpdatedTimestamp();
33                 vip = instanceInfo.getVIPAddress();
34                 svip = instanceInfo.getSecureVipAddress();
35             }
36             invalidateCache(appName, vip, svip);
37             logger.info("Cancelled instance {}/{} (replication={})", appName, id, isReplication);
38             return true;
39         }
40     } finally {
41         read.unlock();
42     }
43 }
最后服务下单其实就是调用leaseToCancel.cancel(),通过更新evictionTimestamp来取消租赁
1 public void cancel() {
2     if (evictionTimestamp <= 0) {
3         evictionTimestamp = System.currentTimeMillis();
4 }
总结:
总的来说Eureka的实现原理不难理解:
- 注册、获取列表就是往定义好的map中存取值。
- 心跳就是服务端判断节点是否存活,存活则更新存活的时间戳。
- 而服务的下线也通用是通过时间戳来实现。

 浙公网安备 33010602011771号