Wemos D1入门

ESP8266特点介绍
- 802.11 b/g/n
- 内置Tensilica L106 超低功耗 32 位微型 MCU,主频支持 80 MHz 和160 MHz,支持 RTOS
- 内置10 bit高精度ADC
- 内置TCP/IP协议栈
- 内置TR 开关、balun、LNA、功率放大器和匹配网络
- 内置PLL、稳压器和电源管理组件,802.11b 模式下+20 dBm的输出功率
- A-MPDU 、 A-MSDU 的聚合和 0.4 s的保护间隔
- WiFi @ 2.4 GHz,支持 WPA/WPA2 安全模式
- 支持AT远程升级及云端OTA升级
- 支持 STA/AP/STA+AP 工作模式
- 支持 Smart Config 功能(包括 Android 和 iOS 设备)
- HSPI 、UART、I2C、I2S、IR Remote Control、PWM、GPIO
- 深度睡眠保持电流为 10 uA,关断电流小于 5 uA
- 2 ms 之内唤醒、连接并传递数据包
- 待机状态消耗功率小于1.0 mW (DTIM3)
- 工作温度范围:-40℃- 125℃
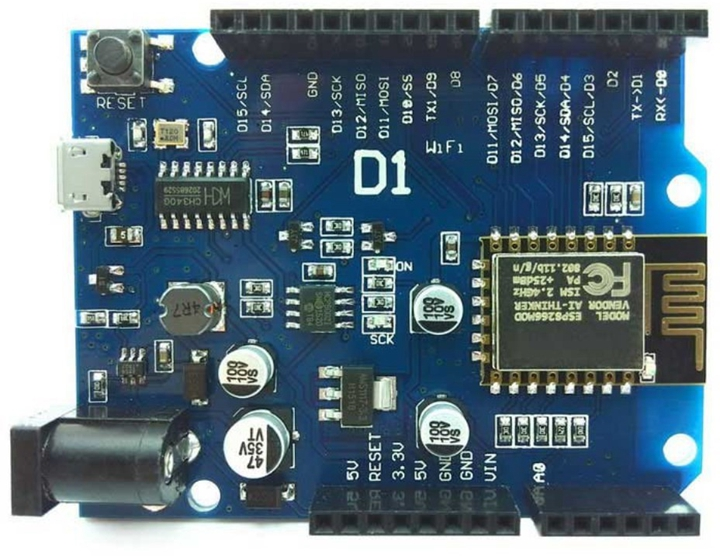
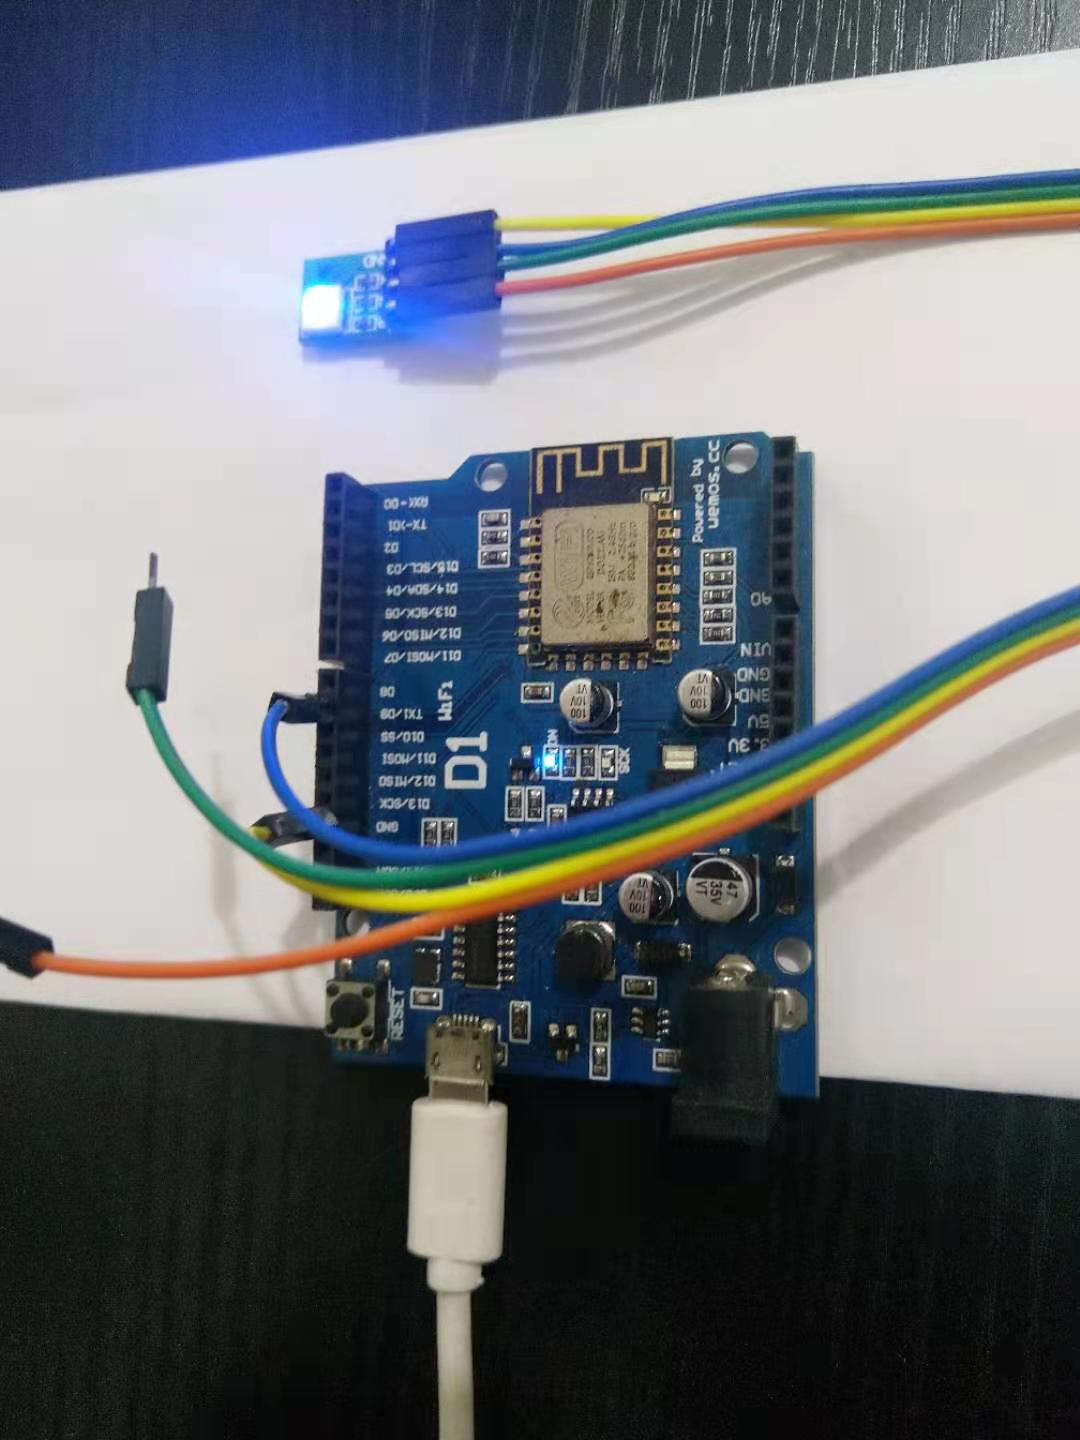
WeMos D1开发板
全称是WeMos D1 WiFI UNO R3开发板,基于ESP-8266,兼容Arduino。
有了这款物联网开发板,我们就可以愉快的使用arduino方式开发ESP8266,玩转物联网项目。
引脚
WeMos D1包含:
数字IO引脚11个。除了D0引脚外,其余引脚均支持pwm、I2C、中断、单总线。
模拟输入引脚1个(最大支持3.3v输入)。
模拟引脚仅有1个。数字引脚(包括RX,TX)共有11个
需要注意的一点是:WeMos D1上数字引脚的一侧引脚数量远大于11个,
这是因为该板上D3与D15、D4与D14、D5与D13、D6与D12、D7与D11、D9与板载LED 它们两两之间是互通的。
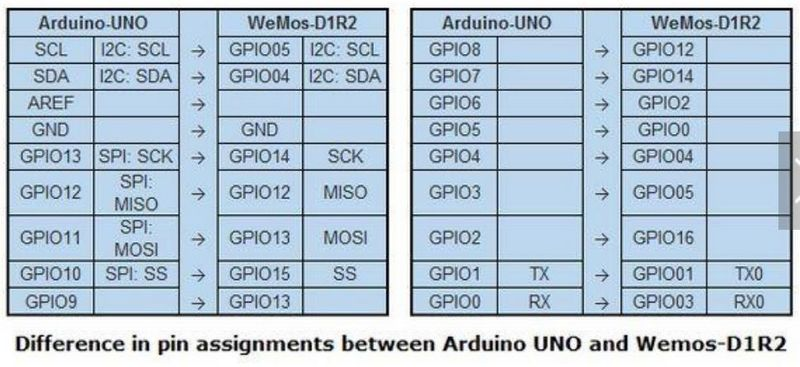
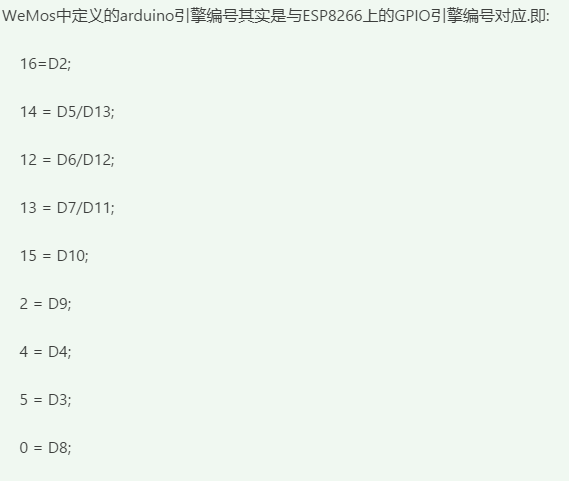
具体引脚的定义可以参考我整理的引脚定义库。
1.Arduino IDE下载
链接:https://pan.baidu.com/s/1ig6psM6GvWJk0CwqaIqs7A
提取码:uyy4
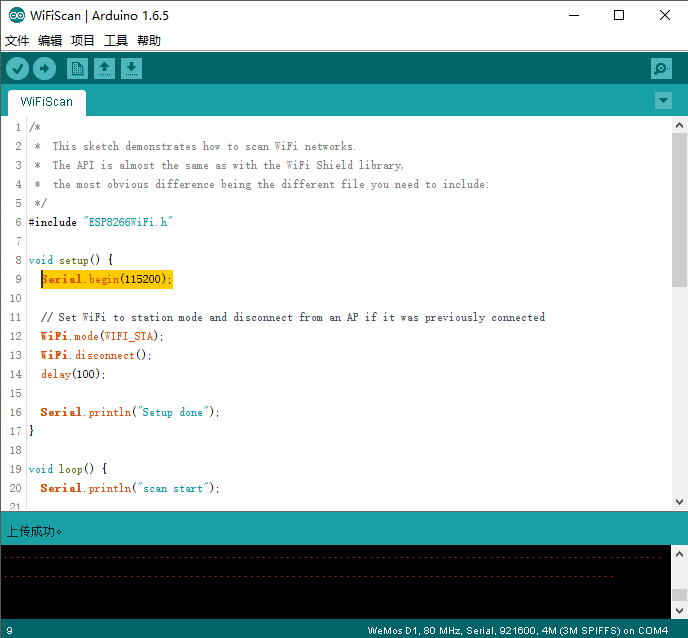
2.示例(搜索WIFI)
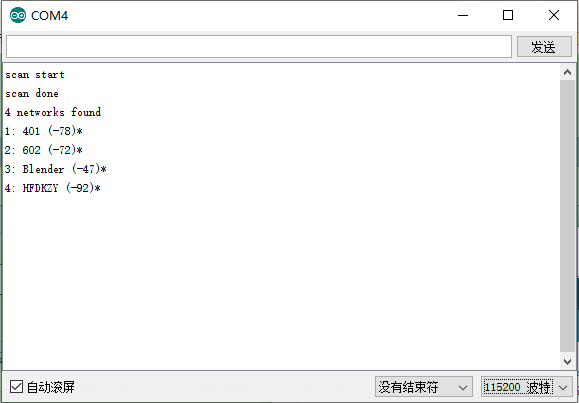
 1 /*
 2  *  This sketch demonstrates how to scan WiFi networks.
 3  *  The API is almost the same as with the WiFi Shield library,
 4  *  the most obvious difference being the different file you need to include:
 5  */
 6 #include "ESP8266WiFi.h"
 7
 8 void setup() {
 9   Serial.begin(115200);
10
11   // Set WiFi to station mode and disconnect from an AP if it was previously connected
12   WiFi.mode(WIFI_STA);
13   WiFi.disconnect();
14   delay(100);
15
16   Serial.println("Setup done");
17 }
18
19 void loop() {
20   Serial.println("scan start");
21
22   // WiFi.scanNetworks will return the number of networks found
23   int n = WiFi.scanNetworks();
24   Serial.println("scan done");
25   if (n == 0)
26     Serial.println("no networks found");
27   else
28   {
29     Serial.print(n);
30     Serial.println(" networks found");
31     for (int i = 0; i < n; ++i)
32     {
33       // Print SSID and RSSI for each network found
34       Serial.print(i + 1);
35       Serial.print(": ");
36       Serial.print(WiFi.SSID(i));
37       Serial.print(" (");
38       Serial.print(WiFi.RSSI(i));
39       Serial.print(")");
40       Serial.println((WiFi.encryptionType(i) == ENC_TYPE_NONE)?" ":"*");
41       delay(10);
42     }
43   }
44   Serial.println("");
45
46   // Wait a bit before scanning again
47   delay(5000);
48 }
3.WIFI搜索
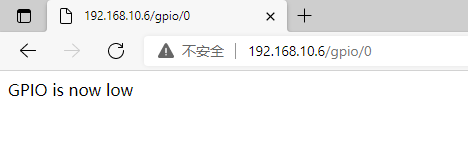
4.点灯控制
/*
 *  This sketch demonstrates how to set up a simple HTTP-like server.
 *  The server will set a GPIO pin depending on the request
 *    http://server_ip/gpio/0 will set the GPIO2 low,
 *    http://server_ip/gpio/1 will set the GPIO2 high
 *  server_ip is the IP address of the ESP8266 module, will be
 *  printed to Serial when the module is connected.
 */

#include <ESP8266WiFi.h>

const char* ssid = "your-ssid";
const char* password = "your-password";

// Create an instance of the server
// specify the port to listen on as an argument
WiFiServer server(80);

void setup() {
  Serial.begin(115200);
  delay(10);

  // prepare GPIO2
  pinMode(2, OUTPUT);
  digitalWrite(2, 0);

  // Connect to WiFi network
  Serial.println();
  Serial.println();
  Serial.print("Connecting to ");
  Serial.println(ssid);

  WiFi.begin(ssid, password);

  while (WiFi.status() != WL_CONNECTED) {
    delay(500);
    Serial.print(".");
  }
  Serial.println("");
  Serial.println("WiFi connected");

  // Start the server
  server.begin();
  Serial.println("Server started");

  // Print the IP address
  Serial.println(WiFi.localIP());
}

void loop() {
  // Check if a client has connected
  WiFiClient client = server.available();
  if (!client) {
    return;
  }

  // Wait until the client sends some data
  Serial.println("new client");
  while(!client.available()){
    delay(1);
  }

  // Read the first line of the request
  String req = client.readStringUntil('\r');
  Serial.println(req);
  client.flush();

  // Match the request
  int val;
  if (req.indexOf("/gpio/0") != -1)
    val = 0;
  else if (req.indexOf("/gpio/1") != -1)
    val = 1;
  else {
    Serial.println("invalid request");
    client.stop();
    return;
  }

  // Set GPIO2 according to the request
  digitalWrite(2, val);

  client.flush();

  // Prepare the response
  String s = "HTTP/1.1 200 OK\r\nContent-Type: text/html\r\n\r\n<!DOCTYPE HTML>\r\n<html>\r\nGPIO is now ";
  s += (val)?"high":"low";
  s += "</html>\n";

  // Send the response to the client
  client.print(s);
  delay(1);
  Serial.println("Client disonnected");

  // The client will actually be disconnected
  // when the function returns and 'client' object is detroyed
}

作者:儒良设计
-------------------------------------------
个性签名:独学而无友,则孤陋而寡闻。做一个灵魂有趣的人!
万水千山总是情,打赏一分行不行,所以如果你心情还比较高兴,也是可以扫码打赏博主,哈哈哈(っ•̀ω•́)っ✎⁾⁾!


 浙公网安备 33010602011771号