
spring学习总结1
博文参考链接:https://www.yiibai.com/spring/spring-auto-wiring-beans-with-autowired-annotation.html
//什么是spring
参考链接:https://blog.csdn.net/qq_22172133/article/details/81487134
spring 是一个开源框架,核心为 IOC(依赖注入/控制反转),AOP(面向切面)
这两个概念后面会详细介绍
//spring优点
1.方便解耦,对依赖对象的创建和管理交给spring容器
2.aop面向切面编程,对通用的异常,监控等进行统一的管理
3.声明式事务,方便事务管理
4.方便程序测试,Spring对Junit4支持,可以通过注解方便的测试Spring程序
spring IOC使用方法:
依赖注入与自动装配的区别:
依赖注入是为引用的对象进行赋值,自动装配是进行赋值时的一种方法
如:
public class Customer
{
	private Person person;

	public Customer(Person person) {
		this.person = person;
	}

	public void setPerson(Person person) {
		this.person = person;
	}
	//...
}
public class Person
{
	//...
}
<bean id="customer" class="com.yiibai.common.Customer" autowire="byName" />
<bean id="person" class="com.yiibai.common.Person" />
其中红色部分是一个依赖注入,Customer类引用了Person类,所以注入了person对象,自动装配模式为 byName,即为这个引用对象(person)赋值时采用的是按名称匹配的方法
依赖注入有两种:setter, 构造器
自动装配有五种:
- no – 缺省情况下,自动配置是通过“ref”属性手动设定
     <bean id="customer" class="com.yiibai.common.Customer">
                  <property name="person" ref="person" />
	</bean>

	<bean id="person" class="com.yiibai.common.Person" />
- byName – 根据属性名称自动装配。如果一个bean的名称和其他bean属性的名称是一样的,将会自装配它。
-
<bean id="customer" class="com.yiibai.common.Customer" autowire="byName" />
<bean id="person" class="com.yiibai.common.Person" />
- byType – 按数据类型自动装配。如果一个bean的数据类型是用其它bean属性的数据类型,兼容并自动装配它。
-
<bean id="customer" class="com.yiibai.common.Customer" autowire="byType" />
<bean id="person" class="com.yiibai.common.Person" />
- 如果有多个相同类型,装配时会报错,因为spring不知道应该注入哪个
-
<bean id="customer" class="com.yiibai.common.Customer" autowire="byType" />
<bean id="person" class="com.yiibai.common.Person" />
<bean id="student" class="com.yiibai.common.Person" /> - 标红部分为两个相同类型(Person)按类型注入会报错
- constructor – 在构造函数参数的byType方式。
-
        <bean id="customer" class="com.yiibai.common.Customer" autowire="constructor" />

	<bean id="person" class="com.yiibai.common.Person" />
- 按构造函数注入,实际上是根据构造函数中参数的类型进行匹配(因此,如果有多个类型相同的bean,注入时也会报错)
- autodetect – 如果找到默认的构造函数,使用“自动装配用构造”; 否则,使用“按类型自动装配”
- 参考链接:https://www.yiibai.com/spring/spring-autowiring-by-autodetect.html
以上为通过xml进行配置,下面介绍下通过注解配置
@Autowired
可以用于 setter方法,构造函数,属性字段
public class Customer
{
        @Autowired 用于属性字段
	private Person person;
	/*@Autowired  用于构造函数
	public Customer(Person person) {
		this.person = person;
	}*/
	/*@Autowired  用于setter方法
	public void setPerson(Person person) {
		this.person = person;
	}*/
	//...
}
public class Person
{
	//...
}
@Autowired注解是通过匹配数据类型自动装配Bean
想要使用@Autowired注解,有两种方法
1.xml引入如下配置
<beans
	//...
	xmlns:context="http://www.springframework.org/schema/context"
	//...
	http://www.springframework.org/schema/context
	http://www.springframework.org/schema/context/spring-context-2.5.xsd">
	//...

	<context:annotation-config />
	//...
</beans>

2.xml中引入AutowiredAnnotationBeanPostProcessor
<beans xmlns="http://www.springframework.org/schema/beans"
	xmlns:xsi="http://www.w3.org/2001/XMLSchema-instance"
	xsi:schemaLocation="http://www.springframework.org/schema/beans
	http://www.springframework.org/schema/beans/spring-beans-2.5.xsd">

<bean
class="org.springframework.beans.factory.annotation.AutowiredAnnotationBeanPostProcessor"/>

	<bean id="CustomerBean" class="com.yiibai.common.Customer">
		<property name="action" value="buy" />
		<property name="type" value="1" />
	</bean>

	<bean id="PersonBean" class="com.yiibai.common.Person">
		<property name="name" value="yiibai" />
		<property name="address" value="address ABC" />
		<property name="age" value="29" />
	</bean>

</beans>

@Qualifier注解,当Autowired注入时有多个相同类型的bean,通过该注解可以指定要注入哪个bean
<beans xmlns="http://www.springframework.org/schema/beans"
	xmlns:xsi="http://www.w3.org/2001/XMLSchema-instance"
	xmlns:context="http://www.springframework.org/schema/context"
	xsi:schemaLocation="http://www.springframework.org/schema/beans
	http://www.springframework.org/schema/beans/spring-beans-2.5.xsd
	http://www.springframework.org/schema/context
	http://www.springframework.org/schema/context/spring-context-2.5.xsd">

	<context:annotation-config />

	<bean id="CustomerBean" class="com.yiibai.common.Customer">
		<property name="action" value="buy" />
		<property name="type" value="1" />
	</bean>

	<bean id="PersonBean1" class="com.yiibai.common.Person">
		<property name="name" value="yiibai-1" />
		<property name="address" value="address-1" />
		<property name="age" value="29" />
	</bean>

	<bean id="PersonBean2" class="com.yiibai.common.Person">
		<property name="name" value="yiibai-2" />
		<property name="address" value="address-2" />
		<property name="age" value="28" />
	</bean>

</beans>
public class Customer
{
@Autowired
@Qualifier("PersonBean1")
private Person person;
private int type;
private String action;
//getter and setter methods
}
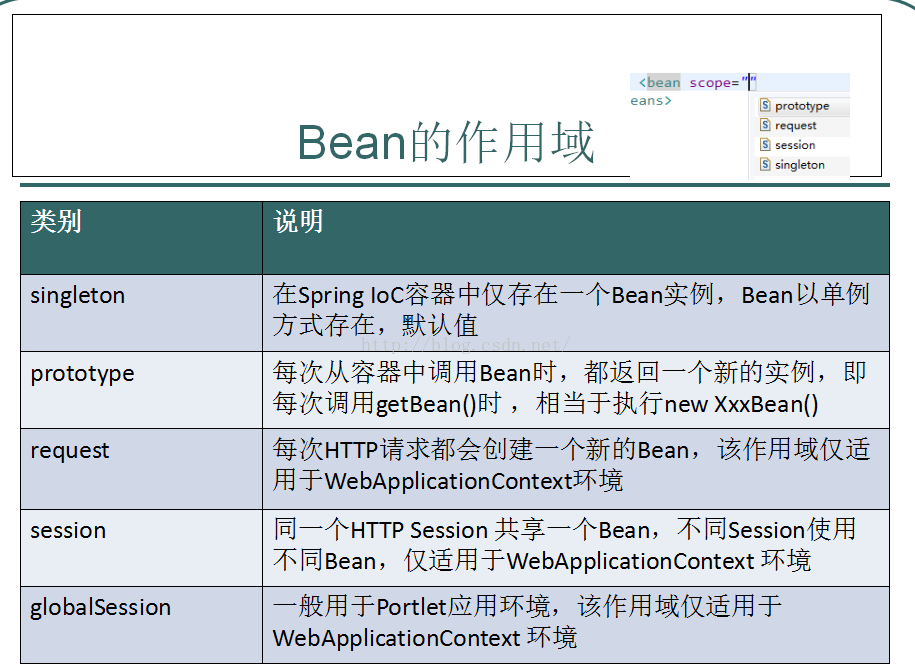
spring bean 的作用域
参考博文:https://blog.csdn.net/fuzhongmin05/article/details/73389779
-
单例 - 每个Spring IoC 容器返回一个bean实例
-
原型- 当每次请求时返回一个新的bean实例
-
请求 - 返回每个HTTP请求的一个Bean实例
-
会话 - 返回每个HTTP会话的一个bean实例
-
全局会话- 返回全局HTTP会话的一个bean实例
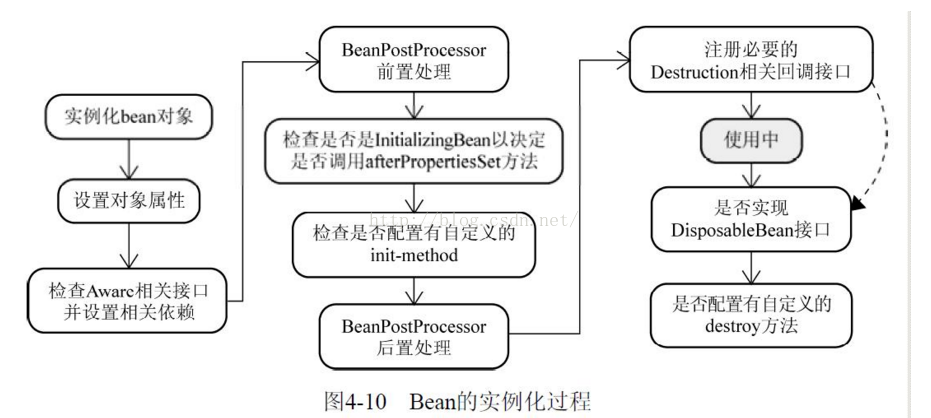
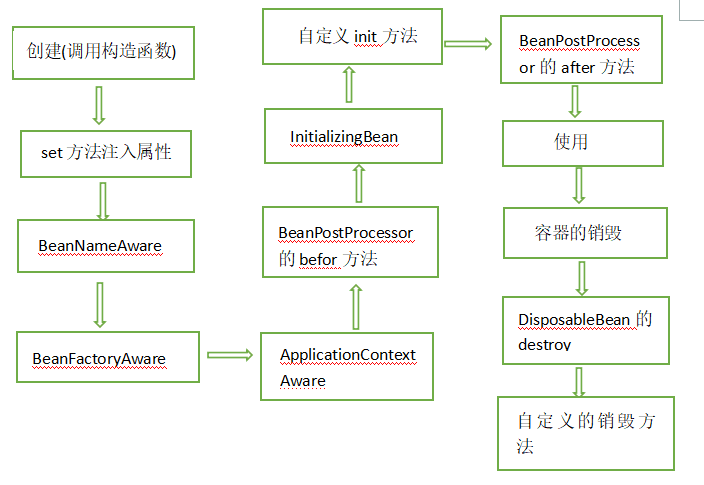
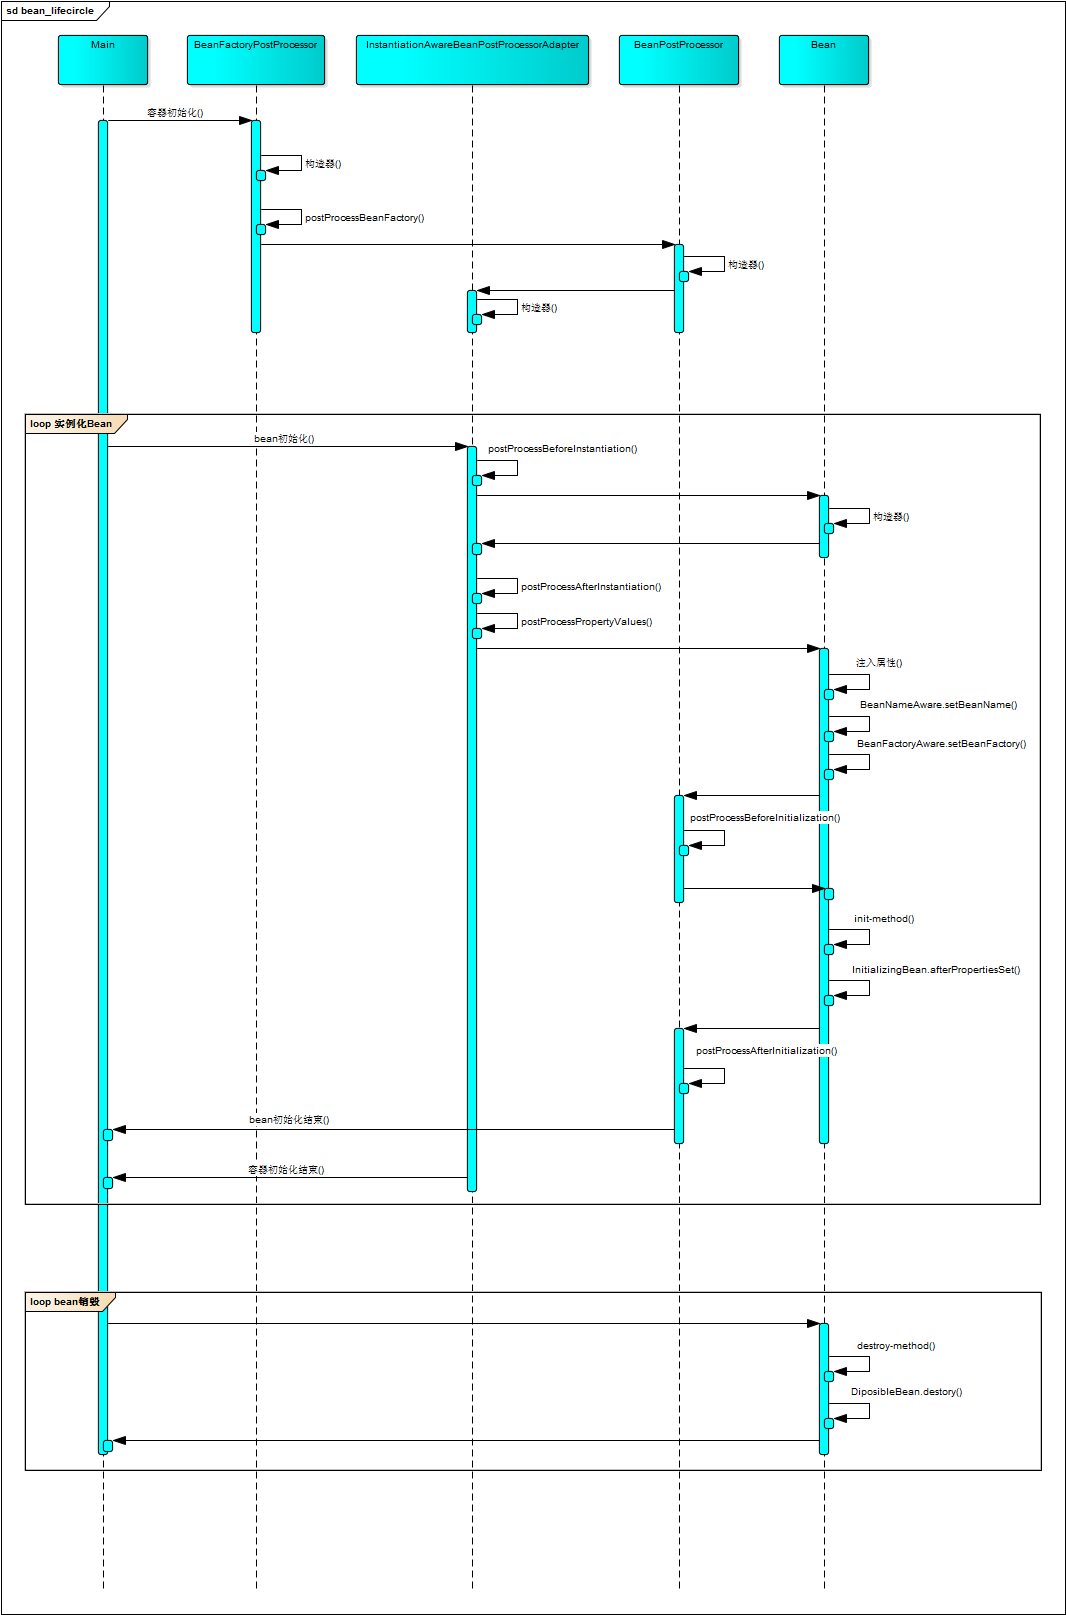
Bean实例生命周期的执行过程如下:
Spring对bean进行实例化,默认bean是单例;
Spring对bean进行依赖注入;
如果bean实现了BeanNameAware接口,spring将bean的id传给setBeanName()方法;
如果bean实现了BeanFactoryAware接口,spring将调用setBeanFactory方法,将BeanFactory实例传进来;
如果bean实现了ApplicationContextAware接口,它的setApplicationContext()方法将被调用,将应用上下文的引用传入到bean中;
如果bean实现了BeanPostProcessor接口,它的postProcessBeforeInitialization方法将被调用;
如果bean实现了InitializingBean接口,spring将调用它的afterPropertiesSet接口方法,类似的如果bean使用了init-method属性声明了初始化方法,该方法也会被调用;
如果bean实现了BeanPostProcessor接口,它的postProcessAfterInitialization接口方法将被调用;
此时bean已经准备就绪,可以被应用程序使用了,他们将一直驻留在应用上下文中,直到该应用上下文被销毁;
若bean实现了DisposableBean接口,spring将调用它的distroy()接口方法。同样的,如果bean使用了destroy-method属性声明了销毁方法,则该方法被调用;
---------------------
作者:fuzhongmin05
原文:https://blog.csdn.net/fuzhongmin05/article/details/73389779
当bean为propotype 时,不会执行指定的destory-method
作用域为prototype的bean,其destroy方法并没有被调用。如果bean的scope设为prototype时,当容器关闭时,destroy方法不会被调用。对于prototype作用域的bean,有一点非常重要,那就是Spring不能对一个prototype bean的整个生命周期负责:容器在初始化、配置、装饰或者是装配完一个prototype实例后,将它交给客户端,随后就对该prototype实例不闻不问了。不管何种作用域,容器都会调用所有对象的初始化生命周期回调方法。但对prototype而言,任何配置好的析构生命周期回调方法都将不会被调用
web项目中如何加载ApplicationContext工厂,保证不用每次获取bean实例都手动进行:ApplicationContext applicationContext = new ClassPathXmlApplicationContext("applicationContext.xml");
方法:将ApplicationContext放在ServletContext 中,因为web应用所有servlet共享一个ServletContext,所以只需要加载一次即可
web.xml中配置
ContextLoaderListener
在这个类中,通过contextLoader监听,加载servletContext,
在学习Spring IoC过程中发现,每次产生ApplicationContext工厂的方式是:
ApplicationContext applicationContext = new ClassPathXmlApplicationContext("applicationContext.xml");
1
这样产生ApplicationContext就有一个弊端,每次访问加载bean的时候都会产生这个工厂,所以这里需要解决这个问题。
ApplicationContext是一个接口,它继承自BeanFactory接口,除了包含BeanFactory的所有功能之外,在国际化支持、资源访问(如URL和文件)、事件传播等方面进行了良好的支持。
解决问题的方法很简单,在web容器启动的时候将ApplicationContext转移到ServletContext中,因为在web应用中所有的Servlet都共享一个ServletContext对象。那么我们就可以利用ServletContextListener去监听ServletContext事件,当web应用启动的是时候,我们就将ApplicationContext装载到ServletContext中。 Spring容器底层已经为我们想到了这一点,在spring-web-xxx-release.jar包中有一个已经实现了ServletContextListener接口的类ContextLoader,其源码如下:
public class ContextLoaderListener extends ContextLoader implements ServletContextListener {
private ContextLoader contextLoader;
public ContextLoaderListener() {
}
public ContextLoaderListener(WebApplicationContext context) {
super(context);
}
public void contextInitialized(ServletContextEvent event) {
this.contextLoader = createContextLoader();
if (this.contextLoader == null) {
this.contextLoader = this;
}
this.contextLoader.initWebApplicationContext(event.getServletContext());
}
@Deprecated
protected ContextLoader createContextLoader() {
return null;
}
@Deprecated
public ContextLoader getContextLoader() {
return this.contextLoader;
}
public void contextDestroyed(ServletContextEvent event) {
if (this.contextLoader != null) {
this.contextLoader.closeWebApplicationContext(event.getServletContext());
}
ContextCleanupListener.cleanupAttributes(event.getServletContext());
}
}
这里就监听到了servletContext的创建过程, 那么 这个类又是如何将applicationContext装入到serveletContext容器中的呢?
this.contextLoader.initWebApplicationContext(event.getServletContext())方法的具体实现中:
public WebApplicationContext initWebApplicationContext(ServletContext servletContext) {
if (servletContext.getAttribute(WebApplicationContext.ROOT_WEB_APPLICATION_CONTEXT_ATTRIBUTE) != null) {
throw new IllegalStateException(
"Cannot initialize context because there is already a root application context present - " +
"check whether you have multiple ContextLoader* definitions in your web.xml!");
}
Log logger = LogFactory.getLog(ContextLoader.class);
servletContext.log("Initializing Spring root WebApplicationContext");
if (logger.isInfoEnabled()) {
logger.info("Root WebApplicationContext: initialization started");
}
long startTime = System.currentTimeMillis();
try {
// Store context in local instance variable, to guarantee that
// it is available on ServletContext shutdown.
if (this.context == null) {
this.context = createWebApplicationContext(servletContext);
}
if (this.context instanceof ConfigurableWebApplicationContext) {
ConfigurableWebApplicationContext cwac = (ConfigurableWebApplicationContext) this.context;
if (!cwac.isActive()) {
// The context has not yet been refreshed -> provide services such as
// setting the parent context, setting the application context id, etc
if (cwac.getParent() == null) {
// The context instance was injected without an explicit parent ->
// determine parent for root web application context, if any.
ApplicationContext parent = loadParentContext(servletContext);
cwac.setParent(parent);
}
configureAndRefreshWebApplicationContext(cwac, servletContext);
}
}
servletContext.setAttribute(WebApplicationContext.ROOT_WEB_APPLICATION_CONTEXT_ATTRIBUTE, this.context);
ClassLoader ccl = Thread.currentThread().getContextClassLoader();
if (ccl == ContextLoader.class.getClassLoader()) {
currentContext = this.context;
}
else if (ccl != null) {
currentContextPerThread.put(ccl, this.context);
}
if (logger.isDebugEnabled()) {
logger.debug("Published root WebApplicationContext as ServletContext attribute with name [" +
WebApplicationContext.ROOT_WEB_APPLICATION_CONTEXT_ATTRIBUTE + "]");
}
if (logger.isInfoEnabled()) {
long elapsedTime = System.currentTimeMillis() - startTime;
logger.info("Root WebApplicationContext: initialization completed in " + elapsedTime + " ms");
}
return this.context;
}
catch (RuntimeException ex) {
logger.error("Context initialization failed", ex);
servletContext.setAttribute(WebApplicationContext.ROOT_WEB_APPLICATION_CONTEXT_ATTRIBUTE, ex);
throw ex;
}
catch (Error err) {
logger.error("Context initialization failed", err);
servletContext.setAttribute(WebApplicationContext.ROOT_WEB_APPLICATION_CONTEXT_ATTRIBUTE, err);
throw err;
}
}
这里的重点是servletContext.setAttribute(WebApplicationContext.ROOT_WEB_APPLICATION_CONTEXT_ATTRIBUTE, this.context),用key:WebApplicationContext.ROOT_WEB_APPLICATION_CONTEXT_ATTRIBUTE value: this.context的形式将applicationContext装载到servletContext中了。另外从上面的一些注释我们可以看出: WEB-INF/applicationContext.xml, 如果我们项目中的配置文件不是这么一个路径的话 那么我们使用ContextLoaderListener 就会出问题, 所以我们还需要在web.xml中配置我们的applicationContext.xml配置文件的路径。
<listener>
<listener-class>org.springframework.web.context.ContextLoaderListener</listener-class>
</listener>
<context-param>
<param-name>contextConfigLocation</param-name>
<param-value>classpath:applicationContext.xml</param-value>
</context-param>
spring AOP:
通知类型:before after around afterThrowing 四种
它结合了上面的三个通知,在方法执行过程中执行。创建一个实现了MethodInterceptor接口的类。必须调用“methodInvocation.proceed();” 继续在原来的方法执行,否则原来的方法将不会执行。
package com.yiibai.aop;

import java.util.Arrays;

import org.aopalliance.intercept.MethodInterceptor;
import org.aopalliance.intercept.MethodInvocation;

public class HijackAroundMethod implements MethodInterceptor {
	@Override
	public Object invoke(MethodInvocation methodInvocation) throws Throwable {

		System.out.println("Method name : "
				+ methodInvocation.getMethod().getName());
		System.out.println("Method arguments : "
				+ Arrays.toString(methodInvocation.getArguments()));

		// same with MethodBeforeAdvice
		System.out.println("HijackAroundMethod : Before method hijacked!");

		try {
			// proceed to original method call
			Object result = methodInvocation.proceed();

			// same with AfterReturningAdvice
			System.out.println("HijackAroundMethod : Before after hijacked!");

			return result;

		} catch (IllegalArgumentException e) {
			// same with ThrowsAdvice
			System.out.println("HijackAroundMethod : Throw exception hijacked!");
			throw e;
		}
	}
}
<beans xmlns="http://www.springframework.org/schema/beans"
	xmlns:xsi="http://www.w3.org/2001/XMLSchema-instance"
	xsi:schemaLocation="http://www.springframework.org/schema/beans
        http://www.springframework.org/schema/beans/spring-beans-2.5.xsd">

	<bean id="customerService" class="com.yiibai.customer.services.CustomerService">
		<property name="name" value="Yong Mook Kim" />
		<property name="url" value="http://www.yiibai.com" />
	</bean>

	<bean id="hijackAroundMethodBean" class="com.yiibai.aop.HijackAroundMethod" />

	<bean id="customerServiceProxy"
                class="org.springframework.aop.framework.ProxyFactoryBean">

		<property name="target" ref="customerService" />

		<property name="interceptorNames">
			<list>
				<value>hijackAroundMethodBean</value>
			</list>
		</property>
	</bean>
</beans>
*************************
Method name : printName
Method arguments : []
HijackAroundMethod : Before method hijacked!
Customer name : YiiBai Mook Kim
HijackAroundMethod : Before after hijacked!
*************************
Method name : printURL
Method arguments : []
HijackAroundMethod : Before method hijacked!
Customer website : http://www.yiibai.com
HijackAroundMethod : Before after hijacked!
*************************
Method name : printThrowException
Method arguments : []
HijackAroundMethod : Before method hijacked!
HijackAroundMethod : Throw exception hijacked!
AOP核心概念
1、横切关注点
对哪些方法进行拦截,拦截后怎么处理,这些关注点称之为横切关注点
2、切面(aspect)
类是对物体特征的抽象,切面就是对横切关注点的抽象
3、连接点(joinpoint)
被拦截到的点,因为Spring只支持方法类型的连接点,所以在Spring中连接点指的就是被拦截到的方法,实际上连接点还可以是字段或者构造器
4、切入点(pointcut)
对连接点进行拦截的定义
5、通知(advice)
所谓通知指的就是指拦截到连接点之后要执行的代码,通知分为前置、后置、异常、最终、环绕通知五类
6、目标对象
代理的目标对象
7、织入(weave)
将切面应用到目标对象并导致代理对象创建的过程
8、引入(introduction)
在不修改代码的前提下,引入可以在运行期为类动态地添加一些方法或字段
Spring对AOP的支持
Spring中AOP代理由Spring的IOC容器负责生成、管理,其依赖关系也由IOC容器负责管理。因此,AOP代理可以直接使用容器中的其它bean实例作为目标,这种关系可由IOC容器的依赖注入提供。Spring创建代理的规则为:
1、默认使用Java动态代理来创建AOP代理,这样就可以为任何接口实例创建代理了
2、当需要代理的类不是代理接口的时候,Spring会切换为使用CGLIB代理,也可强制使用CGLIB
AOP编程其实是很简单的事情,纵观AOP编程,程序员只需要参与三个部分:
1、定义普通业务组件
2、定义切入点,一个切入点可能横切多个业务组件
3、定义增强处理,增强处理就是在AOP框架为普通业务组件织入的处理动作
所以进行AOP编程的关键就是定义切入点和定义增强处理,一旦定义了合适的切入点和增强处理,AOP框架将自动生成AOP代理,即:代理对象的方法=增强处理+被代理对象的方法。
下面给出一个Spring AOP的.xml文件模板,名字叫做aop.xml,之后的内容都在aop.xml上进行扩展:

<?xml version="1.0" encoding="UTF-8"?>
<beans xmlns="http://www.springframework.org/schema/beans"
    xmlns:xsi="http://www.w3.org/2001/XMLSchema-instance"
    xmlns:aop="http://www.springframework.org/schema/aop"
    xmlns:tx="http://www.springframework.org/schema/tx"
    xsi:schemaLocation="http://www.springframework.org/schema/beans
        http://www.springframework.org/schema/beans/spring-beans-4.2.xsd
        http://www.springframework.org/schema/aop
        http://www.springframework.org/schema/aop/spring-aop-4.2.xsd">

</beans>
基于Spring的AOP简单实现
注意一下,在讲解之前,说明一点:使用Spring AOP,要成功运行起代码,只用Spring提供给开发者的jar包是不够的,请额外上网下载两个jar包:
1、aopalliance.jar
2、aspectjweaver.jar
开始讲解用Spring AOP的XML实现方式,先定义一个接口:
public interface HelloWorld
{
    void printHelloWorld();
    void doPrint();
}
定义两个接口实现类:
public class HelloWorldImpl1 implements HelloWorld
{
    public void printHelloWorld()
    {
        System.out.println("Enter HelloWorldImpl1.printHelloWorld()");
    }

    public void doPrint()
    {
        System.out.println("Enter HelloWorldImpl1.doPrint()");
        return ;
    }
}
public class HelloWorldImpl2 implements HelloWorld
{
    public void printHelloWorld()
    {
        System.out.println("Enter HelloWorldImpl2.printHelloWorld()");
    }

    public void doPrint()
    {
        System.out.println("Enter HelloWorldImpl2.doPrint()");
        return ;
    }
}
横切关注点,这里是打印时间:
public class TimeHandler
{
    public void printTime()
    {
        System.out.println("CurrentTime = " + System.currentTimeMillis());
    }
}
有这三个类就可以实现一个简单的Spring AOP了,看一下aop.xml的配置:
<?xml version="1.0" encoding="UTF-8"?>
<beans xmlns="http://www.springframework.org/schema/beans"
    xmlns:xsi="http://www.w3.org/2001/XMLSchema-instance"
    xmlns:aop="http://www.springframework.org/schema/aop"
    xmlns:tx="http://www.springframework.org/schema/tx"
    xsi:schemaLocation="http://www.springframework.org/schema/beans
        http://www.springframework.org/schema/beans/spring-beans-4.2.xsd
        http://www.springframework.org/schema/aop
        http://www.springframework.org/schema/aop/spring-aop-4.2.xsd">

        <bean id="helloWorldImpl1" class="com.xrq.aop.HelloWorldImpl1" />
        <bean id="helloWorldImpl2" class="com.xrq.aop.HelloWorldImpl2" />
        <bean id="timeHandler" class="com.xrq.aop.TimeHandler" />

        <aop:config>
            <aop:aspect id="time" ref="timeHandler">
                <aop:pointcut id="addAllMethod" expression="execution(* com.xrq.aop.HelloWorld.*(..))" />
                <aop:before method="printTime" pointcut-ref="addAllMethod" />
                <aop:after method="printTime" pointcut-ref="addAllMethod" />
            </aop:aspect>
        </aop:config>
</beans>
写一个main函数调用一下:
public static void main(String[] args)
{
    ApplicationContext ctx =
            new ClassPathXmlApplicationContext("aop.xml");

    HelloWorld hw1 = (HelloWorld)ctx.getBean("helloWorldImpl1");
    HelloWorld hw2 = (HelloWorld)ctx.getBean("helloWorldImpl2");
    hw1.printHelloWorld();
    System.out.println();
    hw1.doPrint();

    System.out.println();
    hw2.printHelloWorld();
    System.out.println();
    hw2.doPrint();
}
运行结果为:
CurrentTime = 1446129611993
Enter HelloWorldImpl1.printHelloWorld()
CurrentTime = 1446129611993

CurrentTime = 1446129611994
Enter HelloWorldImpl1.doPrint()
CurrentTime = 1446129611994

CurrentTime = 1446129611994
Enter HelloWorldImpl2.printHelloWorld()
CurrentTime = 1446129611994

CurrentTime = 1446129611994
Enter HelloWorldImpl2.doPrint()
CurrentTime = 1446129611994
看到给HelloWorld接口的两个实现类的所有方法都加上了代理,代理内容就是打印时间
基于Spring的AOP使用其他细节
1、增加一个横切关注点,打印日志,Java类为:
public class LogHandler
{
    public void LogBefore()
    {
        System.out.println("Log before method");
    }

    public void LogAfter()
    {
        System.out.println("Log after method");
    }
}
<?xml version="1.0" encoding="UTF-8"?>
<beans xmlns="http://www.springframework.org/schema/beans"
    xmlns:xsi="http://www.w3.org/2001/XMLSchema-instance"
    xmlns:aop="http://www.springframework.org/schema/aop"
    xmlns:tx="http://www.springframework.org/schema/tx"
    xsi:schemaLocation="http://www.springframework.org/schema/beans
        http://www.springframework.org/schema/beans/spring-beans-4.2.xsd
        http://www.springframework.org/schema/aop
        http://www.springframework.org/schema/aop/spring-aop-4.2.xsd">

        <bean id="helloWorldImpl1" class="com.xrq.aop.HelloWorldImpl1" />
        <bean id="helloWorldImpl2" class="com.xrq.aop.HelloWorldImpl2" />
        <bean id="timeHandler" class="com.xrq.aop.TimeHandler" />
        <bean id="logHandler" class="com.xrq.aop.LogHandler" />

        <aop:config>
            <aop:aspect id="time" ref="timeHandler" order="1">
                <aop:pointcut id="addTime" expression="execution(* com.xrq.aop.HelloWorld.*(..))" />
                <aop:before method="printTime" pointcut-ref="addTime" />
                <aop:after method="printTime" pointcut-ref="addTime" />
            </aop:aspect>
            <aop:aspect id="log" ref="logHandler" order="2">
                <aop:pointcut id="printLog" expression="execution(* com.xrq.aop.HelloWorld.*(..))" />
                <aop:before method="LogBefore" pointcut-ref="printLog" />
                <aop:after method="LogAfter" pointcut-ref="printLog" />
            </aop:aspect>
        </aop:config>
</beans>
测试类不变,打印结果为:
CurrentTime = 1446130273734
Log before method
Enter HelloWorldImpl1.printHelloWorld()
Log after method
CurrentTime = 1446130273735

CurrentTime = 1446130273736
Log before method
Enter HelloWorldImpl1.doPrint()
Log after method
CurrentTime = 1446130273736

CurrentTime = 1446130273736
Log before method
Enter HelloWorldImpl2.printHelloWorld()
Log after method
CurrentTime = 1446130273736

CurrentTime = 1446130273737
Log before method
Enter HelloWorldImpl2.doPrint()
Log after method
CurrentTime = 1446130273737
要想让logHandler在timeHandler前使用有两个办法:
(1)aspect里面有一个order属性,order属性的数字就是横切关注点的顺序
(2)把logHandler定义在timeHandler前面,Spring默认以aspect的定义顺序作为织入顺序
2、我只想织入接口中的某些方法
修改一下pointcut的expression就好了:
<?xml version="1.0" encoding="UTF-8"?>
<beans xmlns="http://www.springframework.org/schema/beans"
    xmlns:xsi="http://www.w3.org/2001/XMLSchema-instance"
    xmlns:aop="http://www.springframework.org/schema/aop"
    xmlns:tx="http://www.springframework.org/schema/tx"
    xsi:schemaLocation="http://www.springframework.org/schema/beans
        http://www.springframework.org/schema/beans/spring-beans-4.2.xsd
        http://www.springframework.org/schema/aop
        http://www.springframework.org/schema/aop/spring-aop-4.2.xsd">

        <bean id="helloWorldImpl1" class="com.xrq.aop.HelloWorldImpl1" />
        <bean id="helloWorldImpl2" class="com.xrq.aop.HelloWorldImpl2" />
        <bean id="timeHandler" class="com.xrq.aop.TimeHandler" />
        <bean id="logHandler" class="com.xrq.aop.LogHandler" />

        <aop:config>
            <aop:aspect id="time" ref="timeHandler" order="1">
                <aop:pointcut id="addTime" expression="execution(* com.xrq.aop.HelloWorld.print*(..))" />
                <aop:before method="printTime" pointcut-ref="addTime" />
                <aop:after method="printTime" pointcut-ref="addTime" />
            </aop:aspect>
            <aop:aspect id="log" ref="logHandler" order="2">
                <aop:pointcut id="printLog" expression="execution(* com.xrq.aop.HelloWorld.do*(..))" />
                <aop:before method="LogBefore" pointcut-ref="printLog" />
                <aop:after method="LogAfter" pointcut-ref="printLog" />
            </aop:aspect>
        </aop:config>
</beans>
表示timeHandler只会织入HelloWorld接口print开头的方法,logHandler只会织入HelloWorld接口do开头的方法
3、强制使用CGLIB生成代理
前面说过Spring使用动态代理或是CGLIB生成代理是有规则的,高版本的Spring会自动选择是使用动态代理还是CGLIB生成代理内容,当然我们也可以强制使用CGLIB生成代理,那就是<aop:config>里面有一个"proxy-target-class"属性,这个属性值如果被设置为true,那么基于类的代理将起作用,如果proxy-target-class被设置为false或者这个属性被省略,那么基于接口的代理将起作用
转载自:https://www.cnblogs.com/hongwz/p/5764917.html
springAOP 实现原理:java动态代理
- 实现原理
前面在学习代理模式的时候,了解到代理模式分为动态代理和静态代理。现在我们就以代理模式为基础先实现我们自己的AOP框架,再来研究Spring的AOP的实现原理。
先以静态代理实现,静态代理关键是在代理对象和目标对象实现共同的接口,并且代理对象持有目标对象的引用。
公共接口代码:
1 public interface IHello {
2     /**
3      * 业务方法
4      * @param str
5      */
6     void sayHello(String str);
7 }
目标类代码:
1 public class Hello implements IHello{
2     @Override
3     public void sayHello(String str) {
4         System.out.println("hello "+str);
5     }
6
7 }
代理类代码,我们给它添加日志记录功能,在方法开始前后执行特定的方法,是不是和AOP特别像呢?
public class ProxyHello implements IHello{
    private IHello hello;
    public ProxyHello(IHello hello) {
        super();
        this.hello = hello;
    }
    @Override
    public void sayHello(String str) {
        Logger.start();//添加特定的方法
        hello.sayHello(str);
        Logger.end();
    }

}
日志类代码:
1 public class Logger {
2     public static void start(){
3         System.out.println(new Date()+ " say hello start...");
4     }
5
6     public static void end(){
7         System.out.println(new Date()+ " say hello end");
8     }
9 }
测试代码:
1 public class Test {
2     public static void main(String[] args) {
3         IHello hello = new ProxyHello(new Hello());//如果我们需要日志功能,则使用代理类
4         //IHello hello = new Hello();//如果我们不需要日志功能则使用目标类
5         hello.sayHello("明天");
6     }
7 }
这样我们就实现了一个最简单的AOP,但是这样会存在一个问题:如果我们像Hello这样的类很多,那么,我们是不是要去写很多个HelloProxy这样的类呢。其实也是一种很麻烦的事。在jdk1.3以后,jdk跟我们提供了一个API java.lang.reflect.InvocationHandler的类, 这个类可以让我们在JVM调用某个类的方法时动态的为些方法做些什么事。下面我们就来实现动态代理的实现。
动态代理实现主要是实现InvocationHandler,并且将目标对象注入到代理对象中,利用反射机制来执行目标对象的方法。
接口实现与静态代理相同,代理类代码:
 1 public class DynaProxyHello implements InvocationHandler{
 2
 3     private Object target;//目标对象
 4     /**
 5      * 通过反射来实例化目标对象
 6      * @param object
 7      * @return
 8      */
 9     public Object bind(Object object){
10         this.target = object;
11         return Proxy.newProxyInstance(this.target.getClass().getClassLoader(), this.target.getClass().getInterfaces(), this);
12     }
13
14     @Override
15     public Object invoke(Object proxy, Method method, Object[] args)
16             throws Throwable {
17         Object result = null;
18         Logger.start();//添加额外的方法
19         //通过反射机制来运行目标对象的方法
20         result = method.invoke(this.target, args);
21         Logger.end();
22         return result;
23     }
24
25 }
测试类代码:
1 public class DynaTest {
2     public static void main(String[] args) {
3         IHello hello = (IHello) new DynaProxyHello().bind(new Hello());//如果我们需要日志功能,则使用代理类
4         //IHello hello = new Hello();//如果我们不需要日志功能则使用目标类
5         hello.sayHello("明天");
6     }
7 }
看完上面的代码可能和Spring AOP相比有一个问题,日志类只能在方法前后打印,但是AOP应该是可以在满足条件就可以执行,所有是否可以将DynaPoxyHello对象和日志操作对象(Logger)解耦呢?
看下面代码实现,将将DynaPoxyHello对象和日志操作对象(Logger)解耦:
我们要在被代理对象的方法前面或者后面去加上日志操作代码(或者是其它操作的代码),那么,我们可以抽象出一个接口,这个接口里就只有两个方法:一个是在被代理对象要执行方法之前执行的方法,我们取名为start,第二个方法就是在被代理对象执行方法之后执行的方法,我们取名为end。
Logger的接口:
1 public interface ILogger {
2     void start(Method method);
3     void end(Method method);
4 }
Logger的接口实现:
 1 public class DLogger implements ILogger{
 2     @Override
 3     public void start(Method method) {
 4         System.out.println(new Date()+ method.getName() + " say hello start...");
 5     }
 6     @Override
 7     public void end(Method method) {
 8         System.out.println(new Date()+ method.getName() + " say hello end");
 9     }
10 }
动态代理类:
 1 public class DynaProxyHello1 implements InvocationHandler{
 2     //调用对象
 3     private Object proxy;
 4     //目标对象
 5     private Object target;
 6
 7     public Object bind(Object target,Object proxy){
 8         this.target=target;
 9         this.proxy=proxy;
10         return Proxy.newProxyInstance(this.target.getClass().getClassLoader(), this.target.getClass().getInterfaces(), this);
11     }
12
13
14     @Override
15     public Object invoke(Object proxy, Method method, Object[] args)
16             throws Throwable {
17         Object result = null;
18         //反射得到操作者的实例
19         Class clazz = this.proxy.getClass();
20         //反射得到操作者的Start方法
21         Method start = clazz.getDeclaredMethod("start", new Class[]{Method.class});
22         //反射执行start方法
23         start.invoke(this.proxy, new Object[]{this.proxy.getClass()});
24         //执行要处理对象的原本方法
25         method.invoke(this.target, args);
26         //反射得到操作者的end方法
27         Method end = clazz.getDeclaredMethod("end", new Class[]{Method.class});
28         //反射执行end方法
29         end.invoke(this.proxy, new Object[]{method});
30         return result;
31     }
32
33 }
测试代码:
1 public class DynaTest1 {
2     public static void main(String[] args) {
3         IHello hello = (IHello) new DynaProxyHello1().bind(new Hello(),new DLogger());//如果我们需要日志功能,则使用代理类
4         //IHello hello = new Hello();//如果我们不需要日志功能则使用目标类
5         hello.sayHello("明天");
6     }
7 }
通过上面例子,可以发现通过动态代理和发射技术,已经基本实现了AOP的功能,如果我们只需要在方法执行前打印日志,则可以不实现end()方法,这样就可以控制打印的时机了。如果我们想让指定的方法打印日志,我们只需要在invoke()方法中加一个对method名字的判断,method的名字可以写在xml文件中,这样我们就可以实现以配置文件进行解耦了,这样我们就实现了一个简单的spring aop框架。
Cglib:
采用底层字节码技术修改被代理类生成的class文件,为被拦截的方法,织入拦截代码

 浙公网安备 33010602011771号