


SSM:Spring整合SpringMVC框架
Spring整合SpringMVC框架
一、搭建和测试SpringMVC的开发环境
1. 在web.xml中配置DispatcherServlet前端控制器
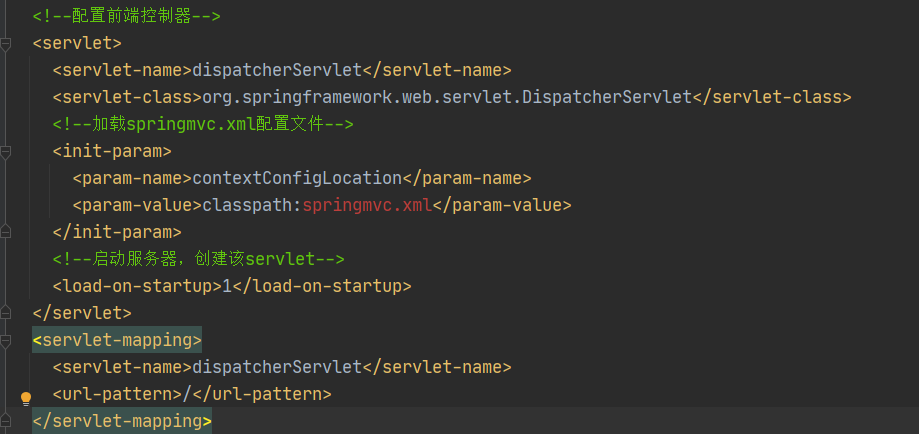


<!--配置前端控制器-->
  <servlet>
    <servlet-name>dispatcherServlet</servlet-name>
    <servlet-class>org.springframework.web.servlet.DispatcherServlet</servlet-class>
    <!--加载springmvc.xml配置文件-->
    <init-param>
      <param-name>contextConfigLocation</param-name>
      <param-value>classpath:springmvc.xml</param-value>
    </init-param>
    <!--启动服务器,创建该servlet-->
    <load-on-startup>1</load-on-startup>
  </servlet>
  <servlet-mapping>
    <servlet-name>dispatcherServlet</servlet-name>
    <url-pattern>/</url-pattern>
  </servlet-mapping>
2. 在web.xml中配置DispatcherServlet过滤器解决中文乱码
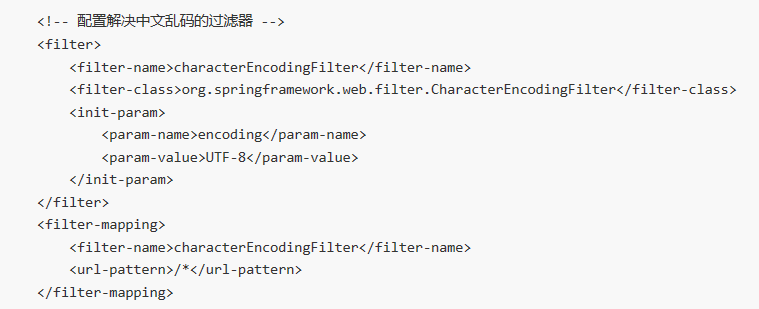
<!--解决中文乱码的过滤器-->
  <filter>
    <filter-name>characterEncodingFilter</filter-name>
    <filter-class>org.springframework.web.filter.CharacterEncodingFilter</filter-class>
    <init-param>
      <param-name>encoding</param-name>
      <param-value>UTF-8</param-value>
    </init-param>
  </filter>
  <filter-mapping>
    <filter-name>characterEncodingFilter</filter-name>
    <url-pattern>/*</url-pattern>
  </filter-mapping>
3. 创建springmvc.xml的配置文件,编写配置文件
1.头文件
<?xml version="1.0" encoding="UTF-8"?>
<beans xmlns="http://www.springframework.org/schema/beans"
       xmlns:mvc="http://www.springframework.org/schema/mvc" xmlns:context="http://www.springframework.org/schema/context"
       xmlns:xsi="http://www.w3.org/2001/XMLSchema-instance"
       xsi:schemaLocation="
        http://www.springframework.org/schema/beans
        http://www.springframework.org/schema/beans/spring-beans.xsd
        http://www.springframework.org/schema/mvc
        http://www.springframework.org/schema/mvc/spring-mvc.xsd
        http://www.springframework.org/schema/context
        http://www.springframework.org/schema/context/spring-context.xsd">
2.开启注解扫描,只扫描Controller注解
<!--开启注解扫描,只扫描Controller注解-->
    <context:component-scan base-package="cn.itcast">
        <context:include-filter type="annotation" expression="org.springframework.stereotype.Controller" />
    </context:component-scan>
3.配置的视图解析器对象
<!--配置的视图解析器对象-->
    <bean id="internalResourceViewResolver" class="org.springframework.web.servlet.view.InternalResourceViewResolver">
        <property name="prefix" value="/WEB-INF/pages/"/>
        <property name="suffix" value=".jsp"/>
    </bean>
4.开启SpringMVC注解的支持
 <!--开启SpringMVC注解的支持-->
    <mvc:annotation-driven/>
5.设置不过滤静态资源
 <!--过滤静态资源-->
    <mvc:resources location="/css/" mapping="/css/**" />
    <mvc:resources location="/images/" mapping="/images/**" />
    <mvc:resources location="/js/" mapping="/js/**" />
完整代码
<?xml version="1.0" encoding="UTF-8"?>
<beans xmlns="http://www.springframework.org/schema/beans"
       xmlns:mvc="http://www.springframework.org/schema/mvc" xmlns:context="http://www.springframework.org/schema/context"
       xmlns:xsi="http://www.w3.org/2001/XMLSchema-instance"
       xsi:schemaLocation="
        http://www.springframework.org/schema/beans
        http://www.springframework.org/schema/beans/spring-beans.xsd
        http://www.springframework.org/schema/mvc
        http://www.springframework.org/schema/mvc/spring-mvc.xsd
        http://www.springframework.org/schema/context
        http://www.springframework.org/schema/context/spring-context.xsd">

    <!--开启注解扫描,只扫描Controller注解-->
    <context:component-scan base-package="cn.itcast">
        <context:include-filter type="annotation" expression="org.springframework.stereotype.Controller" />
    </context:component-scan>

    <!--配置的视图解析器对象-->
    <bean id="internalResourceViewResolver" class="org.springframework.web.servlet.view.InternalResourceViewResolver">
        <property name="prefix" value="/WEB-INF/pages/"/>
        <property name="suffix" value=".jsp"/>
    </bean>

    <!--过滤静态资源-->
    <mvc:resources location="/css/" mapping="/css/**" />
    <mvc:resources location="/images/" mapping="/images/**" />
    <mvc:resources location="/js/" mapping="/js/**" />

    <!--开启SpringMVC注解的支持-->
    <mvc:annotation-driven/>

</beans>
4. 测试SpringMVC的框架搭建是否成功
1. 编写index.jsp和list.jsp编写,超链接
<a href="account/findAll">查询所有</a>
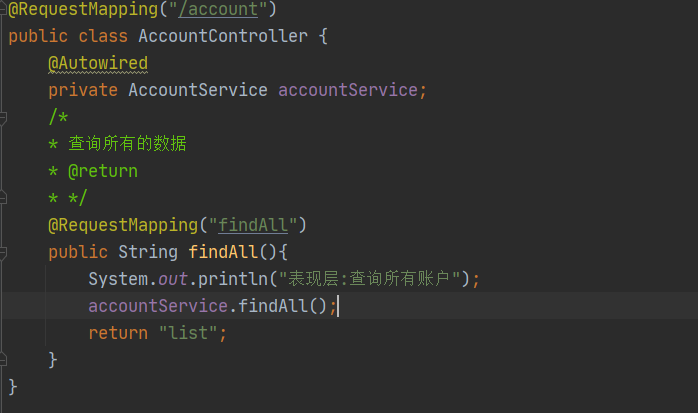
2. 创建AccountController类,编写方法,进行测试
package cn.itcast.controller;

import org.springframework.stereotype.Controller;
import org.springframework.web.bind.annotation.RequestMapping;

@Controller
@RequestMapping("/account")
public class AccountController {
    /*
    * 查询所有的数据
    * @return
    * */
    @RequestMapping("findAll")
    public String findAll(){
        System.out.println("表现层:查询所有账户");
        return "list";
    }
}
二、Spring整合SpringMVC的框架
1. 目的:在controller中能成功的调用service对象中的方法。
2. 在项目启动的时候,就去加载applicationContext.xml的配置文件,在web.xml中配置
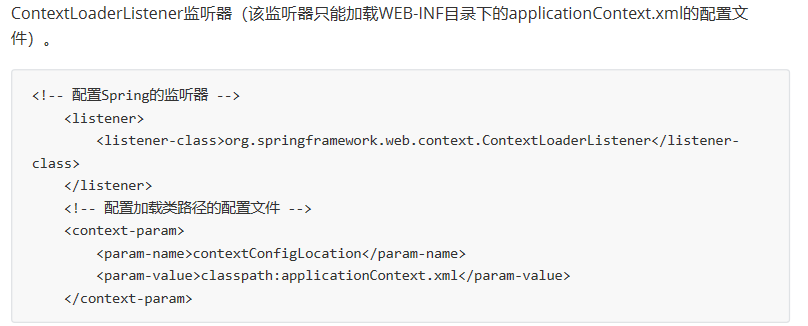
<!--配置Spring的监听器,默认只加载WEB-INF目录下的applicationContext.xml配置文件-->
  <listener>
    <listener-class>org.springframework.web.context.ContextLoaderListener</listener-class>
  </listener>
  <!--设置配置文件的路径-->
  <context-param>
    <param-name>contextConfigLocation</param-name>
    <param-value>classpath:applicationContext.xml</param-value>
  </context-param>
index.jsp文件
<%@ page contentType="text/html;charset=UTF-8" language="java" %>
<html>
<head>
    <title>Title</title>
</head>
<%
 String path=request.getContextPath();
%>
<body>
<a href="<%=path%>/account/findAll">查询所有用户</a>
</body>
</html>
表现层

一纸高中万里风,寒窗读破华堂空。
莫道长安花看尽,由来枝叶几相同?

