[Ubuntu] Ubuntu云服务器通过Apache部署Flask
Ubuntu云服务器通过Apache部署Flask
前言
本文只是记录自己在阿里云的Ubuntu云服务器上尝试部署Flask的过程,只是最简单的Hello World实例,还有很多地方不太懂,如果有错误可以在评论区中留言指出
因为当时没有做太多笔记,是在回忆安装过程,可能部分代码存在问题
环境准备
操作系统: Ubuntu 20.04.1
使用root账号直接登录,所以没有使用 sudo
安装 Apache2
apt-get install apache2 安装apache2
service apache2 start 启动
service apache2 stop 关闭
安装 mod_wsgi
apt-get install libapache2-mod-wsgi-py3
部署过程
创建目标文件夹 (trans是自定义的文件夹名)
mkdir /var/www/trans
cd /var/www/trans
使用虚拟环境来安装flask
python3 -m venv venv 创建虚拟环境 第二个venv是环境名,可以更改
vim venv/bin/activate_this.py 创建 activate_this.py 因为venv是不带这个文件的,以下为具体代码
"""By using execfile(this_file, dict(__file__=this_file)) you will
activate this virtualenv environment.
This can be used when you must use an existing Python interpreter, not
the virtualenv bin/python
"""

try:
    __file__
except NameError:
    raise AssertionError(
        "You must run this like execfile('path/to/active_this.py', dict(__file__='path/to/activate_this.py'))")
import sys
import os

base = os.path.dirname(os.path.dirname(os.path.abspath(__file__)))
site_packages = os.path.join(base, 'lib', 'python%s' % sys.version[:3], 'site-packages')
prev_sys_path = list(sys.path)
import site
site.addsitedir(site_packages)
sys.real_prefix = sys.prefix
sys.prefix = base
# Move the added items to the front of the path:
new_sys_path = []
for item in list(sys.path):
    if item not in prev_sys_path:
        new_sys_path.append(item)
        sys.path.remove(item)
sys.path[:0] = new_sys_path
. venv/bin/activate 激活虚拟环境
pip install flask 安装flask
vim hello.py 创建 hello.py 文件
from flask import Flask

app = Flask(__name__)

@app.route('/')
def index():
    return '<h1>Hello, world</h1>'

if __name__ == '__main__':
    app.run()
vim app.wsgi 创建 app.wsgi 文件
import sys

activate_this = '/var/www/trans/venv/bin/activate_this.py'
with open(activate_this) as file_:
        exec(file_.read(), dict(__file__=activate_this))

sys.path.insert(0, '/var/www/trans')

from hello import app as application
vim /etc/apache2/sites-available/trans.conf 创建一个新的虚拟主机配置文件 x.x.x.x 是云主机的公网IP,根据自己的ip填写,因为域名需要备案,就使用了端口
Listen 2333
<virtualhost *:2333>
        ServerName x.x.x.x
        WSGIDaemonProcess trans threads=5
        WSGIScriptAlias / /var/www/trans/app.wsgi

        <directory /var/www/trans>
                WSGIProcessGroup trans
                WSGIApplicationGroup %{GLOBAL}
                WSGIScriptReloading On
                Order deny,allow
                Allow from all
        </directory>
</virtualhost>
a2ensite trans 激活新的虚拟主机配置
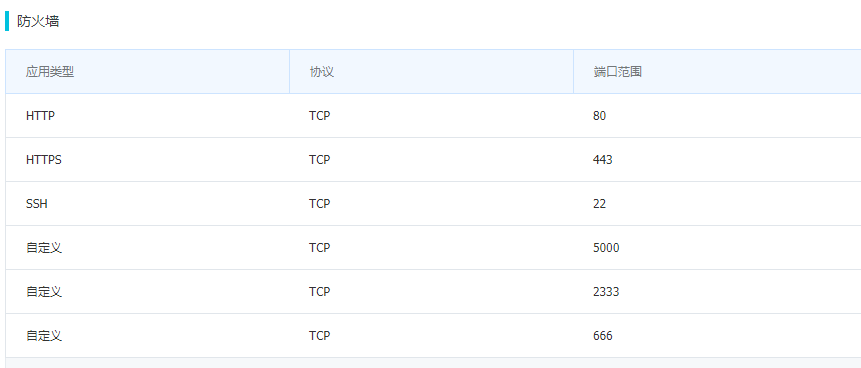
在阿里云控制台中,配置防火墙,使其允许2333端口通过
service apache2 restart 重启apache
浏览器中输入ip加端口,就能访问了

参考文章
Flask官网部署教程: 安装教程中使用 python3 -m venv venv 安装虚拟机,但是部署过程中没有提到过缺少 activate_this.py 文件
flask+mod_wsgi+apache站点部署(Ubuntu16.04) xietx1995 主要参考该教程,将域名解析部分改为了端口
日志-apache的access_log与error_log 之前出错,阅读该文章,找到了错误日志路径,然后发现了是文件 activate_this.py 缺失
No activate_this.py file in venv / pyvenv 发现文件缺失之后,在这个里面找到回答,可以直接使用virtualenv的对应文件
github activate_this.py 因为文件缺失,所以直接复制了这个文件的内容
apache虚拟主机基于域名,ip,端口,配置方法 端口配置参考这篇文章,只是需要将域名部分改为公网ip
