Nacos集群搭建
nacos集群搭建
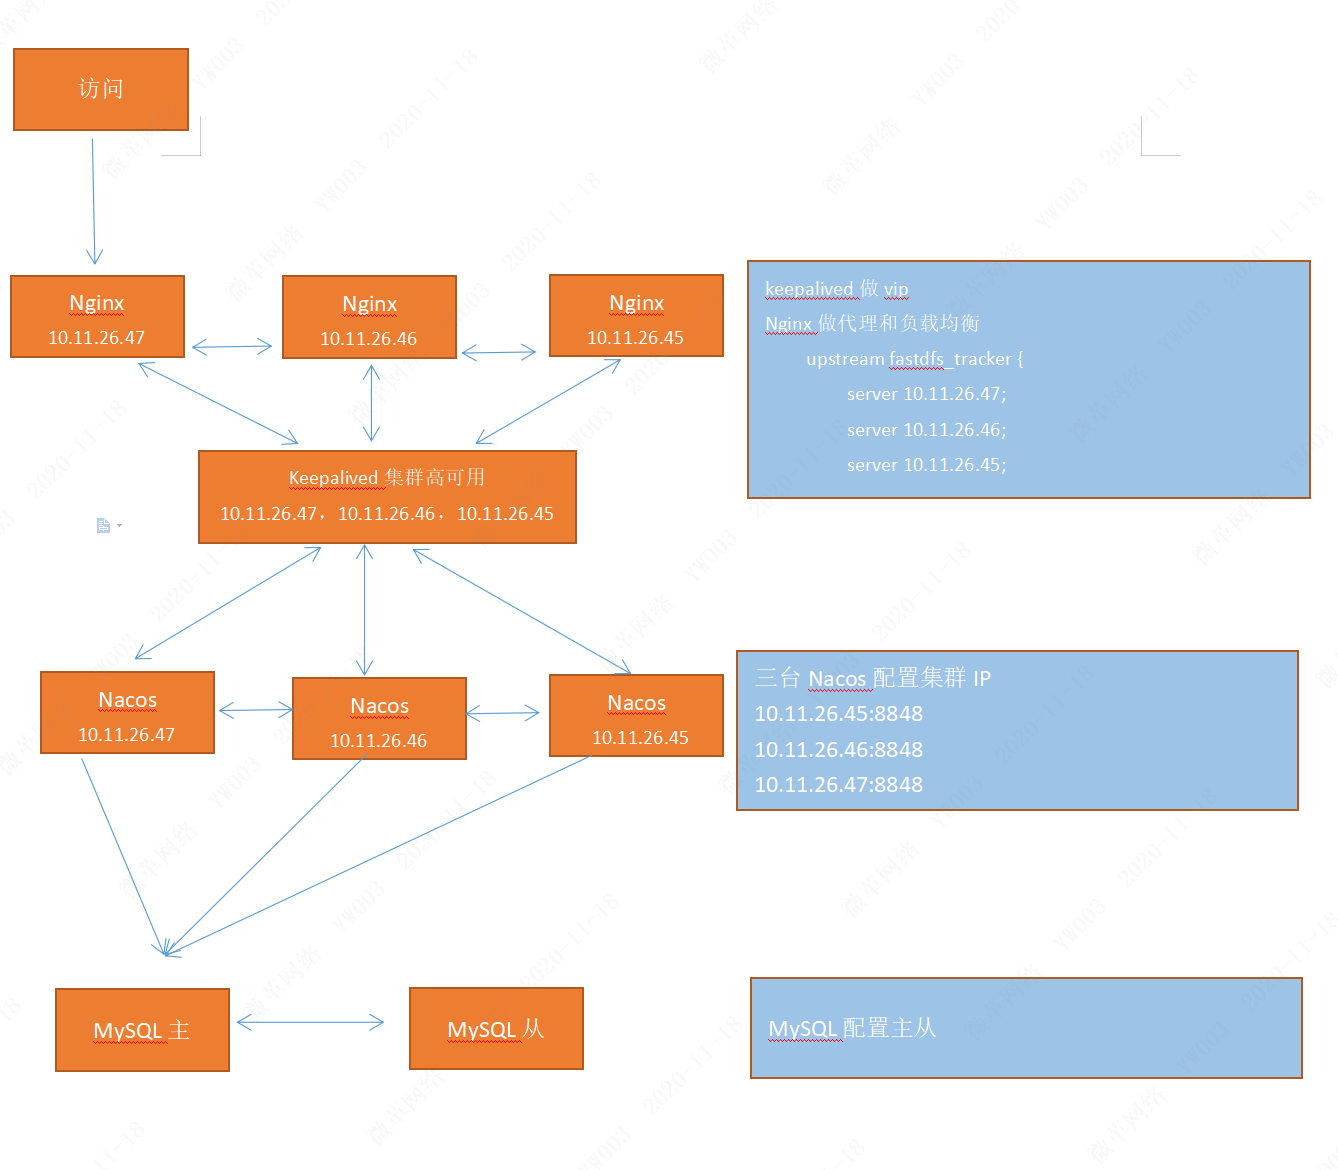
一:设计集群架构图
1、nginx做负载均衡和端口转发
2、keepalived做vip
2、nacos配置集群IP互通
3、MySQL做主从配置,所有操作在主库

二:环境准备
1、三台机器,centos系统
10.11.26.45主节点
10.11.26.46从节点
10.11.26.47从节点
2、nginx-1.17.0
3、nacos-server-1.4.0.tar.gz
4、mysql-5.6.33.tar.gz
5、keepalived
6、修改vim /etc/hosts 配置
10.11.26.47 zjj1
10.11.26.46 zjj2
10.11.26.45 zjj3
三:安装步骤
1、安装keepalived,三台机器都要安装
[root@zjj1 mnt]# yum -y install keepalived
[root@zjj1 keepalived]# cd /etc/keepalived
[root@zjj1 keepalived]# ll

配置主节点
[root@zjj1 keepalived]# cat keepalived.conf
global_defs {
router_id nginx_001
}
vrrp_script chk_nginx {
script "/etc/keepalived/nginx_check.sh"
interval 2
weight -20
}
vrrp_instance VI_1 {
state MASTER
interface eth0
virtual_router_id 101
unicast_src_ip 10.11.26.47 #本机IP
unicast_peer {
10.11.26.46 #从节点IP
}
priority 250
advert_int 1
authentication {
auth_type PASS
auth_pass 1111
}
virtual_ipaddress {
10.11.26.45 #从节点IP
}
track_script {
chk_nginx
}
}
[root@zjj1 keepalived]# cat nginx_check.sh
#!/bin/bash
A=`ps -C nginx --no-header | wc -l`
if [ $A -eq 0 ];then
systemctl start nginx #尝试重新启动nginx
sleep 2 #睡眠2秒
if [ `ps -C nginx --no-header | wc -l` -eq 0 ];then
#killall keepalived #启动失败,将keepalived服务杀死。将vip漂移到其它备份节点
systemctl stop keepalived #启动失败,将keepalived服务杀死。将vip漂移到其它备份节点
fi
fi
配置从节点1
[youxuanshengchan@zjj2 keepalived]$ cat keepalived.conf
global_defs {
router_id nginx_001
}
vrrp_script chk_nginx {
script "/etc/keepalived/nginx_check.sh"
interval 2
weight -20
}
vrrp_instance VI_1 {
state BACKUP
interface eth0
virtual_router_id 101
unicast_src_ip 10.11.26.46 #本机IP
unicast_peer {
10.11.26.47 #主节点IP
}
priority 90
advert_int 1
authentication {
auth_type PASS
auth_pass 1111
}
virtual_ipaddress {
10.11.26.45 #从节点IP
}
track_script {
chk_nginx
}
}
[youxuanshengchan@zjj2 keepalived]$ cat nginx_check.sh
#!/bin/bash
A=`ps -C nginx --no-header | wc -l`
if [ $A -eq 0 ];then
systemctl start nginx #尝试重新启动nginx
sleep 2 #睡眠2秒
if [ `ps -C nginx --no-header | wc -l` -eq 0 ];then
#killall keepalived #启动失败,将keepalived服务杀死。将vip漂移到其它备份节点
systemctl stop keepalived #启动失败,将keepalived服务杀死。将vip漂移到其它备份节点
fi
fi
配置从节点2
[youxuanshengchan@zjj3 keepalived]$ cat keepalived.conf
global_defs {
router_id nginx_001
}
vrrp_script chk_nginx {
script "/etc/keepalived/nginx_check.sh"
interval 2
weight -20
}
vrrp_instance VI_1 {
state BACKUP
interface eth0
virtual_router_id 101
unicast_src_ip 10.11.26.45 #本机IP
unicast_peer {
10.11.26.47 #主节点IP
}
priority 90
advert_int 1
authentication {
auth_type PASS
auth_pass 1111
}
virtual_ipaddress {
10.11.26.46 #从节点IP
}
track_script {
chk_nginx
}
}
[youxuanshengchan@zjj3 keepalived]$ cat nginx_check.sh
#!/bin/bash
A=`ps -C nginx --no-header | wc -l`
if [ $A -eq 0 ];then
systemctl start nginx #尝试重新启动nginx
sleep 2 #睡眠2秒
if [ `ps -C nginx --no-header | wc -l` -eq 0 ];then
#killall keepalived #启动失败,将keepalived服务杀死。将vip漂移到其它备份节点
systemctl stop keepalived #启动失败,将keepalived服务杀死。将vip漂移到其它备份节点
fi
fi
分别在三台机器启动keepalived
[root@zjj1 keepalived]# systemctl restart keepalived
[root@zjj1 keepalived]# systemctl enable keepalived
分别查看 keepalived 是否启动
[root@zjj1 keepalived]# ps aux | grep keepalived

2、三台机器安装nginx
执行脚本nginx.sh安装脚本
#!/bin/bash
yum -y install gcc gcc-c++ make wget
yum -y install openssl openssl-devel pcre pcre-devel GeoIP GeoIP-devel
###################################################
wget http://www.zlib.net/zlib-1.2.11.tar.gz
wget http://nginx.org/download/nginx-1.18.0.tar.gz
tar xf zlib-1.2.11.tar.gz -C /usr/local
tar xf nginx-1.18.0.tar.gz -C /usr/local
#####################################################
cd /usr/local/zlib-1.2.11
./configure
make && make install
cd /usr/local/nginx-1.18.0
useradd nginx -M -s /sbin/nologin
./configure --prefix=/usr/local/nginx-1.18.0/ --user=nginx --group=nginx --with-http_stub_status_module --with-http_ssl_module --with-pcre --with-zlib=/usr/local/zlib-1.2.11/ --with-http_flv_module --with-http_geoip_module --with-http_realip_module
make && make install
cp /usr/local/nginx-1.18.0/conf/nginx.conf /usr/local/nginx-1.18.0/conf/nginx.conf.bak
cat <<eof > /usr/local/nginx-1.18.0/conf/nginx.conf
user nginx nginx;
worker_processes 4;
error_log logs/error.log info;
pid logs/nginx.pid;
events {
worker_connections 12800;
use epoll;
}
http {
include mime.types;
default_type application/octet-stream;
log_format main '$remote_addr - $remote_user [$time_local] "$request" '
'$status $body_bytes_sent "$http_referer" '
'"$http_user_agent" "$http_x_forwarded_for"';
access_log logs/access.log main;
sendfile on;
tcp_nopush on;
keepalive_timeout 30;
gzip on;
gzip_buffers 32 4k;
gzip_comp_level 4;
gzip_disable "MSIE [1-6].";
gzip_min_length 4000;
gzip_http_version 1.1;
gzip_proxied any;
gzip_types text/plain application/x-javascript text/css application/xml;
gzip_vary off;
upstream fastdfs_tracker {
server xx.xx.xx.xx;
server xx.xx.xx.xx;
server xx.xx.xx.xx;
}
##################################################################################
upstream nacos {
server localhost:8848;
}
####################################################################################
server {
listen 80;
server_name localhost;
location / {
proxy_redirect off;
proxy_set_header Host $host;
proxy_set_header X-Real-IP $remote_addr;
proxy_set_header X-Forwarded-For $proxy_add_x_forwarded_for;
proxy_set_header Referer $http_referer;
proxy_pass http://nacos;
proxy_hide_header X-Powered-By;
proxy_hide_header Server;
proxy_http_version 1.1;
proxy_set_header Connection "";
client_max_body_size 1000m;
}
location ~ ^/(acc|oauth|account)/ {
proxy_redirect off;
proxy_set_header Host $host;
proxy_set_header X-Real-IP $remote_addr;
proxy_set_header X-Forwarded-For $proxy_add_x_forwarded_for;
proxy_set_header Referer $http_referer;
proxy_pass http://nacos;
proxy_hide_header X-Powered-By;
proxy_hide_header Server;
proxy_http_version 1.1;
proxy_set_header Connection "";
client_max_body_size 1000m;
}
}
}
eof
mkdir /usr/local/nginx-1.18.0/logs
echo '* hard nofile 65535' >> /etc/security/limits.conf
echo '* soft nofile 51200' >> /etc/security/limits.conf
/usr/local/nginx-1.18.0/sbin/nginx -t && /usr/local/nginx-1.18.0/sbin/nginx
iptables -I INPUT -p tcp -m state --state NEW -m tcp --dport 80 -j ACCEPT
3、MySQL安装执行MySQL安装脚本 MySQL.sh,(也可以安装MySQL8.0),需要下载安装包,到/mnt目录下mysql-5.6.33.tar.gz
#!/bin/bash
tar xf /mnt/mysql-5.6.33.tar.gz -C /usr/local/
#######################################################################################################################################
yum -y install gcc gcc-c++ ncurses ncurses-devel cmake libaio bison gcc-c++ openssl openssl-devel libtool libtool-ltdl-devel
groupadd mysql
useradd -M -g mysql -s /sbin/nologin mysql
mkdir -p /usr/local/mysql/data/
mkdir -p /usr/local/mysql/logs/
chown mysql.mysql /usr/local/mysql/data -R
chown mysql.mysql /usr/local/mysql/logs -R
########################################################################################################################################
cd /usr/local/mysql-5.6.33/
cmake -DMYSQL_USER=mysql -DCMAKE_INSTALL_PREFIX=/usr/local/mysql -DSYSCONFDIR=/usr/local/mysql/ -DMYSQL_DATADIR=/usr/local/mysql/data -DINSTALL_MANDIR=/usr/share/man -DMYSQL_TCP_PORT=3306 -DMYSQL_UNIX_ADDR=/var/lib/mysql/mysql.sock -DDEFAULT_CHARSET=utf8 -DEXTRA_CHARSETS=all -DDEFAULT_COLLATION=utf8_general_ci -DWITH_SSL=system -DWITH_EMBEDDED_SERVER=1 -DENABLED_LOCAL_INFILE=1 -DWITH_INNOBASE_STORAGE_ENGINE=1
make && make install
########################################################################################################################################
cd /usr/local/mysql/
/usr/local/mysql/scripts/mysql_install_db --user=mysql --basedir=/usr/local/mysql/ --datadir=/usr/local/mysql/data/ --defaults-file=/usr/local/mysql/my.cnf
cp /usr/local/mysql/support-files/mysql.server /etc/rc.d/init.d/mysql
chmod 755 /etc/rc.d/init.d/mysql
########################################################################################################################################
sed -i 's%^basedir=%basedir=/usr/local/mysql%' /etc/init.d/mysql
sed -i 's%^datadir=%datadir=/usr/local/mysql/data%' /etc/init.d/mysql
#######################################################################################################################################
chown root.root /usr/local/mysql/ -R
chown mysql.mysql /usr/local/mysql/data/ -R
chown mysql:mysql /usr/local/mysql/logs/ -R
#######################################################################################################################################
mv /etc/my.cnf /etc/my.cnf.bak
ln -s /var/lib/mysql/mysql.sock /tmp/mysql.sock
service mysql start
########################################################################################################################################
echo 'export PATH=$PATH:/usr/local/apache2/bin:/usr/local/mysql/bin'>>/etc/profile
########################################################################################################################################
source /etc/profile
echo "#chkconfig: 2345 80 90" >> /etc/rc.d/init.d/mysql
chkconfig mysql on
service mysql restart
########################################################################################################################################
source /etc/profile
source /etc/profile
/usr/local/mysql/bin/mysql
#修改密码
#delete from mysql.user where user='';
#update mysql.user set password=password('123456') where user='root';
#flush privileges;
#exit
4、安装nacos
[root@zjj1 mnt]# tar xf nacos-server-1.4.0.tar.gz -C /usr/local/
[root@zjj1 nacos]# cd /usr/local/nacos/

[root@zjj1 nacos]# cd conf/
[root@zjj1 conf]# ls

添加数据库链接地址
[root@zjj1 conf]# vim application.properties

配置集群IP
[root@zjj1 conf]# vim cluster.conf

启动nacos
[root@zjj1 bin]# cd /usr/local/nacos/bin/

[root@zjj1 bin]# sh startup.sh start
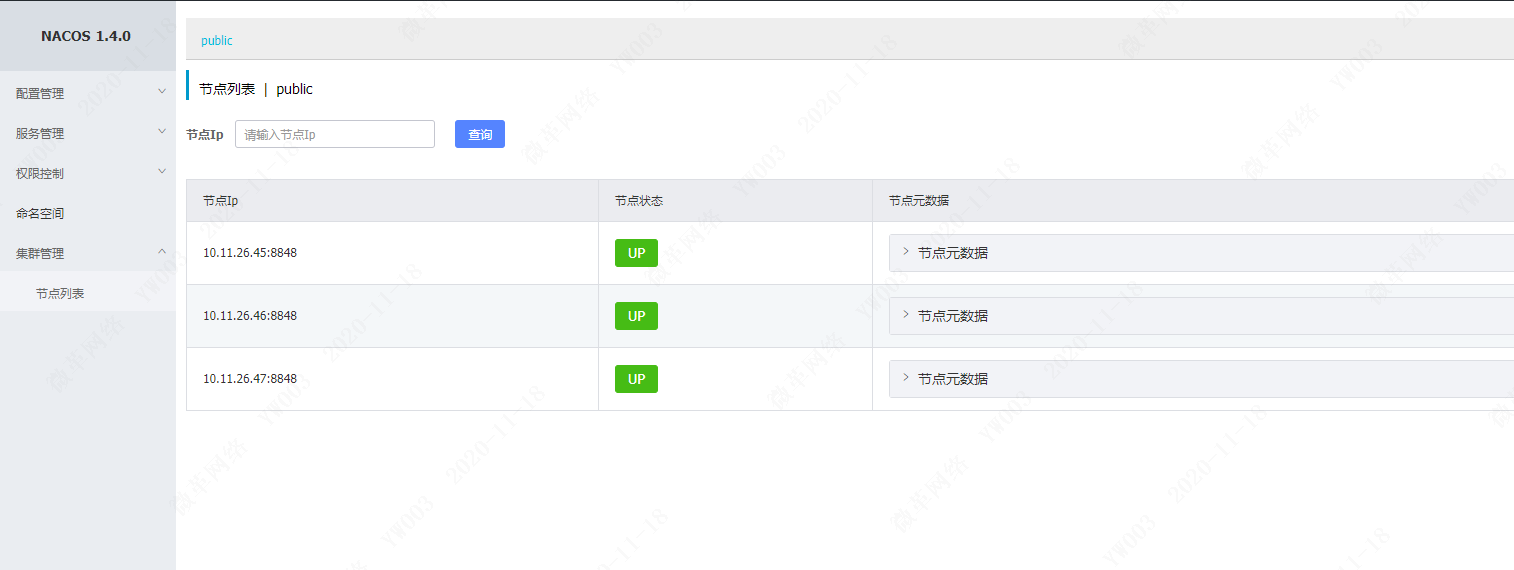
查看是否启动

访问:https://localhost


