在ASP.NET Web API 2中使用Owin基于Token令牌的身份验证
基于令牌的身份验证
基于令牌的身份验证主要区别于以前常用的常用的基于cookie的身份验证,基于cookie的身份验证在B/S架构中使用比较多,但是在Web Api中因其特殊性,基于cookie的身份验证已经不适合了,因为并不是每一个调用api的客户端都是从浏览器发起,我们面临的客户端可能是手机、平板、或者app。
使用基于Token令牌的身份验证有一些好处:
- 服务器的可伸缩性:发送到服务器的令牌是字包含的,不依赖与共享会话存储
- 松散耦合:前端应用程序位于特定的身份验证机制耦合,令牌是从服务器生成的,并且API构建方式可理解该令牌并进行身份验证
- 适用于移动设备:cookie依赖于浏览器,存储于本机平台,使用token将简化流程
构建后端API
步骤一: 创建Web Api 项目
为了进行代码演示,创建一个相对比较干净的环境,我们新建一个项目演示本次功能,本文使用Visual Studio 2017和 .NTE Framework 4.7。
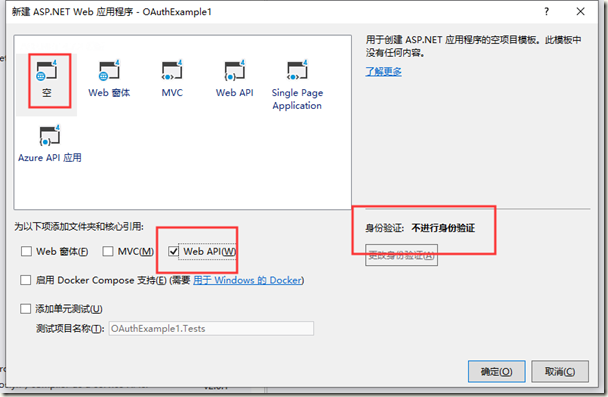
在Vs中选择新建项目,选择ASP.NET Web 应用程序(.NET Framework) ,命名为OauthExample或者随便你喜欢的名字,然后下一步,选择空模板。ok
步骤二:安装Owin包,并设置“StarUp”类
项目右键,管理Nuget程序包,分别安装
Microsoft.AspNet.WebApi.Owin
Microsoft.Owin.Host.SystemWeb
也可以在程序包管理器输入如下代码安装:
Install-Package Microsoft.AspNet.WebApi.Owin
Install-Package Microsoft.Owin.Host.SystemWeb
等待安装完成。
右键项目,移除Global.asax,右键项目,添加OWIN StartUp 类,然后修改代码如下:
using System.Web.Http;
using Microsoft.Owin;
using Owin;

[assembly: OwinStartup(typeof(OAuthExample.Startup))]

namespace OAuthExample
{
    public class Startup
    {
        public void Configuration(IAppBuilder app)
        {
            // 有关如何配置应用程序的详细信息,请访问 https://go.microsoft.com/fwlink/?LinkID=316888
            HttpConfiguration config = new HttpConfiguration();
            WebApiConfig.Register(config);
            app.UseWebApi(config);
        }
    }
}
简要说明
- assembly属性设置了启动时要触发的类
- HttpConfiguration对象用于配置API路由等,我们将对象传递给Register方法
- UasWebApi接收对象config,该方法将把Web Api连接到我们的OWIN服务管道
完成后编译一下,检查是否能通过,如果有问题检查一下Nuget包是否安装正确。
步骤三:添加对OAuth承载令牌生成的支持
安装Owin包,Microsoft.Owin.Security.OAuth,再次打开StartUp文件,修改代码如下(斜体):
using System;
using System.Web.Http;
using Microsoft.Owin;
using Microsoft.Owin.Security.OAuth;
using Owin;

[assembly: OwinStartup(typeof(OAuthExample.Startup))]

namespace OAuthExample
{
    public class Startup
    {
        public void Configuration(IAppBuilder app)
        {
            // 有关如何配置应用程序的详细信息,请访问 https://go.microsoft.com/fwlink/?LinkID=316888

            OAuthAuthorizationServerOptions OAuthServerOptions = new OAuthAuthorizationServerOptions()
            {
                AllowInsecureHttp = true,
                TokenEndpointPath = new PathString("/oauth/token"),
                AccessTokenExpireTimeSpan = TimeSpan.FromDays(1),
                Provider = new CustomAuthorizationServerProvider()
            };

            // Token Generation
            app.UseOAuthAuthorizationServer(OAuthServerOptions);
            app.UseOAuthBearerAuthentication(new OAuthBearerAuthenticationOptions());

            HttpConfiguration config = new HttpConfiguration();
            WebApiConfig.Register(config);
            app.UseWebApi(config);
        }
    }
}
在这里,我们从类“OAuthAuthorizationServerOptions”创建了新实例,并设置选项如下:
- 允许客户端使用http协议请求
- 令牌生成路径为"/oauth/token" ,即通过路径host: port:/oauth/token 获取令牌信息
- 设置令牌的有效时间为一天,如果用户在令牌发出24小时候使用令牌进行身份验证,请求将被拒绝,并返回401状态码
- 我们在名为“CustomAuthorizationServerProvider”的类中实现了如何用户票据的验证和发放
最后我们将此选项传递给扩展方法“ UseOAuthAuthorizationServer”,以便将身份验证中间件添加到管道中。
步骤四:实现“CustomAuthorizationServerProvider”类
在项目中添加名为“ Providers”的新文件夹,然后添加名为“ SimpleAuthorizationServerProvider”的新类,在下面粘贴代码片段:
using System.Security.Claims;
using System.Threading.Tasks;
using Microsoft.Owin.Security.OAuth;

namespace OAuthExample.Providers
{
    public class CustomAuthorizationServerProvider : OAuthAuthorizationServerProvider
    {
        /// <summary>
        /// Called to validate that the origin of the request is a registered "client_id", and that the correct credentials for that client are
        /// present on the request. If the web application accepts Basic authentication credentials,
        /// context.TryGetBasicCredentials(out clientId, out clientSecret) may be called to acquire those values if present in the request header. If the web
        /// application accepts "client_id" and "client_secret" as form encoded POST parameters,
        /// context.TryGetFormCredentials(out clientId, out clientSecret) may be called to acquire those values if present in the request body.
        /// If context.Validated is not called the request will not proceed further.
        /// </summary>
        /// <param name="context">The context of the event carries information in and results out.</param>
        public override async Task ValidateClientAuthentication(OAuthValidateClientAuthenticationContext context)
        {
            context.Validated();
        }

        /// <summary>
        /// Called when a request to the Token endpoint arrives with a "grant_type" of "password". This occurs when the user has provided name and password
        /// credentials directly into the client application's user interface, and the client application is using those to acquire an "access_token" and
        /// optional "refresh_token". If the web application supports the
        /// resource owner credentials grant type it must validate the context.Username and context.Password as appropriate. To issue an
        /// access token the context.Validated must be called with a new ticket containing the claims about the resource owner which should be associated
        /// with the access token. The application should take appropriate measures to ensure that the endpoint isn’t abused by malicious callers.
        /// The default behavior is to reject this grant type.
        /// See also http://tools.ietf.org/html/rfc6749#section-4.3.2
        /// </summary>
        /// <param name="context">The context of the event carries information in and results out.</param>
        public override async Task GrantResourceOwnerCredentials(OAuthGrantResourceOwnerCredentialsContext context)
        {

            context.OwinContext.Response.Headers.Add("Access-Control-Allow-Origin", new[] { "*" });

            //这里是验证用户名和密码,可以根据项目情况自己实现
            if (!(context.UserName == "zhangsan" && context.Password == "123456"))
            {
                context.SetError("invalid_grant", "The user name or password is incorrect.");
                return;
            }

            //可以随便添加
            var identity = new ClaimsIdentity(context.Options.AuthenticationType);
            identity.AddClaim(new Claim("sub", context.UserName));
            identity.AddClaim(new Claim("role", "user"));

            context.Validated(identity);

        }
    }
}
步骤五:允许ASP.NET Web Api跨域请求
使用nuget安装程序包,Install-Package Microsoft.Owin.Cors
然后在Startup类中添加如下代码,最终代码如下:
using System;
using System.Web.Http;
using Microsoft.Owin;
using Microsoft.Owin.Security.OAuth;
using OAuthExample.Providers;
using Owin;

[assembly: OwinStartup(typeof(OAuthExample.Startup))]

namespace OAuthExample
{
    public class Startup
    {
        public void Configuration(IAppBuilder app)
        {
            // 有关如何配置应用程序的详细信息,请访问 https://go.microsoft.com/fwlink/?LinkID=316888

            OAuthAuthorizationServerOptions OAuthServerOptions = new OAuthAuthorizationServerOptions()
            {
                AllowInsecureHttp = true,
                TokenEndpointPath = new PathString("/token"),
                AccessTokenExpireTimeSpan = TimeSpan.FromDays(1),
                Provider = new CustomAuthorizationServerProvider()
            };

            // Token Generation
            app.UseOAuthAuthorizationServer(OAuthServerOptions);
            app.UseOAuthBearerAuthentication(new OAuthBearerAuthenticationOptions());

            HttpConfiguration config = new HttpConfiguration();
            WebApiConfig.Register(config);
            app.UseCors(Microsoft.Owin.Cors.CorsOptions.AllowAll);
            app.UseWebApi(config);
        }
    }
}
代码测试
我们添加一个测试空的Order控制,用来测试一下上面的实现:
[RoutePrefix("api/Orders")]
    public class OrdersController : ApiController
    {
        [Authorize]
        [Route("")]
        public IHttpActionResult Get()
        {
            return Ok(Order.CreateOrders());
        }

    }

    #region Helpers

    public class Order
    {
        public int OrderID { get; set; }
        public string CustomerName { get; set; }
        public string ShipperCity { get; set; }
        public Boolean IsShipped { get; set; }

        public static List<Order> CreateOrders()
        {
            List<Order> OrderList = new List<Order>
            {
                new Order {OrderID = 10248, CustomerName = "Taiseer Joudeh", ShipperCity = "Amman", IsShipped = true },
                new Order {OrderID = 10249, CustomerName = "Ahmad Hasan", ShipperCity = "Dubai", IsShipped = false},
                new Order {OrderID = 10250,CustomerName = "Tamer Yaser", ShipperCity = "Jeddah", IsShipped = false },
                new Order {OrderID = 10251,CustomerName = "Lina Majed", ShipperCity = "Abu Dhabi", IsShipped = false},
                new Order {OrderID = 10252,CustomerName = "Yasmeen Rami", ShipperCity = "Kuwait", IsShipped = true}
            };

            return OrderList;
        }
    }

    #endregion
下面使用PostMan进行模拟测试.
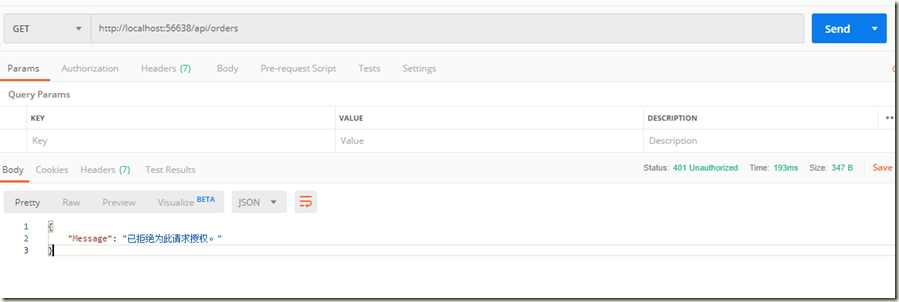
在未授权时,直接访问 http://localhost:56638/api/orders得到如下结果:
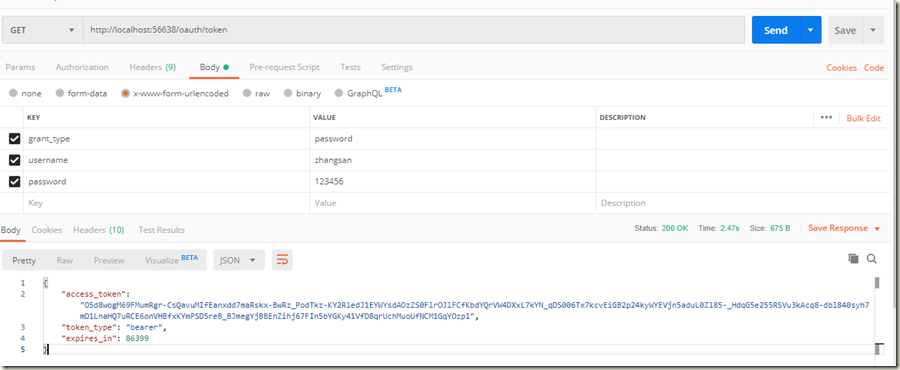
模拟授权访问,先获取令牌:
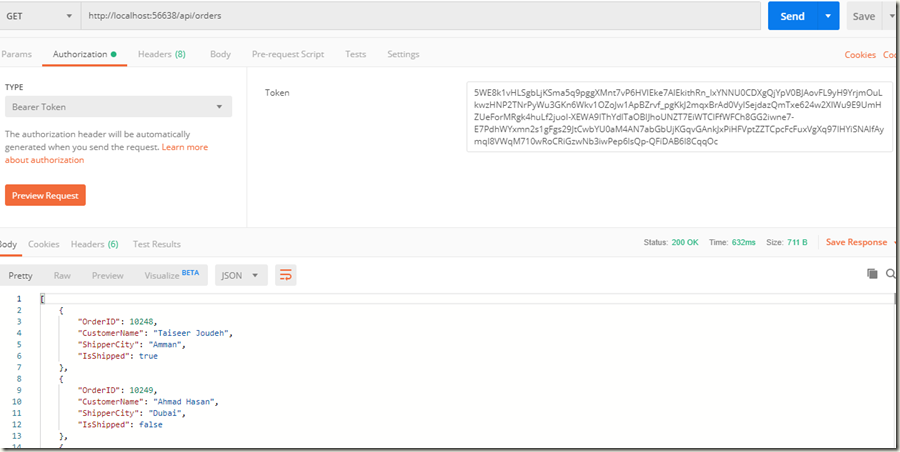
将令牌附加到Order请求,再次尝试访问:
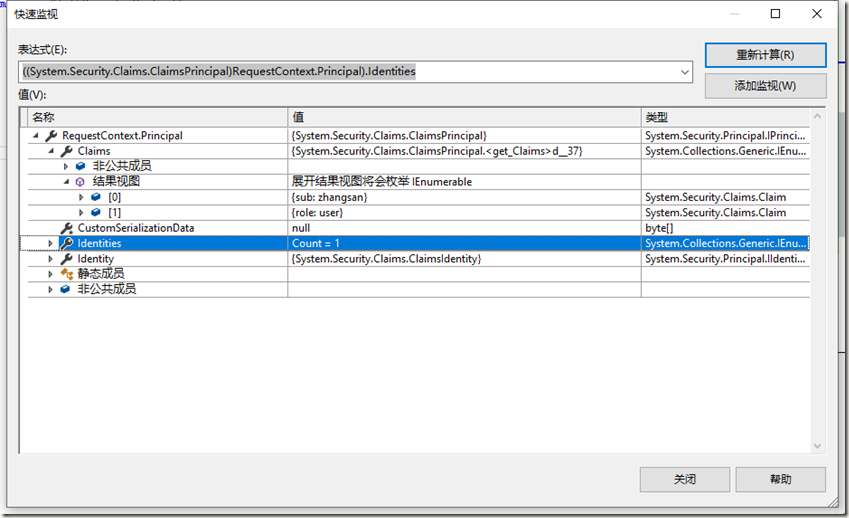
可以看到已经能正常获取到数据,打开调试,看一下方法中的变量如下:
总结
一直觉得WebApi和MVC很多都一样的东西,在实际应用中还是有不少区别,关于OAuth、JWT等等在WebApi中使用较多,本文是参照文末连接做的一个总结,细看下原po的时间都已经是14年的文章了。马上要aspnet core 3.2都要发布了,现在却还在补以前的知识,惭愧的很!
参考链接:
Token Based Authentication using ASP.NET Web API 2, Owin, and Identity
Enable OAuth Refresh Tokens in AngularJS App using ASP .NET Web API 2, and Owin


