什么?这么精髓的View的Measure流程源码全解析,你确定不看看?
前言
Android开发中我们平时接触最多的是各种View, View是一个比较大的体系,包含了绘制流程、事件分发、各种动画、自定义View 等等。前几天我写了一篇事件分发源码解析的文章, 今天我们来探索一下绘制流程中有点难懂的测量流程。
基础知识准备
测量涉及到的相关类和方法:
- MeasureSpec: 中文翻译测量规格,包含了两部分:SpecMode(测量模式)、SpecSize(对应测量模式下的规格大小)。它是由32位int值表示的,高两位代表SpecMode,低30位代表SpecSize
- measure(): 测量的入口方法,里面调用了onMeasure方法
- onMeasure(): 暴露给开发者可以自定义测量规则,不重写的话默认走的都是View的onMeasure方法
现在我们从View的onMeasure方法聊起来吧~~~
View的onMeasure源码解析
为了方便大家理解先给大家上三段常见的代码:
①View的width和height都是wrap_content
<?xml version="1.0" encoding="utf-8"?>
<FrameLayout xmlns:android="http://schemas.android.com/apk/res/android"
    xmlns:app="http://schemas.android.com/apk/res-auto"
    xmlns:tools="http://schemas.android.com/tools"
    android:layout_width="match_parent"
    android:layout_height="match_parent"
    android:padding="16dp">

   <View
       android:layout_width="wrap_content"
       android:layout_height="wrap_content"
       android:layout_gravity="center"
       android:background="@color/red" />

</FrameLayout>
②View的width和height都是match_parent
<?xml version="1.0" encoding="utf-8"?>
<FrameLayout xmlns:android="http://schemas.android.com/apk/res/android"
    xmlns:app="http://schemas.android.com/apk/res-auto"
    xmlns:tools="http://schemas.android.com/tools"
    android:layout_width="match_parent"
    android:layout_height="match_parent"
    android:padding="16dp">

   <View
       android:layout_width="match_parent"
       android:layout_height="match_parent"
       android:layout_gravity="center"
       android:background="@color/red" />

</FrameLayout>
③View的width和height都是100dp
<?xml version="1.0" encoding="utf-8"?>
<FrameLayout xmlns:android="http://schemas.android.com/apk/res/android"
    xmlns:app="http://schemas.android.com/apk/res-auto"
    xmlns:tools="http://schemas.android.com/tools"
    android:layout_width="match_parent"
    android:layout_height="match_parent"
    android:padding="16dp">

   <View
       android:layout_width="100dp"
       android:layout_height="100dp"
       android:layout_gravity="center"
       android:background="@color/red" />

</FrameLayout>
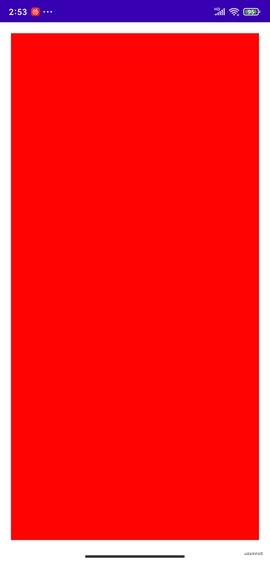
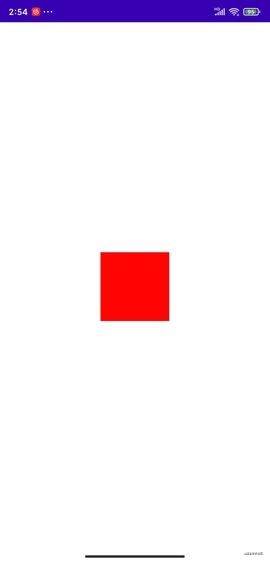
上面三段代码展示效果如下:
场景①和②:

场景③:

简单描述下上面出现的情况:
- 当view的宽高设置成match_parent和wrap_content的时候,显示的大小和父view的大小一致
- 当view的宽高设置成固定值(xxdp)的时候,显示的大小就是我们设置的固定值大小
如果你已经对上面结果感觉毫无疑问而且心里已经知其所以然了,后面的内容可以不用看了。点个赞就可以走了。。。
等等。。开个玩笑。。怎么就当真了呢。。哈哈哈。。废话不多说,走,我们点进去源码瞅瞅。
View.onMeasure
//View.java
public final void measure(int widthMeasureSpec, int heightMeasureSpec) {
    ...
    //1
    onMeasure(widthMeasureSpec, heightMeasureSpec);
    ...
}
上述代码①处代码调用了view的onMeasure方法,先不聊widthMeasureSpec和heightMeasureSpec的由来,这个后面补上。接着我们看View的onMeasure方法:
//View.java
protected void onMeasure(int widthMeasureSpec, int heightMeasureSpec) {
    //1
    setMeasuredDimension(
        getDefaultSize(getSuggestedMinimumWidth(),widthMeasureSpec),//4
    	getDefaultSize(getSuggestedMinimumHeight(), heightMeasureSpec)//4
    );
}

//2
protected final void setMeasuredDimension(int measuredWidth, int measuredHeight) {
     ...
     setMeasuredDimensionRaw(measuredWidth, measuredHeight);
}

//3
private void setMeasuredDimensionRaw(int measuredWidth, int measuredHeight) {
    mMeasuredWidth = measuredWidth;
    mMeasuredHeight = measuredHeight;

    mPrivateFlags |= PFLAG_MEASURED_DIMENSION_SET;
}

//返回background(Drawable)的minWidth、mMinWidth(android_minWitdh)较大值
protected int getSuggestedMinimumWidth() {
    return (mBackground == null) ? mMinWidth : 													 	max(mMinWidth,mBackground.getMinimumWidth());
}

//返回background(Drawable)的minHeight、mMinHeight(android_minHeight)较大值
protected int getSuggestedMinimumHeight() {
    return (mBackground == null) ? mMinHeight :
    		max(mMinHeight, mBackground.getMinimumHeight());

}

//4
public static int getDefaultSize(int size, int measureSpec) {
    int result = size;
    int specMode = MeasureSpec.getMode(measureSpec);
    int specSize = MeasureSpec.getSize(measureSpec);

    switch (specMode) {
        //5
        case MeasureSpec.UNSPECIFIED:
            result = size;
            break;
        //6
        case MeasureSpec.AT_MOST:
        case MeasureSpec.EXACTLY:
            result = specSize;
            break;
    }
    return result;
}
上述代码略微多一点,但是方法都比较简单,下面我们一一介绍下:
- 标注①②③处的调用链:onMeasure-->setMeasuredDimension-->setMeasuredDimensionRaw 走到方法③setMeasuredDimensionRaw处,view的测量流程就结束了,同时赋值了mMeasuredWidth 和mMeasuredHeight,这个时候我们就可以通过getMeasuredWidth()和getMeasuredHeight() 拿到宽高值了
- 方法②setMeasuredDimension处又调用了方法④getDefaultSize
- 方法④getDefaultSize里面大致逻辑是:
- 如果传入的measureSpec的MeasureSpec.Mode的值是MeasureSpec.AT_MOST或者MeasureSpec.EXACTLY 则返回specSize。
- 如果传入的measureSpec的MeasureSpec.Mode的值是MeasureSpec.UNSPECIFIED 则返回size(getSuggestedMinimumWidth()、getSuggestedMinimumHeight())。
现在我们的疑惑点就在于方法①onMeasure的参数是从哪里来的
那么下面我们就瞅瞅FrameLayout相关测量源码
FrameLayout的onMeasure源码解析
在讲FrameLayout的onMeasure前,我们先默认一个事实,这个FrameLayout是Activity的根View,它会被添加到DecorView上,DecorView实际上也是一个FramLayout,下面的源码解释了DecorView的MeasureSpec的由来:
//ViewRootImpl.java

private void performTraversals() {
	...
    //获取DecorView的MeasureSpec
	int childWidthMeasureSpec = getRootMeasureSpec(mWidth, lp.width);
    int childHeightMeasureSpec = getRootMeasureSpec(mHeight, lp.height);
    //测量入口
    performMeasure(childWidthMeasureSpec, childHeightMeasureSpec);

    ...
    //layout入口
    performLayout(lp, mWidth, mHeight);
    ...
    //draw入口
    performDraw();
    ...
}

private static int getRootMeasureSpec(int windowSize, int rootDimension) {
    int measureSpec;
    switch (rootDimension) {

        case ViewGroup.LayoutParams.MATCH_PARENT:
            // Window can't resize. Force root view to be windowSize.
            //默认DecorView的measureSpec是:size=windowSize  mode是EXACTLY
            measureSpec = MeasureSpec.makeMeasureSpec(windowSize, MeasureSpec.EXACTLY);
            break;
        case ViewGroup.LayoutParams.WRAP_CONTENT:
            // Window can resize. Set max size for root view.
            measureSpec = MeasureSpec.makeMeasureSpec(windowSize, MeasureSpec.AT_MOST);
            break;
        default:
            // Window wants to be an exact size. Force root view to be that size.
            measureSpec = MeasureSpec.makeMeasureSpec(rootDimension,MeasureSpec.EXACTLY);
            break;
    }
    return measureSpec;
}

private void performMeasure(int childWidthMeasureSpec, int childHeightMeasureSpec) {
    if (mView == null) {
        return;
    }
    ...
    //mView即为DecorView
    mView.measure(childWidthMeasureSpec, childHeightMeasureSpec);
    ...
}
从上面的代码得知:DecorView的measureSpec是size=windowSize比如(1920px 1080px) mode=EXACTLY, 然后由于Activity根FramLayout的width和height都是match_parent, 所以 FrameLayout measureSpec和DecorView的measureSpec是一致的, 接下来我们看FrameLayout的onMeasure源码:
//FrameLayout.java

//这里的widthMeasureSpec的size 手机屏幕宽度 mode是EXACTLY
//heightMeasureSpec的size是手机屏幕高度-状态栏高度  mode是EXACTLY
protected void onMeasure(int widthMeasureSpec, int heightMeasureSpec) {
    ...
    int maxHeight = 0;
    int maxWidth = 0;
    for (int i = 0; i < count; i++) {
        final View child = getChildAt(i);
        if (mMeasureAllChildren || child.getVisibility() != GONE) {
            //1
         	measureChildWithMargins(child, widthMeasureSpec, 0, heightMeasureSpec, 0);
            final LayoutParams lp = (LayoutParams) child.getLayoutParams();
            maxWidth = Math.max(maxWidth,
					   child.getMeasuredWidth() + lp.leftMargin + lp.rightMargin);
            maxHeight = Math.max(maxHeight,
                       child.getMeasuredHeight() + lp.topMargin + lp.bottomMargin);
            ...
        }
    }

    ...
    //2
    setMeasuredDimension(resolveSizeAndState(maxWidth, widthMeasureSpec, childState),
                resolveSizeAndState(maxHeight, heightMeasureSpec,
                        childState << MEASURED_HEIGHT_STATE_SHIFT));
}

//ViewGroup.java
//3
protected void measureChildWithMargins(View child, int parentWidthMeasureSpec,
        int widthUsed, int parentHeightMeasureSpec, int heightUsed) {
    final MarginLayoutParams lp = (MarginLayoutParams) child.getLayoutParams();

    //4
    final int childWidthMeasureSpec = getChildMeasureSpec(parentWidthMeasureSpec,
                mPaddingLeft + mPaddingRight + lp.leftMargin + lp.rightMargin
                        + widthUsed, lp.width);
    //5
    final int childHeightMeasureSpec = getChildMeasureSpec(parentHeightMeasureSpec,
                mPaddingTop + mPaddingBottom + lp.topMargin + lp.bottomMargin
                        + heightUsed, lp.height);

    //6
    child.measure(childWidthMeasureSpec, childHeightMeasureSpec);

}

//7
public static int getChildMeasureSpec(int spec, int padding, int childDimension) {
    //measureSpec的mode
    int specMode = MeasureSpec.getMode(spec);
    //measureSpec的size
    int specSize = MeasureSpec.getSize(spec);

    int size = Math.max(0, specSize - padding);

    int resultSize = 0;
    int resultMode = 0;

    switch (specMode) {
        case MeasureSpec.EXACTLY:
            if (childDimension >= 0) {//child的宽高值是固定值比如40dp
                resultSize = childDimension;
                resultMode = MeasureSpec.EXACTLY;
            } else if (childDimension == LayoutParams.MATCH_PARENT) {
                //child的lp.width是match_parent
                resultSize = size;
                resultMode = MeasureSpec.EXACTLY;
            } else if (childDimension == LayoutParams.WRAP_CONTENT) {
                //child的lp.width是wrap_content
                resultSize = size;
                resultMode = MeasureSpec.AT_MOST;
            }
            break;

        case MeasureSpec.AT_MOST:
            if (childDimension >= 0) {//child的宽高值是固定值比如40dp
                resultSize = childDimension;
                resultMode = MeasureSpec.EXACTLY;
            } else if (childDimension == LayoutParams.MATCH_PARENT) {
                //此时 child的match_parent 和 wrap_content 返回的MeasureSpec 一模一样
                //mode都是AT_MOST
                resultSize = size;
                resultMode = MeasureSpec.AT_MOST;
            } else if (childDimension == LayoutParams.WRAP_CONTENT) {
                resultSize = size;
                resultMode = MeasureSpec.AT_MOST;
            }
            break;

        case MeasureSpec.UNSPECIFIED:
            if (childDimension >= 0) {
               //child的宽高值是固定值比如40dp
                resultSize = childDimension;
                resultMode = MeasureSpec.EXACTLY;
            } else if (childDimension == LayoutParams.MATCH_PARENT) {
                //此时 child的match_parent 和 wrap_content 返回的MeasureSpec 一模一样
                //mode都是AT_MOST
                resultSize = View.sUseZeroUnspecifiedMeasureSpec ? 0 : size;
                resultMode = MeasureSpec.UNSPECIFIED;
            } else if (childDimension == LayoutParams.WRAP_CONTENT) {
                resultSize = View.sUseZeroUnspecifiedMeasureSpec ? 0 : size;
                resultMode = MeasureSpec.UNSPECIFIED;
            }
            break;
    }

    return MeasureSpec.makeMeasureSpec(resultSize, resultMode);
}

//View.java

//8
public static int resolveSizeAndState(int size, int measureSpec, int childMeasuredState){
    final int specMode = MeasureSpec.getMode(measureSpec);
    final int specSize = MeasureSpec.getSize(measureSpec);
    final int result;
    switch (specMode) {
        case MeasureSpec.AT_MOST://对应了wrap_content
            //如果子view的size大于measureSpec的size返回specSize 不能大于父类传递进来的specSize
            if (specSize < size) {
                result = specSize | MEASURED_STATE_TOO_SMALL;
            } else {//如果子view的size小于specSize 则返回子view的size
                result = size;
            }
            break;
        //EXACTLY模式(一般对应固定值或match_parent) 返回measureSpec的specSize
        case MeasureSpec.EXACTLY:
            result = specSize;
            break;
        case MeasureSpec.UNSPECIFIED://未设置特定测量模式 返回传入的size
        default:
            result = size;
    }
    return result | (childMeasuredState & MEASURED_STATE_MASK);
}
上面的源代码有点多,不着急,我们一个一个来介绍:
-
注释①处我们遍历child,挨个调用方法③measureChildWithMargins()
-
方法③measureChildWithMargins内部 注释④⑤都是调用了方法⑦getChildMeasureSpec
-
方法⑦getChildMeasureSpec比较核心我们详细介绍:
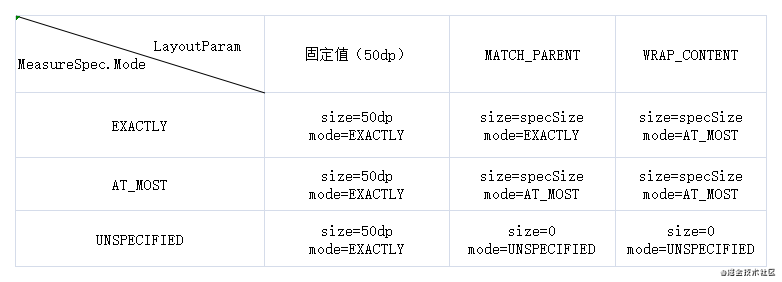
- 首先我们看方法⑦getChildMeasureSpec的参数是measureSpec(即刚才我们提到的decorView的measureSpec)、padding、childDimension(child在xml里面写的width和height), childDimension的取值有三个:固定值xxdp match_parent wrap_content
- 方法⑦getChildMeasureSpec返回了child的measureSpec其计算规则如下图:
![]()
-
注释⑥处调用了child.measure 走入了我们前面讲的view的测量流程, 到这文章前面我们提到三种情景就可以解释通了:
- view的宽高为match_parent或者wrap_content, FrameLayout计算得出子view的MeasureSpec(size=specSize mode=EXATLY或者AT_MOST),但是走到子View里面的测量流程的时候对于EXACTLY和AT_MOST一视同仁取得都是specSize。
- view的值为固定值时,FrameLayout计算得出子view的MeasureSpec(size=childDimension mode=EXATLY),注意这里measureSpec的specSize是childDimension
-
所有子view测量完后,我们计算并保存了maxWidth 和maxHeight, 然后就到了注释②处的setMeasuredDimension方法,然后通过注释⑧resolveSizeAndState方法及参数measureSpec和childMaxSize计算出了FramLayout的width和height,FramLayout测量也就算结束了。注释⑧resolveSizeAndState方法里面的注释我已经标注的很明白了,就不详细介绍了
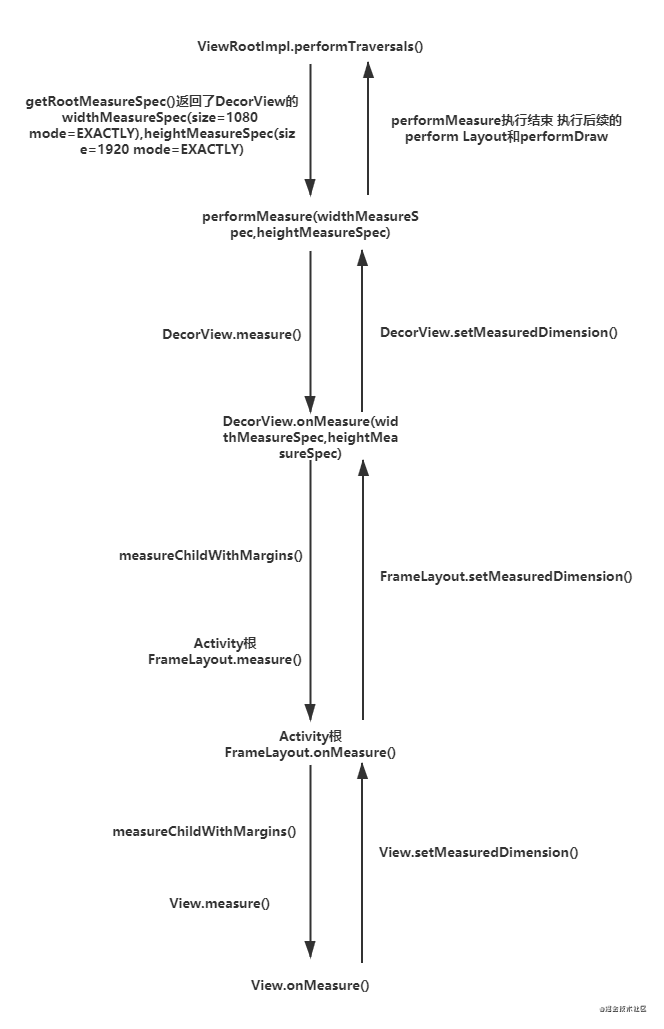
通过上面的流程分析,我们基本把测量流程梳理了一遍,其流程图如下:

总结
-
如果View/ViewGroup并没有重写onMeasure的话,match_parent 和wrap_content表现出来的效果是一样的,都是取得parentMeasureSpec的size ,所以如果想表现成wrap_content的效果,我们需要重写onMeasure方法来定义自己的测量规则,比如:①如果TextView的wrap_content需要生效的话我们可以在AT_MOST模式下,将TextView的宽高设置成文字的矩形大小②如果ImageView的wrap_content需要生效的话我们可以在AT_MOST模式下,将Image的宽高设置成图片的原始大小
-
常规测量模式下,我们的子view是不可能比父View还大,这个时候我们会产生一个疑问:如果我们希望子view/ViewGroup可以超出父view该如何做,答案是UNSPECIFIED,推荐阅读类是NestedScrollView
-
setMeasuredDimension方法是一个view测量的终点方法,其赋值了mMeasureWidth和mMeasureHeight
-
自定义ViewGroup并继承自ViewGroup的时候,如果不重写onMeasure就会导致子view根本没测量,一般我们可以通过调用measureChildren()来测量子view或者自己定义测量规则
推荐阅读
架构师学习笔记
耗时268天,7大模块、2983页58万字,Android开发核心知识笔记!
Java基础、计算机网络、系统
史上最全!押题率90%的 Android 中高级工程师面试复习大纲及真题答案整理(上篇)
Android基础夯实99题,点这里
史上最全!押题率90%的 Android 中高级工程师面试复习大纲及真题答案整理(中篇)
Android高级面试题(上)
史上最全!押题率90%的 Android 中高级工程师面试复习大纲及真题答案整理(下篇)
Android高级面试题(下)
史上最全!押题率90%的 Android 中高级工程师面试复习大纲及真题答案整理(终章)


 浙公网安备 33010602011771号