QPython实例03-制作【ONE一个】可视化应用
一、前言
QPython 3c在大佬的改进下,拥有了基于sl4a的FullScreenWrapper2全屏框架。文章将用该框架制作我们的可视化应用【ONE一个】。
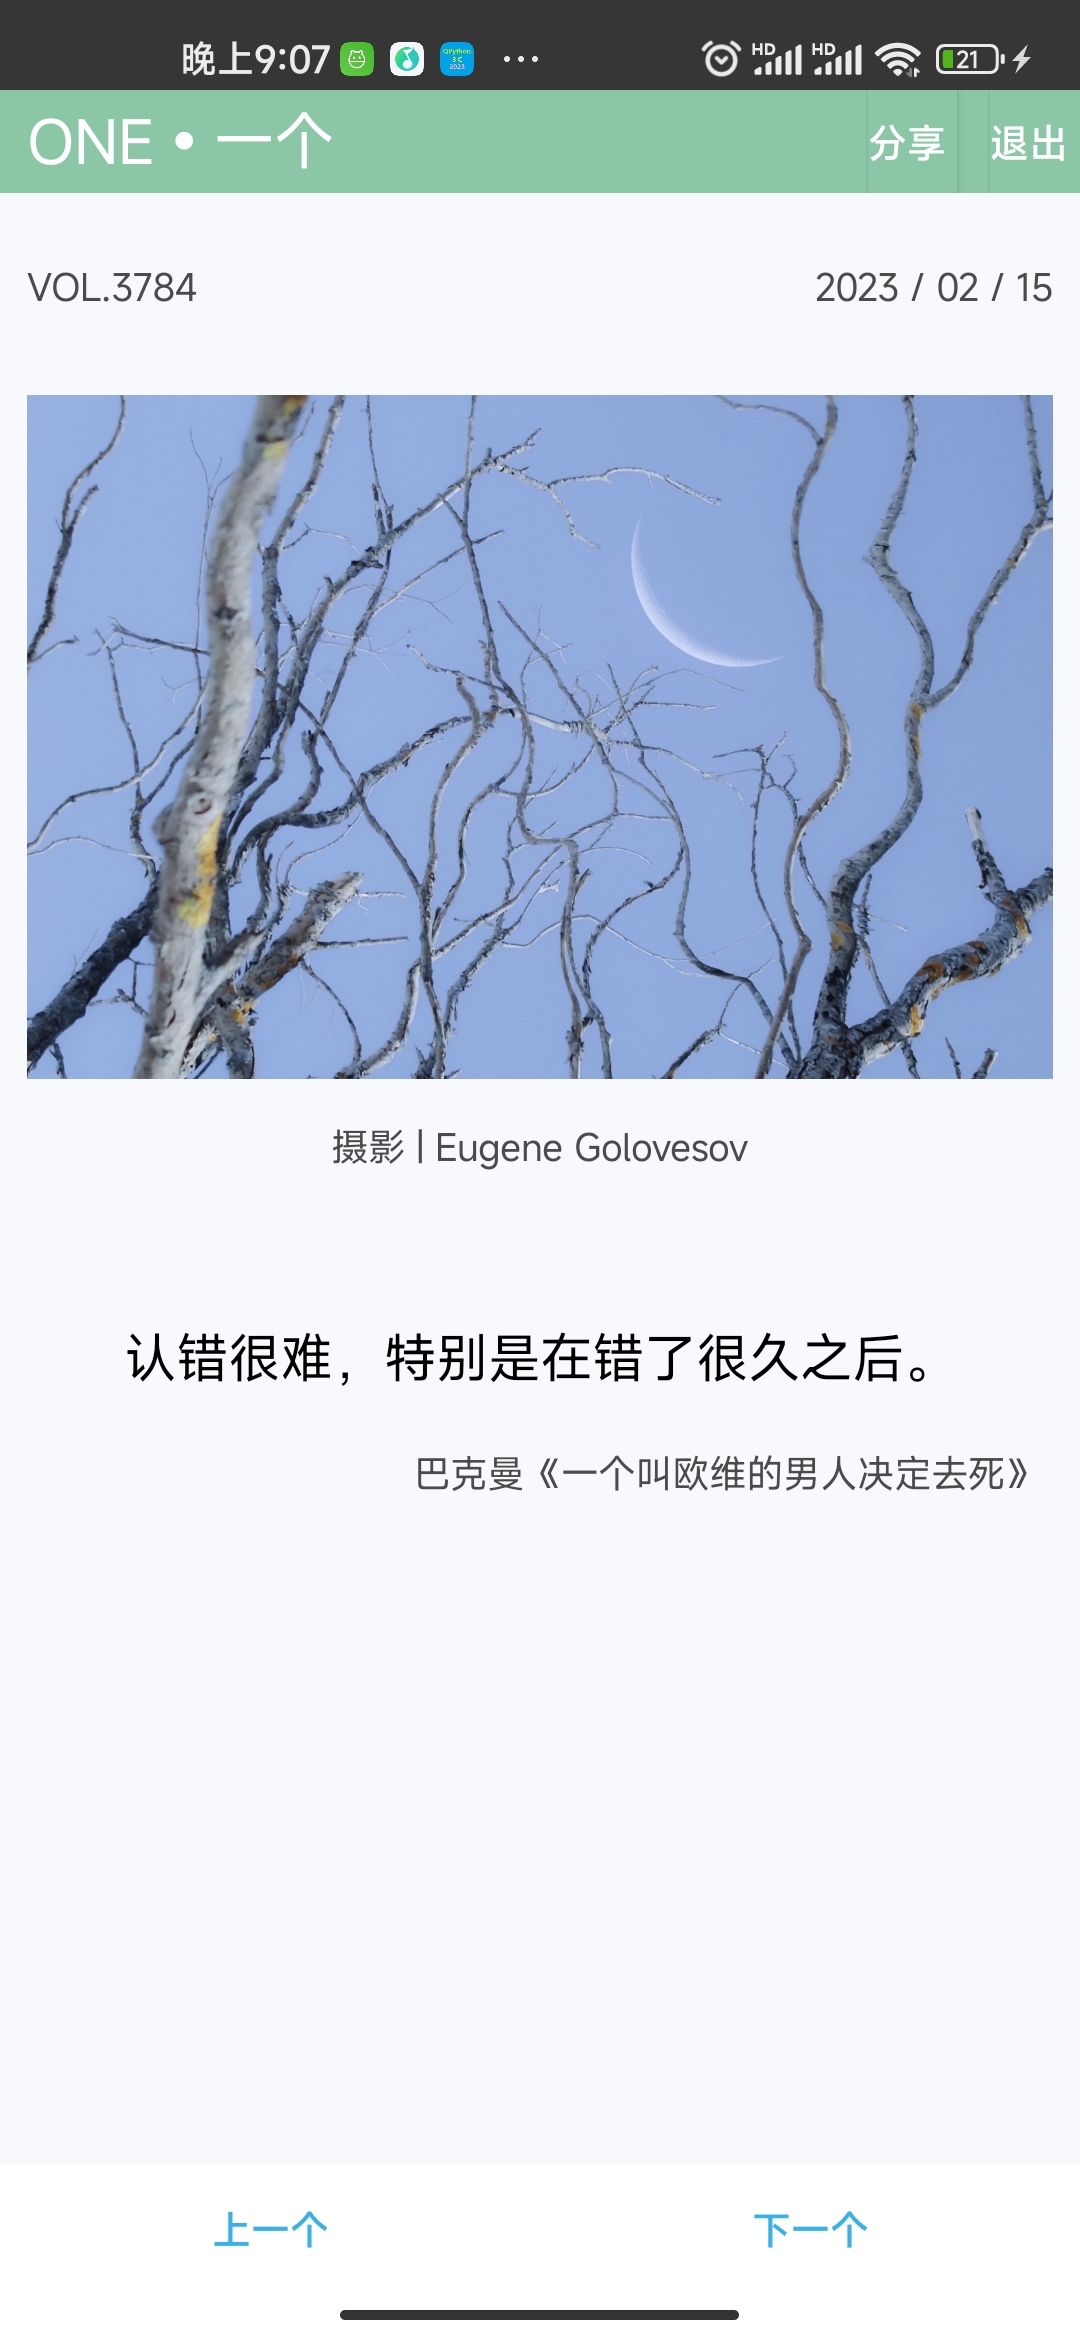
二、最终效果如下

三、准备工作
- AIDE: 使用布局助手生成xml布局代码
- QPython 3C: 使用FullScreenWrapper2制作可视化应用
以上应用在后台回复应用名称即可获取下载链接,如【AIDE】
四、实现思路
- 使用AIDE生成布局代码
- 分析网站获取ONE api
- 使用FullScreenWrapper完成可视化应用
使用AIDE生成布局代码
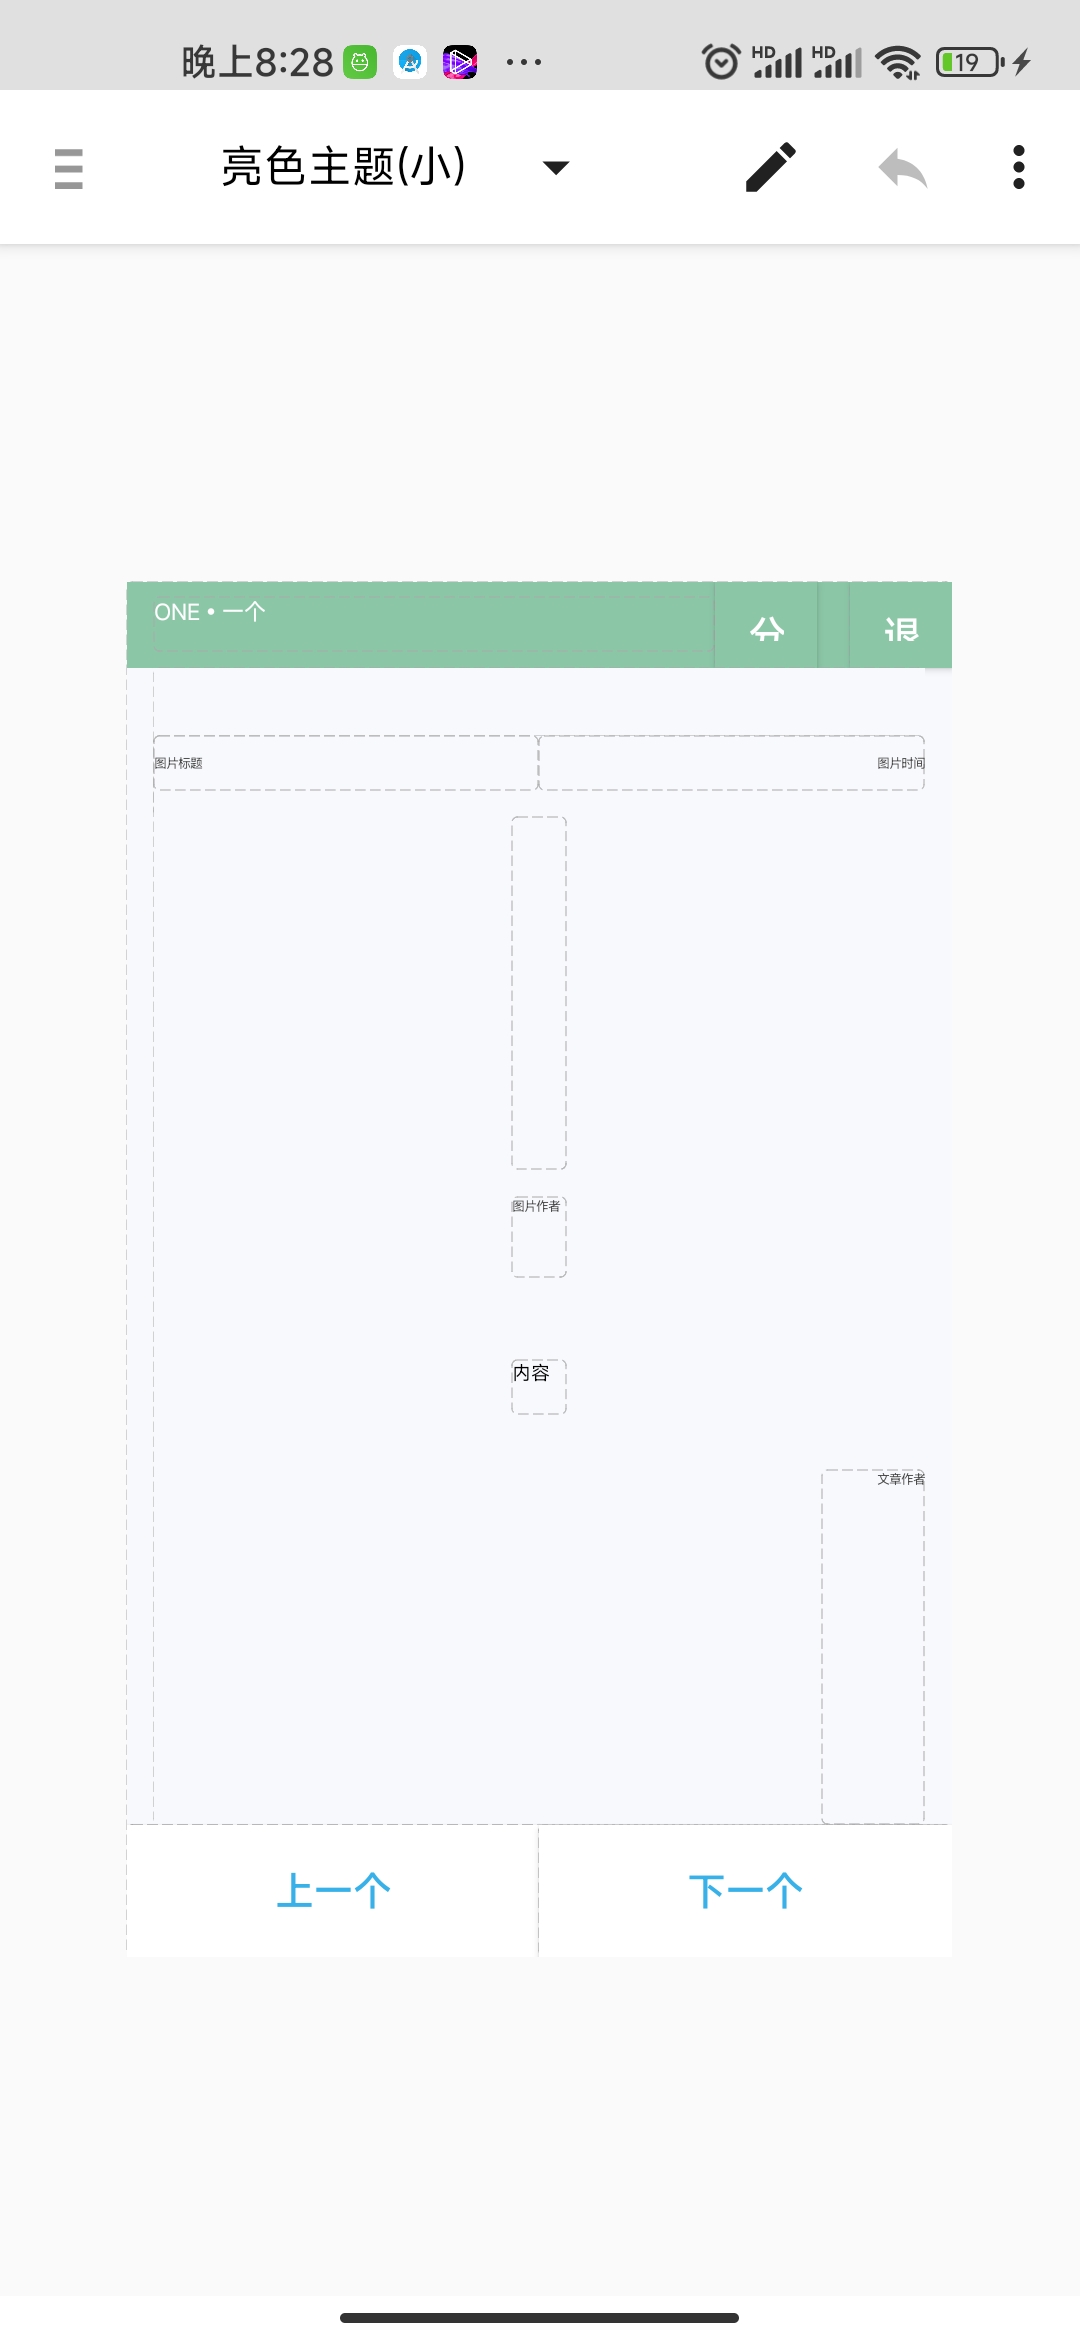
在aide新建项目,在app/src/main/res/layout下新建xml,点击右上角的图片按钮进入设计界面,按照以下进行设计,在qpython中展示可能需要做调整。

然后返回,复制xml代码,xml代码如下:
<?xml version="1.0" encoding="utf-8"?>
<LinearLayout
	xmlns:android="http://schemas.android.com/apk/res/android"
	android:layout_width="fill_parent"
	android:layout_height="fill_parent"
	android:gravity="top"
	android:orientation="vertical"
	android:background="#FFF8F9FD">

	<LinearLayout
		android:orientation="horizontal"
		android:layout_width="match_parent"
		android:layout_height="0dp"
		android:layout_weight="1"
		android:background="#FF8BC6A7">

		<TextView
			android:layout_width="wrap_content"
			android:layout_height="wrap_content"
			android:layout_weight="6"
			android:text="ONE•一个"
			android:id="@+id/bar_title"
			android:textSize="8sp"
			android:layout_gravity="left|center_vertical"
			android:textColor="#FFFFFFFF"
			android:layout_marginLeft="10dp"/>

		<Button
			android:layout_width="0dp"
			android:layout_height="wrap_content"
			android:layout_weight="1"
			android:text="分享"
			android:gravity="left"
			android:layout_gravity="right"
			android:id="@+id/btn_share"
			android:textColor="#FFFFFFFF"
			android:background="#FF8BC6A7"/>

		<Button
			android:layout_width="0dp"
			android:layout_height="wrap_content"
			android:layout_weight="1"
			android:layout_gravity="right"
			android:text="退出"
			android:gravity="left"
			android:id="@+id/btn_exit"
			android:textColor="#FFFFFFFF"
			android:background="#FF8BC6A7"
			android:layout_marginLeft="12dp"/>

	</LinearLayout>

<LinearLayout
		android:orientation="vertical"
		android:layout_width="match_parent"
		android:layout_height="0dp"
		android:layout_weight="19"
		android:background="#FFF8F9FD"
		android:gravity="center"
		android:layout_marginLeft="10dp"
		android:layout_marginRight="10dp">

		<LinearLayout
            android:layout_width="match_parent"
            android:layout_height="0dp"
            android:layout_weight="1"
            android:background="#FFF8F9FD"
            android:layout_marginTop="25dp">

            <TextView
                android:layout_width="0dp"
                android:layout_height="wrap_content"
                android:layout_weight="1"
                android:text="图片标题"
                android:textSize="5sp"
                android:textColor="#FF4B4B4B"
                android:id="@+id/title"
                android:gravity="left|center_vertical"/>

            <TextView
                android:layout_width="0dp"
                android:layout_height="wrap_content"
                android:layout_weight="1"
                android:text="图片时间"
                android:textSize="5sp"
                android:textColor="#FF4B4B4B"
                android:id="@+id/date"
                android:gravity="right|center_vertical"/>
		</LinearLayout>

		<ImageView
			android:src="@drawable/ic_delete"
			android:layout_width="wrap_content"
			android:layout_height="0dp"
			android:id="@+id/pic"
			android:scaleType="fitXY"
			android:layout_weight="6"/>

		<TextView
			android:layout_width="wrap_content"
			android:layout_height="0dp"
			android:layout_weight="1"
			android:text="图片作者"
			android:textSize="5sp"
			android:textColor="#FF4B4B4B"
			android:id="@+id/pic_author"
			android:layout_marginTop="10dp"
			android:layout_marginBottom="10dp"/>

		<TextView
			android:layout_width="wrap_content"
			android:layout_height="wrap_content"
			android:text="内容"
			android:textSize="7sp"
			android:textColor="#FF000000"
			android:id="@+id/content"
			android:gravity="top|left"
			android:layout_marginTop="20dp"
			android:layout_marginBottom="20dp"/>

		<TextView
			android:layout_width="wrap_content"
			android:layout_height="0dp"
			android:layout_weight="6"
			android:text="文章作者"
			android:textSize="5sp"
			android:textColor="#FF4B4B4B"
			android:layout_gravity="top|right"
			android:id="@+id/text_author"
			android:paddingLeft="20dp"/>

	</LinearLayout>


	<LinearLayout
	 android:background="#FFFFFFFF"
		android:orientation="horizontal"
		android:layout_width="match_parent"
		android:layout_height="wrap_content"
		android:layout_gravity="bottom">

		<Button
			android:layout_width="wrap_content"
			android:layout_height="wrap_content"
			android:text="上一个"
			android:textColor="#FF37B1E8"
			android:background="#FFFFFFFF"
			android:layout_gravity="bottom"
			android:layout_weight="1"
			android:shadowDy="2"
			android:id="@+id/btn_prev"/>

		<Button
			android:layout_width="wrap_content"
			android:layout_height="wrap_content"
			android:text="下一个"
			android:textColor="#FF37B1E8"
			android:background="#FFFFFFFF"
			android:layout_gravity="bottom"
			android:layout_weight="1"
			android:id="@+id/btn_next"/>

	</LinearLayout>

</LinearLayout>
分析网站请求获取ONE api
将其中代码改写为python版本
class OneApi(object):
    def __init__(self):
        self.TOKEN=''
        self.API='http://m.wufazhuce.com/one/ajaxlist/'
        self.COOKIES=''

    def getToken(self):
        if self.TOKEN:
            return self.TOKEN
        url='http://m.wufazhuce.com/one'
        try:
            res=requests.get(url)
            if res.status_code==200:
                self.COOKIES=res.headers['Set-Cookie']
                _token=res.text.split("One.token = '")[1].split("'")[0]
                if _token and len(_token)==40:
                    self.TOKEN=_token
                    return _token
                else:
                    print('未获取到token')
                    return ""
        except Exception:
            pass

    def getData(self,page=0):
        token=self.getToken()
        url=self.API + str(page) + '?_token=' + token
        headers = {
            'Cookie':self.COOKIES
        }
        res=requests.get(url,headers=headers)
        if res.status_code==200:
            return json.loads(res.text)['data']
        else:
            return None
使用FullScreenWrapper完成可视化应用
class OnePic(Layout):
    def __init__(self):
        self.api=api
        self.index=0
        self.page=0
        self.articles=self.api.getData(self.page)
        super(OnePic,self).__init__(xmldata,"ONE一个")


    def on_show(self):
        # 给按钮注册事件,以及初始化
        self.add_event(key_EventHandler(handler_function=self.close_app))
        self.views.btn_share.add_event(click_EventHandler(self.views.btn_share,self.share))
        self.views.btn_exit.add_event(click_EventHandler(self.views.btn_exit,self.close_app))
        self.views.btn_prev.add_event(click_EventHandler(self.views.btn_prev,self.btn_prev))
        self.views.btn_next.add_event(click_EventHandler(self.views.btn_next,self.btn_next))
        article=self.articles[self.index]
        self.views.title.text=article['title']
        self.views.date.text=article['date']
        url=api.getPic(article["id"], article["img_url"])
        self.views.pic.src="file://"+url
        self.views.pic_author.text=article["picture_author"]
        self.views.content.text=article["content"]
        self.views.text_author.text=article["text_authors"]

    def on_close(self):
        # 关闭应用时执行的
        pass

    def close_app(self,view,event):
        # 退出app
        FullScreenWrapper2App.exit_FullScreenWrapper2App()

    def btn_prev(self,view,event):
        # 按钮上一个的事件函数
        article=self.prev()
        if article:
            self.views.title.text=article['title']
            self.views.date.text=article['date']
            url=api.getPic(article["id"], article["img_url"])
            self.views.pic.src="file://"+url
            self.views.pic_author.text=article["picture_author"]
            self.views.content.text=article["content"]
            self.views.text_author.text=article["text_authors"]

    def btn_next(self,view,event):
        # 按钮下一个的事件函数
        article=self.next()
        if article:
            self.views.title.text=article['title']
            self.views.date.text=article['date']
            url=api.getPic(article["id"], article["img_url"])
            self.views.pic.src="file://"+url
            self.views.pic_author.text=article["picture_author"]
            self.views.content.text=article["content"]
            self.views.text_author.text=article["text_authors"]

    def share(self, view, event):
        # 按钮分享的事件函数,分享至微信
        action="android.intent.action.SEND"
        mime="text/plain"
        article=self.articles[self.index]
        extras={
            "android.intent.extra.SUBJECT":"分享",
            "android.intent.extra.TEXT":article["content"]+"——"+article["text_authors"]
        }
        flags=268435456
        packageName="com.tencent.mm"
        className="com.tencent.mm.ui.tools.ShareImgUI"
        intent=droid.makeIntent(action=action,type=mime,extras=extras,flags=flags,packagename=packageName,classname=className)
        droid.startActivityIntent(intent.result)


    def prev(self):
        if self.index==0:
            if self.page!=0:
                self.page=self.articles[0]['id']
                self.articles=self.api.getData()
                self.index=len(self.articles)-1
                return self.articles[self.index]
            else:
                droid.makeToast("暂无更多数据")
                return None
        else:
            self.index=self.index-1
            return self.articles[self.index]

    def next(self):
        if self.index==len(self.articles)-1:
            self.page=self.articles[len(self.articles)-1]["id"]
            self.articles=self.api.getData(self.page)
            self.index=0
            return self.articles[self.index]
        else:
            self.index=self.index+1
            return self.articles[self.index]
完整代码
后台回复【one一个】即可获取源码下载链接。将
不足之处
- 下载的图片未做清除处理,请求得越多,图片会下载,占用手机空间
- 分享功能不完善,能分享多个渠道更好,比如qq、微博等
- 用户的浏览数据未做配置化,都是从第一页开始,不能从上次的位置接着看
注意:将fullscreenwrapper2_py3.py放置在storage/emulated/0/qpython/lib/python3.11/site-packages
五。总结
本文主要用于学习python知识,让大家在实操中完成技能学习。如有不足之处,请大家评论区留言评论。
本文由【产品经理不是经理】gzh同步发布,欢迎关注


【推荐】国内首个AI IDE,深度理解中文开发场景,立即下载体验Trae
【推荐】编程新体验,更懂你的AI,立即体验豆包MarsCode编程助手
【推荐】抖音旗下AI助手豆包,你的智能百科全书,全免费不限次数
【推荐】轻量又高性能的 SSH 工具 IShell:AI 加持,快人一步
· TypeScript + Deepseek 打造卜卦网站:技术与玄学的结合
· 阿里巴巴 QwQ-32B真的超越了 DeepSeek R-1吗?
· 【译】Visual Studio 中新的强大生产力特性
· 【设计模式】告别冗长if-else语句:使用策略模式优化代码结构
· AI与.NET技术实操系列(六):基于图像分类模型对图像进行分类