aiohttp模块
一, 什么是进程, 什么是线程?
进程: 运行中的程序. 每次我们执行一个程序, 咱们的操作系统对自动的为这个程序准备一些必要的资源(例如, 分配内存, 创建一个能够执行的线程. )
线程: 程序内, 可以直接被CPU调度的执行过程. 是操作系统能够进行运算调度的最小单位. 它被包含在进程之中, 是进程中的实际运作单位.
进程与线程之间的关系:
进程是资源单位. 线程是执行单位. 就好比是一家公司. 一家公司的资源就是桌椅板凳, 电脑饮水机这些资源, 但是, 我们如果说一家公司正在运转着, 运行着. 那里面必须要有能为这家公司工作的人. 程序里面也一样, 进程就是为了程序运行而需要的各种资源. 但是程序想要运行, 就必须由线程来被CPU调度执行.
我们运行的每一个程序默认都会有一个线程. 哪怕是只有helloworld级别的程序. 想要执行. 也会有一个线程产生.
顾名思义, 多线程就是让程序产生多个线程一起去执行. 还拿公司举例子. 一家公司里如果只有一个员工, 工作效率肯定不会高到哪里去. 怎么提高效率? 多招点儿人就OK了.
如何实现多线程, 在python中, 有两种方案实现多线程.
1. 直接用Thread创建线程
我们先看看单线程的效果
def func():
for i in range(1000):
print("func", i)
if __name__ == '__main__':
func()
for i in range(1000):
print("main", i)
再看多线程
from threading import Thread
def func():
for i in range(1000):
print("func", i)
if __name__ == '__main__':
t = Thread(target=func)
t.start()
for i in range(1000):
print("main", i)
2. 继承Thread类
from threading import Thread
class MyThread(Thread):
def run(self):
for i in range(1000):
print("func", i)
if __name__ == '__main__':
t = MyThread()
t.start()
for i in range(1000):
print("main", i)
以上两种是最基本的python创建多线程的方案. python还提供了线程池
3. 线程池
python还提供了线程池功能. 可以一次性的创建多个线程, 并且, 不需要我们程序员手动去维护. 一切都交给线程池来自动管理.
# 线程池
def fn(name):
for i in range(1000):
print(name, i)
if __name__ == '__main__':
with ThreadPoolExecutor(10) as t:
for i in range(100):
t.submit(fn, name=f"线程{i}")
如果任务有返回值怎么办?
def func(name):
time.sleep(2)
return name
def do_callback(res):
print(res.result())
if __name__ == '__main__':
with ThreadPoolExecutor(10) as t:
names = ["线程1", "线程2", "线程3"]
for name in names:
# 方案一, 添加回调
t.submit(func, name).add_done_callback(do_callback)
if __name__ == '__main__':
start = time.time()
with ThreadPoolExecutor(10) as t:
names = [5, 2, 3]
# 方案二, 直接用map进行任务分发. 最后统一返回结果
results = t.map(func, names, ) # 结果是按照你传递的顺序来执行的, 代价就是如果第一个没结束. 后面就都没结果
for r in results:
print("result", r)
print(time.time() - start)
4. 多线程在爬虫中的应用
http://www.xinfadi.com.cn/marketanalysis/0/list/1.shtml
依然用新发地这个案例.
import requests
from lxml import etree
from concurrent.futures import ThreadPoolExecutor
def get_page_source(url):
resp = requests.get(url)
return resp.text
def get_totle_count():
url = "http://www.xinfadi.com.cn/marketanalysis/0/list/1.shtml"
source = get_page_source(url)
tree = etree.HTML(source)
last_href = tree.xpath("//div[@class='manu']/a[last()]/@href")[0]
totle = last_href.split("/")[-1].split(".")[0]
return int(totle)
def download_content(url):
source = get_page_source(url)
tree = etree.HTML(source)
trs = tree.xpath("//table[@class='hq_table']/tr[position() > 1]")
result = []
for tr in trs:
tds = tr.xpath("./td/text()")
result.append((tds[0], tds[1], tds[2], tds[3], tds[4], tds[5], tds[6]))
return result
def main():
f = open("data.csv", mode="w")
totle = get_totle_count()
url_tpl = "http://www.xinfadi.com.cn/marketanalysis/0/list/{}.shtml"
with ThreadPoolExecutor(50) as t:
data = t.map(download_content, (url_tpl.format(i) for i in range(1, totle+1)))
# 拿到所有任务的返回
for item in data:
# 每个任务的数据循环出一行
for detial in item:
# 写入文件
content = ",".join(detial) + "\n"
print(content)
f.write(content)
if __name__ == '__main__':
main()
三, 多进程
一个公司能创造的价值毕竟是有限的. 怎么办? 开分公司啊. 此所谓多进程. python实现多进程的方案和多线程几乎一样. 非常的简单
###1. 直接用Process创建进程
def func():
for i in range(1000):
print("func", i)
if __name__ == '__main__':
p = Process(target=func)
p.start()
for i in range(1000):
print("main", i)
2. 继承Process类
class MyProcess(Process):
def run(self):
for i in range(1000):
print("MyProcess", i)
if __name__ == '__main__':
t = MyProcess()
t.start()
for i in range(1000):
print("main", i)
###3.多进程在爬虫中的应用
我们一般很少直接使用多进程. 最适合使用多进程的情况是: 多个任务需要一起执行. 并且互相之间数据可能有交汇但功能相对独立.比如, 我们自己做一个代理IP池, 就需要从网络上进行抓取, 抓取得到的IP要进行校验才可以进行使用. 此时, 抓取任务和校验任务就相当于完全独立的两个功能. 此时就可以启动多个进程来实现. 再比如, 如果遇到图片抓取的时候, 我们知道图片在一般都在网页的img标签中src属性存放的是图片的下载地址. 此时我们可以采用多进程的方案来实现, 一个负责疯狂扫图片下载地址. 另一个进程只负责下载图片.
综上, 多个任务需要并行执行, 但是任务之间相对独立(不一定完全独立). 可以考虑用多进程.
# 进程1. 从图片网站中提取到图片的下载路径
def get_pic_src(q):
print("start main page spider")
url = "http://www.591mm.com/mntt/"
resp = requests.get(url)
tree = etree.HTML(resp.text)
child_hrefs = tree.xpath("//div[@class='MeinvTuPianBox']/ul/li/a/@href")
print("get hrefs from main page", child_hrefs)
for href in child_hrefs:
href = parse.urljoin(url, href)
print("handle href", href)
resp_child = requests.get(href)
tree = etree.HTML(resp_child.text)
pic_src = tree.xpath("//div[@id='picBody']//img/@src")[0]
print(f"put {pic_src} to the queue")
q.put(pic_src)
# 作业, 分页图片抓取
# print("ready to another!")
# others = tree.xpath('//ul[@class="articleV2Page"]')
# if others:
# 进程2. 从图片网站中提取到图片的下载路径
def download(url):
print("start download", url)
name = url.split("/")[-1]
resp = requests.get(url)
with open(name, mode="wb") as f:
f.write(resp.content)
resp.close()
print("downloaded", url)
def start_download(q):
with ThreadPoolExecutor(20) as t:
while True:
t.submit(download, q.get()) # 启动
def main():
q = Queue()
p1 = Process(target=start_download, args=(q,))
p2 = Process(target=get_pic_src, args=(q,))
p1.start()
p2.start()
if __name__ == '__main__':
main()


#######################################
#######################################  线程
#######################################
from threading import Thread  # 线程

# # 1. 定义好. 线程要做哪些任务
# def func():
#     for i in range(1000):
#         print("子线程", i)
#
#
# # 2. 写main, 创建子线程
# if __name__ == '__main__':  # 要写这个
#     # t = Thread(target=func)  # 创建一个子线程, 该线程还没有被执行
#     # # 启动一个线程
#     # t.start()
#     # # 主线程继续执行下去.
#     # for i in range(1000):
#     #     print("主线程", i)
#     t1 = Thread(target=func)
#     t2 = Thread(target=func)
#     t1.start()
#     t2.start()


# def func(url):
#     # 编写爬虫的工作
#     print("我要编写爬虫的工作", url)
#
# if __name__ == '__main__':
#     urls = ["第一个", "第二个", "第三个"]
#     for u in urls:
#         # 注意, 线程不是创建的越多就越好. CPU核心数 * 4
#         t = Thread(target=func, args=(u, ))  # args可以给线程传递参数. 但是必须是元组.
#         t.start()


#
# class MyThread(Thread):  # 自己定义一个类. 继承Thread
#
#     def __init__(self, name):
#         super(MyThread, self).__init__()
#         self.name = name
#
#     def run(self):  # 固定的.  # 必须要编写run方法
#         for i in range(1000):
#             print(self.name, i)
#
#
# if __name__ == '__main__':
#     t1 = MyThread("线程1")
#     t2 = MyThread("线程2")
#
#     t1.start()
#     t2.start()

#######################################
#######################################   线程池
#######################################
from concurrent.futures import ThreadPoolExecutor
import time
import random
# def func(name):
#     for i in range(100):
#         print(name, i)
#
#
# if __name__ == '__main__':
#     with ThreadPoolExecutor(5) as t:
#         t.submit(func, "线程1")  # submit 提交
#         t.submit(func, "线程2")  # submit 提交
#         t.submit(func, "线程3")  # submit 提交
#         t.submit(func, "线程4")  # submit 提交
#         t.submit(func, "线程5")  # submit 提交
#         t.submit(func, "线程6")  # submit 提交
#         t.submit(func, "线程7")  # submit 提交
#         t.submit(func, "线程8")  # submit 提交
#         t.submit(func, "线程9")  # submit 提交


def func(name):
    # for i in range(100):
    #     print(name, i)
    time.sleep(random.randint(1,3))
    return name

def fn(res):
    print(res.result())  # 这种方案拿到的结果不是正常的顺序


if __name__ == '__main__':
    task_list = ["线程2", "线程3", "线程4", "线程5", "线程6"]
    with ThreadPoolExecutor(3) as t:
        # for task in task_list:
        #     t.submit(func, task).add_done_callback(fn)  # 直接提交任务
        result = t.map(func, task_list)  # 直接把一堆任务提交
        for r in result:
            print(r)


#######################################
#######################################  线程池应用
#######################################
import requests
from lxml import etree
from concurrent.futures import ThreadPoolExecutor
import time

# csv: 逗号分隔内容的文件
# 周润发,李嘉诚,李佳琦,
f = open("data.csv", mode="w", encoding='utf-8')


def download_xinfadi(url):
    resp = requests.get(url)
    content = resp.text
    tree = etree.HTML(content)
    # tr_list = tree.xpath("//table[@class='hq_table']/tr")[1:]
    tr_list = tree.xpath("//table[@class='hq_table']/tr[position()>1]")
    for tr in tr_list:   # 每一行
        tds = tr.xpath("./td/text()")
        f.write(",".join(tds))
        f.write("\n")


if __name__ == '__main__':
    start = time.time()
    with ThreadPoolExecutor(30) as t:
        for i in range(1, 16):
            url = f"http://www.xinfadi.com.cn/marketanalysis/0/list/{i}.shtml"
            # download_xinfadi(url)
            t.submit(download_xinfadi, url)
    print("多线程用了", time.time() - start)
    start = time.time()
    for i in range(1, 16):
        url = f"http://www.xinfadi.com.cn/marketanalysis/0/list/{i}.shtml"
        download_xinfadi(url)
    print("单线程用了", time.time() - start)

    f.close()


#######################################
#######################################   进程
#######################################

from multiprocessing import Process
from concurrent.futures import ProcessPoolExecutor, ThreadPoolExecutor


def func(name):
    for i in range(1000):
        print(name, i)


if __name__ == '__main__':
    p1 = Process(target=func, args=("进程1",))
    p2 = Process(target=func, args=("进程2",))
    p1.start()
    p2.start()


# 多个任务极其雷同. 使用多线程
# 多个任务几乎无关联的情况用多进程
# 免费的IP代理池.
# 1. 去各大免费代理ip网站去抓取IP
# 2. 验证各个IP是否可用


#######################################
#######################################   进程应用
#######################################
"""

以下言论仅限今天的案例:

进程 1. 访问主页面, 在主页面中拿到详情页的url.
    进入到详情页. 在详情页中提取到图片的下载地址

进程 2. 批量的下载图片


进程之间的通信
队列

"""
import requests
from urllib import parse  # 转化
from lxml import etree
from multiprocessing import Process, Queue
from concurrent.futures import ThreadPoolExecutor


def get_img_src(q):
    url = "http://www.591mm.com/mntt/6.html"
    resp = requests.get(url)
    resp.encoding = 'utf-8'
    # print(resp.text)
    tree = etree.HTML(resp.text)
    href_list = tree.xpath("//div[@class='MeinvTuPianBox']/ul/li/a[1]/@href")
    for href in href_list:
        # http://www.591mm.com/mntt/6.html
        # /mntt/hgmn/307626.html
        # 拼接url地址
        child_url = parse.urljoin(url, href)
        # print(child_url)
        resp_child = requests.get(child_url)
        resp_child.encoding = "utf-8"
        child_tree = etree.HTML(resp_child.text)
        src = child_tree.xpath("//img[@id='mouse_src']/@src")[0]
        q.put(src)  # 往里怼
    q.put("OK了")


def download(url):
    file_name = url.split("/")[-1]
    with open(file_name, mode="wb") as f:
        resp = requests.get(url)
        f.write(resp.content)  # 完成下载


def download_all(q):
    # 在进程里创建线程池
    with ThreadPoolExecutor(10) as t:
        while 1:
            src = q.get()  # 往出拿
            if src == "OK了":
                break
            print(src)
            t.submit(download, src)


if __name__ == '__main__':
    q = Queue()
    p1 = Process(target=get_img_src, args=(q,))
    p2 = Process(target=download_all, args=(q,))

    p1.start()
    p2.start()
####################################### ####################################### ####################################### import re # result = re.findall("a", "我是一个abcdeafg") # print(result) # result = re.findall(r"\d+", "我今年18岁, 我有200000000块") # print(result) # # 这个是重点. 多多练习 # result = re.finditer(r"\d+", "我今年18岁, 我有200000000块") # for item in result: # 从迭代器中拿到内容 # print(item.group()) # 从匹配到的结果中拿到数据 # search只会匹配到第一次匹配的内容 # result = re.search(r"\d+", "我叫周杰伦, 今年32岁, 我的班级是5年4班") # print(result.group()) # # match, 在匹配的时候. 是从字符串的开头进行匹配的, 类似在正则前面加上了^ # result = re.match(r"\d+", "我叫周杰伦, 今年32岁, 我的班级是5年4班") # print(result) # # 预加载, 提前把正则对象加载完毕 # obj = re.compile(r"\d+") # # 直接把加载好的正则进行使用 # result = obj.findall("我叫周杰伦, 今年32岁, 我的班级是5年4班") # print(result) # 想要提取数据必须用小括号括起来. 可以单独起名字 # (?P<名字>正则) # 提取数据的时候. 需要group("名字") s = """ <div class='西游记'><span id='10010'>中国联通</span></div> <div class='西游记'><span id='10086'>中国移动</span></div> """ obj = re.compile(r"<span id='(?P<hahahahah>\d+)'>(?P<asdfasfasf>.*?)</span>") result = obj.finditer(s) for item in result: id = item.group("hahahahah") print(id) name = item.group("asdfasfasf") print(name) ####################################### ####################################### ####################################### # 思路, # 1. 拿到页面源代码 # 2. 编写正则, 提取页面数据 # 3. 保存数据 import requests import re f = open("top250.csv", mode="w", encoding='utf-8') url = "https://movie.douban.com/top250?start=200&filter=" headers = { "User-Agent": "Mozilla/5.0 (Macintosh; Intel Mac OS X 10_15_4) AppleWebKit/537.36 (KHTML, like Gecko) Chrome/90.0.4430.212 Safari/537.36" } resp = requests.get(url, headers=headers) # resp.encoding = 'utf-8' # 解决乱码问题. pageSource = resp.text # 编写正则表达式 # re.S 可以让正则中的.匹配换行符 obj = re.compile(r'<div class="item">.*?<span class="title">(?P<name>.*?)</sp' r'an>.*?<p class="">.*?导演: (?P<dao>.*?) .*?<br>' r'(?P<year>.*?) .*?<span class="rating_num" property="v:average">' r'(?P<score>.*?)</span>.*?<span>(?P<num>.*?)人评价</span>', re.S) # 进行正则匹配 result = obj.finditer(pageSource) for item in result: name = item.group("name") dao = item.group("dao") year = item.group("year").strip() # 去掉字符串左右两端的空白 score = item.group("score") num = item.group("num") f.write(f"{name},{dao},{year},{score},{num}\n") # 如果觉着low. 可以更换成csv模块. 进行数据写入 f.close() resp.close() print("豆瓣TOP250提取完毕.") # 如何翻页提取? # (页数 - 1)*25 => start ####################################### ####################################### ####################################### """ 1. 提取到主页面中的每一个电影的背后的那个url地址 1. 拿到 "2021必看热片" 那一块的HTML代码. 2. 从刚才拿到的HTML代码中提取到href的值 2. 访问子页面, 提取到电影的名称以及下载地址 1. 拿到子页面的页面源代码 2. 数据提取 """ import requests import re url = "https://www.dy2018.com/" resp = requests.get(url) resp.encoding = "gbk" # print(resp.text) # 1.提取2021必看热片部分的HTML代码 obj1 = re.compile(r"2021必看热片.*?<ul>(?P<html>.*?)</ul>", re.S) result1 = obj1.search(resp.text) html = result1.group("html") # 2.提取a标签中的href的值 obj2 = re.compile(r"<li><a href='(?P<href>.*?)' title") result2 = obj2.finditer(html) obj3 = re.compile(r'<div id="Zoom">.*?◎片 名(?P<movie>.*?)<br />.*?<td style="WORD-WRAP: break-word"' r' bgcolor="#fdfddf"><a href="(?P<download>.*?)">', re.S) for item in result2: # print(item.group("href")) # 拼接出子页面的url child_url = url.strip("/") + item.group("href") child_resp = requests.get(child_url) child_resp.encoding = 'gbk' result3 = obj3.search(child_resp.text) movie = result3.group("movie") download = result3.group("download") print(movie, download) ####################################### ####################################### ####################################### # 安装bs4 # pip install bs4 from bs4 import BeautifulSoup html = """ <ul> <li><a href="zhangwuji.com">张无忌</a></li> <li id="abc"><a href="zhouxingchi.com">周星驰</a></li> <li><a href="zhubajie.com">猪八戒</a></li> <li><a href="wuzetian.com">武则天</a></li> <a href="jinmaoshiwang.com">金毛狮王</a> </ul> """ # 1. 初始化BeautifulSoup对象 page = BeautifulSoup(html, "html.parser") # page.find("标签名", attrs={"属性": "值"}) # 查找某个元素, 只会找到一个结果 # page.find_all("标签名", attrs={"属性": "值"}) # 找到一堆结果 # li = page.find("li", attrs={"id":"abc"}) # a = li.find("a") # print(a.text) # 拿文本 # print(a.get("href")) # 拿属性. get("属性名") li_list = page.find_all("li") for li in li_list: a = li.find("a") text = a.text href = a.get("href") print(text, href) ####################################### ####################################### ####################################### import requests from bs4 import BeautifulSoup f = open("新发地菜价.csv", mode="w", encoding='utf-8') url = "http://www.xinfadi.com.cn/marketanalysis/0/list/1.shtml" resp = requests.get(url) # 初始化BS4对象 page = BeautifulSoup(resp.text, "html.parser") table = page.find("table", attrs={"class": "hq_table"}) trs = table.find_all("tr")[1:] # 此时拿到除了第一行外的所有tr for tr in trs: # 每一行 tds = tr.find_all("td") name = tds[0].text low = tds[1].text avg = tds[2].text hig = tds[3].text kind = tds[4].text dan = tds[5].text date = tds[6].text # print(name, low, avg, hig, kind, dan, date) f.write(f"{name},{low},{avg},{hig},{kind},{dan},{date}\n") f.close() resp.close() print("爬取成功") ####################################### ####################################### ####################################### import requests from bs4 import BeautifulSoup domain = "https://www.umei.net" """ 注意, 子页面的url如果开头是/, 直接在前面拼接上域名即可 子页面的url不是/开头, 此时需要找到主页面的url, 去掉最后一个/后面的所有内容. 和当前获取到的url进行拼接 """ url = "https://www.umei.net/bizhitupian/xiaoqingxinbizhi/" resp = requests.get(url) resp.encoding = "utf-8" n = 1 # 图片名称 main_page = BeautifulSoup(resp.text, "html.parser") a_list = main_page.find_all("a", attrs={"class": "TypeBigPics"}) for a in a_list: href = a.get("href") child_url = domain + href child_resp = requests.get(child_url) # 请求到子页面 child_resp.encoding = "utf-8" # 子页面的bs对象 child_bs = BeautifulSoup(child_resp.text, "html.parser") div = child_bs.find("div", attrs={"class": "ImageBody"}) img_src = div.find("img").get("src") # 拿到图片的下载路径 # print(img_src) # 下载图片 img_resp = requests.get(img_src) # print(img_resp.text) # 注意, 图片不是文本. 不能获取text的内容 with open(f"bs4_img/{n}.jpg", mode="wb") as f: # 注意, 此时写入到文件的是字节. 所以必须是wb f.write(img_resp.content) # 把图片信息写入到文件中 print(f"{n}图片下载完毕") n += 1 ####################################### ####################################### ####################################### from lxml import etree # 如果pycharm报错. 可以考虑这种导入方式 # from lxml import html # etree = html.etree xml = """ <book> <id>1</id> <name>野花遍地香</name> <price>1.23</price> <nick>臭豆腐</nick> <author> <nick id="10086">周大强</nick> <nick id="10010">周芷若</nick> <nick class="jay">周杰伦</nick> <nick class="jolin">蔡依林</nick> <div> <nick>惹了</nick> </div> </author> <partner> <nick id="ppc">胖胖陈</nick> <nick id="ppbc">胖胖不陈</nick> </partner> </book> """ # 此时练习只能用XMLxml # et = etree.XML(xml) # result = et.xpath("/book") # / 表示根节点 # result = et.xpath("/book/name") # 在xpath中间的/表示的是儿子 # result = et.xpath("/book/name/text()")[0] # text() 拿文本 # result = et.xpath("/book//nick") # //表示的是子孙后代. # result = et.xpath("/book/*/nick/text()") # * 通配符. 谁都行 # result = et.xpath("/book/author/nick[@class='jay']/text()") # []表示属性筛选. @属性名=值 find(Nick, attrs={"class":"jay"}) # result = et.xpath("/book/partner/nick/@id") # 最后一个/表示拿到nick里面的id的内容, @属性. 可以直接拿到属性值 # print(result) # xpath处理HTML html = """ <!DOCTYPE html> <html lang="en"> <head> <meta charset="UTF-8" /> <title>Title</title> </head> <body> <ul> <li><a href="http://www.baidu.com">百度</a></li> <li><a href="http://www.google.com">谷歌</a></li> <li><a href="http://www.sogou.com">搜狗</a></li> </ul> <ol> <li><a href="feiji">飞机</a></li> <li><a href="dapao">大炮</a></li> <li><a href="huoche">火车</a></li> </ol> <div class="job">李嘉诚</div> <div class="common">胡辣汤</div> </body> </html> """ et = etree.HTML(html) # li_list = et.xpath("/html/body/ul/li[2]/a/text()") # print(li_list) li_list = et.xpath("//li") for li in li_list: href = li.xpath("./a/@href")[0] # ./表示当前节点 text = li.xpath("./a/text()")[0] # ./表示当前节点 print(text, href) # 后续的爬虫工作..... ####################################### ####################################### ####################################### """ 1. 拿到页面源代码 2. 从页面源代码中提取你需要的数据. 价格, 名称, 公司名称 """ import requests from lxml import etree url = "https://beijing.zbj.com/search/f/?type=new&kw=saas" resp = requests.get(url) resp.encoding = "utf-8" # print(resp.text) # 提取数据 et = etree.HTML(resp.text) divs = et.xpath("//div[@class='new-service-wrap']/div") for div in divs: # 此时的div就是一条数据. 对应一个商品信息 # 商品价格 price = div.xpath("./div/div/a/div[2]/div[1]/span[1]/text()") if not price: # 过滤掉无用的数据 continue price = price[0] company = div.xpath("./div/div/a[2]/div[1]/p/text()")[0] # name = div.xpath("./div/div/a[1]/div[2]/div[2]/p//text()") # //表示提取p的所有文本, 包括子子孙孙所有内容 # name = "".join(name) print(company) break # r = "_".join(["张无忌", "麻花藤", "码云"]) # print(r) ####################################### ####################################### ####################################### from pyquery import PyQuery # html = """ # <ul> # <li class="aaa"><a href="http://www.google.com">谷歌</a></li> # <li class="aaa"><a href="http://www.baidu.com">百度</a></li> # <li class="bbb" id="qq"><a href="http://www.qq.com">腾讯</a></li> # <li class="bbb"><a href="http://www.yuanlai.com">猿来</a></li> # </ul> # """ # # # 加载html内容 # p = PyQuery(html) # print(p) # print(type(p)) # pyquery对象直接(css选择器) # a = p("a") # print(a) # print(type(a)) # 依然是pyquery对象 # # 链式操作 # a = p("li")("a") # print(a) # a = p("li a") # print(a) # a = p(".aaa a") # class="aaa" # print(a) # a = p("#qq a") # id="qq" # print(a) # href = p("#qq a").attr("href") # 拿属性 # text = p("#qq a").text() # 拿文本 # print(text) # 坑, 如果多个标签同时拿属性. 只能默认拿到第一个 # href = p("li a").attr("href") # print(href) # # 多个标签拿属性 # it = p("li a").items() # for item in it: # 从迭代器中拿到每一个标签 # href = item.attr("href") # 拿到href属性\ # text = item.text() # print(text, href) # 快速总结: # 1. pyquery(选择器) # 2. items() 当选择器选择的内容很多的时候. 需要一个一个处理的时候 # 3. attr(属性名) 获取属性信息 # 4. text() 获取文本 # div = """ # <div><span>我爱你</span></div> # """ # p = PyQuery(div) # html = p("div").html() # 全都要 # text = p("div").text() # 只要文本, 所有的HTML标签被过滤掉 # print(html) # print(text) html = """ <HTML> <div class="aaa">哒哒哒</div> <div class="bbb">嘟嘟嘟</div> </HTML> """ p = PyQuery(html) # 在xxxx标签后面添加xxxxx新标签 # p("div.aaa").after("""<div class="ccc">吼吼吼</div>""") # p("div.aaa").append("""<span>我爱你</span>""") # p("div.bbb").attr("class", "aaa") # 修改属性 # p("div.bbb").attr("id", "12306") # 新增属性, 前提是该标签没有这个属性 # p("div.bbb").remove_attr("id") # 删除属性 # p("div.bbb").remove() # 删除标签 # print(p) # dic = {} # dic['jay'] = "周杰伦" # print(dic) # dic['jay'] = "呵呵哒" # print(dic) ####################################### ####################################### ####################################### """ 1, 提取页面源代码 2, 解析页面源代码. 提取数据 """ import requests from pyquery import PyQuery def get_page_source(url): resp = requests.get(url) resp.encoding = "gbk" return resp.text def parse_page_source(html): doc = PyQuery(html) mt_list = doc(".mt-10").items() # class="mt-10" for mt in mt_list: # 拿到每一个mt # 判断是否有汽车经销商 if not mt("div > dl:nth-child(3) > dt:contains(购车经销商)"): # 向 地点 后添加购车经销商进去 mt("div > dl:nth-child(2)").after(PyQuery("""<dl class="choose-dl"> <dt>购车经销商</dt> <dd> <a href="###" class="js-dearname" data-val='125965,47759' data-evalid="3629818" target="_blank">   </a> </dd> </dl>""")) # 提取购买的车型 # 想要在已经提取的内容中获取第一个怎么办? eq(0) # nth-child(1) 在css进行选择的时候.选取第1个位置的内容 chexing = mt("div > dl:nth-child(1) > dd").eq(0).text().replace("\n", "").replace(" ", "") didian = mt("div > dl:nth-child(2) > dd").text() shijian = mt("div > dl:nth-child(4) > dd").text() jiage = mt("div > dl:nth-child(5) > dd").text().replace(" 万元", "") youhao = mt("div > dl:nth-child(6) > dd > p:nth-child(1)").text().replace(" 升/百公里", "") gonglishu = mt("div > dl:nth-child(6) > dd > p:nth-child(2)").text().replace(" 公里", "") other = mt("div > div > dl > dd").text().split() print(other) # 存储到文件中....... def main(): url = "https://k.autohome.com.cn/146/" # 1, 提取页面源代码 html = get_page_source(url) # 2, 解析页面源代码.提取数据 parse_page_source(html) if __name__ == '__main__': main()
#######################################
#######################################
#######################################
# 登录 -> 得到cookie
# 带着cookie 去请求到书架url -> 书架上的内容

# 必须得把上面的两个操作连起来
# 我们可以使用session进行请求 -> session你可以认为是一连串的请求. 在这个过程中的cookie不会丢失
import requests

# # 会话
# session = requests.session()
# data = {
#     "loginName": "18614075987",
#     "password": "q6035945"
# }
#
# # 1. 登录
# url = "https://passport.17k.com/ck/user/login"
# session.post(url, data=data)
# # print(resp.text)
# # print(resp.cookies)  # 看cookie
#
# # 2. 拿书架上的数据
# # 刚才的那个session中是有cookie的
# resp = session.get('https://user.17k.com/ck/author/shelf?page=1&appKey=2406394919')
#
# print(resp.json())

resp = requests.get("https://user.17k.com/ck/author/shelf?page=1&appKey=2406394919", headers={
    "Cookie":"GUID=bbb5f65a-2fa2-40a0-ac87-49840eae4ad1; c_channel=0; c_csc=web; UM_distinctid=17700bddefba54-0a914fc70f1ede-326d7006-1fa400-17700bddefc9e3; Hm_lvt_9793f42b498361373512340937deb2a0=1614327827; accessToken=avatarUrl%3Dhttps%253A%252F%252Fcdn.static.17k.com%252Fuser%252Favatar%252F16%252F16%252F64%252F75836416.jpg-88x88%253Fv%253D1610625030000%26id%3D75836416%26nickname%3D%25E9%25BA%25BB%25E8%25BE%25A3%25E5%2587%25A0%25E4%25B8%259D%26e%3D1629888002%26s%3D63b8b7687fc8a717; sensorsdata2015jssdkcross=%7B%22distinct_id%22%3A%2275836416%22%2C%22%24device_id%22%3A%2217700ba9c71257-035a42ce449776-326d7006-2073600-17700ba9c728de%22%2C%22props%22%3A%7B%22%24latest_traffic_source_type%22%3A%22%E7%9B%B4%E6%8E%A5%E6%B5%81%E9%87%8F%22%2C%22%24latest_referrer%22%3A%22%22%2C%22%24latest_referrer_host%22%3A%22%22%2C%22%24latest_search_keyword%22%3A%22%E6%9C%AA%E5%8F%96%E5%88%B0%E5%80%BC_%E7%9B%B4%E6%8E%A5%E6%89%93%E5%BC%80%22%7D%2C%22first_id%22%3A%22bbb5f65a-2fa2-40a0-ac87-49840eae4ad1%22%7D; Hm_lpvt_9793f42b498361373512340937deb2a0=1614336271"
})
print(resp.text)

#######################################
#######################################
#######################################
# 1. 拿到contId
# 2. 拿到videoStatus返回的json. ->  srcURL
# 3. srcURL里面的内容进行修整
# 4. 下载视频
import requests

# 拉取视频的网址
url = "https://www.pearvideo.com/video_1725199"
contId = url.split("_")[1]

videoStatusUrl = f"https://www.pearvideo.com/videoStatus.jsp?contId={contId}"

headers = {
    "User-Agent": "Mozilla/5.0 (Macintosh; Intel Mac OS X 10_15_4) AppleWebKit/537.36 (KHTML, like Gecko) Chrome/88.0.4324.192 Safari/537.36",
    # 防盗链: 溯源, 当前本次请求的上一级是谁
    "Referer": url
}

resp = requests.get(videoStatusUrl, headers=headers)
dic = resp.json()

srcUrl = dic['videoInfo']['videos']['srcUrl']
systemTime = dic['systemTime']
srcUrl = srcUrl.replace(systemTime, f"cont-{contId}")

# 下载视频
with open("a.mp4", mode="wb") as f:
    f.write(requests.get(srcUrl).content)


#######################################
#######################################
#######################################
# 代理. 可以使用第三方的机器来代理你的请求
# 代理的弊端:
#      1. 慢.
#      2. 代理IP不好找.
import requests

# https://www.kuaidaili.com/free/intr/1/

url = "https://www.baidu.com"

# 准备代理信息
proxy = {
    "http": "http://182.84.144.66:3256/",
    "https": "https://182.84.144.66:3256/"
}

# proxies 代理
resp = requests.get(url, proxies=proxy)
resp.encoding = 'utf-8'
print(resp.text)


#######################################
#######################################
#######################################
import requests


def get_ip():
    while 1:  # 反复提取代理IP
        # 有待完善. 如果代理ip都用完了. 怎么办????
        url = "http://dev.kdlapi.com/api/getproxy/?orderid=902718903050420&num=100&protocol=2&method=1&an_an=1&an_ha=1&quality=1&format=json&sep=1"
        resp = requests.get(url)
        ips = resp.json()
        if ips['code'] == 0:
            for ip in ips['data']['proxy_list']:  # 拿到每一个ip
                print("即将返回ip", ip)
                yield ip   # 一个一个返回代理ip
            print("所有IP已经用完, 即将更新!")  # for循环结束. 继续提取新IP
        else:
            print("获取代理IP出现异常. 重新获取!")


def spider():
    url = "https://www.dy2018.com/"
    while 1:
        try:
            proxy_ip = next(gen)  # 拿到代理ip
            proxy = {
                "http": "http://" + proxy_ip,
                "https": "https://" + proxy_ip,
            }
            print(proxy)
            proxy = {
                'http': 'http://118.117.188.32:3256',
                'https': 'https://118.117.188.32:3256'
            }
            proxy = {
                'http': 'http://182.84.145.178:3256',
                'https': 'https//182.84.145.178:3256'
            }
            resp = requests.get(url, proxies=proxy, timeout=20)
            resp.encoding = "utf-8"
            return resp.text
        except :
            print("报错了. ")


if __name__ == '__main__':
    gen = get_ip()  #  gen就是代理ip的生成器
    for i in range(10):
        print(spider())


#######################################
#######################################
#######################################
Python协程基础知识
协程概念引入
协程是我要重点去讲解的一个知识点. 它能够更加高效的利用CPU.
我们单独的用一个线程来完成某一个操作. 看看它的效率是否真的能把CPU完全利用起来.
import time
def func():
print("我爱黎明")
time.sleep(3)
print("我真的爱黎明")
func()
各位请看. 在该程序中, 我们的func()实际在执行的时候至少需要3秒的时间来完成操作. 中间的三秒钟需要让我当前的线程处于阻塞状态. 阻塞状态的线程 CPU是不会来执行你的. 那么此时cpu很可能会切换到其他程序上去执行. 此时, 对于你来说, CPU其实并没有为你工作(在这三秒内), 那么我们能不能通过某种手段, 让CPU一直为我而工作. 尽量的不要去管其他人.
我们要知道CPU一般抛开执行周期不谈, 如果一个线程遇到了IO操作, CPU就会自动的切换到其他线程进行执行. 那么, 如果我想办法让我的线程遇到了IO操作就挂起, 留下的都是运算操作. 那CPU是不是就会长时间的来照顾我~.
以此为目的, 伟大的程序员就发明了一个新的执行过程. 当线程中遇到了IO操作的时候, 将线程中的任务进行切换, 切换成非 IO操作. 等原来的IO执行完了. 再恢复回原来的任务中.
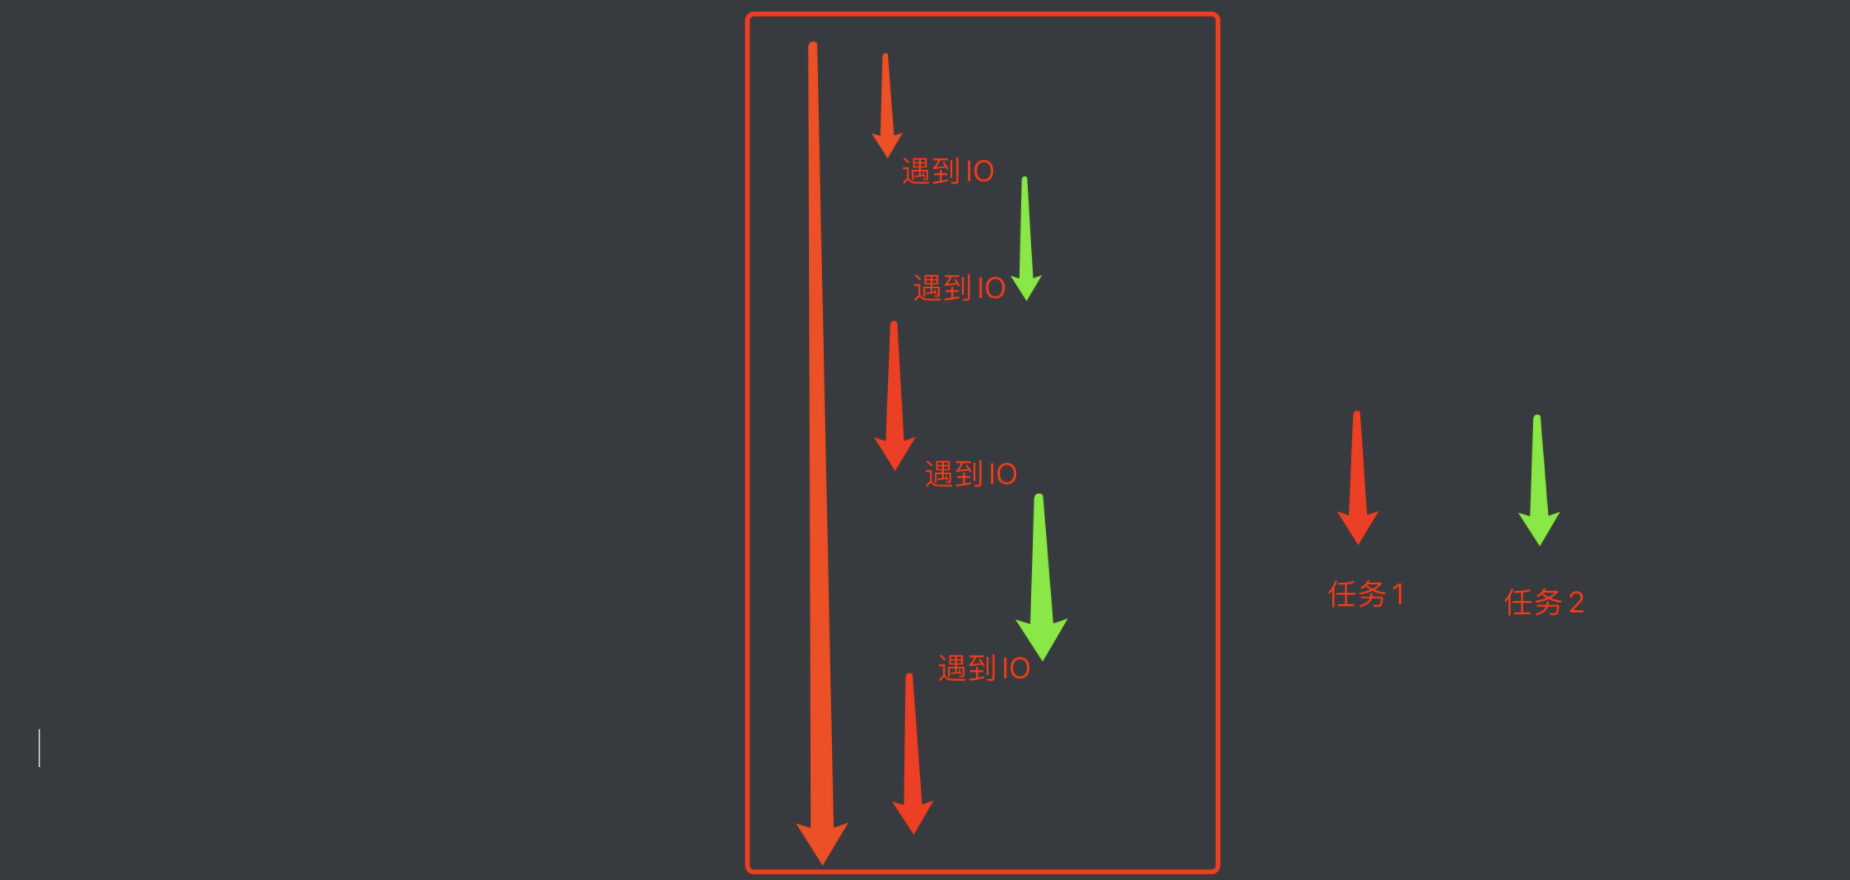
就形成了这样一种模型, 在程序遇到了IO操作(费时不费力的操作)时, 自动切换到其他任务. 该模型被称为协程.
协程基本语法
协程的基本写法: 咱就介绍一种, 也是最好用的一种.
先上手来一下.
async def func():
print("我是协程")
if __name__ == '__main__':
# print(func()) # 注意, 此时拿到的是一个协程对象, 和生成器差不多.该函数默认是不会这样执行的
coroutine = func()
asyncio.run(coroutine) # 用asyncio的run来执行协程.
# lop = asyncio.get_event_loop()
# lop.run_until_complete(coroutine) # 这两句顶上面一句
效果不明显, 继续加码
import time
# await: 当该任务被挂起后,CPU会自动切换到其他任务中
async def func1():
print("func1, start")
await asyncio.sleep(3)
print("func1, end")
async def func2():
print("func2, start")
await asyncio.sleep(4)
print("func2, end")
async def func3():
print("func3, start")
await asyncio.sleep(2)
print("func3, end")
if __name__ == '__main__':
start = time.time()
tasks = [ # 协程任务列表
asyncio.create_task(func1()), # 创建协程任务
asyncio.create_task(func2()),
asyncio.create_task(func3()),
]
lop = asyncio.get_event_loop()
# 我要执行这个协程任务列表中的所有任务
lop.run_until_complete(asyncio.wait(tasks)) # 我要执行这个协程任务列表中的所有任务
print(time.time() - start)
妙不妙~~
上面的程序还可以写成这样
async def main():
print("start")
# # 添加协程任务
# t1 = asyncio.create_task(func1())
# t2 = asyncio.create_task(func2())
# t3 = asyncio.create_task(func3())
#
# ret1 = await t1
# ret2 = await t2
# ret3 = await t3
tasks = [
asyncio.create_task(func1()),
asyncio.create_task(func2()),
asyncio.create_task(func3())
]
# 一次性把所有任务都执行
done, pedding = await asyncio.wait(tasks)
print("end")
if __name__ == '__main__':
start = time.time()
asyncio.run(main())
print(time.time() - start)
模拟一下爬虫怎么样~
async def download(url):
print("开始抓取")
await asyncio.sleep(3) # 我要开始下载了
print("下载结束", url)
return "老子是源码你信么"
async def main():
urls = [
"http://www.baidu.com",
"http://www.h.com",
"http://luoyonghao.com"
]
# 生成任务列表
tasks = [asyncio.create_task(download(url)) for url in urls]
done, pedding = await asyncio.wait(tasks)
for d in done:
print(d.result())
if __name__ == '__main__':
asyncio.run(main())
多任务协程返回值
import asyncio
async def faker1():
print("任务1开始")
await asyncio.sleep(1)
print("任务1完成")
return "任务1结束"
async def faker2():
print("任务2开始")
await asyncio.sleep(2)
print("任务2完成")
return "任务2结束"
async def faker3():
print("任务3开始")
await asyncio.sleep(3)
print("任务3完成")
return "任务3结束"
async def main():
tasks = [
asyncio.create_task(faker3()),
asyncio.create_task(faker1()),
asyncio.create_task(faker2()),
]
# 方案一, 用wait, 返回的结果在result中
result, pending = await asyncio.wait(tasks)
for r in result:
print(r.result())
# 方案二, 用gather, 返回的结果在result中, 结果会按照任务添加的顺序来返回数据
# return_exceptions如果任务在执行过程中报错了. 返回错误信息.
result = await asyncio.gather(*tasks, return_exceptions=True)
for r in result:
print(r)
if __name__ == '__main__':
asyncio.run(main())
协程在爬虫中的使用
aiohttp是python的一个非常优秀的第三方异步http请求库. 我们可以用aiohttp来编写异步爬虫(协程)
安装:
pip install aiohttp
pip install aiofiles
###aiohttp模块基本使用
实例代码:
import aiohttp
import asyncio
import aiofiles
async def download(url):
try:
name = url.split("/")[-1]
# 创建session对象 -> 相当于requsts对象
async with aiohttp.ClientSession() as session:
# 发送请求, 这里和requests.get()几乎没区别, 除了代理换成了proxy
async with session.get(url) as resp:
# 读取数据. 如果想要读取源代码. 直接resp.text()即可. 比原来多了个()
content = await resp.content.read()
# 写入文件, 用默认的open也OK. 用aiofiles能进一步提升效率
async with aiofiles.open(name, mode="wb") as f:
await f.write(content)
return "OK"
except:
print(123)
return "NO"
async def main():
url_list = [
"http://pic3.hn01.cn/wwl/upload/2021/06-30/omv2i40essl.jpg",
"http://pic3.hn01.cn/wwl/upload/2021/06-30/kg3ccicvnqd.jpg",
"http://pic3.hn01.cn/wwl/upload/2021/06-30/jhw5yhbtyaa.jpg",
"http://pic3.hn01.cn/wwl/upload/2021/06-30/y1enehg1esu.jpg",
"http://pic3.hn01.cn/wwl/upload/2021/06-28/2pshuolbhrg.jpg",
]
tasks = []
for url in url_list:
# 创建任务
task = asyncio.create_task(download(url))
tasks.append(task)
await asyncio.wait(tasks)
if __name__ == '__main__':
asyncio.run(main())
从最终运行的结果中能非常直观的看到用异步IO完成爬虫的效率明显高了很多
协程案例-扒光一部小说需要多久?
目标, 明朝那些事儿 https://www.zanghaihua.org/mingchaonaxieshier/
import asyncio
import aiofiles
import aiohttp
import requests
from lxml import etree
import os
import time
def get_all_detail_url(url):
"""
获取到所有详情页的url
:param url: 主页URL
:return: {章节名称:[detail_url, detail_url....]}
"""
resp = requests.get(url)
tree = etree.HTML(resp.text)
booklist = tree.xpath("//div[@class='booklist clearfix']/span")
dic = {}
chapter = ""
for book in booklist:
if 'v' in book.xpath("./@class"):
chapter = book.xpath("./text()")[0]
dic[chapter] = []
else:
href = book.xpath("./a/@href")[0]
dic[chapter].append(href)
return dic
async def download_one(session, file_path, url):
async with session.get(url) as resp:
text = await resp.text()
tree = etree.HTML(text)
title = tree.xpath(".//div[@class='chaptertitle clearfix']/h1/text()")[0]
content = "\n".join(tree.xpath(".//div[@id='BookText']/text()")).replace("\u3000", "")
async with aiofiles.open(f"./{file_path}/{title}.txt", mode="w", encoding='utf-8') as f:
await f.write(content)
async def download(file_path, urls):
tasks = []
print(id(asyncio.get_event_loop()))
async with aiohttp.ClientSession() as session:
for url in urls:
tasks.append(asyncio.create_task(download_one(session, file_path, url)))
await asyncio.wait(tasks)
print(file_path, "done")
def main():
# 拿到目录页中所有详情页的url
url = "https://www.zanghaihua.org/mingchaonaxieshier/"
detail_urls = get_all_detail_url(url)
for name, urls in detail_urls.items():
if not os.path.exists(name):
os.