SpringMVC基本概念和入门案例
SpringMVC的基本概念
关于三层架构和MVC
三层架构
我们的开发架构一般都是基于两种形式,一种是 C/S 架构,也就是客户端/服务器,另一种是 B/S 架构,也就是浏览器服务器。在 JavaEE 开发中,几乎全都是基于 B/S 架构的开发。
那么在 B/S 架构中,系统标准的三层架构包括:表现层、业务层、持久层。三层架构在我们的实际开发中使用的非常多,所以我们课程中的案例也都是基于三层架构设计的。
三层架构中,每一层各司其职,接下来我们就说说每层都负责哪些方面:
- 表现层:
也就是我们常说的 web 层。它负责接收客户端请求,向客户端响应结果,通常客户端使用http协议请求web层,web 需要接收 http 请求,完成 http 响应。表现层包括展示层和控制层:控制层负责接收请求,展示层负责结果的展示。表现层依赖业务层,接收到客户端请求一般会调用业务层进行业务处理,并将处理结果响应给客户端。表现层的设计一般都使用 MVC 模型。(MVC 是表现层的设计模型,和其他层没有关系)。
- 业务层:
也就是我们常说的 service 层。它负责业务逻辑处理,和我们开发项目的需求息息相关。web 层依赖业务层,但是业务层不依赖 web 层。业务层在业务处理时可能会依赖持久层,如果要对数据持久化需要保证事务一致性。(也就是我们说的,事务应该放到业务层来控制)。
- 持久层:
也就是我们是常说的 dao 层。负责数据持久化,包括数据层即数据库和数据访问层,数据库是对数据进行持久化的载体,数据访问层是业务层和持久层交互的接口,业务层需要通过数据访问层将数据持久化到数据库中。通俗的讲,持久层就是和数据库交互,对数据库表进行曾删改查的。
MVC模型
MVC全名是 Model View Controller,是模型(model)-视图(view)-控制器(controller)的缩写,是一种用于设计创建 Web 应用程序表现层的模式。MVC 中每个部分各司其职:
Model(模型):通常指的就是我们的数据模型。作用一般情况下用于封装数据。
View(视图):通常指的就是我们的 jsp 或者 html。作用一般就是展示数据的。通常视图是依据模型数据创建的。
Controller(控制器):是应用程序中处理用户交互的部分,作用一般就是处理程序逻辑的。

SpringMVC概述
SpringMVC是什么
SpringMVC 是一个基于 Java 的实现 MVC 设计模型的请求驱动类型的轻量级 Web 框架,属于SpringFrameWork 的后续产品,已经融合在 Spring Web Flow 里面,已经成为目前最主流的 MVC 框架之一。
SpringMVC 框架可以通过一套注解,让一个简单的 Java 类成为处理请求的控制器,而无须实现任何接口。同时它还支持 RESTful 编程风格的请求。
SpringMVC的优势
(1)清晰的角色划分:
- 前端控制器(DispatcherServlet)
- 请求到处理器映射(HandlerMapping)
- 处理器适配器(HandlerAdapter)
- 视图解析器(ViewResolver)
- 处理器或页面控制器(Controller)
- 验证器( Validator)
- 命令对象(Command 请求参数绑定到的对象就叫命令对象)
- 表单对象(Form Object 提供给表单展示和提交到的对象就叫表单对象)。
(2)分工明确,而且扩展点相当灵活,可以很容易扩展,虽然几乎不需要。
(3)由于命令对象就是一个 POJO,无需继承框架特定 API,可以使用命令对象直接作为业务对象。
(4)和 Spring 其他框架无缝集成,是其它 Web 框架所不具备的。
(5)可适配,通过 HandlerAdapter 可以支持任意的类作为处理器。
(6)可定制性,HandlerMapping、ViewResolver 等能够非常简单的定制。
(7)功能强大的数据验证、格式化、绑定机制。
(8)RESTful风格的支持、简单的文件上传、约定大于配置的契约式编程支持、基于注解的零配
置支持等等。
SpringMVC的入门
环境搭建
新建 maven web 项目,引入相关的依赖
    <modelVersion>4.0.0</modelVersion>

    <artifactId>SpringMVC_Learn</artifactId>
    <packaging>war</packaging>

    <dependencies>
        <dependency>
            <groupId>org.springframework</groupId>
            <artifactId>spring-webmvc</artifactId>
            <version>5.3.1</version>
        </dependency>

        <!-- 日志 -->
        <dependency>
            <groupId>ch.qos.logback</groupId>
            <artifactId>logback-classic</artifactId>
            <version>1.2.3</version>
        </dependency>

        <!-- ServletAPI -->
        <dependency>
            <groupId>javax.servlet</groupId>
            <artifactId>javax.servlet-api</artifactId>
            <version>3.1.0</version>
            <scope>provided</scope>
        </dependency>

        <!-- Spring5和Thymeleaf整合包 -->
        <dependency>
            <groupId>org.thymeleaf</groupId>
            <artifactId>thymeleaf-spring5</artifactId>
            <version>3.0.12.RELEASE</version>
        </dependency>
    </dependencies>
入门案例
(1)配置核心的控制器(配置DispatcherServlet),在 webapp/WEB-INF 下的 web.xml 配置文件中配置核心控制器DispatcherServlet
<?xml version="1.0" encoding="UTF-8"?>
<web-app xmlns="http://xmlns.jcp.org/xml/ns/javaee"
         xmlns:xsi="http://www.w3.org/2001/XMLSchema-instance"
         xsi:schemaLocation="http://xmlns.jcp.org/xml/ns/javaee http://xmlns.jcp.org/xml/ns/javaee/web-app_4_0.xsd"
         version="4.0">

    <!--配置前端控制器,对浏览器的请求进行统一处理-->
    <servlet>
        <servlet-name>springMVC</servlet-name>
        <servlet-class>org.springframework.web.servlet.DispatcherServlet</servlet-class>
        <!-- 配置SpringMVC配置文件的位置和名称 -->
        <init-param>
            <param-name>contextConfigLocation</param-name>
            <param-value>classpath:springmvc.xml</param-value>
        </init-param>
        <!-- 将前端控制器DispatcherServlet的初始化时间提前到服务器启动时 -->
        <load-on-startup>1</load-on-startup>
    </servlet>

    <servlet-mapping>
        <servlet-name>springMVC</servlet-name>
        <url-pattern>/</url-pattern>
    </servlet-mapping>
</web-app>
(2)resources 目录下新建 springmvc.xml 配置文件
<?xml version="1.0" encoding="UTF-8"?>
<beans xmlns="http://www.springframework.org/schema/beans"
       xmlns:xsi="http://www.w3.org/2001/XMLSchema-instance"
       xmlns:context="http://www.springframework.org/schema/context"
       xmlns:mvc="http://www.springframework.org/schema/mvc"
       xsi:schemaLocation="http://www.springframework.org/schema/beans http://www.springframework.org/schema/beans/spring-beans.xsd http://www.springframework.org/schema/context https://www.springframework.org/schema/context/spring-context.xsd http://www.springframework.org/schema/mvc https://www.springframework.org/schema/mvc/spring-mvc.xsd">

    <!-- 开启注解扫描 -->
    <context:component-scan base-package="com.lalala.controller"></context:component-scan>

    <!-- 配置Thymeleaf视图解析器 -->
    <bean id="viewResolver" class="org.thymeleaf.spring5.view.ThymeleafViewResolver">
        <property name="order" value="1"/>
        <property name="characterEncoding" value="UTF-8"/>
        <property name="templateEngine">
            <bean class="org.thymeleaf.spring5.SpringTemplateEngine">
                <property name="templateResolver">
                    <bean class="org.thymeleaf.spring5.templateresolver.SpringResourceTemplateResolver">
                        <!-- 视图前缀 -->
                        <property name="prefix" value="/WEB-INF/templates/"/>
                        <!-- 视图后缀 -->
                        <property name="suffix" value=".html"/>
                        <property name="templateMode" value="HTML5"/>
                        <property name="characterEncoding" value="UTF-8"/>
                    </bean>
                </property>
            </bean>
        </property>
    </bean>

    <!--
      处理静态资源,例如html、js、css、jpg
      若只设置该标签,则只能访问静态资源,其他请求则无法访问
      此时必须设置<mvc:annotation-driven/>解决问题
     -->
    <mvc:default-servlet-handler/>

    <!-- 开启mvc注解驱动 -->
    <mvc:annotation-driven>
        <mvc:message-converters>
            <!-- 处理响应中文内容乱码 -->
            <bean class="org.springframework.http.converter.StringHttpMessageConverter">
                <property name="defaultCharset" value="UTF-8"/>
                <property name="supportedMediaTypes">
                    <list>
                        <value>text/html</value>
                        <value>application/json</value>
                    </list>
                </property>
            </bean>
        </mvc:message-converters>
    </mvc:annotation-driven>
</beans>
(3)webapp/WEB-INF/templates 下的 index.html 如下
<!DOCTYPE html>
<html lang="en" xmlns:th="http://www.thymeleaf.org">
<head>
    <meta charset="UTF-8">
    <title>首页</title>
</head>
<body>
    <h1>首页</h1>
</body>
</html>
(4)创建请求控制器,控制器由不同的JAVA类担任,请求控制器中每一个处理请求的方法称为控制器方法。在 controller 包下新建 HelloController
package com.lalala.controller;

import org.springframework.stereotype.Controller;
import org.springframework.web.bind.annotation.RequestMapping;

//控制器类
@Controller
public class HelloController {
    @RequestMapping("/")
    public String index() {
        System.out.println("Hello SpringMVC");
        //返回视图名称
        return "index";
    }
}
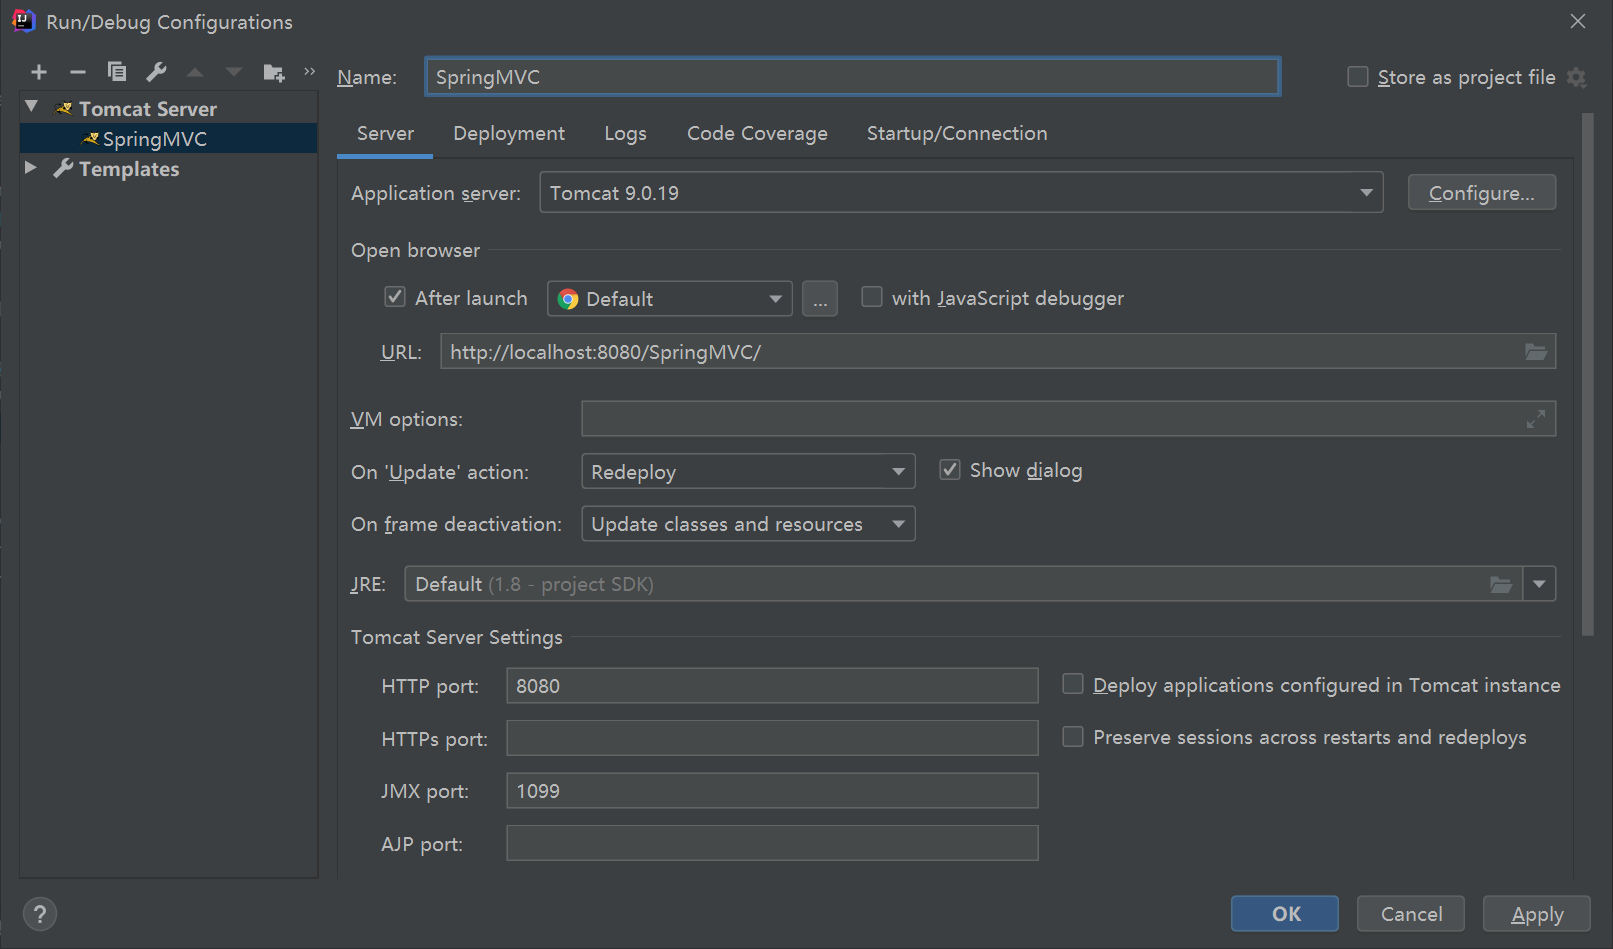
(5)设置tomcat

(6)启动tomcat
入门案例的执行过程分析
入门案例的执行流程:
- 当启动Tomcat服务器的时候,因为配置了load-on-startup标签,所以会创建DispatcherServlet对象,
就会加载springmvc.xml配置文件。 - 开启了注解扫描,那么HelloController对象就会被创建。
- 发送请求,请求会先到达DispatcherServlet核心控制器,根据配置@RequestMapping注解,找到执行的具体方法。
- 根据执行方法的返回值,再根据配置的视图解析器,去指定的目录下查找指定名称的html文件。
- Tomcat服务器渲染页面,做出响应。
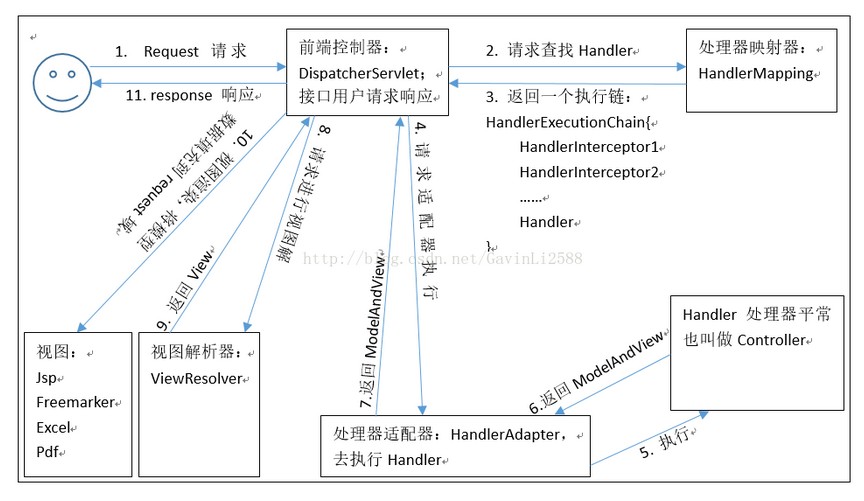
springmvc执行流程原理

RequestMapping注解
使用说明
源码:
@Target({ElementType.METHOD, ElementType.TYPE})
@Retention(RetentionPolicy.RUNTIME)
@Documented
@Mapping
public @interface RequestMapping {
}
作用:用于建立请求 URL 和处理请求方法之间的对应关系。
出现位置
-
@RequestMapping标识在类上:
设置请求 URL 的第一级访问目录,映射请求路径的初始信息。此处不写的话,就相当于应用的根目录。写的话需要以 / 开头。它出现的目的是为了使我们的 URL 可以按照模块化管理。
例如:
账户模块
/account/add
/account/update
/account/delete
...
订单模块
/order/add
/order/update
/order/delete
可以把 account 和 order 写在类上使我们的 URL 更加精细。
- @RequestMapping标识在方法上:设置请求 URL 的第二级访问目录,映射请求路径的具体信息。
属性:
- value:用于指定请求的 URL。可以是一个字符串类型的数组,表示该请求映射能够匹配多个请求地址所对应的请求,它和 path 属性的作用是一样的。
- method:用于指定请求的方式。可以是一个RequestMethod类型的数组,表示能够匹配多种请求方式,当请求方式不满足要求时就会报错。
- params:用于指定限制请求参数的条件,它支持简单的表达式。要求请求参数的key和value必须和配置的一模一样。
例如:
params = {"accountName"},表示请求参数必须有 accountName
params = {"moeny!100"},表示请求参数中 money 不能是 100
- headers:用于指定限制请求消息头的条件。
使用示例
出现位置示例
新建控制器:在类上添加 @RequestMapping 注解
package com.lalala.controller;

import org.springframework.stereotype.Controller;
import org.springframework.web.bind.annotation.RequestMapping;

//控制器类
@Controller
@RequestMapping("/hello")
public class HelloController {
    @RequestMapping("/testRequestMapping")
    public String testRequestMapping(){
        System.out.println("测试requestMapping注解...");
        return "success";
    }
}
index.html中的代码:
<!DOCTYPE html>
<html lang="en" xmlns:th="http://www.thymeleaf.org">
<head>
    <meta charset="UTF-8">
    <title>首页</title>
</head>
<body>
    <h1>首页</h1>
    <a th:href="@{/hello/testRequestMapping}">测试requestMapping注解</a>
</body>
</html>
success.html页面内容如下:
<!DOCTYPE html>
<html lang="en">
<head>
    <meta charset="UTF-8">
    <title>Title</title>
</head>
<body>
    success
</body>
</html>
value属性的示例
新建控制器类:
package com.lalala.controller;

import org.springframework.stereotype.Controller;
import org.springframework.web.bind.annotation.RequestMapping;

//控制器类
@Controller
public class HelloController {
    @RequestMapping(value = {"/testRequestMapping", "/test"})
    public String testRequestMapping() {
        return "success";
    }
}
index.html中的代码如下:
<!DOCTYPE html>
<html lang="en" xmlns:th="http://www.thymeleaf.org">
<head>
    <meta charset="UTF-8">
    <title>首页</title>
</head>
<body>
    <h1>首页</h1>
    <a th:href="@{/testRequestMapping}">测试RequestMapping的value属性 /testRequestMapping</a><br/>
    <a th:href="@{/test}">测试RequestMapping的value属性 test</a>
</body>
</html>
可以发现通过/testRequestMapping和/test都能够跳转到我们的success.html页面
method属性的示例
控制器代码
package com.lalala.controller;

import org.springframework.stereotype.Controller;
import org.springframework.web.bind.annotation.RequestMapping;
import org.springframework.web.bind.annotation.RequestMethod;

//控制器类
@Controller
public class HelloController {
    //指定请求方式为GET请求
    @RequestMapping(value = "/test", method = RequestMethod.GET)
    public String testRequestMapping() {
        return "success";
    }
}
index.html如下:
<!DOCTYPE html>
<html lang="en" xmlns:th="http://www.thymeleaf.org">
<head>
    <meta charset="UTF-8">
    <title>首页</title>
</head>
<body>
    <h1>首页</h1>
    <!-- 使用post请求-->
    <form th:action="@{/test}" method="post">
        <input type="submit">
    </form>
</body>
</html>
我们在控制器中设置了method = RequestMethod.POST,当使用GET方式的请求就会报HTTP Status 405 – Method Not Allowed的错误。
可以设置接收多种类型的请求方式:
@RequestMapping(value = "/test", method = {RequestMethod.GET, RequestMethod.POST})
params属性的示例
控制器中的代码
package com.lalala.controller;

import org.springframework.stereotype.Controller;
import org.springframework.web.bind.annotation.RequestMapping;

//控制器类
@Controller
public class HelloController {

    @RequestMapping(value = "/testParams", params = {"username"})
    public String testParams() {
        return "success";
    }
}
index.html中如下
<a th:href="@{/testParams?username=admin}">测试RequestMapping注解的params属性</a>
headers属性的示例
控制器中的代码
package com.lalala.controller;

import org.springframework.stereotype.Controller;
import org.springframework.web.bind.annotation.RequestMapping;

//控制器类
@Controller
public class HelloController {
    @RequestMapping(
            value = "/testParamsAndHeaders",
            params = {"username", "password!=123456"},
            headers = {"Host=localhost:8000"})
    public String testParamsAndHeaders() {
        return "success";
    }
}
index.html如下
<!DOCTYPE html>
<html lang="en" xmlns:th="http://www.thymeleaf.org">
<head>
    <meta charset="UTF-8">
    <title>首页</title>
</head>
<body>
    <h1>首页</h1>
    <a th:href="@{/testParamsAndHeaders?username=admin,password=123}">测试RequestMapping注解的headers属性</a>
</body>
</html>
由于不满足headers属性,所以此时页面显示404错误。
RequestMapping注解的派生注解
对于处理请求方式的控制器方法,SpringMVC提供了@RequestMapping的派生注解。
- 处理get请求的映射:@GetMapping,即相当于@RequestMapping(method = RequestMethod.GET)的缩写。
- 处理post请求的映射:@PostMapping
- 处理put请求的映射:@PutMapping
- 处理delete请求的映射:@DeleteMapping
- 处理Patch请求的映射:@PatchMapping
@GetMapping(value = "/testGetMapping")
public String testGetMapping() {
    return "success";
}
入门案例中涉及的组件
DispatcherServlet:前端控制器
对有用户的请求和响应进行统一的处理,用户请求到达前端控制器,它就相当于 MVC 模式中的 C,DispatcherServlet 是整个流程控制的中心,由它调用其它组件处理用户的请求,dispatcherServlet 的存在降低了组件之间的耦合性。
HandlerMapping:处理器映射器
HandlerMapping 负责根据用户请求找到 Handler 即处理器,SpringMVC 提供了不同的映射器实现不同的映射方式,例如:配置文件方式,实现接口方式,注解方式等。
Handler:处理器
它就是我们开发中要编写的具体业务控制器。由 DispatcherServlet 把用户请求转发到 Handler。由 Handler 对具体的用户请求进行处理。
HandlAdapter:处理器适配器
通过 HandlerAdapter 对处理器进行执行,这是适配器模式的应用,通过扩展适配器可以对更多类型的处理器进行执行。
View Resolver:视图解析器
View Resolver 负责将处理结果生成 View 视图,View Resolver 首先根据逻辑视图名解析成物理视图名即具体的页面地址,再生成 View 视图对象,最后对 View 进行渲染将处理结果通过页面展示给用户。
View:视图
SpringMVC 框架提供了很多的 View 视图类型的支持,包括:jstlView、freemarkerView、pdfView等。我们最常用的视图就是 jsp。
一般情况下需要通过页面标签或页面模版技术将模型数据通过页面展示给用户,需要由程序员根据业务需求开发具体的页面。
mvc:annotation-driven标签的作用
在 SpringMVC 的各个组件中,处理器映射器、处理器适配器、视图解析器称为 SpringMVC 的三大组件。
使用<mvc:annotation-driven>自动加载 RequestMappingHandlerMapping(处理映射器)和
RequestMappingHandlerAdapter(处理适配器), 可用在springmvc.xml配置文件中使用
<mvc:annotation-driven>替代注解处理器和适配器的配置。它就相当于在 xml 中配置了:
<!-- 上面的标签相当于如下配置 -->
<!-- HandlerMapping -->
<bean class="org.springframework.web.servlet.mvc.method.annotation.RequestMappingHandlerM
apping"></bean>
<bean class="org.springframework.web.servlet.handler.BeanNameUrlHandlerMapping"></bean>
<!-- HandlerAdapter -->
<bean class="org.springframework.web.servlet.mvc.method.annotation.RequestMappingHandlerA
dapter"></bean>
<bean class="org.springframework.web.servlet.mvc.HttpRequestHandlerAdapter"></bean>
<bean class="org.springframework.web.servlet.mvc.SimpleControllerHandlerAdapter"></bean>
<!-- HadnlerExceptionResolvers -->
<bean class="org.springframework.web.servlet.mvc.method.annotation.ExceptionHandlerExcept
ionResolver"></bean>
<bean class="org.springframework.web.servlet.mvc.annotation.ResponseStatusExceptionResolver"></bean>
<bean class="org.springframework.web.servlet.mvc.support.DefaultHandlerExceptionResolver"></bean>
注意:
- 一般开发中,我们都需要写上此标签(虽然从入门案例中看,我们不写也行,但该标签还有具体的使用场景)。
明确:
- 我们只需要编写处理具体业务的控制器以及视图。

