(8)Django框架学习-python模拟Django框架
原贴来源
python实现web服务器
web开发首先要有web服务器才行。比如apache,但是在开发阶段最好有一个简单方便的开发服务器,
容易重启进行调试,等开发调试完毕后,再将代码部署到成熟稳定高效的web服务器。
# -*- coding: utf-8 -*-
from wsgiref import simple_server
# 定义一个输出 hello world 和环境变量的简单web应用程序
def hello_app(environ, start_response):
# 输出 http 头,text/plain 表示是纯文本
start_response('200 OK', [('Content-type','text/plain')])
# 准备输出的内容
content = []
content.append('Hello world')
for key, value in environ.items():
content.append('%s : %s' % (key, value))
# 输出,根据 wsgi 协议,返回的需要是一个迭代器,返回一个 list 就可以
return ['\n'.join(content)]
# 构造开发服务器对象,设置绑定的地址和端口,并把 hello world 应用程序传给他
server = simple_server.make_server('localhost', 8080, hello_app)
# 启动开发服务器
server.serve_forever()
执行上面这个程序后,打开浏览器,访问一个以 http://localhost:8080 开头的网址即可看到 environ 所包含的内容。
 (截取一小部分)
 基础知识
浏览器和web应用之间使用的是http协议,它规定了请求和响应的格式。
请求包(Http Request)
请求主要包括请求的方法,请求的URL,请求头,请求体。
请求的方法http规定有GET, POST, PUT, DELETE,只不过通过浏览器发起的web请求一般只涉及GET和POST请求。
GET一般用来获取服务器内容,POST类似修改内容,PUT添加,DELETE删除。
一般通过提交html的form表单发起POST请求。成功后需要进行重定向。
从协议上看GET,HTTP请求最大的区别就是GET请求没有请求体,而POST请求有。这就意味着可以通过POST请求
向服务器发送大量数据,如上传文件等,当然GET请求也可以通过URL本身以及其参数向服务器传递参数,比如
url?arg1=value&arg2=value
请求头就是包含了请求包的描述信息。 比如编码,包长度等。
响应包(Http Response)
http的响应包的格式更简单一些,包括状态码,响应头和响应体,状态码表示该请求的结果,比如
200表示成功
404表示资源没有找到
500表示服务器错误
301表示资源已经换了地址,客户端需要跳转。
响应头和请求头类似,包括一些描述信息,响应体一般就是输出内容了,大部分是页面html代码。
请求的生命周期
1. web服务器接收到原始的http请求后进行一定程度的包装再交给web应用程序
2. web应用程序处理后,再以一定的格式返回数据给web服务器
3. web服务器再将数据包装成http响应包返回给浏览器。
关于cgi
cgi(common gateway interface)就是web服务器与web应用程序之间的一个古老的协议,在cgi协议中,
web服务器将http请求的各种信息放到cgi应用程序的环境变量中,cgi应用程序再通过标准输出,输出它的响应头
和相应内容给web服务器。
上面用到的开发服务器与应用程序之间所使用的协议叫做wsgi,它和cgi类似,同样将请求包装成一种key-value对,
只不过cgi通过环境变量传给cgi应用程序,而wsgi直接使用python的字典对象来传递。
hello_app的第一个参数environ就是包含请求信息的字典对象,第二个参数是个函数,web应用程序在输出响应内容
前需要先调用它来输出状态码和响应头。
处理web请求和响应
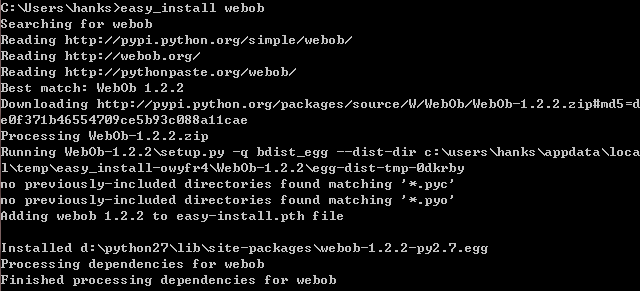
这里使用webob模块来处理请求和响应,需要安装,这里首先要安装setuptools模块,一个包管理的工具,可以通过
这个工具自动下载需要的软件包,类似ubuntu的app-get。下面是地址:
安装结束,可以直接在命令行中输入:
easy_install webob
这样就会自动下载安装。

简单使用:
>>> # 导入 Request 对象
>>> from webob import Request
>>> environ = {}
>>> # 使用 Request 来包装 environ 字典
>>> req = Request(environ)
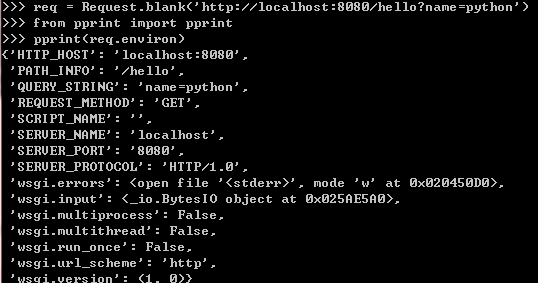
使用一个Request类来包装environ,然后通过Request对象的属性和方法对environ进行访问。由于
只有在一个web环境才能得到一个真实的environ字典,为了方便大家在shell中进行测试,webob提供
了一个模拟简单web请求的方法:

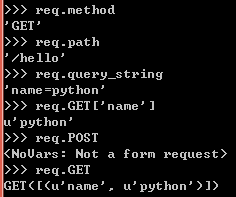
也可以通过req查找其它有用的信息

同时也可以通过webob模块中的Response对象来包装响应信息。

下面使用webob模块重写之前的hello_app
# -*- coding: utf-8 -*-
from wsgiref import simple_server
from webob import Request, Response
# 我们顺便增加了一个功能,就是根据用户在 URL 后面传递的参数
# 显示相应的内容
def hello_app(request):
content = []
# 获取 get 请求的参数
content.append('Hello %s'%request.GET['name'])
# 输出所有 environ 变量
for key, value in request.environ.items():
content.append('%s : %s' % (key, value))
response = Response(body='\n'.join(content))
response.headers['content-type'] = 'text/plain'
return response
# 对请求和响应进行包装
def wsgi_wrapper(environ, start_response):
request = Request(environ)
response = hello_app(request)
# response 对象本身也实现了与 wsgi 服务器之间通讯的协议,
# 所以可以帮我们处理与web服务器之间的交互。
# 这一句比较奇怪,对象使用括号是什么意思。。。。
return response(environ, start_response)
server = simple_server.make_server('localhost', 8080, wsgi_wrapper)
server.serve_forever()
为了让 wsgi_wrapper 更加通用一点,可以把它设计成装饰器的形式:
# -*- coding: utf-8 -*-
from wsgiref import simple_server
from webob import Request, Response
# 写成装饰器的 wsgi_wrapper
def wsgi_wrapper(func):
def new_func(environ, start_response):
request = Request(environ)
response = func(request)
return response(environ, start_response)
new_func.__name__ = func.__name__
new_func.__doc__ = func.__doc__
return new_func
# 应用程序
@wsgi_wrapper
def hello_app(request):
content = []
content.append('Hello %s'%request.GET['name'])
for key, value in request.environ.items():
content.append('%s : %s' % (key, value))
response = Response(body='\n'.join(content))
response.headers['content-type'] = 'text/plain'
return response
server = simple_server.make_server('localhost', 8080, hello_app)
server.serve_forever()
模板
果然,还是需要用到模板,不能总是直接在Response中写上长串的html代码。
python中的模板引擎主要有mako, genshi, jinjia等。
- mako 主要特点在于模板里面 可以比较方便的嵌入Python代码,而且执行效率一流;
- genshi 的特点在于基于 xml, 非常简单易懂的模板语法,对于热爱xhtml的朋友来说是很好的选择,
同时也可以嵌入Python 代码,实现一些复杂的展现逻辑;
- jinja 和 genshi 一样拥有很简单的模板语法,只是不 依赖于 xml 的格式,同样很适合设计人员直接进行模板的制作,
同时也可以嵌入Python 代码实现一些复杂的展现逻辑。
这里使用Mako,地址http://pypi.python.org/pypi/Mako,下载python setup.py install进行安装
简单的模块例子:
## -*- coding: utf-8 -*-
<html>
<head>
<title>简单mako模板</title>
</head>
<body>
<h5>Hello ${name}!</h5>
<ul>
% for key, value in data.items():
<li>
${key} - ${value}
<li>
% endfor
</ul>
</body>
</html>
保存为simple.html文件,然后需要给模板对象传递data和name两个参数,然后进行渲染,就可以输入html内容<html>
<head>
<title>简单mako模板</title>
</head>
<body>
<h5>Hello ${name}!</h5>
<ul>
% for key, value in data.items():
<li>
${key} - ${value}
<li>
% endfor
</ul>
</body>
</html>
# -*- coding: utf-8 -*-
# 导入模板对象
from mako.template import Template
# 使用模板文件名构造模板对象
tmpl = Template(filename='./simple.html', output_encoding='utf-8')
# 构造一个简单的字典填充模板,并print出来
print tmpl.render(name='python', data = {'a':1, 'b':2})
# 导入模板对象
from mako.template import Template
# 使用模板文件名构造模板对象
tmpl = Template(filename='./simple.html', output_encoding='utf-8')
# 构造一个简单的字典填充模板,并print出来
print tmpl.render(name='python', data = {'a':1, 'b':2})
保存为test_template.py文件,运行就可以输入内容:
$ python test_template.py
<html>
<head>
<title>简单mako模板</title>
</head>
<body>
<h5>Hello python!</h5>
<ul>
<li>
a - 1
<li>
<li>
b - 2
<li>
</ul>
</body>
</html>
<head>
<title>简单mako模板</title>
</head>
<body>
<h5>Hello python!</h5>
<ul>
<li>
a - 1
<li>
<li>
b - 2
<li>
</ul>
</body>
</html>
下面对hello_app程序进行重构:
1. 把 wsgi_wrapper 单独放到通用模块 utils.py:
# -*- coding: utf-8 -*-
from webob import Request
def wsgi_wrapper(func):
def new_func(environ, start_response):
request = Request(environ)
response = func(request)
return response(environ, start_response)
new_func.__name__ = func.__name__
new_func.__doc__ = func.__doc__
return new_func
2. 把 hello_app 给彻底独立出来,形成单独的模块 controller.py : from webob import Request
def wsgi_wrapper(func):
def new_func(environ, start_response):
request = Request(environ)
response = func(request)
return response(environ, start_response)
new_func.__name__ = func.__name__
new_func.__doc__ = func.__doc__
return new_func
# -*- coding: utf-8 -*-
from utils import wsgi_wrapper
from webob import Response
from mako import Template
# 整合了模板功能的 hello_app
@wsgi_wrapper
def hello_app(request):
tmpl = Template(filename='./simple.html', output_encoding='utf-8')
content = tmpl.render(name=request.GET['name'], data=request.environ)
return Response(body=content)
3. 这样 main.py 就变成这样了: from utils import wsgi_wrapper
from webob import Response
from mako import Template
# 整合了模板功能的 hello_app
@wsgi_wrapper
def hello_app(request):
tmpl = Template(filename='./simple.html', output_encoding='utf-8')
content = tmpl.render(name=request.GET['name'], data=request.environ)
return Response(body=content)
# -*- coding: utf-8 -*-
from wsgiref import simple_server
from controller import hello_app
server = simple_server.make_server('localhost', 8080, hello_app)
server.serve_forever()
from wsgiref import simple_server
from controller import hello_app
server = simple_server.make_server('localhost', 8080, hello_app)
server.serve_forever()
ORM(Object Relation Mapping, 对象关系映射)
终于也要这一步了,作为web应用,还是需要与数据库进行合作。这里使用sqlalchemy,是一个 ORM (对象-关系映射)库,提供Python对象与关系数据库之间的映射。和Django的models用法很像,也是可以通过python代码来创建数据库表,并进行操作。sqlalchemy 还可以自动映射 Python 对象的继承,可以实现eager loading、lazy loading, 可以直接将 Model 映射到自定
义的 SQL 语句,支持n多的数据库等等等等。 可以说 sqlalchemy 既有不输于 Hibernate 的强大功能,同时不失 Python
的简洁优雅。
使用方法:
# -*- coding: utf-8 -*-
from sqlalchemy import *
from sqlalchemy.orm import sessionmaker, scoped_session
from sqlalchemy.ext.declarative import declarative_base
# 创建数据库引擎,这里我们直接使用 Python2.5 自带的数据库引擎:sqlite,
# 直接在当前目录下建立名为 data.db 的数据库
engine = create_engine('sqlite:///data.db')
# sqlalchemy 中所有数据库操作都要由某个session来进行管理
# 关于 session 的详细信息请参考:http://www.sqlalchemy.org/docs/05/session.html
Session = scoped_session(sessionmaker(autocommit=False, autoflush=False, bind=engine))
Base = declarative_base()
class Dictionary(Base):
# Python 对象对应关系数据库的表名
__tablename__ = 't_dictionary'
# 定义自动,参数含义分别为:数据库字段名,字段类型,其他选项
key = Column('key', String(255), primary_key=True)
value = Column('value', String(255))
# 创建数据库
Base.metadata.create_all(engine)
session = Session()
for item in ['python','ruby','java']:
# 构造一个对象
dictionary = Dictionary(key=item, value=item.upper())
# 告诉 sqlalchemy ,将该对象加到数据库
session.add(dictionary)
# 提交session,在这里才真正执行数据库的操作,添加三条记录到数据库
session.commit()
# 查询数据库中Dictionary对象对应的数据
for dictionary in session.query(Dictionary):
print dictionary.key, dictionary.value
上面的代码你执行两遍就会报错,为什么。。。因为插入数据库的主键重复了。。。。
这样就可以整合到之前的controller.py文件中
# -*- coding: utf-8 -*-
from utils import wsgi_wrapper
from webob import Response
from mako.template import Template
# 导入公用的 model 模块
from model import Session, Dictionary
@wsgi_wrapper
def hello_app(request):
session = Session()
# 查询到所有 Dictionary 对象
dictionaries = session.query(Dictionary)
# 然后根据 Dictionary 对象的 key、value 属性把列表转换成一个字典
data = dict([(dictionary.key, dictionary.value) for dictionary in dictionaries])
tmpl = Template(filename='./simple.html', output_encoding='utf-8')
content = tmpl.render(name=request.GET['name'], data=data)
return Response(body=content)
URL分发控制
给不同的资源设计不同的 URL, 客户端请求这个 URL,web应用程序再根据用户请求的 URL 定位到具体功能并执行之。
提供一个干净的 URL 有很多好处:
1. 可读性,通过 URL 就可以大概了解其提供什么功能
2. 用户容易记住也方便直接输入
3.设计良好的 URL 一般都更短小精悍,对搜索引擎也 更友好
使用selector模块来处理url映射
下载地址http://pypi.python.org/pypi/selector, 下载那个source文件进行python setup.py install
首先把urls的配置单独放到urls.py中
# -*- coding: utf-8 -*-
from controller import hello_app
mappings = [('/hello/{name}', {'GET':hello_app})]
修改main.pyfrom controller import hello_app
mappings = [('/hello/{name}', {'GET':hello_app})]
# -*- coding: utf-8 -*-
from wsgiref import simple_server
from urls import mappings
from selector import Selector
# 构建 url 分发器
app = Selector(mappings)
server = simple_server.make_server('localhost', 8080, app)
server.serve_forever()
然后,在 hello_app 中就可以通过 environ['wsgiorg.routing_args'] 获取到 name 参数了, from wsgiref import simple_server
from urls import mappings
from selector import Selector
# 构建 url 分发器
app = Selector(mappings)
server = simple_server.make_server('localhost', 8080, app)
server.serve_forever()
不过在 wsgi_wrapper 其实还可以进一步简化 hello_app 的工作: 直接把解析得到的参数
当作函数参数传过去!修改 utils.py:
from webob import Request
def wsgi_wrapper(func):
def new_func(environ, start_response):
request = Request(environ)
position_args, keyword_args = environ.get('wsgiorg.routing_args', ((), {}))
response = func(request, *position_args, **keyword_args)
return response(environ, start_response)
new_func.__name__ = func.__name__
new_func.__doc__ = func.__doc__
return new_func
那 hello_app 就可以改成这样了: def wsgi_wrapper(func):
def new_func(environ, start_response):
request = Request(environ)
position_args, keyword_args = environ.get('wsgiorg.routing_args', ((), {}))
response = func(request, *position_args, **keyword_args)
return response(environ, start_response)
new_func.__name__ = func.__name__
new_func.__doc__ = func.__doc__
return new_func
...
@wsgi_wrapper
def hello_app(request, name=''):
...
content = tmpl.render(name=name, data=data)
return Response(body=content)
执行main.py,访问http://localhost:8080/hello/Python@wsgi_wrapper
def hello_app(request, name=''):
...
content = tmpl.render(name=name, data=data)
return Response(body=content)
总结
以上部分的实现,就是类似Django框架中的几个主要的功能模块,虽然感觉有点东拼西凑的,
但大体可以了解一个web框架需要的基本功能,不过要开发出一个成熟的web框架,还需要更多模块来
支持,比如Session管理,安全机制等等,感兴趣的话,可以阅读Django的源代码,去了解更加详细的
框架实现机制。
作者:btchenguang
本文版权归作者和博客园共有,欢迎转载,但未经作者同意必须保留此段声明,且在文章页面明显位置给出原文连接,否则保留追究法律责任的权利.


