
.Net实现深色模式窗口
深色模式窗口实现原理是遍历窗口的所有子控件,将子控件的字体颜色和背景色修改为深色模式,代码为:
public static void darkSubs(Control ui)
        {
            foreach (var obj in ui.Controls)
            {
                if (obj is Button btn)
                    dark(btn);
                else if (obj is TextBoxBase tx)
                    dark(tx);
                else if (obj is ListBox lb)
                    dark(lb);
                else if (obj is TreeView tr)
                    dark(tr);
                else if (obj is ListView lv)
                    dark(lv);
                else if (obj is ToolStrip tb)
                    dark(tb);
                else if (obj is PropertyGrid pg)
                    dark(pg);
                else if (obj is Panel panel)
                    darkSubs(panel);
                else if (obj is UserControl uc)
                    darkSubs(uc);
            }
        }
如果子窗口是Panel或者UserControl,则通过递归调用darkSubs,修改其子控件为深色模式。
对于普通控件,一般只需要修改字体颜色和背景色,即可实现深色模式,如TreeView:
public static void dark(TreeView ui)
        {
            ui.BackColor = CONTROL_BACK;
            ui.ForeColor = TEXT_FORE;
            ui.BorderStyle = FRAME_BORDER;
        }
对于ListView控件,当其处于Detail显示模式时,由于其表头Header不能直接修改背景颜色,需要自定义表头绘制方法:
public static void dark(ListView ui)
        {
            ui.BackColor = CONTROL_BACK;
            ui.ForeColor = TEXT_FORE;
            ui.BorderStyle = FRAME_BORDER;

            ui.OwnerDraw = true;
            ui.DrawItem += Ui_DrawItem;
            ui.DrawColumnHeader += ListView_DrawColumnHeader;
            ui.ColumnWidthChanged += ListView_ColumnWidthChanged;
            //ui.LostFocus += (s,e) => ui.autoSpan();
            ui.GotFocus += (s, e) => ui.autoSpan();
            ui.autoSpan();
        }

        private static void ListView_ColumnWidthChanged(object sender, ColumnWidthChangedEventArgs e)
        {
            var ui = sender as ListView;
            if (e.ColumnIndex == ui.Columns.Count - 1)
                return;
            var col = ui.Columns[ui.Columns.Count - 1];
            col.Width = -2;
        }

        private static void ListView_DrawColumnHeader(object sender, DrawListViewColumnHeaderEventArgs e)
        {
            //Fills one solid background for each cell.
            using (SolidBrush backBrush = new SolidBrush(FORM_BACK))
            {
                e.Graphics.FillRectangle(backBrush, e.Bounds);
            }
            //Draw the borders for the header around each cell.
            using (Pen backBrush = new Pen(CONTROL_BACK))
            {
                e.Graphics.DrawRectangle(backBrush, e.Bounds);
            }
            using (SolidBrush foreBrush = new SolidBrush(TEXT_FORE))
            {
                //Since e.Header.TextAlign returns 'HorizontalAlignment' with values of (Right, Center, Left).
                //DrawString uses 'StringAlignment' with values of (Near, Center, Far).
                //We must translate these and setup a vertical alignment that doesn't exist in DrawListViewColumnHeaderEventArgs.
                StringFormat stringFormat = GetStringFormat(e.Header.TextAlign);

                //Do some padding, since these draws right up next to the border for Left/Near.  Will need to change this if you use Right/Far
                Rectangle rect = e.Bounds; rect.X += 2;
                // e.Graphics.DrawString(e.Header.Text, e.Font, foreBrush, rect, stringFormat);
                e.Graphics.DrawString(e.Header.Text, e.Font, foreBrush, rect, stringFormat);
            }
        }

        private static StringFormat GetStringFormat(HorizontalAlignment ha)
        {
            StringAlignment align;

            switch (ha)
            {
                case HorizontalAlignment.Right:
                    align = StringAlignment.Far;
                    break;
                case HorizontalAlignment.Center:
                    align = StringAlignment.Center;
                    break;
                default:
                    align = StringAlignment.Near;
                    break;
            }

            return new StringFormat()
            {
                Alignment = align,
                LineAlignment = StringAlignment.Center
            };
        }

        private static void Ui_DrawItem(object sender, DrawListViewItemEventArgs e)
        {
            e.DrawDefault = true;
        }
对于Form的标题栏,也无法通过属性直接设置背景颜色,但是在Win10及以上版本的最新补丁中,有OS Api可以修改窗口标题栏颜色模式,所以直接调用OS Api实现:
[DllImport("DwmApi")]
        private static extern int DwmSetWindowAttribute(IntPtr hwnd, int attr, int[] attrValue, int attrSize);

        public static void setDarkTitle(Form form)
        {
            IntPtr hwnd = form.Handle;
            //DwmSetWindowAttribute(hwnd, 19, new[] { 1 }, 4);
            //DwmSetWindowAttribute(hwnd, 20, new[] { 1 }, 4);
            if (DwmSetWindowAttribute(hwnd, 19, new[] { 1 }, 4) != 0)
                DwmSetWindowAttribute(hwnd, 20, new[] { 1 }, 4);
        }
为了方便应用调用,通过C#的静态扩展方法的方式,封装Form的扩展方法:
public static T dark<T>(this T form) where T : Form
        {
            setDarkTitle(form);
            form.BackColor = FORM_BACK;
            form.ForeColor = TEXT_FORE;

            darkSubs(form);

            return form;
        }
应用程序只要简单调用dark方法,即可实现窗口的深色模式显示:
var myForm = new MyForm().dark();
myForm.Show();
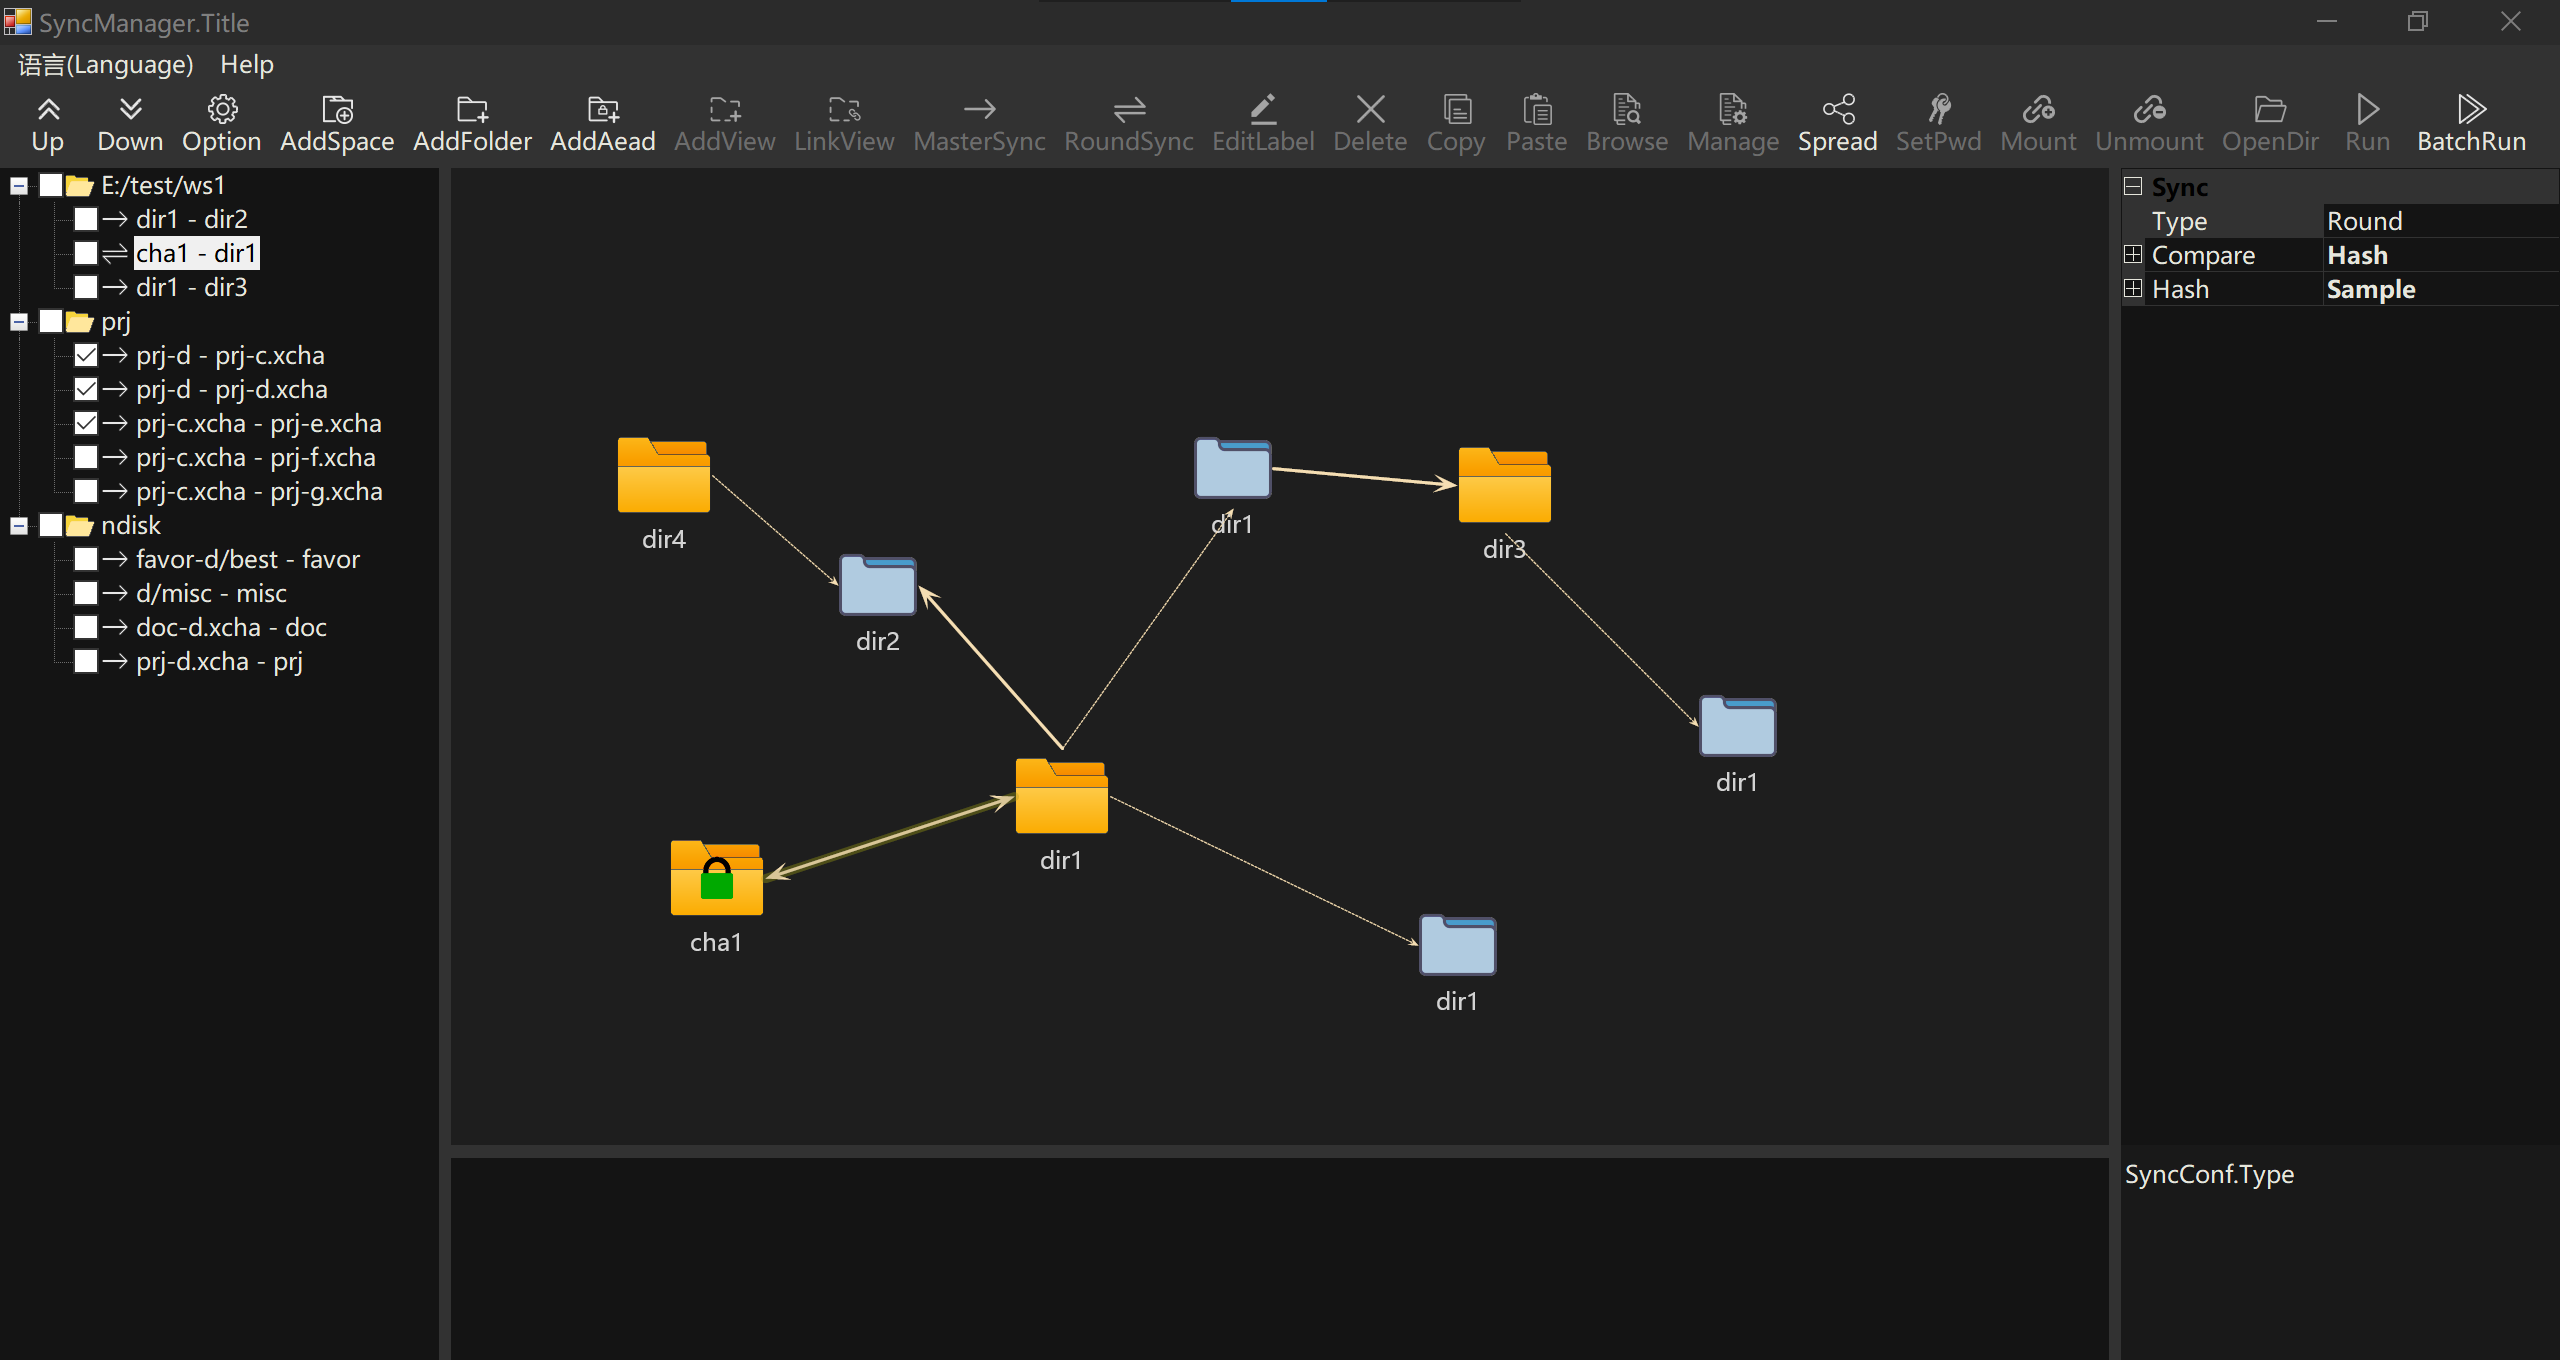
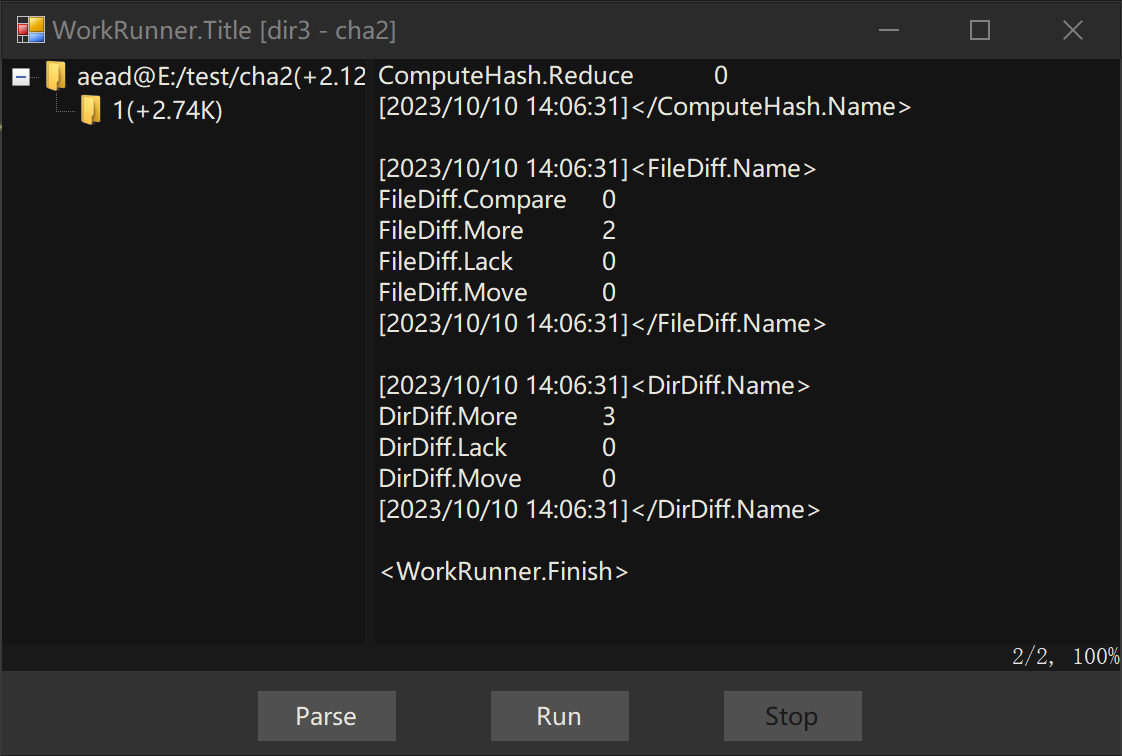
深色模式效果图如下:
完整代码:


using System;
using System.Collections.Generic;
using System.Drawing;
using System.Linq;
using System.Runtime.InteropServices;
using System.Text;
using System.Threading.Tasks;
using System.Windows.Forms;

namespace util.ext
{
    public static class DarkFormEx
    {
        public static Color FORM_BACK = Color.FromArgb(50, 50, 50);
        public static Color TEXT_FORE = Color.FromArgb(230, 230, 220);
        public static Color CONTROL_BACK = Color.FromArgb(20, 20, 20);
        public static Color BUTTON_BACK = Color.FromArgb(80, 80, 80);
        public static Color BUTTON_BORDER = Color.FromArgb(50, 50, 50);
        public static BorderStyle FRAME_BORDER = BorderStyle.None;

        public static T dark<T>(this T form) where T : Form
        {
            setDarkTitle(form);
            form.BackColor = FORM_BACK;
            form.ForeColor = TEXT_FORE;

            darkSubs(form);

            return form;
        }

        public static void darkSubs(Control ui)
        {
            foreach (var obj in ui.Controls)
            {
                if (obj is Button btn)
                    dark(btn);
                else if (obj is TextBoxBase tx)
                    dark(tx);
                else if (obj is ListBox lb)
                    dark(lb);
                else if (obj is TreeView tr)
                    dark(tr);
                else if (obj is ListView lv)
                    dark(lv);
                else if (obj is ToolStrip tb)
                    dark(tb);
                else if (obj is PropertyGrid pg)
                    dark(pg);
                else if (obj is Panel panel)
                    darkSubs(panel);
                else if (obj is UserControl uc)
                    darkSubs(uc);
            }
        }

        public static void dark(this UserControl ui)
        {
            ui.BackColor = FORM_BACK;
            ui.ForeColor = TEXT_FORE;

            darkSubs(ui);
        }

        public static void dark(PropertyGrid ui)
        {
            ui.ViewBackColor = CONTROL_BACK;
            ui.ViewBorderColor = CONTROL_BACK;
            ui.ViewForeColor = TEXT_FORE;
            ui.LineColor = FORM_BACK;
            ui.CanShowVisualStyleGlyphs = false;
            ui.CategorySplitterColor = CONTROL_BACK;
        }

        public static void dark(ToolStrip ui)
        {
            ui.BackColor = FORM_BACK;
            ui.ForeColor = TEXT_FORE;
            foreach (var obj in ui.Items)
            {
                if (obj is ToolStripTextBox tx)
                {
                    tx.BackColor = CONTROL_BACK;
                    tx.ForeColor = TEXT_FORE;
                    tx.BorderStyle = BorderStyle.FixedSingle;
                }
            }
        }

        public static void dark(TreeView ui)
        {
            ui.BackColor = CONTROL_BACK;
            ui.ForeColor = TEXT_FORE;
            ui.BorderStyle = FRAME_BORDER;
        }

        public static void dark(ListView ui)
        {
            ui.BackColor = CONTROL_BACK;
            ui.ForeColor = TEXT_FORE;
            ui.BorderStyle = FRAME_BORDER;

            ui.OwnerDraw = true;
            ui.DrawItem += Ui_DrawItem;
            ui.DrawColumnHeader += ListView_DrawColumnHeader;
            ui.ColumnWidthChanged += ListView_ColumnWidthChanged;
            //ui.LostFocus += (s,e) => ui.autoSpan();
            ui.GotFocus += (s, e) => ui.autoSpan();
            ui.autoSpan();
        }

        private static void ListView_ColumnWidthChanged(object sender, ColumnWidthChangedEventArgs e)
        {
            var ui = sender as ListView;
            if (e.ColumnIndex == ui.Columns.Count - 1)
                return;
            var col = ui.Columns[ui.Columns.Count - 1];
            col.Width = -2;
        }

        private static void ListView_DrawColumnHeader(object sender, DrawListViewColumnHeaderEventArgs e)
        {
            //Fills one solid background for each cell.
            using (SolidBrush backBrush = new SolidBrush(FORM_BACK))
            {
                e.Graphics.FillRectangle(backBrush, e.Bounds);
            }
            //Draw the borders for the header around each cell.
            using (Pen backBrush = new Pen(CONTROL_BACK))
            {
                e.Graphics.DrawRectangle(backBrush, e.Bounds);
            }
            using (SolidBrush foreBrush = new SolidBrush(TEXT_FORE))
            {
                //Since e.Header.TextAlign returns 'HorizontalAlignment' with values of (Right, Center, Left).
                //DrawString uses 'StringAlignment' with values of (Near, Center, Far).
                //We must translate these and setup a vertical alignment that doesn't exist in DrawListViewColumnHeaderEventArgs.
                StringFormat stringFormat = GetStringFormat(e.Header.TextAlign);

                //Do some padding, since these draws right up next to the border for Left/Near.  Will need to change this if you use Right/Far
                Rectangle rect = e.Bounds; rect.X += 2;
                // e.Graphics.DrawString(e.Header.Text, e.Font, foreBrush, rect, stringFormat);
                e.Graphics.DrawString(e.Header.Text, e.Font, foreBrush, rect, stringFormat);
            }
        }

        private static StringFormat GetStringFormat(HorizontalAlignment ha)
        {
            StringAlignment align;

            switch (ha)
            {
                case HorizontalAlignment.Right:
                    align = StringAlignment.Far;
                    break;
                case HorizontalAlignment.Center:
                    align = StringAlignment.Center;
                    break;
                default:
                    align = StringAlignment.Near;
                    break;
            }

            return new StringFormat()
            {
                Alignment = align,
                LineAlignment = StringAlignment.Center
            };
        }

        private static void Ui_DrawItem(object sender, DrawListViewItemEventArgs e)
        {
            e.DrawDefault = true;
        }

        public static void dark(Button ui)
        {
            ui.BackColor = BUTTON_BACK;
            ui.FlatStyle = FlatStyle.Flat;
            ui.FlatAppearance.BorderColor = BUTTON_BORDER;
        }

        public static void dark(ListBox ui)
        {
            ui.BackColor = CONTROL_BACK;
            ui.ForeColor = TEXT_FORE;
            ui.BorderStyle = FRAME_BORDER;
        }

        public static void dark(TextBoxBase ui)
        {
            if (ui.ReadOnly)
                ui.BackColor = FORM_BACK;
            else
                ui.BackColor = CONTROL_BACK;
            ui.ForeColor = TEXT_FORE;

            if (ui.Multiline)
            {
                ui.BorderStyle = FRAME_BORDER;
            }
            else if (ui.BorderStyle != BorderStyle.None)
            {
                //ui.MinimumSize = new Size(0, ui.Size.Height);
                ui.BorderStyle = BorderStyle.FixedSingle;
            }
        }

        [DllImport("DwmApi")]
        private static extern int DwmSetWindowAttribute(IntPtr hwnd, int attr, int[] attrValue, int attrSize);

        public static void setDarkTitle(Form form)
        {
            IntPtr hwnd = form.Handle;
            //DwmSetWindowAttribute(hwnd, 19, new[] { 1 }, 4);
            //DwmSetWindowAttribute(hwnd, 20, new[] { 1 }, 4);
            if (DwmSetWindowAttribute(hwnd, 19, new[] { 1 }, 4) != 0)
                DwmSetWindowAttribute(hwnd, 20, new[] { 1 }, 4);
        }
    }
}
Github代码链接:https://github.com/bsmith-zhao/vfs/blob/main/util/ext/DarkFormEx.cs

 浙公网安备 33010602011771号