N63050第十七周运维作业
第十七周
就业和全程班本周学习内容:
第三十三天:
nginx的负载均衡和反向代理
1nginx的rewrite模块详解
2nginx的rewrite模块和防盗链
3nginx实现http反向代理
4nginx反向代理和缓存功能
5nginx实现反向代理的客户端IP地址透传
6nginx反向代理负载均衡及调度算法
第三十四天:
keepalived高可用实现
1nginx的四层代理负载均衡
2nginx实现LNMP的wordpress应用
3nginx实现LNMP的kod云盘实现
4nginx的openresty编译安装和内核优化
5高可用性解决方案
6keepalived架构和VRRP的VIP主从架构
7keepalived实现VRRP的VIP主主架构
就业和全程班第十七周作业:
1、nginx负载均衡中常见的算法及原理有哪些?
反向代理负载均衡算法:
hash KEY [consistent];
#基于指定请求报文中首部字段或者URI等key做hash计算,使用consistent参数,将使用ketama一致性hash算法,适用于后端是Cache服务器(如varnish)时使用,consistent定义使用一致性hash运算,一致性hash基于取模运算


hash $request_uri consistent; #基于用户请求的uri做hash

hash $cookie_sessionid  #基于cookie中的sessionid这个key进行hash调度,实现会话绑定

ip_hash;
#源地址hash调度方法,基于的客户端的remote_addr(源地址IPv4的前24位或整个IPv6地址)做hash计算,以实现会话保持

least_conn;
#最少连接调度算法,优先将客户端请求调度到当前连接最少的后端服务器,相当于LVS中的WLC
2、使用rewrite规则实现将所有到a域名的访问rewrite到b域名
定义子conf路径
[root@centos8 ~]#vim /apps/nginx/conf/nginx.conf

http {
    include       mime.types;
    include /apps/nginx/conf/conf.d/*.conf;
#最后一行为子conf路径

[root@centos8 ~]#cat /apps/nginx/conf/conf.d/pc.conf
server {
  listen 80;
  server_name www.magedu.org;
  location / {
    root /data/nginx/html/pc;
    rewrite / http://www.jd.com redirect;
  }
}

#ubuntu测试
[root@ubuntu1804 ~]#curl -I www.magedu.org
HTTP/1.1 302 Moved Temporarily
Server: nginx/1.18.0
Date: Thu, 02 Mar 2023 14:25:44 GMT
Content-Type: text/html
Content-Length: 145
Connection: keep-alive
Location: http://www.jd.com
3、实现反向代理客户端IP透传
3.1参数解释
反向代理配置参数
proxy_pass;
#用来设置将客户端请求转发给的后端服务器的主机,可以是主机名(将转发至后端服务做为主机头首部)、IP地址:端口的方式
#也可以代理到预先设置的主机群组,需要模块ngx_http_upstream_module支持

proxy_hide_header field;
#用于nginx作为反向代理的时候,在返回给客户端http响应时,隐藏后端服务器相应头部的信息,可以设置在http,server或location块
proxy_hide_header ETag;
#隐藏后端服务器ETag首部字段

proxy_set_header;
#可更改或添加客户端的请求头部信息内容并转发至后端服务器,比如在后端服务器想要获取客户端的真实IP的时候,就要更改每一个报文的头部

#proxy_set_header X-Forwarded-For $proxy_add_x_forwarded_for;
#添加客户端IP和反向代理服务器IP到请求报文头部

“X-Forwarded-For”客户端请求标头字段,$remote_addr附加变量,用逗号分隔。
如果客户端请求标头中不存在“X-Forwarded-For”字段,
则该$proxy_add_x_forwarded_for变量等于该$remote_addr变量。

proxy_set_header X-Real-IP $remote_addr;
#添加HOST到报文头部,如果客户端为NAT上网那么其值为客户端的共用的公网IP地址,常用于在日之中记录客户端的真实IP地址。

#在后端httpd服务器修改配置,添加日志记录X-Forwarded-For字段
LogFormat "%h %l %u %t \"%r\" %>s %b \"%{Referer}i\" \"%{User-Agent}i\" \"%{X-Forwarded-For}i\"" combined
反向代理缓存配置参数
proxy_cache zone_name | off; 默认off
#指明调用的缓存,或关闭缓存机制;Context:http, server, location
#zone_name 表示缓存的名称.需要由proxy_cache_path事先定义

proxy_cache_key string;
#缓存中用于“键”的内容,默认值:proxy_cache_key $scheme$proxy_host$request_uri;

proxy_cache_valid [code ...] time;
#定义对特定响应码的响应内容的缓存时长,定义在http{...}中

proxy_cache_path;
#设置缓存的路径和其他参数。缓存数据存储在文件中。

#在http配置定义缓存信息
#定义缓存保存路径,proxycache会自动创建
proxy_cache_path /data/nginx/proxycache

levels=1:2:2
#定义缓存目录结构层次,1:2:2可以生成2^4x2^8x2^8=2^20=1048576个目录

keys_zone=proxycache:20m
#指内存中缓存的大小,主要用于存放key和metadata(如:使用次数),一般1M可存放8000个左右的key

inactive=120s
#缓存有效时间

max_size=1g;
#最大磁盘占用空间,磁盘存入文件内容的缓存空间最大值

proxy_cache_key $request_uri;
#对指定的数据进行MD5的运算做为缓存的key

proxy_cache_key $scheme$proxy_host$uri$is_args$args;
#默认情况下,指令的值接近字符串

proxy_cache proxycache;
#调用缓存功能,需要定义在相应的配置段,如server{...};或者location等

proxy_cache_valid 200 302 301 10m;
#指定的状态码返回的数据缓存多长时间

proxy_cache_valid any 1m;
#除指定的状态码返回的数据以外的缓存多长时间,必须设置,否则不会缓存
响应报文头部配置参数
add_header X-Via $server_addr;
#当前nginx主机的IP

add_header X-Cache $upstream_cache_status;
#是否缓存命中

add_header X-Accel $server_name;
#客户访问的FQDN
3.2 多级代理实现ip透传

3.2.1反向代理配置参数
proxy_pass;
#用来设置将客户端请求转发给的后端服务器的主机,可以是主机名(将转发至后端服务做为主机头首部)、IP地址:端口的方式
#也可以代理到预先设置的主机群组,需要模块ngx_http_upstream_module支持

proxy_hide_header field;
#用于nginx作为反向代理的时候,在返回给客户端http响应时,隐藏后端服务器相应头部的信息,可以设置在http,server或location块
proxy_hide_header ETag;
#隐藏后端服务器ETag首部字段

proxy_set_header;
#可更改或添加客户端的请求头部信息内容并转发至后端服务器,比如在后端服务器想要获取客户端的真实IP的时候,就要更改每一个报文的头部

#proxy_set_header X-Forwarded-For $proxy_add_x_forwarded_for;
#添加客户端IP和反向代理服务器IP到请求报文头部

“X-Forwarded-For”客户端请求标头字段,$remote_addr附加变量,用逗号分隔。
如果客户端请求标头中不存在“X-Forwarded-For”字段,
则该$proxy_add_x_forwarded_for变量等于该$remote_addr变量。

proxy_set_header X-Real-IP $remote_addr;
#添加HOST到报文头部,如果客户端为NAT上网那么其值为客户端的共用的公网IP地址,常用于在日之中记录客户端的真实IP地址。

#在后端httpd服务器修改配置,添加日志记录X-Forwarded-For字段
LogFormat "%h %l %u %t \"%r\" %>s %b \"%{Referer}i\" \"%{User-Agent}i\" \"%{X-Forwarded-For}i\"" combined
3.2.2反向代理缓存配置参数
proxy_cache zone_name | off; 默认off
#指明调用的缓存,或关闭缓存机制;Context:http, server, location
#zone_name 表示缓存的名称.需要由proxy_cache_path事先定义

proxy_cache_key string;
#缓存中用于“键”的内容,默认值:proxy_cache_key $scheme$proxy_host$request_uri;

proxy_cache_valid [code ...] time;
#定义对特定响应码的响应内容的缓存时长,定义在http{...}中

proxy_cache_path;
#设置缓存的路径和其他参数。缓存数据存储在文件中。

#在http配置定义缓存信息
#定义缓存保存路径,proxycache会自动创建
proxy_cache_path /data/nginx/proxycache

levels=1:2:2
#定义缓存目录结构层次,1:2:2可以生成2^4x2^8x2^8=2^20=1048576个目录

keys_zone=proxycache:20m
#指内存中缓存的大小,主要用于存放key和metadata(如:使用次数),一般1M可存放8000个左右的key

inactive=120s
#缓存有效时间

max_size=1g;
#最大磁盘占用空间,磁盘存入文件内容的缓存空间最大值

proxy_cache_key $request_uri;
#对指定的数据进行MD5的运算做为缓存的key

proxy_cache_key $scheme$proxy_host$uri$is_args$args;
#默认情况下,指令的值接近字符串

proxy_cache proxycache;
#调用缓存功能,需要定义在相应的配置段,如server{...};或者location等

proxy_cache_valid 200 302 301 10m;
#指定的状态码返回的数据缓存多长时间

proxy_cache_valid any 1m;
#除指定的状态码返回的数据以外的缓存多长时间,必须设置,否则不会缓存
3.2.3相应报文头部配置参数
add_header X-Via $server_addr;
#当前nginx主机的IP

add_header X-Cache $upstream_cache_status;
#是否缓存命中

add_header X-Accel $server_name;
#客户访问的FQDN
3.2.4环境准备
client :10.0.0.7 测试
nginx1 :10.0.0.8 X-Forwarded-For:client ip
nginx2 :10.0.0.18 X-Forwarded-For:client ip
httpd :10.0.0.28 X-Forwarded-For:client ip,nginx1
3.2.5第一个代理服务器
[root@nginx1 ~]#vim /apps/nginx/conf/nginx.conf
http {
    proxy_cache_path /data/nginx/proxycache levels=1:1:1 keys_zone=proxycache:20m inactive=120s max_size=1g;
    log_format  main  '$remote_addr - $remote_user [$time_local] "$request" '
                      '$status $body_bytes_sent "$http_referer" '
                      '"$http_user_agent" "$http_x_forwarded_for"';

    access_log  logs/access.log  main;

[root@nginx1 ~]#vim /apps/nginx/conf/conf.d/pc.conf
server {
  listen 80;
  server_name www.magedu.org;
  root /data/nginx/html/pc;
  location /api {
        index index.html;
        proxy_pass http://10.0.0.18;
        proxy_set_header X-Forwarded-For $proxy_add_x_forwarded_for;
        }
}
[root@nginx1 ~]#mkdir /data/nginx
3.2.6第二个代理服务器
[root@nginx2 ~]#vim /apps/nginx/conf/nginx.conf
http {
    proxy_cache_path /data/nginx/proxycache levels=1:1:1 keys_zone=proxycache:20m inactive=120s max_size=1g;
    log_format  main  '$remote_addr - $remote_user [$time_local] "$request" '
                      '$status $body_bytes_sent "$http_referer" '
                      '"$http_user_agent" "$http_x_forwarded_for"';

    access_log  logs/access.log  main;

server {
		listen 80;
        server_name  www.magedu.org;
        location / {
                proxy_pass http://10.0.0.28;
                proxy_set_header X-Forwarded-For $proxy_add_x_forwarded_for;
        }
[root@nginx2 ~]#mkdir /data/nginx
3.2.7查看日志
[root@nginx1 ~]#tail -f /apps/nginx/logs/access.log
10.0.0.100 - - [25/Apr/2022:14:54:06 +0800] "GET /index.html HTTP/1.1" 200 10 "-" "curl/7.58.0" "-"

[root@nginx2 ~]#tail -f /apps/nginx/logs/access.log
10.0.0.8 - - [25/Apr/2022:14:54:06 +0800] "GET /index.html HTTP/1.0" 200 10 "-" "curl/7.58.0" "10.0.0.100"
3.2.8后端服务器配置日志格式
[root@centos28 html]# vim /etc/httpd/conf/httpd.conf
LogFormat "%h %l %u %t \"%r\" %>s %b \"%{Referer}i\" \"%{User-Agent}i\" \"%{x-Forwarded-For}i\"" combined
CustomLog "logs/access_log" common
3.2.9实现ip透传
[root@centos28 html]# tail -f /var/log/httpd/access_log
10.0.0.18 - - [25/Apr/2022:15:00:08 +0800] "GET /index.html HTTP/1.0" 200 10 "-" "curl/7.58.0" "10.0.0.100, 10.0.0.8"
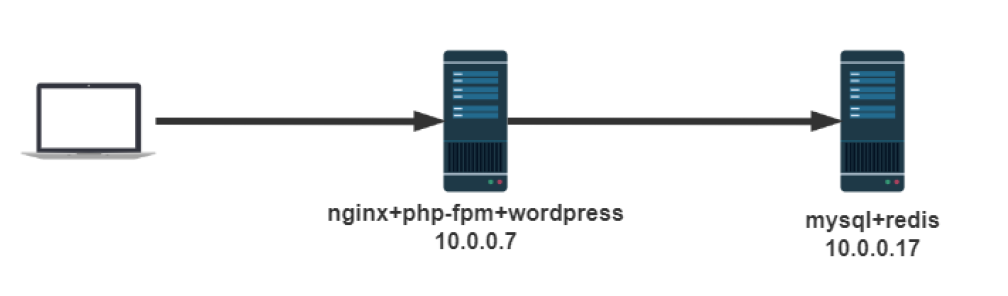
4、利用LNMP实现wordpress站点搭建
LNMP项目实战环境说明
L:Linux(CentOS7)https://mirrors.aliyun.com/centos/7/isos/x86_64/
N:Nginx(1.18.0) https://nginx.org/en/download.html
M:MySQL(8.0.19) https://dev.mysql.com/downloads/mysql/
P:PHP(7.4.10) http://php.net/downloads.php
Wordpress(5.4.2):https://cn.wordpress.org/download/
#部署规划:
10.0.0.7:Nginx php-fpm 运行web服务
10.0.0.17:运行MySQL数据库,Redis服务
4.1二进制部署mysql数据库( 10.0.0.17 )
[root@back ~]#ll
total 473716
-rw-------. 1 root root      1579 Feb 21 13:40 anaconda-ks.cfg
-rw-r--r--  1 root root      2409 Mar 11 23:32 install_mysql5.7or8.0_for_centos.sh
-rw-r--r--  1 root root 485074552 Sep  1  2021 mysql-8.0.19-linux-glibc2.12-x86_64.tar.xz
[root@back ~]#cat install_mysql5.7or8.0_for_centos.sh

. /etc/init.d/functions
SRC_DIR=`pwd`
MYSQL='mysql-8.0.19-linux-glibc2.12-x86_64.tar.xz'
COLOR='echo -e \E[01;31m'
END='\E[0m'
MYSQL_ROOT_PASSWORD=magedu


check (){

if [ $UID -ne 0 ]; then
  action "当前用户不是root,安装失败" false
  exit 1
fi

cd  $SRC_DIR
if [ !  -e $MYSQL ];then
        $COLOR"缺少${MYSQL}文件"$END
		$COLOR"请将相关软件放在${SRC_DIR}目录下"$END
        exit
elif [ -e /usr/local/mysql ];then
        action "数据库已存在,安装失败" false
        exit
else
	return
fi
}

install_mysql(){
    $COLOR"开始安装MySQL数据库..."$END
	yum  -y -q install libaio numactl-libs   libaio &> /dev/null
    cd $SRC_DIR
    tar xf $MYSQL -C /usr/local/
    MYSQL_DIR=`echo $MYSQL| sed -nr 's/^(.*[0-9]).*/\1/p'`
    ln -s  /usr/local/$MYSQL_DIR /usr/local/mysql
    chown -R  root.root /usr/local/mysql/
    id mysql &> /dev/null || { useradd -s /sbin/nologin -r  mysql ; action "创建mysql用户"; }

    echo 'PATH=/usr/local/mysql/bin/:$PATH' > /etc/profile.d/mysql.sh
    .  /etc/profile.d/mysql.sh
	ln -s /usr/local/mysql/bin/* /usr/bin/
    cat > /etc/my.cnf <<-EOF
[mysqld]
server-id=1
log-bin
datadir=/data/mysql
socket=/data/mysql/mysql.sock
log-error=/data/mysql/mysql.log
pid-file=/data/mysql/mysql.pid
[client]
socket=/data/mysql/mysql.sock
EOF
    mysqld --initialize --user=mysql --datadir=/data/mysql
    cp /usr/local/mysql/support-files/mysql.server  /etc/init.d/mysqld
    chkconfig --add mysqld
    chkconfig mysqld on
    service mysqld start
    [ $? -ne 0 ] && { $COLOR"数据库启动失败,退出!"$END;exit; }
    MYSQL_OLDPASSWORD=`awk '/A temporary password/{print $NF}' /data/mysql/mysql.log`
    mysqladmin  -uroot -p$MYSQL_OLDPASSWORD password $MYSQL_ROOT_PASSWORD &>/dev/null
    action "数据库安装完成"
}


check

install_mysql
运行脚本安装数据库
[root@back ~]#bash install_mysql5.7or8.0_for_centos.sh
开始安装MySQL数据库...
创建mysql用户                                              [  OK  ]
Starting MySQL. SUCCESS!
数据库安装完成                                             [  OK  ]
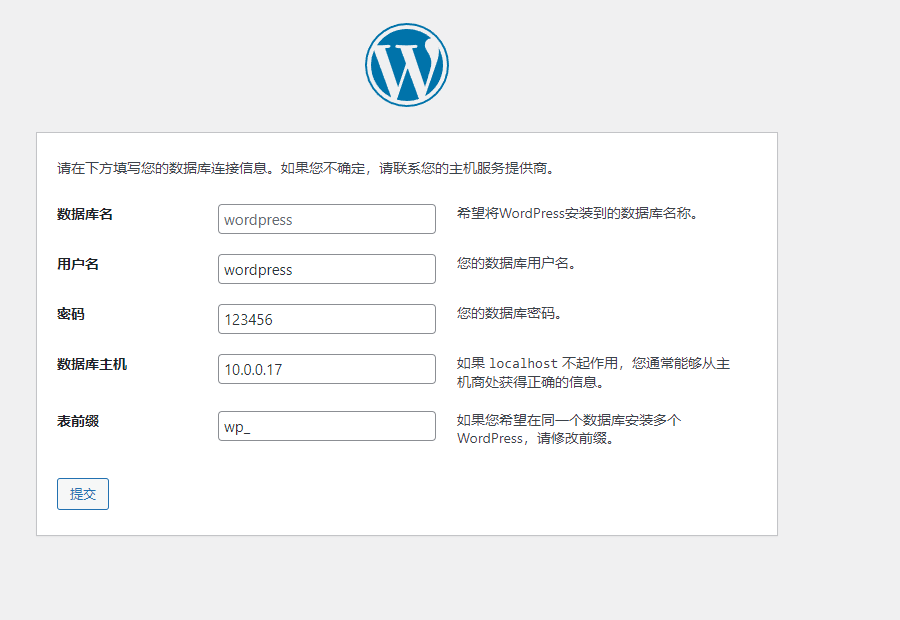
4.2创建wordpress数据库和用户并授权
[root@back ~]#mysql -uroot -pmagedu
[root@centos7 ~]#mysql -uroot -pmagedu
mysql: [Warning] Using a password on the command line interface can be insecure.
Welcome to the MySQL monitor. Commands end with ; or \g.
Your MySQL connection id is 9
Server version: 8.0.19 MySQL Community Server - GPL
Copyright (c) 2000, 2020, Oracle and/or its affiliates. All rights reserved.
Oracle is a registered trademark of Oracle Corporation and/or its
affiliates. Other names may be trademarks of their respective
owners.
Type 'help;' or '\h' for help. Type '\c' to clear the current input statement.
mysql> create database wordpress;
Query OK, 1 row affected (0.01 sec)
mysql> create user wordpress@'10.0.0.%' identified by '123456';
Query OK, 0 rows affected (0.01 sec)
mysql> grant all on wordpress.* to wordpress@'10.0.0.%';
Query OK, 0 rows affected (0.01 sec)
4.3验证MYSQL账户权限
在WordPress服务器10.0.0.7使用授权的MySQL账户远程登录测试权限
[root@wordpress ~]#mysql -uwordpress -p123456 -h10.0.0.17
mysql: [Warning] Using a password on the command line interface can be insecure.
Welcome to the MySQL monitor.  Commands end with ; or \g.
Your MySQL connection id is 10
Server version: 8.0.19 MySQL Community Server - GPL

Copyright (c) 2000, 2020, Oracle and/or its affiliates. All rights reserved.

Oracle is a registered trademark of Oracle Corporation and/or its
affiliates. Other names may be trademarks of their respective
owners.

Type 'help;' or '\h' for help. Type '\c' to clear the current input statement.

mysql> show databases;
+--------------------+
| Database           |
+--------------------+
| information_schema |
| wordpress          |
+--------------------+
2 rows in set (0.01 sec)
4.4部署PHP
- 在10.0.0.7主机上部署php-fpm服务
4.4.1 编译安装php
[root@wordpress]#
yum install -y gcc openssl-devel libxml2-devel bzip2-devel libmcrypt-devel sqlite-devel oniguruma-devel
[root@wordpress]# cd /usr/local/src
wget https://www.php.net/distributions/php-7.4.19.tar.xz
[root@wordpress]# tar -xf php-7.4.19.tar.xz
[root@wordpress]# cd php-7.4.19
./configure --prefix=/apps/php74 --enable-mysqlnd --with-mysqli=mysqlnd --with-pdo-mysql=mysqlnd --with-openssl --with-zlib --with-config-file-path=/etc --with-config-file-scan-dir=/etc/php.d --enable-mbstring --enable-xml --enable-sockets --enable-fpm --enable-maintainer-zts --disable-fileinfo
[root@wordpress php-7.4.19]# make -j 8 && make install
4.4.2准备php配置文件
[root@wordpress php-7.4.19]#cp /usr/local/src/php-7.4.19/php.ini-production /etc/php.ini
[root@wordpress php-7.4.19]#cd /apps/php74/etc
[root@wordpress etc]#cp php-fpm.conf.default php-fpm.conf
[root@wordpress etc]#ls
php-fpm.conf  php-fpm.conf.default  php-fpm.d
[root@wordpress etc]#cd php-fpm.d
[root@wordpress php-fpm.d]#cp www.conf.default www.conf
[root@wordpress php-fpm.d]#vim www.conf
[root@wordpress php-fpm.d]#grep '^[^;]' www.conf
[www]
user = www
group = www
listen = 127.0.0.1:9000
pm = dynamic
pm.max_children = 5
pm.start_servers = 2
pm.min_spare_servers = 1
pm.max_spare_servers = 3
pm.status_path = /pm_status
ping.path = /ping
access.log = log/$pool.access.log
slowlog = log/$pool.log.slow

#创建账户
[root@wordpress php-fpm.d]#useradd -r -s /sbin/nologin www
#创建访问日志文件路径
[root@wordpress php-fpm.d]#mkdir /apps/php74/log
4.4.3启动并验证php服务
[root@wordpress php-fpm.d]#/apps/php74/sbin/php-fpm -t
[12-Mar-2023 23:19:35] NOTICE: configuration file /apps/php74/etc/php-fpm.conf test is successful

[root@wordpress php-fpm.d]#cp /usr/local/src/php-7.4.19/sapi/fpm/php-fpm.service /usr/lib/systemd/system/
[root@wordpress php-fpm.d]#systemctl daemon-reload
[root@wordpress php-fpm.d]#systemctl enable --now php-fpm
Created symlink from /etc/systemd/system/multi-user.target.wants/php-fpm.service to /usr/lib/systemd/system/php-fpm.service.
[root@wordpress php-fpm.d]#ss -ntl
State      Recv-Q Send-Q                                      Local Address:Port                                                      Peer Address:Port
LISTEN     0      128                                              127.0.0.1:9000                                                                 *:*
LISTEN     0      128                                                      *:22                                                                   *:*
LISTEN     0      100                                              127.0.0.1:25                                                                   *:*
LISTEN     0      70                                                    [::]:33060                                                             [::]:*
LISTEN     0      128                                                   [::]:3306                                                              [::]:*
LISTEN     0      128                                                   [::]:22                                                                [::]:*
LISTEN     0      100                                                  [::1]:25                                                                [::]:*
[root@wordpress php-fpm.d]#systemctl status php-fpm
● php-fpm.service - The PHP FastCGI Process Manager
   Loaded: loaded (/usr/lib/systemd/system/php-fpm.service; enabled; vendor preset: disabled)
   Active: active (running) since Sun 2023-03-12 23:20:54 CST; 4min 24s ago
 Main PID: 11671 (php-fpm)
   CGroup: /system.slice/php-fpm.service
           ├─11671 php-fpm: master process (/apps/php74/etc/php-fpm.conf)
           ├─11672 php-fpm: pool www
           └─11673 php-fpm: pool www

Mar 12 23:20:54 wordpress systemd[1]: Started The PHP FastCGI Process Manager.
[root@wordpress php-fpm.d]#pstree -p |grep php
           |-php-fpm(11671)-+-php-fpm(11672)
           |                `-php-fpm(11673)
[root@wordpress php-fpm.d]#ps -ef |grep php
root      11671      1  0 23:20 ?        00:00:00 php-fpm: master process (/apps/php74/etc/php-fpm.conf)
www       11672  11671  0 23:20 ?        00:00:00 php-fpm: pool www
www       11673  11671  0 23:20 ?        00:00:00 php-fpm: pool www
root      11706   2196  0 23:26 pts/4    00:00:00 grep --color=auto php
4.5部署ngingx
在10.0.0.7主机部署nginx服务
4.5.1 编译安装 nginx
[root@wordpress ~]#yum -y install gcc pcre-devel openssl-devel zlib-devel
[root@wordpress ~]#cd /usr/local/src/
[root@wordpress src]#wget http://nginx.org/download/nginx-1.18.0.tar.gz
[root@wordpress src]#ls
nginx-1.18.0.tar.gz  php-7.4.19  php-7.4.19.tar.xz
[root@wordpress src]#tar xf nginx-1.18.0.tar.gz
[root@wordpress src]#cd nginx-1.18.0
[root@wordpress nginx-1.18.0]#./configure --prefix=/apps/nginx \
--user=www \
--group=www \
--with-http_ssl_module \
--with-http_v2_module \
--with-http_realip_module \
--with-http_stub_status_module \
--with-http_gzip_static_module \
--with-pcre \
--with-stream \
--with-stream_ssl_module \
--with-stream_realip_module
[root@wordpress nginx-1.18.0]#make && make install
4.5.2准备服务文件并启动 nginx
[root@wordpress ~]#vim /usr/lib/systemd/system/nginx.service
[Unit]
Description=nginx - high performance web server
Documentation=http://nginx.org/en/docs/
After=network-online.target remote-fs.target nss-lookup.target
Wants=network-online.target

[Service]
Type=forking
PIDFILE=/apps/nginx/run/nginx.pid
ExecStart=/apps/nginx/sbin/nginx -c /apps/nginx/conf/nginx.conf
ExecReload=/bin/kill -s HUP $MAINPID
ExecStop=/bin/kill -s TERM $MAINPID

[Install]
WantedBy=multi-user.target


[root@wordpress ~]#mkdir /apps/nginx/run/
#修改配置文件
[root@wordpress ~]#vim /apps/nginx/conf/nginx.conf
pid /apps/nginx/run/nginx.pid;

[root@wordpress ~]#systemctl daemon-reload
[root@wordpress ~]#systemctl enable --now nginx
Created symlink from /etc/systemd/system/multi-user.target.wants/nginx.service to /usr/lib/systemd/system/nginx.service.
[root@wordpress ~]#systemctl status nginx
● nginx.service - nginx - high performance web server
   Loaded: loaded (/usr/lib/systemd/system/nginx.service; enabled; vendor preset: disabled)
   Active: active (running) since Sun 2023-03-12 23:42:30 CST; 7s ago
     Docs: http://nginx.org/en/docs/
  Process: 14755 ExecStart=/apps/nginx/sbin/nginx -c /apps/nginx/conf/nginx.conf (code=exited, status=0/SUCCESS)
 Main PID: 14756 (nginx)
   CGroup: /system.slice/nginx.service
           ├─14756 nginx: master process /apps/nginx/sbin/nginx -c /apps/nginx/conf/nginx.conf
           └─14757 nginx: worker process
4.5.3配置nginx支持fastcgi
[root@wordpress ~]#grep -Ev '#|^$' /apps/nginx/conf/nginx.conf
worker_processes  1;
pid        /apps/nginx/run/nginx.pid;
events {
    worker_connections  1024;
}
http {
    include       mime.types;
    default_type  application/octet-stream;
    sendfile        on;
    keepalive_timeout  65;
    server {
        listen       80;
        server_name  www.magedu.org;
        location / {
            root   /data/nginx/wordpress;
            index  index.php index.html index.htm;
        }
        error_page   500 502 503 504  /50x.html;
        location = /50x.html {
            root   html;
        }
        location ~ \.php$ {
            root           /data/nginx/wordpress;
            fastcgi_pass   127.0.0.1:9000;
            fastcgi_index  index.php;
            fastcgi_param  SCRIPT_FILENAME  $document_root$fastcgi_script_name;
            include        fastcgi_params;
        }
	location ~^/(ping|pm_status)$ {
	    include fastcgi_params;
	    fastcgi_pass 127.0.0.1:9000;
	    fastcgi_param PATH_TRANSLATED $document_root$fastcgi_script_name;
	    }
    }
}

#直接能引用以上配置文件

[root@wordpress ~]#nginx -t
nginx: the configuration file /apps/nginx/conf/nginx.conf syntax is ok
nginx: configuration file /apps/nginx/conf/nginx.conf test is successful
[root@wordpress ~]#systemctl reload nginx
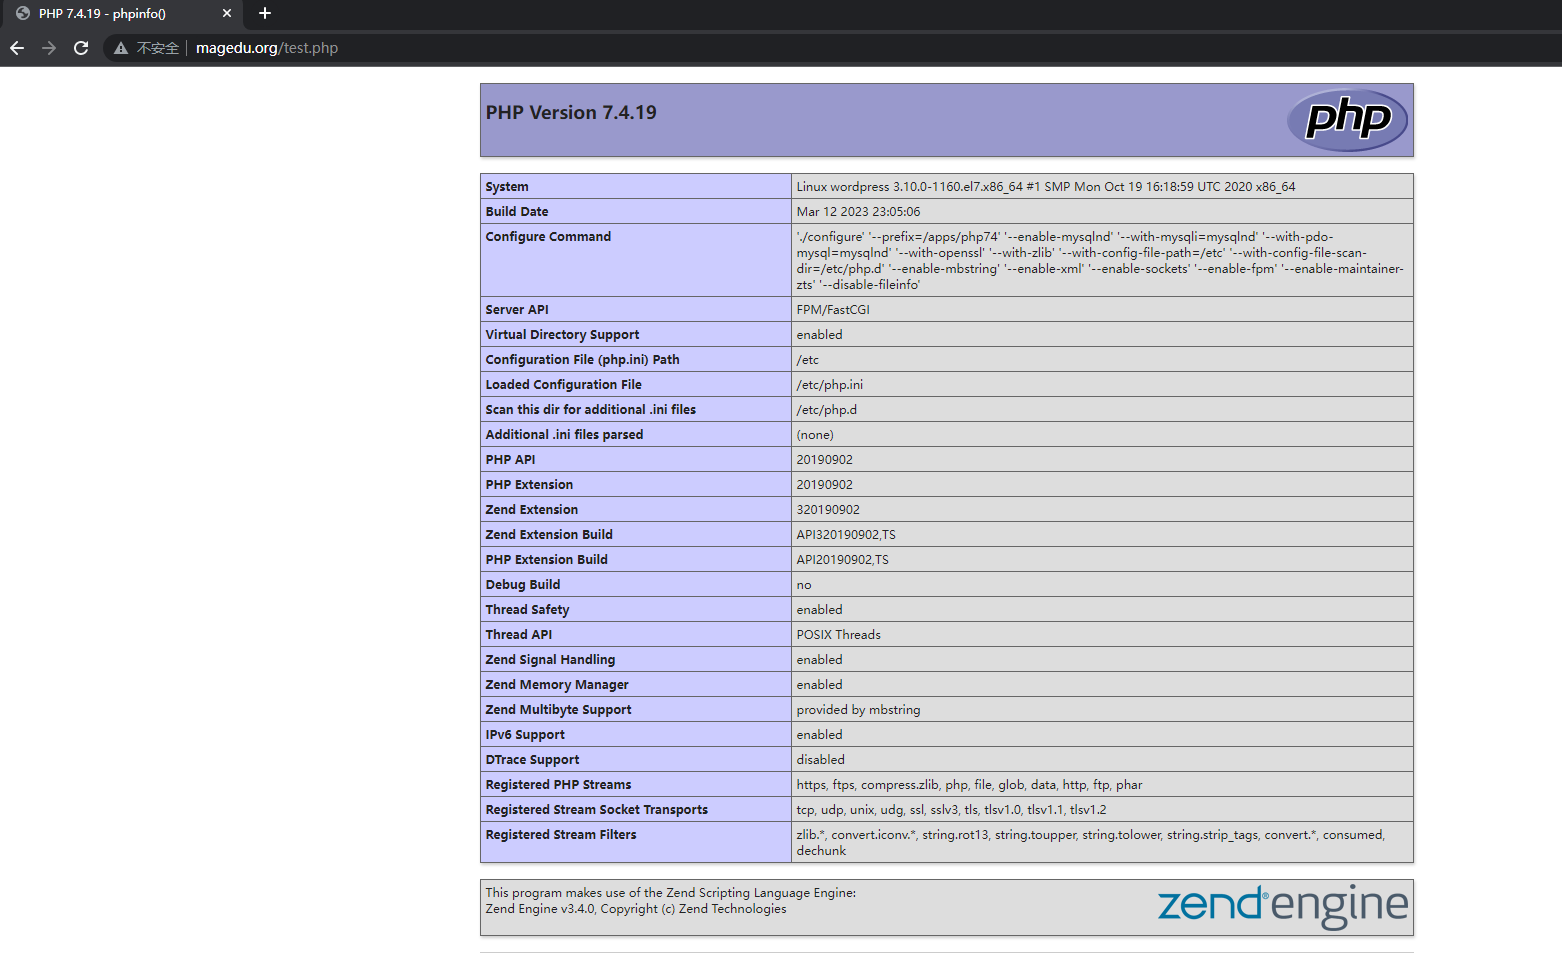
4.5.4准备php测试页面
[root@wordpress ~]#mkdir -p /data/nginx/wordpress
[root@wordpress ~]#vim /data/nginx/wordpress/test.php
[root@wordpress ~]#cat /data/nginx/wordpress/test.php
<?php phpinfo(); ?>
4.5.5 验证php测试页


4.6部署 WordPress
4.6.1准备 WordPress 文件
[root@wordpress ~]#ls
anaconda-ks.cfg  install_mysql5.7or8.0_for_centos.sh  mysql-8.0.19-linux-glibc2.12-x86_64.tar.xz  wordpress  wordpress-6.1.1-zh_CN.zip
[root@wordpress ~]#cp -r wordpress/* /data/nginx/wordpress
[root@wordpress ~]#chown -R www.www /data/nginx/wordpress
4.6.2初始化web页面
打开浏览器访问下面链接
www.magedu.org
配置win 的hosts文件

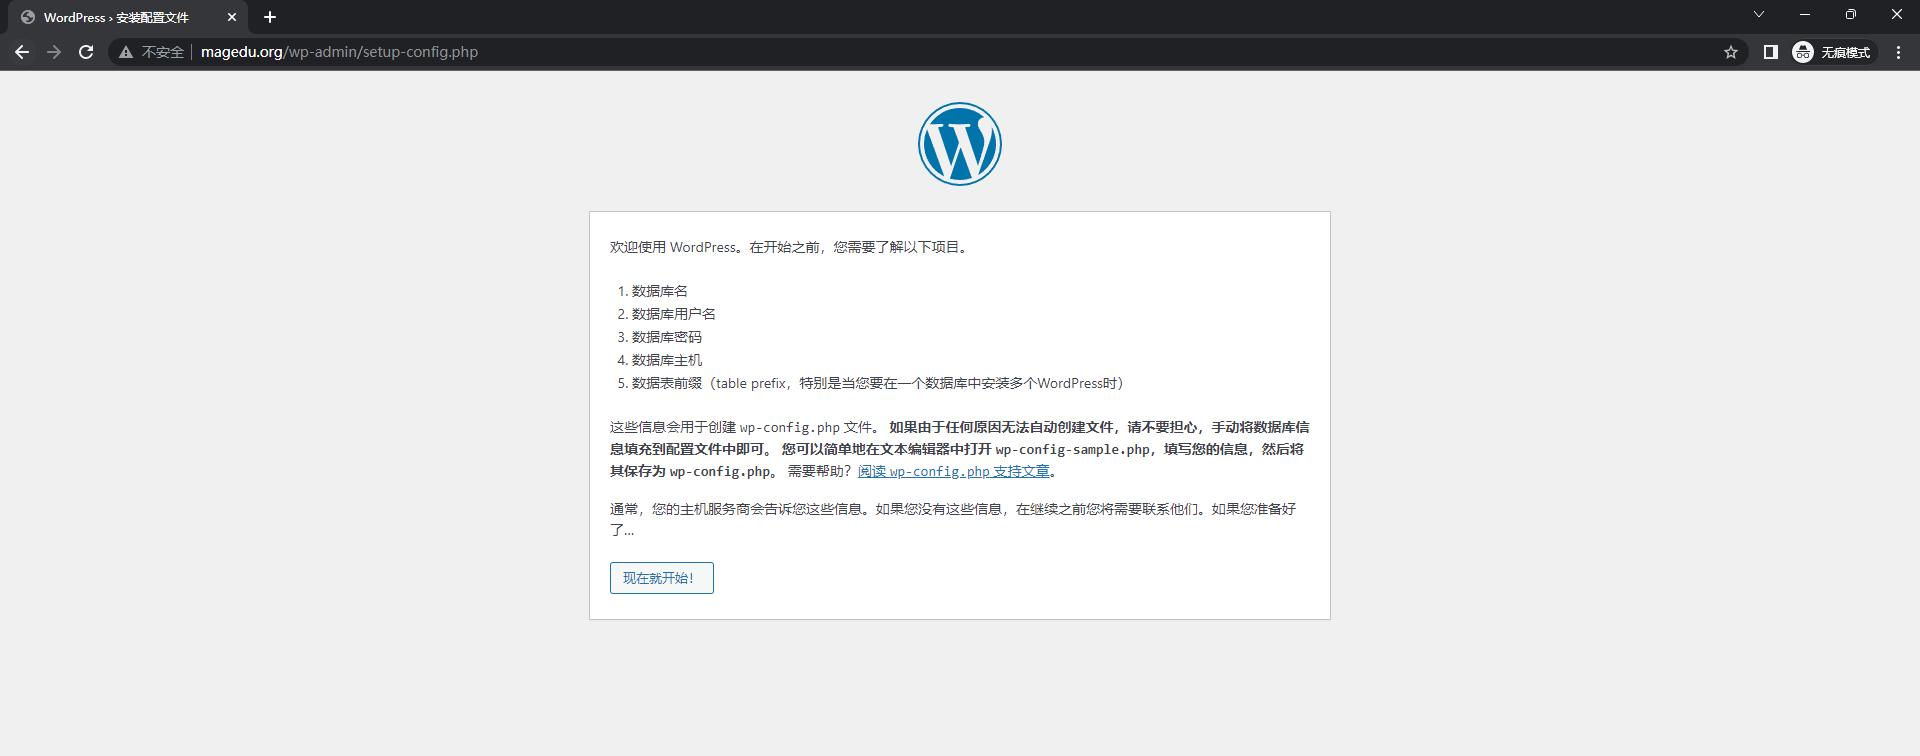
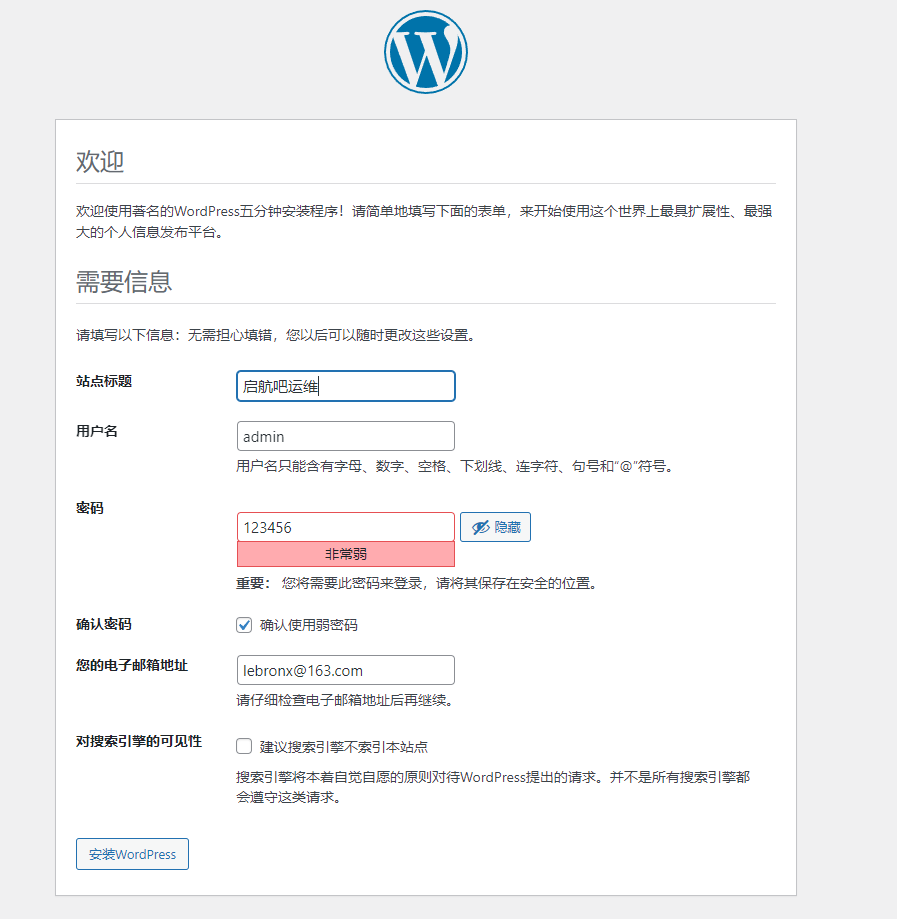

发表文章
4.6.3 配置允许上传大文件
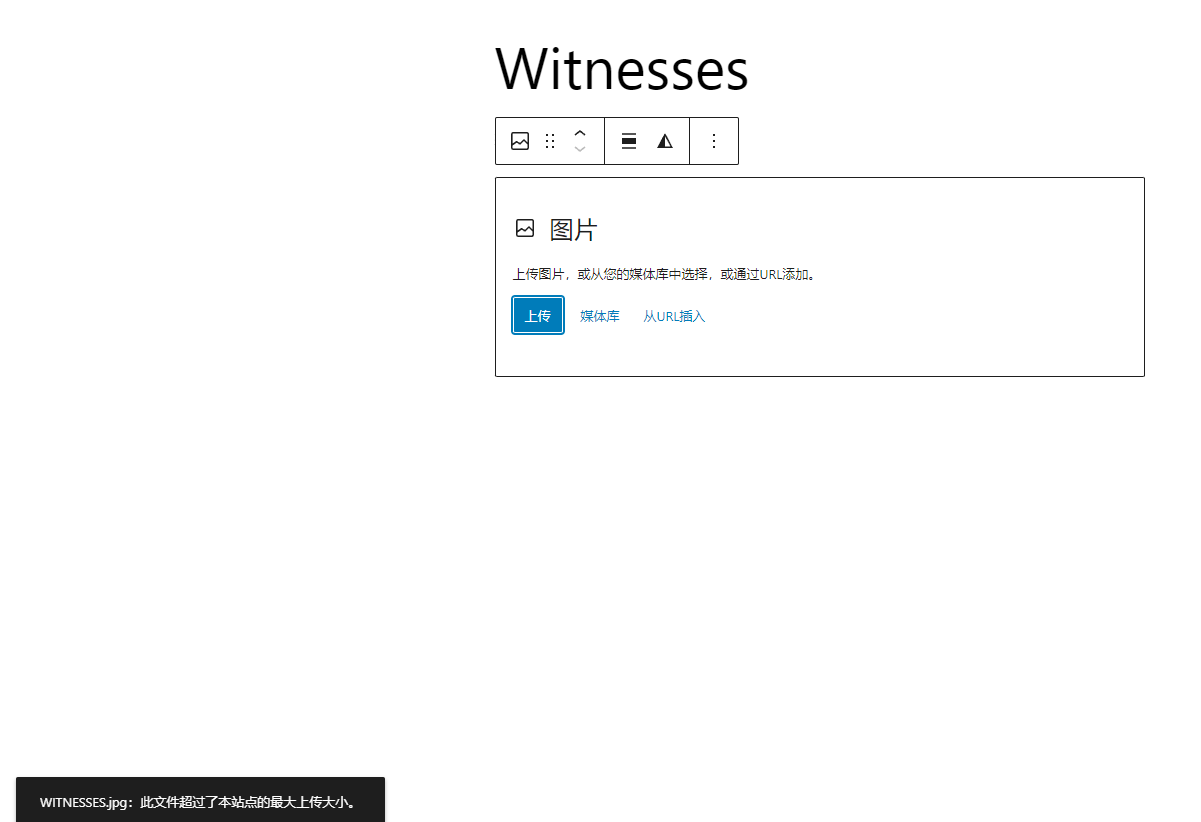
注意:默认只支持1M以下文件上传,要利用php程序上传大图片,还需要修改下面三项配置,最大上传由三项值
的最小值决定
#直接上传大于1M文件,会出现下面413错误
[root@wordpress ~]#tail -f /apps/nginx/logs/access.log
10.0.0.1 - - [27/Nov/2020:12:21:16 +0800] "POST /wp-admin/async-upload.php
HTTP/1.1" 413 585 "http://10.0.0.7/wp-admin/upload.php" "Mozilla/5.0 (Windows NT
10.0; Win64; x64) AppleWebKit/537.36 (KHTML, like Gecko) Chrome/87.0.4280.67
Safari/537.36 Edg/87.0.664.47"
#nginx上传文件大小限制
[root@wordpress ~]#vim /apps/nginx/conf/nginx.conf
server {
client_max_body_size 10m; #默认值为1M
.....
#php上传文件大小限制
[root@wordpress ~]#vim /etc/php.ini
post_max_size = 30M #默认值为8M
upload_max_filesize = 20M #默认值为2M
[root@wordpress ~]#systemctl restart nginx php-fpm

4.6.4安全加固

vim /apps/nginx/conf/nginx.conf
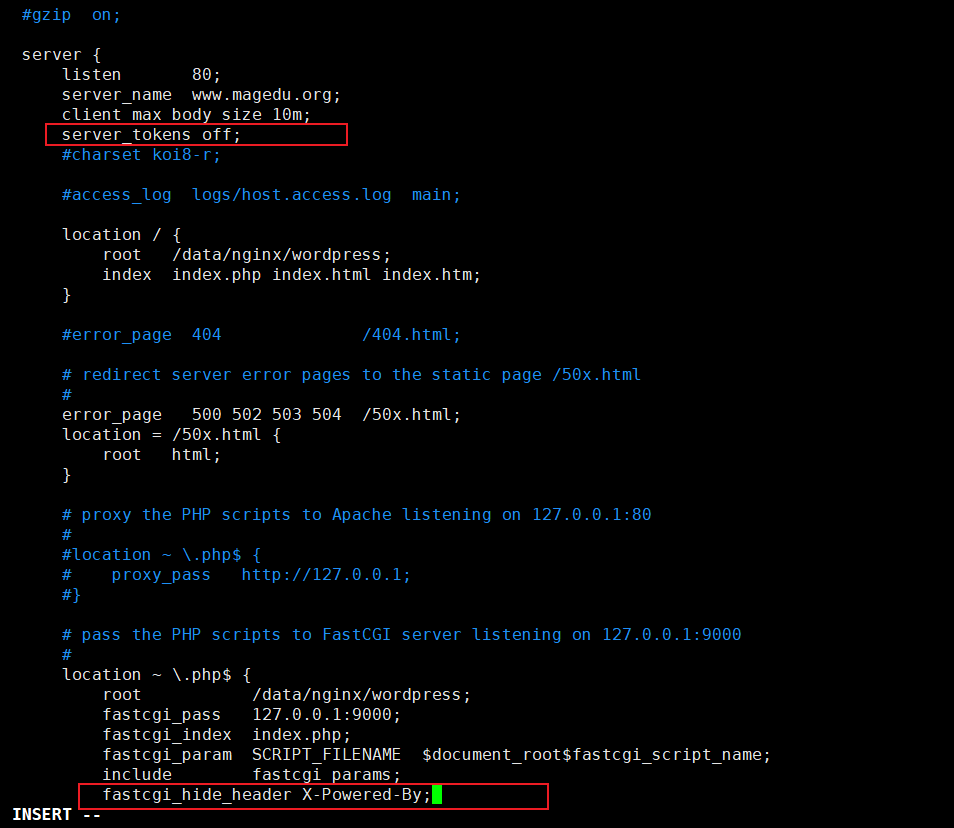
#重启服务systemctl reload nginx
4.6.5配置 php 开启 opcache 加速
在10.0.0.7主机进行以下修改配置
#编辑php.ini配置文件
[root@wordpress ~]#vim /etc/php.ini
[opcache]
; Determines if Zend OPCache is enabled
zend_extension=opcache.so
opcache.enable=1
.....
[root@centos7 ~]#systemctl restart php-fpm
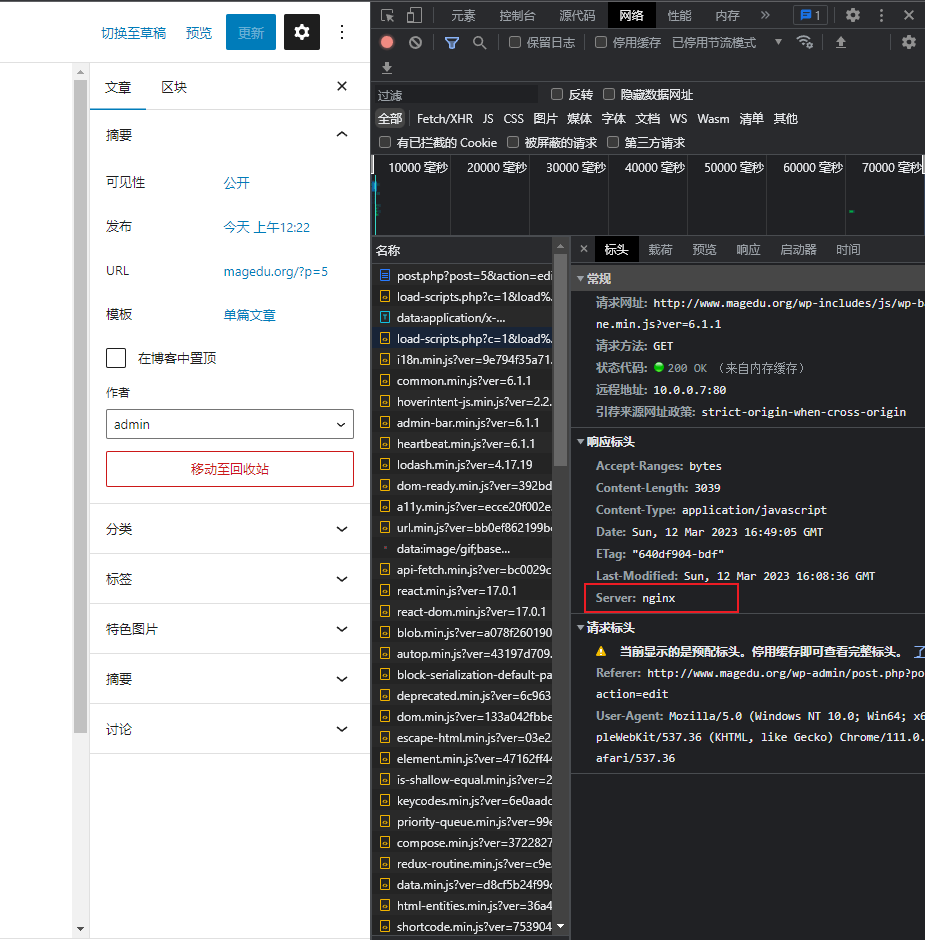
#访问测试页确认开启opcache加速


 浙公网安备 33010602011771号