python opencv轮廓检测
引用网址:https://blog.csdn.net/Mr_Nobody17/article/details/119995281
0.边缘和轮廓
边缘检测能够检测出边缘,但是边缘是不连续的。
将边缘连接成一个整体,构成轮廓。
1.图像轮廓检测中注意的问题
对象是二值图像,所以需要进行闽值分割。
在Opencv中,背景必须是黑色的,对象必须是白色的。
因为自动从黑色背景中找白色的轮廓。
2.cv2.findContours()函数
(1)函数接口
cv.findContours(
image,
mode,
method[, contours[, hierarchy[, offset]]]
)
-> image, contours, hierarchy
(2)参数说明
Parameters
image 寻找轮廓的图像
mode
数表示轮廓的检索模式,有四种(本文介绍的都是新的cv2接口):
cv2.RETR_EXTERNAL表示只检测外轮廓
cv2.RETR_LIST检测的轮廓不建立等级关系
cv2.RETR_CCOMP建立两个等级的轮廓,上面的一层为外边界,里面的一层为内孔的边界信息。如果内孔内还有一个连通物体,这个物体的边界也在顶层。
cv2.RETR_TREE建立一个等级树结构的轮廓。
method
轮廓的近似办法:
cv2.CHAIN_APPROX_NONE存储所有的轮廓点,相邻的两个点的像素位置差不超过1,即max(abs(x1-x2),abs(y2-y1))==1
cv2.CHAIN_APPROX_SIMPLE压缩水平方向,垂直方向,对角线方向的元素,只保留该方向的终点坐标,例如一个矩形轮廓只需4个点来保存轮廓信息
cv2.CHAIN_APPROX_TC89_L1,CV_CHAIN_APPROX_TC89_KCOS使用teh-Chinl chain 近似算法
(3)返回值说明
image 图像
contours 返回一个list,list中每个元素都是图像中的一个轮廓,用numpy中的ndarray表示。
hierarchy 每条轮廓对应的属性
参考:
OpenCV: Structural Analysis and Shape Descriptors
3.cv2.drawContours()函数
(1)函数接口
cv.drawContours(
image,
contours,
contourIdx,
color[, thickness[, lineType[, hierarchy[, maxLevel[, offset]]]]]
)
-> image
(2)参数说明
image 指明在哪幅图像上绘制轮廓
contours 轮廓本身,在Python中是一个list。
contourIdx 指定绘制轮廓list中的哪条轮廓,如果是-1,则绘制其中的所有轮廓。后面的参数很简单。其中thickness表明轮廓线的宽度,如果是-1(cv2.FILLED),则为填充模式。
color Color of the contours.
thickness Thickness of lines the contours are drawn with. If it is negative (for example, thickness=FILLED ), the contour interiors are drawn.
lineType Line connectivity. See LineTypes
hierarchy Optional information about hierarchy. It is only needed if you want to draw only some of the contours (see maxLevel ).
maxLevel Maximal level for drawn contours. If it is 0, only the specified contour is drawn. If it is 1, the function draws the contour(s) and all the nested contours. If it is 2, the function draws the contours, all the nested contours, all the nested-to-nested contours, and so on. This parameter is only taken into account when there is hierarchy available.
offset Optional contour shift parameter. Shift all the drawn contours by the specified offset=(dx,dy) .
参考:
OpenCV: Drawing Functions
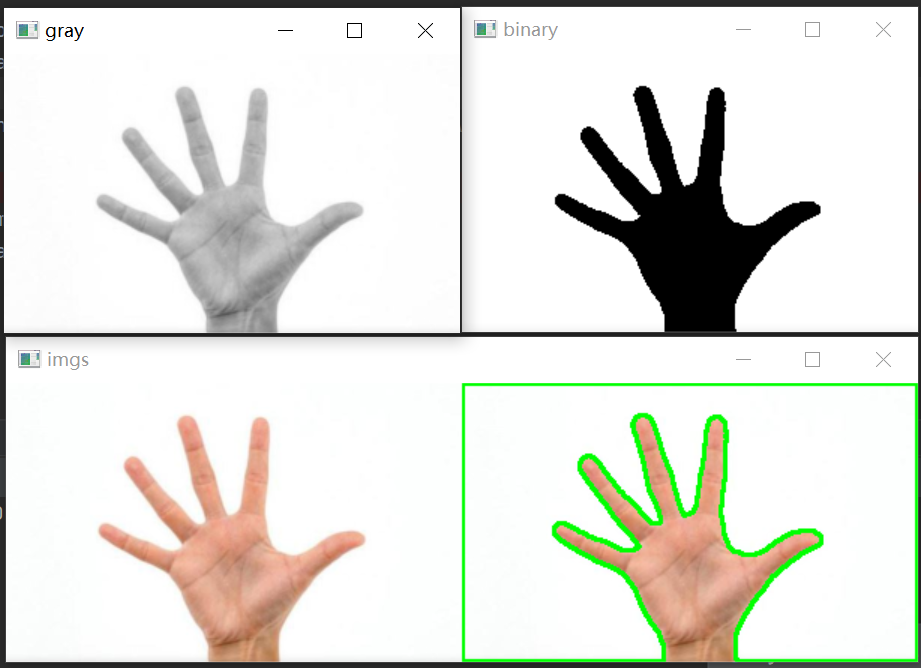
4.代码测试
import cv2
import numpy as np
# 获取照片
img=cv2.imread(r"C:\Users\Nobody\Desktop\Hand.JPG",1)
# 缩放
img1=cv2.resize(img,None,fx=0.5,fy=0.5)
# 获取灰度照片
gray=cv2.cvtColor(img1,cv2.COLOR_BGR2GRAY)
cv2.imshow('gray',gray)
# 获取二值照片
ret,binary = cv2.threshold(gray,210,255,cv2.THRESH_BINARY)
cv2.imshow('binary',binary)
# 获取轮廓
contours,hie=cv2.findContours(binary,cv2.RETR_TREE,cv2.CHAIN_APPROX_NONE)
# 画出轮廓
draw_img=img1.copy()
cv2.drawContours(draw_img,contours,-1,(0,255,0),2)
imgs=np.hstack([img1,draw_img])
cv2.imshow('imgs',imgs)
cv2.waitKey()
结果输出:
import cv2
import numpy as np
# 获取照片
img=cv2.imread(r"C:\Users\Nobody\Desktop\pic1.png",1)
# 缩放
img1=cv2.resize(img,None,fx=0.5,fy=0.5)
# 获取灰度照片
gray=cv2.cvtColor(img1,cv2.COLOR_BGR2GRAY)
cv2.imshow('gray',gray)
# 获取二值照片
ret,binary = cv2.threshold(gray,80,255,cv2.THRESH_BINARY)
cv2.imshow('binary',binary)
# 获取轮廓
contours,hie=cv2.findContours(binary,cv2.RETR_TREE,cv2.CHAIN_APPROX_NONE)
# 画出轮廓
draw_img=img1.copy()
cv2.drawContours(draw_img,contours,-1,(0,255,0),2)
imgs=np.hstack([img1,draw_img])
cv2.imshow('imgs',imgs)
cv2.waitKey()
参考:
OpenCV-Python教程(11、轮廓检测)_sunny2038的专栏-CSDN博客_轮廓检测
Python-OpenCV中的图像轮廓检测 - chenzhen0530 - 博客园
————————————————
版权声明:本文为CSDN博主「Mr_Nobody17」的原创文章,遵循CC 4.0 BY-SA版权协议,转载请附上原文出处链接及本声明。
原文链接:https://blog.csdn.net/Mr_Nobody17/article/details/119995281

 浙公网安备 33010602011771号