Appium+Python3+iOS真机环境搭建 (转载并更新)
Appium 是一个自动化测试开源工具,支持 iOS 平台和 Android 平台上的原生应用,web 应用和混合应用。
本次环境配置相关:
macOS:10.12 (Sirerra) -> 10.14.3 (Mojave)
Appium-desktop:1.10.0.dmg
Xcode:8 -> 10.1
一、环境升级
说明:原来系统 mac os Sierra (10.12) 按照环境配置(二)运行时,提示系统版本过低,Xcode版本过低。
1. 升级 Mac OS,链接:https://support.apple.com/zh-cn/macos/high-sierra (选择了最新的 Mojave)
2. 升级 Xcode,APP Store 选择最新版本更新。
二、环境配置
1、 安装homebrew:
$ /usr/bin/ruby -e "$(curl -fsSL https://raw.githubusercontent.com/Homebrew/install/master/install)"
2、 安装libimobiledevice:
$ brew install libimobiledevice --HEAD
Requested 'libusbmuxd >= 1.1.0' but version of libusbmuxd is 1.0.10解决办法
brew uninstall --ignore-dependencies usbmuxd
brew install --HEAD usbmuxd
brew unlink usbmuxd
brew link usbmuxd
3、 安装carthage:
$ brew install carthage
4、安装node:
$ brew install node
5、安装npm:
$ brew install npm
安装cnpm:国内直接用npm下载安装会有好多网络问题,安装淘宝的cnpm要比npm好用,https://npm.taobao.org/
$ npm install -g cnpm --registry=https://registry.npm.taobao.org
Note: 如果下面涉及 npm 操作有问题时,可改用 cnpm
6、安装ios-deploy:
$ npm install -g ios-deploy
select: error: tool 'xcodebuild' requires Xcode, but active developer directory '/Library/Developer/CommandLineTools' is a command line tools instance
以上错误是因为安装了 xcode , 但并不是系统默认的位置, 所以可以使用以下命令把 xcode 的路径修改为你安装的位置即可
sudo xcode-select --switch /Applications/Xcode.app/Contents/Developer8、安装xcpretty:
$ gem install xcpretty
9、安装appium,appium-doctor
进入官网,下载Appium-1.10.0.dmg,安装即可。
10、使用appium-doctor 检查Appium iOS环境环境
appium-doctor --ios
二、安装WebDriverAgent
1、下载 facebook 的 WebDriverAgent,进入 https://github.com/facebook/WebDriverAgent/,下载
2、进入appium安装目录下 Downloads,将下载的 WebDriverAgent-master,重新命名为 WebDriverAgent
3、在 Downloads/WebDriverAgent目录下执行以下命令
$ cd Downloads/WebDriverAgent
$ mkdir -p Resources/WebDriverAgent.bundle
$ sh ./Scripts/bootstrap.sh
4. 将Downloads/WebDriverAgent 文件夹替换掉 Appium 安装目录下的 WebDriverAgent
4.1 进入“访达”,/Applications/Appium.app,右键 “显示包内容”,
具体路径为 /Applications/Appium.app/Contents/Resources/app/node_modules/appium-xcuitest-driver
4.2 将原来的 WebDriverAgent 更名为 WebDriverAgent2
4.3 将 Downloads/WebDriverAgent 复制过来
5、编译WebDriverAgent.xcodeproj
在/Applications/Appium.app/Contents/Resources/app/node_modules/appium-xcuitest-driver/WebDriverAgent,选择 WebDriverAgent.xcodeproj,使用 Xcode打开

注意:进入项目后要编辑一些内容,请无比按照步骤全部修改。
1、Project WebDriverAgent 下面的 Target 涉及到的 文件的 Bundle Identifier 需要全部重新命名。(图片 mark "4",并且 所有Identifier注意保持一致!!)
修改规则:com.facebook.xx.xx, 将前面的 com.facebook 重新更名为 自己要测试的 app 包名,并且后面部分不同
2、TARGETS->WebDriverAgentLib的修改为例:
2.1,修改 Build Settings 为例:修改 Product Bundle Identifier 值的 com.facebook.wda.lib 为 com.gece.smartinvest.wda.lib
2.2,General 的 Bundle Identifier 值的 com.facebook.wda.lib 为 com.gece.smartinvest.wda.lib
2.3,勾选 Signing,选择 “Automatically manage signing”,并且 选择使用个人的证书。(经使用,可以使用 Apple ID,不需要开发者账号)
Note: 下面所有 targets 的 signing 选择 apple ID 都没有异常,可以正常使用。

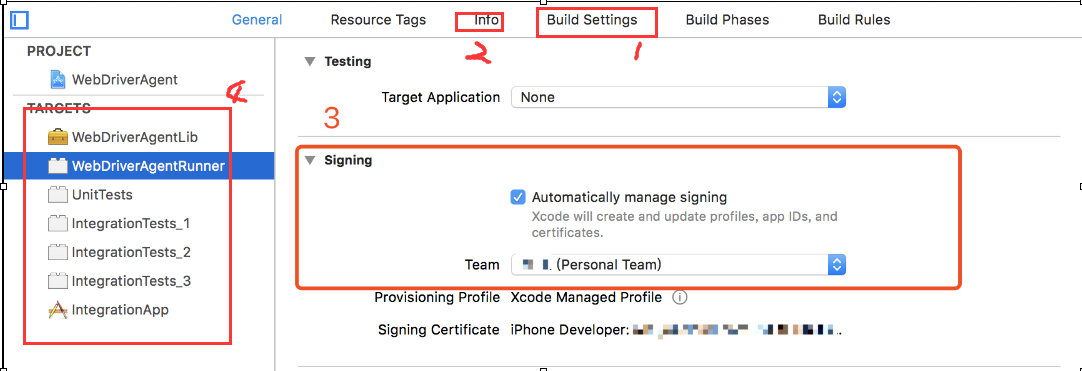

3. 依次 修改 WebDriverAgentRunner -> UnitTests -> IntegrationTests_1 -> IntegrationTests_2 ->IntegrationTests_3 -> IntegrationAPP
4、Device选择已连接的测试机
5、点击build按钮来测试,按照步骤设置后,可build succeeded~

6、测试机上安装证书,执行以下命令:
$ xcodebuild -project WebDriverAgent.xcodeproj -scheme WebDriverAgentRunner -destination 'id=测试机的udid' test
Notes: 1. 查询 udid, 可以通过 itunes 连接 手机 查找
2. 在手机安装 WebDriverAgent 时,可能会多次提示 CodeSign 登录钥匙。正常情况下,输入 MAC 登录密码,并选择 “始终允许”
如果,提示错误:办法依次操作:1. 进入 钥匙串访问\登录-我的证书,点开当前证书 ,然后 访问控制 选择 “允许所有应用程序访问此项目”。应该可以,不行走第二步。
2. 重置登录密码 -> 重启电脑 -> 输入新密码 -> Xcode 的证书重新获取,并重新编译,codesign 界面输入新密码。应该可以,不行走第三步
3. 进入 /Library/Keychains,删除该文件夹下的所有文件。修改密码,重启,-> 重启电脑 -> 输入新密码 -> Xcode 的证书重新获取,并重新编译,codesign 界面输入新密码。应该可以


如果没有报错证明安装成功,同时手机上会安装一个WebDriverAgent软件。需要在手机设置->通用->设备管理->信任开发者。如下图:


三、Appium Desktop
1. 打开 Appium Desktop,Host 地址:127.0.0.1, Post:4723
2. 启动服务
3. Desired Capabiltiies 配置:
{
'platformName': "IOS",
'deviceName': "xxxxx",
'platformVersion': "12.1,
'udid': "xxxxxxxxxxxx",
'bundleID': "com.gece.smartInvest",
'automationName': "XCUITest"
}
4. Start Session,可以正常打开手机上的 APP
四、Appium Client端
Appium Client有Ruby,Python,Java三个版本,可自行选择自己喜欢的安装即可,本次只针对Python版安装:
1. pip install Appium-Python-Client
2. 通过 Python 写脚本调用

 浙公网安备 33010602011771号