【API】Open3D库的使用教程
1. PointCloud 与 io操作
常用方法:
-
print(pcd) -> 输出模型的points/faces数量
-
属性:
- normals
- colors
- points
-
方法
- select_by_index
- get_center
- get_max_bound
- get_min_bound
- get_oriented_bounding_box
-
- crop
- dimension
- normalize_normals
- paint_uniform_color
-
- estimate_normals # 顶点法线估计
- compute_mean_and_covariance
- compute_nearest_neighbor_distance
- compute_point_cloud_distance
-
- remove_non_finite_points
- remove_radius_outlier
- remove_statistical_outlier
- uniform_down_sample # 通过收集每第n个点来对点云进行下采样
- voxel_down_sample # 把点云分配在三维的网格中,取平均值
- voxel_down_sample_and_trace
-
- rotate
- scale
- transform
1.1. 读取与保存模型
pcd = o3d.io.read_point_cloud(uu.rpath("open3d_/bunny_simp.pcd"))
# ply = o3d.io.read_point_cloud(uu.rpath("open3d_/bunny_simp.ply"))
print(pcd)

# %% 另存模型
res = o3d.io.write_point_cloud(uu.rpath("open3d_/bunny_simp.ply"), pcd)
# res == True/False
当然,也可以按照三角面片的方式读取和保存:
mesh = o3d.io.read_triangle_mesh("../../TestData/knot.ply")
print(mesh)
o3d.io.write_triangle_mesh("copy_of_knot.ply", mesh)
也包括对二维图像(jpg/png)的读取API:
img = o3d.io.read_image("../../test_data/lena_color.jpg")
o3d.io.write_image("copy_of_lena_color.jpg", img)
1.2. 点云可视化
o3d.visualization.draw_geometries(geometry_list: List[open3d.cpu.pybind.geometry.Geometry], window_name: str = 'Open3D', width: int = 1920, height: int = 1080, left: int = 50, top: int = 50, point_show_normal: bool = False, mesh_show_wireframe: bool = False, mesh_show_back_face: bool = False, lookat: numpy.ndarray[float64[3, 1]], up: numpy.ndarray[float64[3, 1]], front: numpy.ndarray[float64[3, 1]], zoom: float) -> None

# 示例
o3d.visualization.draw_geometries([pcd],
                                  zoom=0.3412,
                                  front=[0.4257, -0.2125, -0.8795],
                                  lookat=[2.6172, 2.0475, 1.532],
                                  up=[-0.0694, -0.9768, 0.2024])
使用Visualizer定义显示窗口的细节(支持逐步更新):
vis = o3d.visualization.Visualizer()
vis.create_window()
# 将两个点云放入visualizer
vis.add_geometry(source)
# vis.add_geometry(target)
vis.get_render_option().point_size = 2  # 点云大小
vis.get_render_option().background_color = np.asarray([0, 0, 0])  # 背景颜色

vis.update_geometry()
vis.poll_events()
vis.update_renderer()
vis.run()
使用json配置文件来定义细节:
vis.get_render_option().load_from_json("../../test_data/renderoption.json")
Change field of view:
def custom_draw_geometry_with_custom_fov(pcd, fov_step):
    vis = o3d.visualization.Visualizer()
    vis.create_window()
    vis.add_geometry(pcd)
    ctr = vis.get_view_control()
    print("Field of view (before changing) %.2f" % ctr.get_field_of_view())
    ctr.change_field_of_view(step=fov_step)
    print("Field of view (after changing) %.2f" % ctr.get_field_of_view())
    vis.run()
    vis.destroy_window()
显示动图(Callback functions):
def custom_draw_geometry_with_rotation(pcd):

    def rotate_view(vis):
        ctr = vis.get_view_control()
        ctr.rotate(10.0, 0.0)
        return False

    o3d.visualization.draw_geometries_with_animation_callback([pcd], rotate_view)
支持快捷键操作:
def custom_draw_geometry_with_key_callback(pcd):

    def change_background_to_black(vis):
        opt = vis.get_render_option()
        opt.background_color = np.asarray([0, 0, 0])
        return False

    def load_render_option(vis):
        vis.get_render_option().load_from_json(
            "../../test_data/renderoption.json")
        return False

    def capture_depth(vis):
        depth = vis.capture_depth_float_buffer()
        plt.imshow(np.asarray(depth))
        plt.show()
        return False

    def capture_image(vis):
        image = vis.capture_screen_float_buffer()
        plt.imshow(np.asarray(image))
        plt.show()
        return False

    key_to_callback = {}
    key_to_callback[ord("K")] = change_background_to_black
    key_to_callback[ord("R")] = load_render_option
    key_to_callback[ord(",")] = capture_depth
    key_to_callback[ord(".")] = capture_image
    o3d.visualization.draw_geometries_with_key_callbacks([pcd], key_to_callback)
1.3. Open3D中的用户交互操作
pcd = o3d.io.read_point_cloud(uu.rpath("open3d_/bunny.ply"))
o3d.visualization.draw_geometries_with_editing([pcd])
This function simply reads a point cloud and calls draw_geometries_with_editing() . This function provides vertex selection and cropping.
- Press 'Y' twice to align geometry with negative direction of y-axis
- Press 'K' to lock screen and to switch to selection mode
- Drag for rectangle selection, or use ctrl + left click for polygon selection
- Press 'C' to get a selected geometry and to save it
- Press 'F' to switch to freeview mode
1.4. 其他显示渲染技巧
1.5. 数据格式转换(numpy)
numpy数组转open3d格式:
target_points = np.array(target.points)
target_origin = o3d.geometry.PointCloud()
target_origin.points = o3d.utility.Vector3dVector(target_points)

# 或者
nd_arr = np.ones((100, 3),dtype = np.float32)
point_cloud = PointCloud()
point_cloud.points = Vector3dVector(nd_arr[:,0:3].reshape(-1,3))
o3d.visualization.draw_geometries([point_cloud])
open3d格式转numpy数组:
# Convert Open3D.o3d.geometry.PointCloud to numpy array
xyz_load = np.asarray(pcd_load.points)
1.6. 点云上色
source = o3d.read_point_cloud("plys/test.ply")

source.paint_uniform_color([1, 0.706, 0])      # 黄色
source.paint_uniform_color([0, 0.651, 0.929])  # 蓝色
1.7. 体素下采样, Voxel downsampling
downpcd = pcd.voxel_down_sample(voxel_size=0.05)
Downsample the point cloud with a voxel of 0.05, voxel_size越大,则保留点越少。
1.8. Vertex normal estimation
downpcd.estimate_normals(
    search_param=o3d.geometry.KDTreeSearchParamHybrid(radius=0.1, max_nn=30))
The two key arguments:
- radius = 0.1
- max_nn = 30
specifies search radius and maximum nearest neighbor.

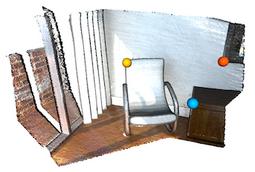
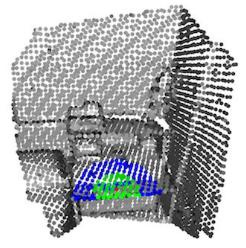
1.9. 最小外包围框(包络体)
aabb = chair.get_axis_aligned_bounding_box()
aabb.color = (1, 0, 0)
obb = chair.get_oriented_bounding_box()
obb.color = (0, 1, 0)
o3d.visualization.draw_geometries([chair, aabb, obb],
                                  zoom=0.7,
                                  front=[0.5439, -0.2333, -0.8060],
                                  lookat=[2.4615, 2.1331, 1.338],
                                  up=[-0.1781, -0.9708, 0.1608])
1.10. 包络凸面体
pcl = o3dtut.get_bunny_mesh().sample_points_poisson_disk(number_of_points=2000)
hull, _ = pcl.compute_convex_hull()
hull_ls = o3d.geometry.LineSet.create_from_triangle_mesh(hull)
hull_ls.paint_uniform_color((1, 0, 0))
o3d.visualization.draw_geometries([pcl, hull_ls])
1.11. Transformation
Translate:
mesh = o3d.geometry.TriangleMesh.create_coordinate_frame()
mesh_tx = copy.deepcopy(mesh).translate((1.3, 0, 0))
mesh_ty = copy.deepcopy(mesh).translate((0, 1.3, 0))
print(f'Center of mesh: {mesh.get_center()}')
print(f'Center of mesh tx: {mesh_tx.get_center()}')
print(f'Center of mesh ty: {mesh_ty.get_center()}')
Rotation:
mesh = o3d.geometry.TriangleMesh.create_coordinate_frame()
mesh_r = copy.deepcopy(mesh)
R = mesh.get_rotation_matrix_from_xyz((np.pi / 2, 0, np.pi / 4))
mesh_r.rotate(R, center=(0, 0, 0))
o3d.visualization.draw_geometries([mesh, mesh_r])
Scale:
mesh = o3d.geometry.TriangleMesh.create_coordinate_frame()
mesh_s = copy.deepcopy(mesh).translate((2, 0, 0))
mesh_s.scale(0.5, center=mesh_s.get_center())
o3d.visualization.draw_geometries([mesh, mesh_s])
2. Filters: 滤波算法
2.1. Downsample
-
pcd.voxel_down_sample(voxel_size=0.02)
Downsample the point cloud with a voxel of 0.02
-
pcd.uniform_down_sample(every_k_points=5)
Every 5th points are selected
与 voxel_down_sample() 最大的区别就是,生成的点云由于较为随机的隔n抽样,所以生成的新模型属于无序点云。
-
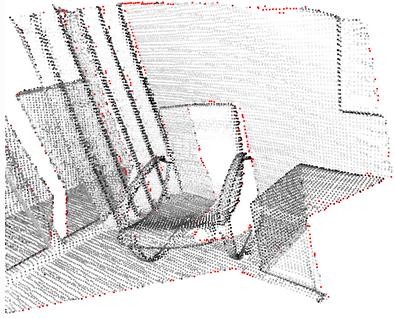
Select down sample
The following helper function uses select_by_index, which takes a binary mask to output only the selected points. The selected points and the non-selected points are visualized.
使用带二进制掩码的
select_down_sample仅输出所选点。选定的点和未选定的点并可视化。def display_inlier_outlier(cloud, ind): inlier_cloud = cloud.select_by_index(ind) outlier_cloud = cloud.select_by_index(ind, invert=True) print("Showing outliers (red) and inliers (gray): ") outlier_cloud.paint_uniform_color([1, 0, 0]) inlier_cloud.paint_uniform_color([0.8, 0.8, 0.8]) o3d.visualization.draw_geometries([inlier_cloud, outlier_cloud], zoom=0.3412, front=[0.4257, -0.2125, -0.8795], lookat=[2.6172, 2.0475, 1.532], up=[-0.0694, -0.9768, 0.2024])
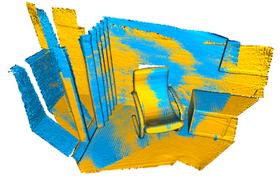
2.2. Point cloud outlier removal
-
Statistical outlier removal, 统计离群值移除
cl, ind = voxel_down_pcd.remove_statistical_outlier(nb_neighbors=20,
                                                    std_ratio=2.0)
display_inlier_outlier(voxel_down_pcd, ind)
删除与点云的平均值相比更远离其邻居的点。
- nb_neighbors: 允许指定要考虑多少个邻居,以便计算给定点的平均距离
- std_ratio: 允许基于跨点云的平均距离的标准偏差来设置阈值级别。此数字越低,过滤器将越具有攻击性
-
Radius outlier removal, 半径离群值去除
cl, ind = voxel_down_pcd.remove_radius_outlier(nb_points=16, radius=0.05)
display_inlier_outlier(voxel_down_pcd, ind)
删除在给定球体中周围几乎没有邻居的点。
- nb_points: 选择球体应包含的最小点数
- radius: 定义将用于计算邻居的球体的半径
2.3. Plane Segmentation: 使用RANSAC从点云中分割几何图元的支持面
要在点云中找到具有最大支持的平面,我们可以使用segement_plane。
- distance_threshold: 定义一个点到一个估计平面的最大距离,该点可被视为一个不规则点;
- ransac_n: 定义随机采样的点数以估计一个平面;
- num_iterations: 定义对随机平面进行采样和验证的频率。
函数将平面返回为(a,b,c,d) 。这样,对于平面上的每个点(x,y,z),我们都有 ax + by + cz + d = 0 。该功能进一步调整内部点的索引列表。
plane_model, inliers = downpcd_inlier_cloud.segment_plane(distance_threshold=0.01, ransac_n=5, num_iterations=10000)
[a, b, c, d] = plane_model
print(f"Plane equation: {a:.2f}x + {b:.2f}y + {c:.2f}z + {d:.2f} = 0")
3. 手动配准
import numpy as np
import copy

def draw_registration_result(source, target, transformation):
    source_temp = copy.deepcopy(source)
    target_temp = copy.deepcopy(target)
    source_temp.paint_uniform_color([1, 0.706, 0])
    target_temp.paint_uniform_color([0, 0.651, 0.929])
    source_temp.transform(transformation)
    o3d.visualization.draw_geometries([source_temp, target_temp])

def pick_points(pcd):
    vis = o3d.visualization.VisualizerWithEditing()
    vis.create_window()
    vis.add_geometry(pcd)
    vis.run()  # user picks points
    vis.destroy_window()
    return vis.get_picked_points()

print("Demo for manual ICP")
source = o3d.io.read_point_cloud("/d/Home/workspace/MCAD/vision3D//ICP/cloud_bin_0.pcd")
target = o3d.io.read_point_cloud("/d/Home/workspace/MCAD/vision3D/ICP/cloud_bin_2.pcd")
print("Visualization of two point clouds before manual alignment")
draw_registration_result(source, target, np.identity(4))

# pick points from two point clouds and builds correspondences
picked_id_source = pick_points(source)
picked_id_target = pick_points(target)
assert (len(picked_id_source) >= 3 and len(picked_id_target) >= 3)
assert (len(picked_id_source) == len(picked_id_target))
corr = np.zeros((len(picked_id_source), 2))
corr[:, 0] = picked_id_source
corr[:, 1] = picked_id_target

# estimate rough transformation using correspondences
print("Compute a rough transform using the correspondences given by user")
p2p = o3d.pipelines.registration.TransformationEstimationPointToPoint()
trans_init = p2p.compute_transformation(source, target,
                                        o3d.utility.Vector2iVector(corr))

# point-to-point ICP for refinement
print("Perform point-to-point ICP refinement")
threshold = 0.03  # 3cm distance threshold
reg_p2p = o3d.pipelines.registration.registration_icp(
    source, target, threshold, trans_init,
    o3d.pipelines.registration.TransformationEstimationPointToPoint())
draw_registration_result(source, target, reg_p2p.transformation)
- Please pick at least three correspondences using [shift + left click], Press [shift + right click] to undo point picking
- After picking points, press 'Q' to close the window
4. 项目中多个模型的拼接
从文件中读取多个点云模型,点云被降采样并一起可视化。
def load_point_clouds(voxel_size=0.0):
    pcds = []
    for i in range(3):
        pcd = o3d.io.read_point_cloud("../../test_data/ICP/cloud_bin_%d.pcd" %
                                      i)
        # 降采样
        pcd_down = pcd.voxel_down_sample(voxel_size=voxel_size)
        pcds.append(pcd_down)
    return pcds

voxel_size = 0.02
pcds_down = load_point_clouds(voxel_size)
o3d.visualization.draw_geometries(pcds_down,
                                  zoom=0.3412,
                                  front=[0.4257, -0.2125, -0.8795],
                                  lookat=[2.6172, 2.0475, 1.532],
                                  up=[-0.0694, -0.9768, 0.2024])
4.1. ICP配准(基于PoseGraph对齐)
ICP (iterative closest point), 是对点云配准目前最常用的方法。其原理就是不断的对一个点云进行转换,并计算其中每个点与另外一个点云集的距离,将它转换成一个 fitness score 。然后不断地变换知道将这个总距离降到最低。一般来说icp都是经过全局配准之后运用的,也就是说两个点云要先被粗略地配准,然后icp会完成配准的微调。
姿势图有两个关键元素:节点(几何体片段)和边。
-
节点是一个与位姿矩阵Ti相关联的几何Pi,它将Pi转换成全局空间。变换矩阵Ti(集合)是待优化的未知变量。相邻节点通常有很大的重叠,可以用点到面ICP进行配准。
-
每个边包含一个变换矩阵Tij,该矩阵将源几何体Pi与目标几何体Pj对齐。
成对配准容易出错:错误对齐的对数可能会超过正确对齐的对。因此,他们将姿势图的边分为两类。 里程表边缘 连接临时接近的相邻节点。像ICP这样的局部配准算法可以可靠地对齐它们。 循环闭合边 连接任何非相邻节点。对齐是通过 全局注册 找到的,可靠性较低。在Open3D中,这两类边是通过 PoseGraphEdge 初始化器中的 uncertain 参数来区分的。
下面的脚本将创建具有三个节点和三条边的姿态图。在这些边中,有两条是里程计边 (uncertain = False) ,一条是环路闭合边(uncertain = True)。
def pairwise_registration(source, target):
    print("Apply point-to-plane ICP")
    icp_coarse = o3d.pipelines.registration.registration_icp(
        source, target, max_correspondence_distance_coarse, np.identity(4),
        o3d.pipelines.registration.TransformationEstimationPointToPlane())
    icp_fine = o3d.pipelines.registration.registration_icp(
        source, target, max_correspondence_distance_fine,
        icp_coarse.transformation,
        o3d.pipelines.registration.TransformationEstimationPointToPlane())
    transformation_icp = icp_fine.transformation
    information_icp = o3d.pipelines.registration.get_information_matrix_from_point_clouds(
        source, target, max_correspondence_distance_fine,
        icp_fine.transformation)
    return transformation_icp, information_icp

def full_registration(pcds, max_correspondence_distance_coarse,
                      max_correspondence_distance_fine):
    pose_graph = o3d.pipelines.registration.PoseGraph()
    odometry = np.identity(4)
    pose_graph.nodes.append(o3d.pipelines.registration.PoseGraphNode(odometry))
    n_pcds = len(pcds)
    for source_id in range(n_pcds):
        for target_id in range(source_id + 1, n_pcds):
            transformation_icp, information_icp = pairwise_registration(
                pcds[source_id], pcds[target_id])
            print("Build o3d.pipelines.registration.PoseGraph")
            if target_id == source_id + 1:  # odometry case
                odometry = np.dot(transformation_icp, odometry)
                pose_graph.nodes.append(
                    o3d.pipelines.registration.PoseGraphNode(
                        np.linalg.inv(odometry)))
                pose_graph.edges.append(
                    o3d.pipelines.registration.PoseGraphEdge(source_id,
                                                             target_id,
                                                             transformation_icp,
                                                             information_icp,
                                                             uncertain=False))
            else:  # loop closure case
                pose_graph.edges.append(
                    o3d.pipelines.registration.PoseGraphEdge(source_id,
                                                             target_id,
                                                             transformation_icp,
                                                             information_icp,
                                                             uncertain=True))
    return pose_graph

print("Full registration ...")
max_correspondence_distance_coarse = voxel_size * 15
max_correspondence_distance_fine = voxel_size * 1.5
with o3d.utility.VerbosityContextManager(o3d.utility.VerbosityLevel.Debug) as cm:
    pose_graph = full_registration(pcds_down,
                                   max_correspondence_distance_coarse,
                                   max_correspondence_distance_fine)
Open3D使用global_optimization 功能执行姿势图优化。有两种优化方法可供选择:GlobalOptimizationGaussNewton or GlobalOptimizationLevenbergMarquardt。推荐后者,因为它具有更好的收敛性。类GlobalOptimizationConvergenceCriteria可以用来设置全局优化的最大次数和各种参数。
类 GlobalOptimizationOption 定义了几个选项:
max_correspondence_distance确定对应阈值edge_prune_threshold是修剪离群边缘的阈值reference_node被认为是全局空间的节点id。
print("Optimizing PoseGraph ...")
option = o3d.pipelines.registration.GlobalOptimizationOption(
    max_correspondence_distance=max_correspondence_distance_fine,
    edge_prune_threshold=0.25,
    reference_node=0)
with o3d.utility.VerbosityContextManager(
        o3d.utility.VerbosityLevel.Debug) as cm:
    o3d.pipelines.registration.global_optimization(
        pose_graph,
        o3d.pipelines.registration.GlobalOptimizationLevenbergMarquardt(),
        o3d.pipelines.registration.GlobalOptimizationConvergenceCriteria(),
        option)
转换后的点云将被列出并使用draw_geometries可视化。
print("Transform points and display")
for point_id in range(len(pcds_down)):
    print(pose_graph.nodes[point_id].pose)
    pcds_down[point_id].transform(pose_graph.nodes[point_id].pose)
o3d.visualization.draw_geometries(pcds_down,
                                  zoom=0.3412,
                                  front=[0.4257, -0.2125, -0.8795],
                                  lookat=[2.6172, 2.0475, 1.532],
                                  up=[-0.0694, -0.9768, 0.2024])
合并多个点云模型:
pcds = load_point_clouds(voxel_size)
pcd_combined = o3d.geometry.PointCloud()
for point_id in range(len(pcds)):
    pcds[point_id].transform(pose_graph.nodes[point_id].pose)
    pcd_combined += pcds[point_id]
pcd_combined_down = pcd_combined.voxel_down_sample(voxel_size=voxel_size)
o3d.io.write_point_cloud("multiway_registration.pcd", pcd_combined_down)
o3d.visualization.draw_geometries([pcd_combined_down],
                                  zoom=0.3412,
                                  front=[0.4257, -0.2125, -0.8795],
                                  lookat=[2.6172, 2.0475, 1.532],
                                  up=[-0.0694, -0.9768, 0.2024])
5. 体素化
体素化(Voxelization)是将物体的几何形式表示转换成最接近该物体的体素表示形式,产生体数据集,其不仅包含模型的表面信息,而且能描述模型的内部属性。表示模型的空间体素跟表示图像的二维像素比较相似,只不过从二维的点扩展到三维的立方体单元,而且基于体素的三维模型有诸多应用。
5.1. 对模型表面的体素化
这一步的操作比较简单,首先计算出模型的AABB包围盒,然后根据空间分辨率对包围盒进行划分,得到每个大小为(X/N) * (Y/N) * (Z/N)空间像素列表。然后对构成3D模型的多边形或三角形列表进行遍历,得到这些基本体元所对就应的包围盒,然后由AABB求交运算得到这些基本体元所能影响到的体素单元,将这些体素单元做为待判断的基本对象。为了做进一步的精确判定,使用三角形与AABB的求交算法确定这些基本体元所能影响到最终体素,并将这些体素标记为非空,这样就完成了对3D模型表面的体素化操作。
5.2. 对模型内部的体素化
将模型表面体素化的操作进行完之后即可得到对模型体素表示的一个“外壳”,接下来要做的操作就是进行模型的内部体素化操作。这里采用一种简单的方法。首先将对应的3D模型建立空间八叉树,这棵八叉树主要用于进行基本体元面片的求交操作。然后对模型AABB中的所有空体素,从其中心位置以轴对齐方向来发射两条射线,这两条射线的方向相反,但基本方向都是轴对齐的。对于这两条的射线利用空间模型的八叉树来得到其与3D模型的相交位置,并得到相交点的法向量及到相交点的距离,然后根据这两点法向量之间的关系来判断得到当前体素是在3D模型的内部或是在3D模型的外部。将这样的操作施加于每一个空的体素之后就可以完成对3D模型内部的体素化操作。
但是将这样的操作施加于每一个空的体素速度比较慢,故而此处可以采用扫描的方法来进行加速处理。如果判断得到某个体素的位置为模型内部后,就可以根据射线的方向及这两条射线与模型的交点处的距离来对当前体素相邻的体素进行扫描,这样不需要再做判断就可以标记出相邻体素的状态,这样就加速了整个模型内部的体素化操作。
5.3. API
Open3D 提供了函数 create_from_triangle_mesh 从三角形网格创建体素栅格。它返回一个体素网格,其中与三角形相交的所有体素都设置为1,其他所有体素都设置为0。参数 voxel_size 定义了体素网格的分辨率。
mesh = o3dtut.get_bunny_mesh()
# fit to unit cube
mesh.scale(1 / np.max(mesh.get_max_bound() - mesh.get_min_bound()),
          center=mesh.get_center())
o3d.visualization.draw_geometries([mesh])

print('voxelization')
voxel_grid = o3d.geometry.VoxelGrid.create_from_triangle_mesh(mesh,
                                                             voxel_size=0.05)
o3d.visualization.draw_geometries([voxel_grid])

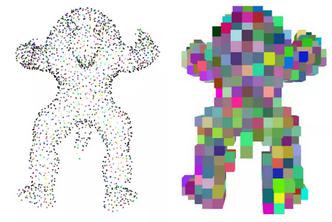
也可以使用 create_from_point_cloud 方法从点云创建体素网格。如果点云的至少一个点位于体素内,则体素被占用。体素的颜色是体素内所有点的平均值。参数 voxel_size 定义体素网格的分辨率。
N = 2000
pcd = o3dtut.get_armadillo_mesh().sample_points_poisson_disk(N)
# fit to unit cube
pcd.scale(1 / np.max(pcd.get_max_bound() - pcd.get_min_bound()),
         center=pcd.get_center())
pcd.colors = o3d.utility.Vector3dVector(np.random.uniform(0, 1, size=(N, 3)))
o3d.visualization.draw_geometries([pcd])

print('voxelization')
voxel_grid = o3d.geometry.VoxelGrid.create_from_point_cloud(pcd,
                                                           voxel_size=0.05)
o3d.visualization.draw_geometries([voxel_grid])
5.4. 验证点是否包含在体素内
体素网格也可以用来测试点是否在被占用的体素内。函数 check_if_included 以一个 (n,3) 维的数组作为输入和一个 bool 类型的数组作为输出。
queries = np.asarray(pcd.points)
output = voxel_grid.check_if_included(o3d.utility.Vector3dVector(queries))
print(output[:10])
[True, True, True, True, True, True, True, True, True, True]
5.5. 体素切割
函数 create_from_point_cloud 和 create_from_triangle_mesh 仅在几何体的曲面上创建被占用的体素。然而,可以从许多深度贴图或轮廓切割体素网格。Open3D 提供了函数 carve_depth_map 和 carve_silhouette 用于体素切割。
下面的代码演示了如何使用:首先从几何体渲染深度贴图,然后使用这些深度贴图雕刻密集的体素网格。结果是一个填充了给定形状的体素网格。
def xyz_spherical(xyz):
    x = xyz[0]
    y = xyz[1]
    z = xyz[2]
    r = np.sqrt(x * x + y * y + z * z)
    r_x = np.arccos(y / r)
    r_y = np.arctan2(z, x)
    return [r, r_x, r_y]

def get_rotation_matrix(r_x, r_y):
    rot_x = np.asarray([[1, 0, 0], [0, np.cos(r_x), -np.sin(r_x)],
                        [0, np.sin(r_x), np.cos(r_x)]])
    rot_y = np.asarray([[np.cos(r_y), 0, np.sin(r_y)], [0, 1, 0],
                        [-np.sin(r_y), 0, np.cos(r_y)]])
    return rot_y.dot(rot_x)

def get_extrinsic(xyz):
    rvec = xyz_spherical(xyz)
    r = get_rotation_matrix(rvec[1], rvec[2])
    t = np.asarray([0, 0, 2]).transpose()
    trans = np.eye(4)
    trans[:3, :3] = r
    trans[:3, 3] = t
    return trans

def preprocess(model):
    min_bound = model.get_min_bound()
    max_bound = model.get_max_bound()
    center = min_bound + (max_bound - min_bound) / 2.0
    scale = np.linalg.norm(max_bound - min_bound) / 2.0
    vertices = np.asarray(model.vertices)
    vertices -= center
    model.vertices = o3d.utility.Vector3dVector(vertices / scale)
    return model

def voxel_carving(mesh,
                  output_filename,
                  camera_path,
                  cubic_size,
                  voxel_resolution,
                  w=300,
                  h=300,
                  use_depth=True,
                  surface_method='pointcloud'):
    mesh.compute_vertex_normals()
    camera_sphere = o3d.io.read_triangle_mesh(camera_path)

    # setup dense voxel grid
    voxel_carving = o3d.geometry.VoxelGrid.create_dense(
        width=cubic_size,
        height=cubic_size,
        depth=cubic_size,
        voxel_size=cubic_size / voxel_resolution,
        origin=[-cubic_size / 2.0, -cubic_size / 2.0, -cubic_size / 2.0],
        color=[1.0, 0.7, 0.0])

    # rescale geometry
    camera_sphere = preprocess(camera_sphere)
    mesh = preprocess(mesh)

    # setup visualizer to render depthmaps
    vis = o3d.visualization.Visualizer()
    vis.create_window(width=w, height=h, visible=False)
    vis.add_geometry(mesh)
    vis.get_render_option().mesh_show_back_face = True
    ctr = vis.get_view_control()
    param = ctr.convert_to_pinhole_camera_parameters()

    # carve voxel grid
    pcd_agg = o3d.geometry.PointCloud()
    centers_pts = np.zeros((len(camera_sphere.vertices), 3))
    for cid, xyz in enumerate(camera_sphere.vertices):
        # get new camera pose
        trans = get_extrinsic(xyz)
        param.extrinsic = trans
        c = np.linalg.inv(trans).dot(np.asarray([0, 0, 0, 1]).transpose())
        centers_pts[cid, :] = c[:3]
        ctr.convert_from_pinhole_camera_parameters(param)

        # capture depth image and make a point cloud
        vis.poll_events()
        vis.update_renderer()
        depth = vis.capture_depth_float_buffer(False)
        pcd_agg += o3d.geometry.PointCloud.create_from_depth_image(
            o3d.geometry.Image(depth),
            param.intrinsic,
            param.extrinsic,
            depth_scale=1)

        # depth map carving method
        if use_depth:
            voxel_carving.carve_depth_map(o3d.geometry.Image(depth), param)
        else:
            voxel_carving.carve_silhouette(o3d.geometry.Image(depth), param)
        print("Carve view %03d/%03d" % (cid + 1, len(camera_sphere.vertices)))
    vis.destroy_window()

    # add voxel grid survace
    print('Surface voxel grid from %s' % surface_method)
    if surface_method == 'pointcloud':
        voxel_surface = o3d.geometry.VoxelGrid.create_from_point_cloud_within_bounds(
            pcd_agg,
            voxel_size=cubic_size / voxel_resolution,
            min_bound=(-cubic_size / 2, -cubic_size / 2, -cubic_size / 2),
            max_bound=(cubic_size / 2, cubic_size / 2, cubic_size / 2))
    elif surface_method == 'mesh':
        voxel_surface = o3d.geometry.VoxelGrid.create_from_triangle_mesh_within_bounds(
            mesh,
            voxel_size=cubic_size / voxel_resolution,
            min_bound=(-cubic_size / 2, -cubic_size / 2, -cubic_size / 2),
            max_bound=(cubic_size / 2, cubic_size / 2, cubic_size / 2))
    else:
        raise Exception('invalid surface method')
    voxel_carving_surface = voxel_surface + voxel_carving

    return voxel_carving_surface, voxel_carving, voxel_surface

mesh = o3dtut.get_armadillo_mesh()

output_filename = os.path.abspath("../../test_data/voxelized.ply")
camera_path = os.path.abspath("../../test_data/sphere.ply")
visualization = True
cubic_size = 2.0
voxel_resolution = 128.0

voxel_grid, voxel_carving, voxel_surface = voxel_carving(
    mesh, output_filename, camera_path, cubic_size, voxel_resolution)
切割:
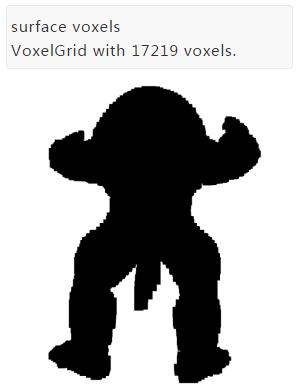
print("surface voxels")
print(voxel_surface)
o3d.visualization.draw_geometries([voxel_surface])
print("carved voxels")
print(voxel_carving)
o3d.visualization.draw_geometries([voxel_carving])
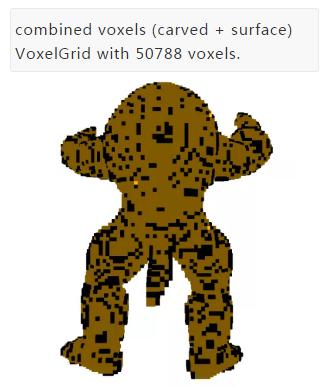
print("combined voxels (carved + surface)")
print(voxel_grid)
o3d.visualization.draw_geometries([voxel_grid])

6. 数据处理
在进行正式配准之前我们还需要对点云做以下处理:特例去除 (outlier removal)。 目前大部分深度摄像头所拍摄的点云图都带有噪音,以及不存在的点,大多因为生产误差以及摄像头本身就有的噪声,在配准的时候我们不希望包括这些因为误差被记录的点,所以为了提高配准的效率以及准确率,我们要先将这些特例点去除。
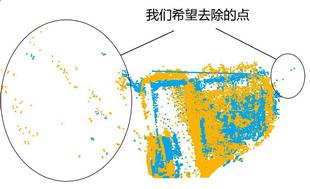
o3d.geometry.radius_outlier_removal() 这个函数是使用球体判断一个特例的函数,它需要两个参数:nb_points 和 radius 。它会给点云中的每个点画一个半径为 radius 的球体,如
果在这个球体中其他的点的数量小于 nb_points, 这个算法会将这个点判断为特例,并删除。
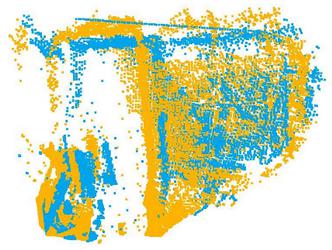
#为两个点云上上不同的颜色
source.paint_uniform_color([1, 0.706, 0])    #source 为黄色
target.paint_uniform_color([0, 0.651, 0.929])#target 为蓝色

#为两个点云分别进行outlier removal
processed_source, outlier_index = o3d.geometry.radius_outlier_removal(source,
                                              nb_points=16,
                                              radius=0.5)
processed_target, outlier_index = o3d.geometry.radius_outlier_removal(target,
                                              nb_points=16,
                                              radius=0.5)
o3d.visualization.draw_geometries([processed_source,processed_target])
6.1. 降采样
根据体素降采样从点云输入到点云输出。如果法线和颜色存在则将其平均
voxel_down_sample(self,voxel_size)
使用geometry.PointCloud.VoxelDownSample下采样的函数。 在下采样之前还记录点云索引
voxel_down_sample_and_trace(self,
    voxel_size,
    min_bound,  # 体素边界的最小坐标
    max_bound,  # 体素边界的最大坐标
    approximate_class=False) ->
        tuple(open3d.geometry.PointCloud, numpy.ndarray[int32[m, n]]),  # 采样后的稀疏点云数据
        list(open3d.utility.IntVector)  # 立方编号
几何坐标的最小/大范围:
get_min_bound()
get_max_bound()
用法示例
min_bound = dense_pcd.get_min_bound() - voxel_size * 0.5  #获取最小点坐标 - 0.05 * 0.5
max_bound = dense_pcd.get_max_bound() + voxel_size * 0.5
6.2. 点法线估计
estimate_normals() 用于计算每个点的法线。该函数查找相邻点并使用协方差分析计算相邻点的主轴。该函数将 KDTreeSearchParamHybrid 类的实例作为参数。 两个关键参数 radius = 0.1 和 max_nn = 30 指定搜索半径和最大最近邻居。它的搜索半径为10厘米,最多可考虑30个邻居,以节省计算时间。
print("Recompute the normal of the downsampled point cloud")
downpcd.estimate_normals(search_param=o3d.geometry.KDTreeSearchParamHybrid(
    radius=0.1, max_nn=30))
o3d.visualization.draw_geometries([downpcd])
提示:协方差分析算法产生两个相反的方向作为正常候选。如果不知道几何体的全局结构,两者都可以是正确的。这就是所谓的法向问题。Open3D尝试调整法线的方向,使其与原始法线对齐(如果存在)。否则,Open3D会随机猜测。如果需要考虑方向,则需要调用其他方向函数,如 orient_normals_to_align_with_direction 和 orient_normals_towards_camera_location 。
使用 draw_geometries() 可视化点云:
- 按n查看法线
- 键-和键+可用于控制法线的长度
7. kdtree
Open3D使用 FLANN 来构建 KDTree,以快速检索最近的邻居。
print("Testing kdtree in open3d ...")
print("Load a point cloud and paint it gray.")
pcd = o3d.io.read_point_cloud("../../TestData/Feature/cloud_bin_0.pcd")
pcd.paint_uniform_color([0.5, 0.5, 0.5])
pcd_tree = o3d.geometry.KDTreeFlann(pcd)
该脚本读取点云并构建KDTree。 这是用于以下最近邻居查询的预处理步骤。
print("Paint the 1500th point red.")
pcd.colors[1500] = [1, 0, 0]
我们选择第1500个点作为锚点并将其涂成红色。
print("Find its 200 nearest neighbors, paint blue.")
[k, idx, _] = pcd_tree.search_knn_vector_3d(pcd.points[1500], 200)
np.asarray(pcd.colors)[idx[1:], :] = [0, 0, 1]
函数 search_knn_vector_3d() 返回锚点的k个最近邻居的索引列表。这些相邻点涂有蓝色。请注意,我们将pcd.colors转换为numpy数组以批量访问点颜色,并向所有选定点广播蓝色[0,0,1]。 我们跳过第一个索引,因为它是锚点本身。
print("Find its neighbors with distance less than 0.2, paint green.")
[k, idx, _] = pcd_tree.search_radius_vector_3d(pcd.points[1500], 0.2)
np.asarray(pcd.colors)[idx[1:], :] = [0, 1, 0]
同样,我们可以使用search_radius_vector_3d查询所有距锚点距离小于给定半径的点。 我们将这些点涂成绿色。
print("Visualize the point cloud.")
o3d.visualization.draw_geometries([pcd])
print("")
8. 颜色映射
将颜色映射到从深度相机重建的几何形状。由于彩色帧和深度帧不一定是完美对齐的,所以使用彩色图像进行纹理映射的结果会导致一个模糊的彩色映射。Open3d提供了基于“Zhou2014”中的彩色映射优化算法。
下面的代码读取彩色和深度图像对,并且生成 rgbd_image。注意convert_rgb_to_intensity标志位设置为 False。只是为了保留8-bit彩色通道而不是使用单通道浮点型图像。
def sorted_alphanum(file_list_ordered):
    convert = lambda text: int(text) if text.isdigit() else text
    alphanum_key = lambda key: [convert(c) for c in re.split('([0-9]+)', key)]
    return sorted(file_list_ordered, key=alphanum_key)


def get_file_list(path, extension=None):
    if extension is None:
        file_list = [path + f for f in os.listdir(path) if os.path.isfile(join(path, f))]
    else:
        file_list = [
            path + f
            for f in os.listdir(path)
            if os.path.isfile(os.path.join(path, f)) and os.path.splitext(f)[1] == extension
        ]
    file_list = sorted_alphanum(file_list)
    return file_list

#####################################################################

path = o3dtut.download_fountain_dataset()
debug_mode = False  # 选择是否可视化RGBD图像

rgbd_images = []
depth_image_path = get_file_list(os.path.join(path, "depth/"),
                                 extension=".png")
color_image_path = get_file_list(os.path.join(path, "image/"),
                                 extension=".jpg")
assert (len(depth_image_path) == len(color_image_path))
for i in range(len(depth_image_path)):
    depth = o3d.io.read_image(os.path.join(depth_image_path[i]))
    color = o3d.io.read_image(os.path.join(color_image_path[i]))
    rgbd_image = o3d.geometry.RGBDImage.create_from_color_and_depth(
        color, depth, convert_rgb_to_intensity=False)
    if debug_mode:
        pcd = o3d.geometry.PointCloud.create_from_rgbd_image(
            rgbd_image,
            o3d.camera.PinholeCameraIntrinsic(
                o3d.camera.PinholeCameraIntrinsicParameters.
                PrimeSenseDefault))
        o3d.visualization.draw_geometries([pcd])
    rgbd_images.append(rgbd_image)
下面的代码读取相机轨迹和网格数据:
camera = o3d.io.read_pinhole_camera_trajectory(
    os.path.join(path, "scene/key.log"))
mesh = o3d.io.read_triangle_mesh(
    os.path.join(path, "scene", "integrated.ply"))
为了可视化出相机的姿态不适合颜色映射,下面的代码故意设置迭代次数为0,也就是不对其映射做优化。color_map_optimization 使用对应的相机姿态和RGBD图像来绘制网格。如果没有优化的话,可以看到纹理很模糊。
# Before full optimization, let's just visualize texture map
# with given geometry, RGBD images, and camera poses.
option = o3d.color_map.ColorMapOptimizationOption()
option.maximum_iteration = 0
with o3d.utility.VerbosityContextManager(o3d.utility.VerbosityLevel.Debug) as cm:
    o3d.color_map.color_map_optimization(mesh, rgbd_images, camera, option)
o3d.visualization.draw_geometries([mesh])
注意:该算法预先计算所有点在 epsilon 半径上的所有邻近点。如果选择的 epsilon 太大,这可能需要大量内存。
8.1. 刚性优化
下一步优化相机参数来获得清晰的彩色图像。下面的代码设置最大迭代次数为300。
# Optimize texture and save the mesh as texture_mapped.ply
# This is implementation of following paper
# Q.-Y. Zhou and V. Koltun,
# Color Map Optimization for 3D Reconstruction with Consumer Depth Cameras,
# SIGGRAPH 2014
option.maximum_iteration = 100 if is_ci else 300
option.non_rigid_camera_coordinate = False
with o3d.utility.VerbosityContextManager(o3d.utility.VerbosityLevel.Debug) as cm:
    o3d.color_map.color_map_optimization(mesh, rgbd_images, camera, option)
o3d.visualization.draw_geometries([mesh])
8.2. 非刚性优化
为了有一个更好的映射质量,需要使用非刚性优化。要启用非刚性优化只需要在调用 color_map_optimization() 前将 option.non_rigid_camera_coordinate 设置为True。除了六维相机姿态以外,非刚性优化甚至考虑了由锚点表示的局部图像变形。这种方式更加灵活并且会有着更高的彩色映射质量。残差也会小于刚性优化的情况。
option.maximum_iteration = 100 if is_ci else 300
option.non_rigid_camera_coordinate = True
with o3d.utility.VerbosityContextManager(o3d.utility.VerbosityLevel.Debug) as cm:
    o3d.color_map.color_map_optimization(mesh, rgbd_images, camera, option)
o3d.visualization.draw_geometries([mesh])
9. 画3D矩形框方法:
def custom_draw_geometry(pcd,linesets):
    vis = o3d.visualization.Visualizer()
    vis.create_window()
    vis.add_geometry(pcd)
    vis.add_geometry(linesets)
    render_option = vis.get_render_option()
    render_option.point_size = 4
    render_option.background_color = np.asarray([0, 0, 0])
    vis.run()
    vis.destroy_window()

pc = np.ones((100, 3),dtype = np.float32) #点云
lines_box = np.array([[0, 1], [1, 2], [0, 3], [2, 3], [4, 5], [4, 7], [5, 6], [6, 7],[0, 4], [1, 5], [2, 6], [3, 7]])
colors = np.array([[0, 1, 0] for j in range(len(lines_box))])
line_set = o3d.geometry.LineSet()
line_set.points = o3d.utility.Vector3dVector(points_box)
line_set.lines = o3d.utility.Vector2iVector(lines_box)
line_set.colors = o3d.utility.Vector3dVector(colors)
point_cloud = o3d.geometry.PointCloud()
point_cloud.points = o3d.utility.Vector3dVector(pc)
# generateBox(point_cloud)
custom_draw_geometry(point_cloud, line_set)
10. 连续帧点云流可视化方法:
import os
import numpy as np
import open3d as o3d

files = os.listdir("0806_reconstruction/")

vis = o3d.visualization.Visualizer()
vis.create_window()
pointcloud = o3d.geometry.PointCloud()
to_reset = True
vis.add_geometry(pointcloud)
for f in files:
    pcd = o3d.io.read_point_cloud("0806_reconstruction/" + f)
    pcd = np.asarray(pcd.points).reshape((-1, 3))
    pointcloud.points = o3d.utility.Vector3dVector(pcd)
    vis.update_geometry()
    # 注意,如果使用的是open3d 0.8.0以后的版本,这句话应该改为下面格式
    # vis.update_geometry(pointcloud)
    if to_reset:
        vis.reset_view_point(True)
        to_reset = False
    vis.poll_events()
    vis.update_renderer()

 浙公网安备 33010602011771号